

Instruction Manual
Page 2
... Manual Dear Customer, Thank you have any queries concerning your dealer or our sales company if you for using modern production techniques and comprehensive quality assurance. Note or hint on chlorine-free paper. © 2001 Andreas Stihl AG & Co., Waiblingen 0458 566 7721. The operating and handling instructions are shown and explained in better use of damaging the power tool...
... Manual Dear Customer, Thank you have any queries concerning your dealer or our sales company if you for using modern production techniques and comprehensive quality assurance. Note or hint on chlorine-free paper. © 2001 Andreas Stihl AG & Co., Waiblingen 0458 566 7721. The operating and handling instructions are shown and explained in better use of damaging the power tool...

Instruction Manual
Page 3
... the guide bar in a bench vise or, at the cutting site, in a safe place for assistance. Electric saws: Disconnect plug from your STIHL dealer. The STIHL filing tool can help reduce the risk of the cutter. - Always file from time to time. As a result, engineering changes and improvements are usually enough. - It is mounted can be observed while operating the filing tool. and in these instructions and the owner's manual of...
... the guide bar in a bench vise or, at the cutting site, in a safe place for assistance. Electric saws: Disconnect plug from your STIHL dealer. The STIHL filing tool can help reduce the risk of the cutter. - Always file from time to time. As a result, engineering changes and improvements are usually enough. - It is mounted can be observed while operating the filing tool. and in these instructions and the owner's manual of...
Instruction Manual
Page 4
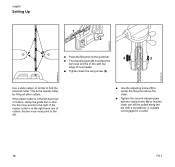
... in the left . : Use the adjusting screw (3) to center the filing tool above the chain. : Tighten the second clamping jaw with top edge of rivet heads. : Tighten down the wing screw (2). If the master cutter is the master cutter for filing all other cutters. 566BA002 KN 566BA003 KN 566BA004 KN english Setting Up 1 1 2 : Place the filing tool on the guide bar. 4 3 : The clamping jaws...
... in the left . : Use the adjusting screw (3) to center the filing tool above the chain. : Tighten the second clamping jaw with top edge of rivet heads. : Tighten down the wing screw (2). If the master cutter is the master cutter for filing all other cutters. 566BA002 KN 566BA003 KN 566BA004 KN english Setting Up 1 1 2 : Place the filing tool on the guide bar. 4 3 : The clamping jaws...
Instruction Manual
Page 5
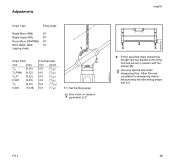
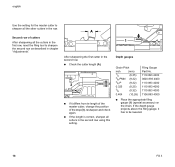
... and cut. Use only special saw chain sharpening files. Adjustments Chain Type Filing Angle Rapid Micro (RM) 30° Rapid Super (RS) 30° Picco Micro (PM/PMN) 30° RCX, RMX, PMX 10 ° (ripping chain) 1 Chain Pitch inch 1/4 3/8 PMN 3/8 P 0.325 3/8 0.404 (mm) (6,35) (9,32) (9,32) (8,25) (9,32) (10,26) File Diameter mm (inch) 4,0 (5/32) 4,0 (5/32) 4,0 (5/32) 4,8 (3/16) 5,2 (13/64) 5,5 (7/32) 1 = Set the filing angle...
... and cut. Use only special saw chain sharpening files. Adjustments Chain Type Filing Angle Rapid Micro (RM) 30° Rapid Super (RS) 30° Picco Micro (PM/PMN) 30° RCX, RMX, PMX 10 ° (ripping chain) 1 Chain Pitch inch 1/4 3/8 PMN 3/8 P 0.325 3/8 0.404 (mm) (6,35) (9,32) (9,32) (8,25) (9,32) (10,26) File Diameter mm (inch) 4,0 (5/32) 4,0 (5/32) 4,0 (5/32) 4,8 (3/16) 5,2 (13/64) 5,5 (7/32) 1 = Set the filing angle...
Instruction Manual
Page 6
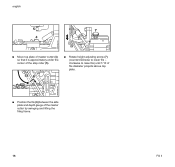
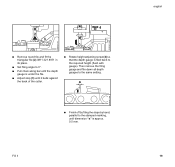
english 5 7 4 566BA007 KN : Move top plate of master cutter (4) so that it is approximately under the center of the stop roller (5). 6 : Rotate height adjusting screw (7) (counterclockwise to raise file) until 1/10 of file diameter projects above top plate. 566BA008 KN : Position the file (6) between the side plate and depth gauge of the master cutter by swinging and lifting the filing frame. 16 566BA009 KN FG 3 clockwise to lower file -
english 5 7 4 566BA007 KN : Move top plate of master cutter (4) so that it is approximately under the center of the stop roller (5). 6 : Rotate height adjusting screw (7) (counterclockwise to raise file) until 1/10 of file diameter projects above top plate. 566BA008 KN : Position the file (6) between the side plate and depth gauge of the master cutter by swinging and lifting the filing frame. 16 566BA009 KN FG 3 clockwise to lower file -
Instruction Manual
Page 7
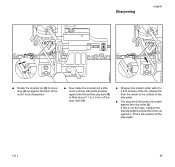
...outside of the side plate. : The stop bar (1) should now locate against it. Check the position of the stop again. Always file from the inside to 3 firm strokes of the file. Sharpening english 10 4 9 8 12 3 10 4 12 566BA010 KN 566BA011 KN : Rotate the knurled nut (8) to move stop (9) up against the... back of the cutter to be sharpened. : Now rotate the knurled nut a little more until the side plate presses against the file and the stop bar (10) is not the case, readjust the stop (3) slightly and pull the chain up against the...
...outside of the side plate. : The stop bar (1) should now locate against it. Check the position of the stop again. Always file from the inside to 3 firm strokes of the file. Sharpening english 10 4 9 8 12 3 10 4 12 566BA010 KN 566BA011 KN : Rotate the knurled nut (8) to move stop (9) up against the... back of the cutter to be sharpened. : Now rotate the knurled nut a little more until the side plate presses against the file and the stop bar (10) is not the case, readjust the stop (3) slightly and pull the chain up against the...
Instruction Manual
Page 8
... first row, reset the filing tool to sharpen the second row as described in the row. 566BA014 KN english Use the setting for the master cutter to sharpen all the other cutters in chapter "Adjustments". A After sharpening the first cutter in the second row using this setting. 566BA013 KN 566BA012 KN 1 Depth gauges Chain Pitch inch 1/4 3/8 PMN 3/8 P 0.325 3/8 0.404 (mm...
... first row, reset the filing tool to sharpen the second row as described in the row. 566BA014 KN english Use the setting for the master cutter to sharpen all the other cutters in chapter "Adjustments". A After sharpening the first cutter in the second row using this setting. 566BA013 KN 566BA012 KN 1 Depth gauges Chain Pitch inch 1/4 3/8 PMN 3/8 P 0.325 3/8 0.404 (mm...
Instruction Manual
Page 9
... height adjusting screw (4) so that the depth gauge is approx. 0.5 mm. 4 2 3 566BA016 KN 566BA015 KN : Remove round file and fit the triangular file (2) 0811 421 8971 in its place. : Set filing angle to 0°. : Pull chain along bar until the depth gauge is under the file. : Adjust stop (3) until dimension "a" is filed back to the required height (flush with gauge). FG 3 english 19 Then remove the filing gauge and file down...
... height adjusting screw (4) so that the depth gauge is approx. 0.5 mm. 4 2 3 566BA016 KN 566BA015 KN : Remove round file and fit the triangular file (2) 0811 421 8971 in its place. : Set filing angle to 0°. : Pull chain along bar until the depth gauge is under the file. : Adjust stop (3) until dimension "a" is filed back to the required height (flush with gauge). FG 3 english 19 Then remove the filing gauge and file down...
Instruction Manual
Page 10
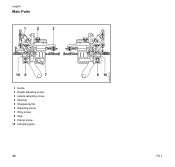
english Main Parts 1 2 3 4 5 10 6 7 1 Guide 2 Height adjusting screw 3 Lateral adjusting screw 4 Stop bar 5 Sharpening file 6 Adjusting screw 7 Wing screw 8 Stop 9 Clamp screw 10 Clamping jaws 20 8 9 10 566BA001 KN FG 3
english Main Parts 1 2 3 4 5 10 6 7 1 Guide 2 Height adjusting screw 3 Lateral adjusting screw 4 Stop bar 5 Sharpening file 6 Adjusting screw 7 Wing screw 8 Stop 9 Clamp screw 10 Clamping jaws 20 8 9 10 566BA001 KN FG 3


