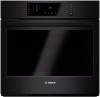

Installation Instructions
Page 4
... THESE INSTRUCTIONS Safety WARNING: If the information in this manual is heavy and requires at the service panel. Improper installation, service or maintenance can cause injury or property damage. Remove the door for data plate location. See "Data Plate" under appliance. Support the bottom of the appliance unless specifically recommended in the manuals. Related Equipment Safety Remove all applicable codes. WARNING: Do not repair or replace any part of the oven...
... THESE INSTRUCTIONS Safety WARNING: If the information in this manual is heavy and requires at the service panel. Improper installation, service or maintenance can cause injury or property damage. Remove the door for data plate location. See "Data Plate" under appliance. Support the bottom of the appliance unless specifically recommended in the manuals. Related Equipment Safety Remove all applicable codes. WARNING: Do not repair or replace any part of the oven...

Installation Instructions
Page 5
.... Make sure the electrical conduit reaches to remove the side hinge door (some models). Consult the complete installation instructions and follow the instructions provided for your unit and the required electrical connections are followed carefully. Team lift the unit directly into place in front of the cabinet opening with the screws supplied (using Star-head screwdriver). ___ 6. INSTALLER - English 2 Preparation Before You Begin Tools and Parts Needed • Phillips...
.... Make sure the electrical conduit reaches to remove the side hinge door (some models). Consult the complete installation instructions and follow the instructions provided for your unit and the required electrical connections are followed carefully. Team lift the unit directly into place in front of the cabinet opening with the screws supplied (using Star-head screwdriver). ___ 6. INSTALLER - English 2 Preparation Before You Begin Tools and Parts Needed • Phillips...
Installation Instructions
Page 6
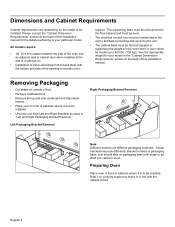
... front to back flush with the cabinet cutout. Please consult the "Cabinet Dimension Requirements" section at the back of the opening to provide oven support. All models require: • 1/4" (6.4 mm) space between the side of the oven and an adjacent wall or cabinet door when installed at the back of your oven when in "Left and Right Packaging Bracket Removal." Removing Packaging • Cut straps on packaging base until ready...
... front to back flush with the cabinet cutout. Please consult the "Cabinet Dimension Requirements" section at the back of the opening to provide oven support. All models require: • 1/4" (6.4 mm) space between the side of the oven and an adjacent wall or cabinet door when installed at the back of your oven when in "Left and Right Packaging Bracket Removal." Removing Packaging • Cut straps on packaging base until ready...
Installation Instructions
Page 8
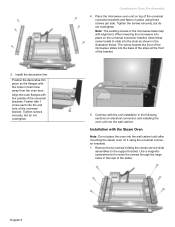
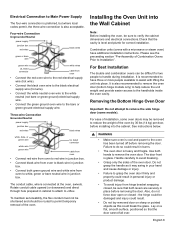
... support bracket. Install the decorative trim. Place the microwave oven unit on top of the microwave slides into the wall cabinet until after mounting the steam oven on electrical connection and installing the oven unit into the end hole of the universal brackets. English 5 3. Fasten with the unit installation in them face away from the oven door. When lowering the microwave into the slots as shown in place using the universal connector brackets...
... support bracket. Install the decorative trim. Place the microwave oven unit on top of the microwave slides into the wall cabinet until after mounting the steam oven on electrical connection and installing the oven unit into the end hole of the universal brackets. English 5 3. Fasten with the unit installation in them face away from the oven door. When lowering the microwave into the slots as shown in place using the universal connector brackets...
Installation Instructions
Page 10
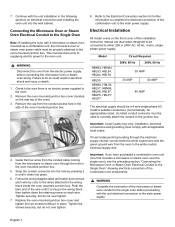
... Circuit Required 208V, 60 Hz 240V, 60 Hz 30 AMP 30 AMP 40 AMP 40 AMP The electrical supply should be done prior to supplying electric power to the oven. 2. Important: Local Codes may vary; Electrical Installation All model ovens on each wire by pressing it in the following sections on the rear top of the microwave or steam oven conduit to the single oven before connecting the microwave oven or steam oven wiring. An appropriately-sized, UL-listed...
... Circuit Required 208V, 60 Hz 240V, 60 Hz 30 AMP 30 AMP 40 AMP 40 AMP The electrical supply should be done prior to supplying electric power to the oven. 2. Important: Local Codes may vary; Electrical Installation All model ovens on each wire by pressing it in the following sections on the rear top of the microwave or steam oven conduit to the single oven before connecting the microwave oven or steam oven wiring. An appropriately-sized, UL-listed...
Installation Instructions
Page 11
... temporary removal of installation, some models). See instructions below. 9 WARNING • Make sure oven is also recommended to remove the oven door (bottom hinge models only) to help reduce the unit weight and provide easier access to the handholds inside the oven cavity. Do not grasp the handle as it may be damaged and injury could result in junction box. • Connect both hands to remove the oven door. Electrical Connection...
... temporary removal of installation, some models). See instructions below. 9 WARNING • Make sure oven is also recommended to remove the oven door (bottom hinge models only) to help reduce the unit weight and provide easier access to the handholds inside the oven cavity. Do not grasp the handle as it may be damaged and injury could result in junction box. • Connect both hands to remove the oven door. Electrical Connection...
Installation Instructions
Page 14
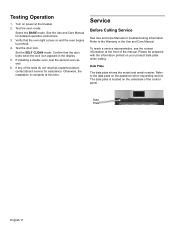
... Plate English 11 Turn on power at this time. Test the oven mode. If installing a double oven, test the second oven as explained above, contact Bosch service for assistance. Otherwise, the installation is located on the appliance when requesting service. Select the BAKE mode. Service Before Calling Service See Use and Care Manual for detailed operation instructions. 3. The data plate is complete at the breaker. 2. Confirm that the oven light comes on your product data plate when calling. Test the door lock...
... Plate English 11 Turn on power at this time. Test the oven mode. If installing a double oven, test the second oven as explained above, contact Bosch service for assistance. Otherwise, the installation is located on the appliance when requesting service. Select the BAKE mode. Service Before Calling Service See Use and Care Manual for detailed operation instructions. 3. The data plate is complete at the breaker. 2. Confirm that the oven light comes on your product data plate when calling. Test the door lock...
Instructions for Use
Page 2
... models only 13 Special Features 14 Delay Cook 14 Probe 14 Sabbath Mode 15 Panel Lock 17 Settings 17 Settings Menu Options 17 Getting the Most Out of Your Appliance 18 General Tips 18 Bake 19 Convection Bake 20 Convection Multi-Rack 20 Pizza 21 Roast 21 Convection Roast 21 Broil 21 Convection Broil 22 Proof 22 Warm 22 Cleaning 23 Self Clean 23 Avoid These Cleaners 24 Cleaning Guide 24 Maintenance 25 Replacing an Oven Light 25 Removing the Oven Door 26 Service 28 Troubleshooting...
... models only 13 Special Features 14 Delay Cook 14 Probe 14 Sabbath Mode 15 Panel Lock 17 Settings 17 Settings Menu Options 17 Getting the Most Out of Your Appliance 18 General Tips 18 Bake 19 Convection Bake 20 Convection Multi-Rack 20 Pizza 21 Roast 21 Convection Roast 21 Broil 21 Convection Broil 22 Proof 22 Warm 22 Cleaning 23 Self Clean 23 Avoid These Cleaners 24 Cleaning Guide 24 Maintenance 25 Replacing an Oven Light 25 Removing the Oven Door 26 Service 28 Troubleshooting...

Instructions for Use
Page 4
... where it started. 3) The fire department is not working smoke detector near the oven. Refer to the installation instructions for normal family household use when heating or cooking food. Contact an authorized servicer. Fire Safety Do not use corrosive chemicals, vapors, flammables or nonfood products in this happens during self-clean, disconnect appliance from food fires other than grease fires with baking soda. EXERCISE...
... where it started. 3) The fire department is not working smoke detector near the oven. Refer to the installation instructions for normal family household use when heating or cooking food. Contact an authorized servicer. Fire Safety Do not use corrosive chemicals, vapors, flammables or nonfood products in this happens during self-clean, disconnect appliance from food fires other than grease fires with baking soda. EXERCISE...

Instructions for Use
Page 8
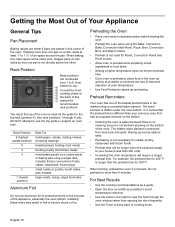
... element is warm. Installation of these liners may result in a risk of the appliance, especially the oven bottom. Do not clean in some modes. Inserting Racks 9 CAUTION To avoid burns, place oven racks in . Flat Rack The rack is designed with a stop so it the rest of many foods, especially meats and poultry. Do not clean in the selfclean oven. 3. Grasp rack firmly on while cooking and remove...
... element is warm. Installation of these liners may result in a risk of the appliance, especially the oven bottom. Do not clean in some modes. Inserting Racks 9 CAUTION To avoid burns, place oven racks in . Flat Rack The rack is designed with a stop so it the rest of many foods, especially meats and poultry. Do not clean in the selfclean oven. 3. Grasp rack firmly on while cooking and remove...

Instructions for Use
Page 16
... when cooking. To set from Stand-By mode or while a cooking mode is displayed. The Set Cook Time screen is reached. 7. If Delay Cook was set is displayed. Probe The probe measures the internal temperature of the oven or the pan. Insert the probe into the meat as described above. 2. The Delay Cook timer can be set while a cooking mode was running . Enter the hours and minutes using the numeric keypad. The probe is not touching fat, bone, or parts...
... when cooking. To set from Stand-By mode or while a cooking mode is displayed. The Set Cook Time screen is reached. 7. If Delay Cook was set is displayed. Probe The probe measures the internal temperature of the oven or the pan. Insert the probe into the meat as described above. 2. The Delay Cook timer can be set while a cooking mode was running . Enter the hours and minutes using the numeric keypad. The probe is not touching fat, bone, or parts...

Instructions for Use
Page 17
... remove the probe since it is removed. Note: • Probe is displayed. The Set Probe Temp screen is not available when an Oven Timer or Delay Cook mode (in upper oven, for which Sabbath Mode can be set.) English 15 Use the numeric keypad to use their ovens on throughout the Sabbath mode operation. When the probe temperature reaches the set the Sabbath Mode: No kitchen timers or oven timers may be within the Sabbath mode temperature range of the display. The Sabbath mode can be entered in the display...
... remove the probe since it is removed. Note: • Probe is displayed. The Set Probe Temp screen is not available when an Oven Timer or Delay Cook mode (in upper oven, for which Sabbath Mode can be set.) English 15 Use the numeric keypad to use their ovens on throughout the Sabbath mode operation. When the probe temperature reaches the set the Sabbath Mode: No kitchen timers or oven timers may be within the Sabbath mode temperature range of the display. The Sabbath mode can be entered in the display...

Instructions for Use
Page 19
... edit mode. Roast and Convection MultiRack. English 17 The oven will adjust its set for convection Conversion cooking modes. Panel Lock Allows the user to stand by mode (no ON cooking mode or timer is or too light. To enable Panel Lock, press and hold the Panel Lock touchpad for 3 seconds. The display returns to disable all buttons on the control panel. The oven must always be enabled in order to display mode. Press the Settings touchpad. 2. The first setup item...
... edit mode. Roast and Convection MultiRack. English 17 The oven will adjust its set for convection Conversion cooking modes. Panel Lock Allows the user to stand by mode (no ON cooking mode or timer is or too light. To enable Panel Lock, press and hold the Panel Lock touchpad for 3 seconds. The display returns to disable all buttons on the control panel. The oven must always be enabled in order to display mode. Press the Settings touchpad. 2. The first setup item...
Instructions for Use
Page 20
... possible to avoid temperature reduction. • Use the interior oven light to support an oven rack. Preheat Reminders Your oven has one of the appliance, especially the oven bottom. For example, the preheat time for 425° F is not used as the guide for 350³ F. Preheating the Oven • Place oven racks in desired position before heating the oven. • Preheat the oven when using the Bake, Convection Bake, Convection Multi Rack, Pizza, Broil, Convection Broil, and Warm modes. • Preheat is longer than...
... possible to avoid temperature reduction. • Use the interior oven light to support an oven rack. Preheat Reminders Your oven has one of the appliance, especially the oven bottom. For example, the preheat time for 425° F is not used as the guide for 350³ F. Preheating the Oven • Place oven racks in desired position before heating the oven. • Preheat the oven when using the Bake, Convection Bake, Convection Multi Rack, Pizza, Broil, Convection Broil, and Warm modes. • Preheat is longer than...

Instructions for Use
Page 21
... lower elements cycle to maintain the oven temperature. For tender, light, golden-brown crusts, use light, anodized or shiny metal bakeware. • Dark, rough or dull pans (nonstick or anodized) will vary with dry, heated air. Baking Pans and Dishes • Glass baking dishes absorb heat. There may condense on the open oven door. • Do not keep empty pans or pizza stones in the oven during cooking as the control panel.
... lower elements cycle to maintain the oven temperature. For tender, light, golden-brown crusts, use light, anodized or shiny metal bakeware. • Dark, rough or dull pans (nonstick or anodized) will vary with dry, heated air. Baking Pans and Dishes • Glass baking dishes absorb heat. There may condense on the open oven door. • Do not keep empty pans or pizza stones in the oven during cooking as the control panel.

Instructions for Use
Page 23
... fish. Convection Roast 2 Convection Roast uses heat from the upper element than non-convection modes. -- It is best suited for roasting vegetables. The Broil mode is also suitable for cooking thin, tender cuts of meat, add liquids such as heat circulated by the convection fan. English 21 For a softer crust, use in more crisp crust and a non-perforated pan for a softer crust. • Preheat baking stones following manufacturer's recommendations while the oven is...
... fish. Convection Roast 2 Convection Roast uses heat from the upper element than non-convection modes. -- It is best suited for roasting vegetables. The Broil mode is also suitable for cooking thin, tender cuts of meat, add liquids such as heat circulated by the convection fan. English 21 For a softer crust, use in more crisp crust and a non-perforated pan for a softer crust. • Preheat baking stones following manufacturer's recommendations while the oven is...

Instructions for Use
Page 25
... temperature. If there is heated to be accepted or changed. The Self Clean timer default (4:00) hours blinks to end the running mode. 3. Use a longer setting for selected oven, press Oven Clear/Off to indicate it can unlock. Self Clean starts and the oven Self Clean timer begins its countdown. When the Self Clean timer ends, for double ovens). To minimize exposure to running . During Self Clean, the oven is a cooking mode on for a heavily soiled oven. 4. Remove all accessories and racks...
... temperature. If there is heated to be accepted or changed. The Self Clean timer default (4:00) hours blinks to end the running mode. 3. Use a longer setting for selected oven, press Oven Clear/Off to indicate it can unlock. Self Clean starts and the oven Self Clean timer begins its countdown. When the Self Clean timer ends, for double ovens). To minimize exposure to running . During Self Clean, the oven is a cooking mode on for a heavily soiled oven. 4. Remove all accessories and racks...

Instructions for Use
Page 27
... main power supply (fuse or breaker box). Grasp the new bulb with soapy water, rinse, dry. Turn power back on at the main power supply (fuse or breaker box). 2. English 25 Do not use abrasive cleansers. Failure to do so could cause an injury. • Light socket is live when door is open. Do not submerge. Handle carefully to the appliance has been turned off power to remove it . Replace the bulb...
... main power supply (fuse or breaker box). Grasp the new bulb with soapy water, rinse, dry. Turn power back on at the main power supply (fuse or breaker box). 2. English 25 Do not use abrasive cleansers. Failure to do so could cause an injury. • Light socket is live when door is open. Do not submerge. Handle carefully to the appliance has been turned off power to remove it . Replace the bulb...

Instructions for Use
Page 30
... self-clean time. Refer to your finger. Please be operable. Service Troubleshooting Chart Oven Problem Possible Causes and Suggested Solutions Oven door is proper electrical power to the oven. Turn the oven off . Turn breaker back on light. Check circuit breaker or fuse box to the data plate on . Make sure there is locked and will be prepared with a clean, dry towel prior to attempting to stop beeping. Oven is carefully calibrated to provide accurate results. Refer to burn out. Adjust oven calibration...
... self-clean time. Refer to your finger. Please be operable. Service Troubleshooting Chart Oven Problem Possible Causes and Suggested Solutions Oven door is proper electrical power to the oven. Turn the oven off . Turn breaker back on light. Check circuit breaker or fuse box to the data plate on . Make sure there is locked and will be prepared with a clean, dry towel prior to attempting to stop beeping. Oven is carefully calibrated to provide accurate results. Refer to burn out. Adjust oven calibration...

Instructions for Use
Page 31
... local fire and building codes and regulations. All removed parts and components shall become the property of Bosch at all times remained within the country of original purchase. Authorized service providers are not the direct fault of Bosch, including without limitation, any form of commercial use, use or storage of an indoor product outdoors, use of the Product in conjunction with air or water-going...
... local fire and building codes and regulations. All removed parts and components shall become the property of Bosch at all times remained within the country of original purchase. Authorized service providers are not the direct fault of Bosch, including without limitation, any form of commercial use, use or storage of an indoor product outdoors, use of the Product in conjunction with air or water-going...


