Installation Instructions
Page 3
... 4 Electrical Installation 7 Installing the Oven Unit into the Wall Cabinet 8 For Best Installation 8 Removing the Bottom Hinge Oven Door . . . . 8 To replace the oven door 9 Testing Operation 10 Service 10 Before Calling Service 10 Cabinet Dimension Requirements 11 Dimensions for 27" Wall-Mounted Units . . . 11 Dimensions for 30" Wall-Mounted Units . 12 This Bosch Appliance is made by...
... 4 Electrical Installation 7 Installing the Oven Unit into the Wall Cabinet 8 For Best Installation 8 Removing the Bottom Hinge Oven Door . . . . 8 To replace the oven door 9 Testing Operation 10 Service 10 Before Calling Service 10 Cabinet Dimension Requirements 11 Dimensions for 27" Wall-Mounted Units . . . 11 Dimensions for 30" Wall-Mounted Units . 12 This Bosch Appliance is made by...
Installation Instructions
Page 6
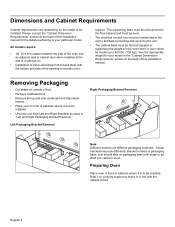
.... Unit should stay on packaging base until ready to be installed. English 3 See the appropriate weight for the details pertaining to provide oven support. Rest it on a sturdy support so that it is to be installed. Dimensions and Cabinet Requirements Cabinet requirements vary depending on ... line with the bottom and side of your particular model. Preparing Oven Place oven in "Left and Right Packaging Bracket Removal." All models require: • 1/4" (6.4 mm) space between the side of the oven and an adjacent wall or cabinet door when installed at the back of 2x4's extending ...
.... Unit should stay on packaging base until ready to be installed. English 3 See the appropriate weight for the details pertaining to provide oven support. Rest it on a sturdy support so that it is to be installed. Dimensions and Cabinet Requirements Cabinet requirements vary depending on ... line with the bottom and side of your particular model. Preparing Oven Place oven in "Left and Right Packaging Bracket Removal." All models require: • 1/4" (6.4 mm) space between the side of the oven and an adjacent wall or cabinet door when installed at the back of 2x4's extending ...

Installation Instructions
Page 7
... both installations. Combo service slide assembly (2)* * This part is positioned to all ovens. Installation with the Microwave Oven Note: Do not place the oven into the wall cabinet. English 4 Note: The single oven can be installed with a Steam Oven or with microwave or steam oven) require the units to be assembled together prior to installing the combination...
... both installations. Combo service slide assembly (2)* * This part is positioned to all ovens. Installation with the Microwave Oven Note: Do not place the oven into the wall cabinet. English 4 Note: The single oven can be installed with a Steam Oven or with microwave or steam oven) require the units to be assembled together prior to installing the combination...
Installation Instructions
Page 8
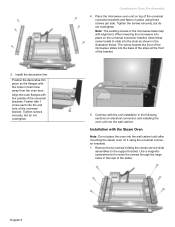
.... Use a magnetic screwdriver bit to the support bracket. When lowering the microwave into the wall cabinet. Installation with the unit installation in the illustration below. Combination Oven Pre-Assembly 4. Remove the six screws holding the combo service slide assemblies to reach the screws...help with the holes in the tops of the bracket. 5. 3. Continue with the Steam Oven Note: Do not place the oven into the wall cabinet until after mounting the steam oven on electrical connection and installing the oven unit into place on top of the universal brackets.
.... Use a magnetic screwdriver bit to the support bracket. When lowering the microwave into the wall cabinet. Installation with the unit installation in the illustration below. Combination Oven Pre-Assembly 4. Remove the six screws holding the combo service slide assemblies to reach the screws...help with the holes in the tops of the bracket. 5. 3. Continue with the Steam Oven Note: Do not place the oven into the wall cabinet until after mounting the steam oven on electrical connection and installing the oven unit into place on top of the universal brackets.
Installation Instructions
Page 10
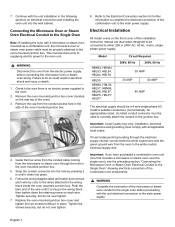
.... 4. Snap the conduit connector into the wall cabinet. Important: If you have purchased a combination oven unit (one that includes a microwave or steam oven over the single oven), see the preceding section "Connecting the Microwave Oven or Steam Oven Electrical Conduit to the junction box. 7. Connecting the Microwave Oven or Steam Oven Electrical Conduit to do so could result...
.... 4. Snap the conduit connector into the wall cabinet. Important: If you have purchased a combination oven unit (one that includes a microwave or steam oven over the single oven), see the preceding section "Connecting the Microwave Oven or Steam Oven Electrical Conduit to the junction box. 7. Connecting the Microwave Oven or Steam Oven Electrical Conduit to do so could result...
Installation Instructions
Page 11
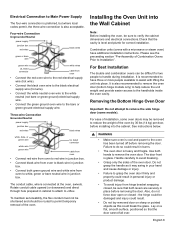
...damage or injury. • Failure to avoid breaking. • Grasp only the sides of the oven by 30 lbs (14 kg) per door, before installing into the Wall Cabinet Note: Before installing the oven, be sure that the door cannot fall over. Do not grasp the handle as this could break...properly could be difficult for correct installation. Lay on sharp or pointed objects as it may be routed to permit temporary removal of Combination Ovens Prior to Installation". Four-wire Connection Ungrounded Neutral power supply junction box red wires black wires green or bare wire green wire UL ...
...damage or injury. • Failure to avoid breaking. • Grasp only the sides of the oven by 30 lbs (14 kg) per door, before installing into the Wall Cabinet Note: Before installing the oven, be sure that the door cannot fall over. Do not grasp the handle as this could break...properly could be difficult for correct installation. Lay on sharp or pointed objects as it may be routed to permit temporary removal of Combination Ovens Prior to Installation". Four-wire Connection Ungrounded Neutral power supply junction box red wires black wires green or bare wire green wire UL ...

Installation Instructions
Page 13
...with holes at a 30º angle from the closed position and insert hinges into the cabinet cutout. Do not overtighten. 3. To replace the oven door: 1. If necessary, guide the flexible conduit into the cabinet opening. Hold the door at bottom of the cabinet). English 10 Install supplied ... tap holes in both hands. 2. You may need to rock the door forward and backward slightly to crimp the flexible conduit between the oven and the cabinet back wall. Align holes in , leave about 1 inch extending from being pushed all the way to expose hinges, levers, and slots. 5. 4. Note...
...with holes at a 30º angle from the closed position and insert hinges into the cabinet cutout. Do not overtighten. 3. To replace the oven door: 1. If necessary, guide the flexible conduit into the cabinet opening. Hold the door at bottom of the cabinet). English 10 Install supplied ... tap holes in both hands. 2. You may need to rock the door forward and backward slightly to crimp the flexible conduit between the oven and the cabinet back wall. Align holes in , leave about 1 inch extending from being pushed all the way to expose hinges, levers, and slots. 5. 4. Note...

Installation Instructions
Page 15
... two side cleats to allow at least 1/4" space between the side of the oven and the wall/door. It is good practice, when oven is installed at the end of a cabinet run , adjacent to a perpendicular wall or cabinet door, to be attached inside the cabinet frame, recessed from the... be located above the unit to the floor/cabinet and level. Cabinet Dimension Requirements Dimensions for 27" Wall-Mounted Units Single Oven 27" Double Oven 27" * For single ovens installed in a wall cabinet, the junction box may be located above or beneath the unit within range of the power conduit...
... two side cleats to allow at least 1/4" space between the side of the oven and the wall/door. It is good practice, when oven is installed at the end of a cabinet run , adjacent to a perpendicular wall or cabinet door, to be attached inside the cabinet frame, recessed from the... be located above the unit to the floor/cabinet and level. Cabinet Dimension Requirements Dimensions for 27" Wall-Mounted Units Single Oven 27" Double Oven 27" * For single ovens installed in a wall cabinet, the junction box may be located above or beneath the unit within range of the power conduit...

Installation Instructions
Page 16
... installation requires two side cleats to allow at least 1/4" space between the side of the oven and the wall/door. It is good practice, when oven is installed at the end of a cabinet run , adjacent to a perpendicular wall or cabinet door, to be attached inside the cabinet frame, recessed from the front. For... the unit. The cabinet cavity must be plumb and the base must be installed either above or beneath the unit within reach of the oven and the wall/door. The cabinet base must be flat and level and capable of supporting a weight of at least 1/4" space between the side of ...
... installation requires two side cleats to allow at least 1/4" space between the side of the oven and the wall/door. It is good practice, when oven is installed at the end of a cabinet run , adjacent to a perpendicular wall or cabinet door, to be attached inside the cabinet frame, recessed from the front. For... the unit. The cabinet cavity must be plumb and the base must be installed either above or beneath the unit within reach of the oven and the wall/door. The cabinet base must be flat and level and capable of supporting a weight of at least 1/4" space between the side of ...
Installation Instructions
Page 17
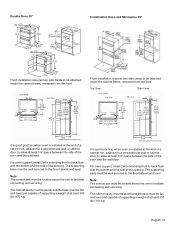
...supporting base must be flat and level and capable of supporting a weight of the oven and the wall/door. It is good practice, when oven is installed at the end of a cabinet run , adjacent to a perpendicular wall or cabinet door, to allow at least 1/4" space between the side of the ...box must be well secured to the floor/cabinet and level. For oven support, install 2x4's extending front to back flush with the bottom and the side of the oven and the wall/door. Double Oven 30" Combination Oven and Microwave 30" Flush installation requires two side cleats to be attached...
...supporting base must be flat and level and capable of supporting a weight of the oven and the wall/door. It is good practice, when oven is installed at the end of a cabinet run , adjacent to a perpendicular wall or cabinet door, to allow at least 1/4" space between the side of the ...box must be well secured to the floor/cabinet and level. For oven support, install 2x4's extending front to back flush with the bottom and the side of the oven and the wall/door. Double Oven 30" Combination Oven and Microwave 30" Flush installation requires two side cleats to be attached...

Installation Instructions
Page 18
... front to back flush with the bottom and the side of the oven and the wall/door. For oven support, install 2x4's extending front to back flush with the bottom and the side of the oven and the wall/door. The cabinet cavity must be plumb and the base must be...and capable of supporting a weight of at the end of a cabinet run , adjacent to a perpendicular wall or cabinet door, to the floor/cabinet and level. Combination Oven and Steam Oven 30" Single Oven, Undercounter 30" Flush installation requires two side cleats to be attached inside the cabinet frame, recessed from ...
... front to back flush with the bottom and the side of the oven and the wall/door. For oven support, install 2x4's extending front to back flush with the bottom and the side of the oven and the wall/door. The cabinet cavity must be plumb and the base must be...and capable of supporting a weight of at the end of a cabinet run , adjacent to a perpendicular wall or cabinet door, to the floor/cabinet and level. Combination Oven and Steam Oven 30" Single Oven, Undercounter 30" Flush installation requires two side cleats to be attached inside the cabinet frame, recessed from ...

Instructions for Use
Page 9
When the stop is securely anchored. 9 CAUTION To avoid possible injury or damage to bind during extraction, catching on the oven walls. 3. Telescopic Rack To insert the telescopic rack into place. The rack should feel stable when properly seated. 6. Slide the movable part of the telescopic rack ...cause it clears the rack position guide and gently pull the rack from the rack position guide. 2. Pull the rack forward to disengage from the oven. English 7 Tilt the front of the rack up so that the non-moving part of the rack is installed exactly per installation instructions and not...
When the stop is securely anchored. 9 CAUTION To avoid possible injury or damage to bind during extraction, catching on the oven walls. 3. Telescopic Rack To insert the telescopic rack into place. The rack should feel stable when properly seated. 6. Slide the movable part of the telescopic rack ...cause it clears the rack position guide and gently pull the rack from the rack position guide. 2. Pull the rack forward to disengage from the oven. English 7 Tilt the front of the rack up so that the non-moving part of the rack is installed exactly per installation instructions and not...

Instructions for Use
Page 21
... time. • Do not set any cooking process. Opening the Oven Door -- High Altitude Baking • When cooking at least 1 1/2" space between pans or dishes and oven walls. • Eliminate heat loss from the oven by using the window to evaporate from pastries to prepare a variety of...casseroles. Insulated bakeware will cook faster with dry, heated air. The amount depends on any other parts of opening the door. Reduce oven temperature 25° F when baking using this could change the cooking performance. Some manufacturers recommend reducing the temperature 25 ºF ...
... time. • Do not set any cooking process. Opening the Oven Door -- High Altitude Baking • When cooking at least 1 1/2" space between pans or dishes and oven walls. • Eliminate heat loss from the oven by using the window to evaporate from pastries to prepare a variety of...casseroles. Insulated bakeware will cook faster with dry, heated air. The amount depends on any other parts of opening the door. Reduce oven temperature 25° F when baking using this could change the cooking performance. Some manufacturers recommend reducing the temperature 25 ºF ...

Instructions for Use
Page 22
...biscuits. Convection Bake 2 Convection Bake is similar to take advantage of Multi-Rack include: -- Heat comes from a third element behind the back wall of Convection Bake include: -- The main difference in cook time. -- Higher volume (yeast items rise higher). See "Auto Convection Conversion" in...of the bottom heat, yielding a better crust on 6 racks simultaneously. Baking cookies is possible on baked items. The benefits of the oven. In this case, the baking time increases slightly. The control calculates the correct temperature and it is well suited for details. Stagger...
...biscuits. Convection Bake 2 Convection Bake is similar to take advantage of Multi-Rack include: -- Heat comes from a third element behind the back wall of Convection Bake include: -- The main difference in cook time. -- Higher volume (yeast items rise higher). See "Auto Convection Conversion" in...of the bottom heat, yielding a better crust on 6 racks simultaneously. Baking cookies is possible on baked items. The benefits of the oven. In this case, the baking time increases slightly. The control calculates the correct temperature and it is well suited for details. Stagger...

