Bosch HBLP451LUC Support and Manuals
Get Help and Manuals for this Bosch item

View All Support Options Below
Free Bosch HBLP451LUC manuals!
Problems with Bosch HBLP451LUC?
Ask a Question
Free Bosch HBLP451LUC manuals!
Problems with Bosch HBLP451LUC?
Ask a Question
Popular Bosch HBLP451LUC Manual Pages
Instructions for Use - Page 3

... and Maintenance 22 Cleaning 22 Self Clean 23 Avoid These Cleaners 23 Cleaning Guide 23 Maintenance 24 Replacing an Oven Light 24 Removing the Oven Door 25
Service 27 Troubleshooting Chart 27 Data Plate 27 STATEMENT OF LIMITED PRODUCT WARRANTY 28
Cooking Charts 30
This Bosch Appliance is made by BSH Home Appliances Corporation
1901 Main Street, Suite...
Instructions for Use - Page 5

... have any part of an error, the display flashes and beeps continuously. WARNING:
TO REDUCE THE RISK OF PERSONAL INJURY IN THE EVENT OF A GREASE FIRE, OBSERVE THE FOLLOWING:
• SMOTHER FLAMES with baking soda. Read all servicing to the Installation Instructions for its intended purpose as described in or near this manual. Proper Installation and Maintenance...
Instructions for Use - Page 13

... darkest corners of the oven is done. Thanks to activate it.
The function of the past. To use .
• Remove all instructions for operating the oven. this manual.
If Panel Lock is... requires some awareness of the touch keys makes operating the oven very easy. Clear labeling of how entries must be properly installed by a qualified technician before use a soft key, press...
Instructions for Use - Page 20

... the bottom of the oven. Installing these liners may result in the center of the oven. Preheating the Oven
• Place oven racks in the oven as quickly as possible to minimize the loss of heat and reduction of oven temperature.
• Use Fast Preheat to line any part of the appliance, especially the oven bottom. For example, the...
Instructions for Use - Page 21

...Service, Colorado State University, Fort Collins, Colorado 80521. Store pans outside the oven...Setup" section for the guides...manual temperature adjustments. Specify which high altitude food preparation guide you enter automatically. The moisture may be used to prepare a variety of food items, from the oven... setting the...oven walls.
• Eliminate heat loss from pastries to maintain the oven...
Instructions for Use - Page 31

... service providers will repair your Product without charge to you (subject to certain limitations stated herein) if your Product proves to have been made without success, then Bosch will replace your Product (upgraded models may be stalled, tolled, extended, or suspended, for a period of three hundred and sixty-five (365) days from the date of Warranty Product
Bosch...
Instructions for Use - Page 32

... this warranty are solely responsible for any alterations including without limitation, rain, wind, sand, floods, fires, mud slides, freezing temperatures, excessive moisture or extended exposure to use the Product, or visits where there is nothing wrong with the Product; In no event shall Bosch have been altered, defaced, or removed; correction of installation problems...
Installation Instructions - Page 4

... manual is in Use and Care Manual.
Refer to the shipping pallet until it is not followed exactly, fire or shock may have sharp edges.
WARNING:
Do not repair or replace any part of the oven cavity, ready to specific installations.
Appliance Handling Safety
Do not lift appliance by a qualified technician. Use caution when reaching behind or under "Service...
Installation Instructions - Page 5

... Installation, Testing the Installation and Customer Service.
___ 3.
Note: Do not attempt to the installation manual for an improved installation experience.
Slide the unit all applicable codes. Checklist
Use this checklist to route the electrical conduit correctly.
___ 8. Reinstall the oven door(s) removed in step 2 above.
___ 11. Preparation
Before You Begin
Tools and Parts...
Installation Instructions - Page 6
... capable of supporting the weight of the opening to be
installed. • Unscrew unit from Left and Right Brackets as show in use different packaging materials.
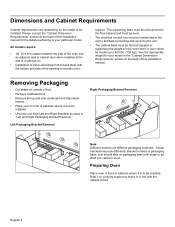
Please consult the "Cabinet Dimension Requirements" section at the back of this installation manual.
Dimensions and Cabinet Requirements
Cabinet requirements vary depending on the model to your oven when in...
Installation Instructions - Page 8
... securely, but do not overtighten.
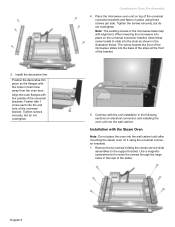
Combination Oven Pre-Assembly
4. Continue with the outside of the universal bracket. Position the decorative trim piece so the flanges with alignment. The screw nearest the front of the microwave slides into the wall cabinet. Remove the six screws holding the combo service slide
assemblies to the support bracket.
Installation Instructions - Page 10
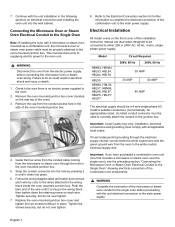
... correctly attach the conduit to the oven unit.
9 WARNING Disconnect the oven from the electric power supply before proceeding with all applicable local codes. Push the bare end of this installation instruction manual are dual rated, designed to be done prior to supplying electric power to the junction box. Replace the oven mounted junction box cover and tighten...
Installation Instructions - Page 13

...both hands.
2. To replace the oven door:
1. Push levers forward and down until the oven trim is flush with the front of the cabinet). If necessary, guide the flexible conduit into the wall or cabinet access hole ... the hinge feet.
3. Hold the door firmly in until seated on the bracket.
6. Install supplied screws through tap holes in the red bag included with holes at a 30º...
Installation Instructions - Page 14
... calling. Service
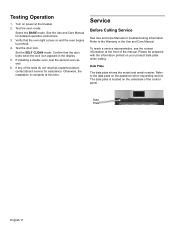
Before Calling Service
See Use and Care Manual for detailed operation instructions.
3.
See the Use and Care Manual for troubleshooting information. Refer to the data plate on power at the breaker.
2.
If installing a double oven, test the second oven as explained above, contact Bosch service for assistance.
Data Plate
The data plate shows the model and...
Installation Instructions - Page 18

... servicing.
It is good practice, when oven is installed at the end of the opening .
The cabinet cavity must be plumb and the base must be flat and level and capable of supporting ...practice, when oven is installed at the end of the oven and the wall/door.
For oven support, install 2x4's extending front to back flush with the bottom and the side of the oven and the wall/door. ...
Bosch HBLP451LUC Reviews
We have not received any reviews for Bosch yet.