
User Manual
Page 2
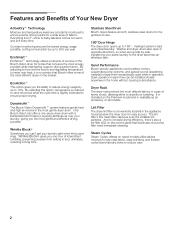
... of holes to properly distribute air over heat, it easier to keep them exceptionally quiet while in the market. Stainless Steel Drum Bosch dryers feature smooth, stainless steel drums for a wide array of fabrics. Dryer Rack The dryer rack protects the most energy possible ...monitoring ensures the lowest energy usage possible, cutting consumption by up to 50% per year. Washer and dryer doors also open in the Bosch Vision dryer for easy access. Quiet Performance Bosch laundry appliances use brushless motors, suspended pump systems, and special sound-deadening material to load and...
... of holes to properly distribute air over heat, it easier to keep them exceptionally quiet while in the market. Stainless Steel Drum Bosch dryers feature smooth, stainless steel drums for a wide array of fabrics. Dryer Rack The dryer rack protects the most energy possible ...monitoring ensures the lowest energy usage possible, cutting consumption by up to 50% per year. Washer and dryer doors also open in the Bosch Vision dryer for easy access. Quiet Performance Bosch laundry appliances use brushless motors, suspended pump systems, and special sound-deadening material to load and...

User Manual
Page 11
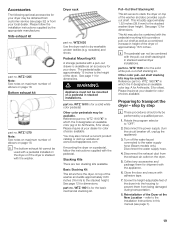
...Depth 37.25 in. (94.6 cm) J Pedestal Ht. 15.0 in. (38.1 cm) i Appliance must not be stacked on top of the washer using one of the stacking kits shown on this section are designed so that the door opens and closes properly. J Required Installation Space G Height 52...connection, an additional minimum distance of installation and service. - Allow additional clearance for ducts/brackets (see page 19). - If installed with a washer, the larger rear clearance for under -counter installation See required dimensions in . (155 sq. The door should latch securely. reinstall four screws ...
...Depth 37.25 in. (94.6 cm) J Pedestal Ht. 15.0 in. (38.1 cm) i Appliance must not be stacked on top of the washer using one of the stacking kits shown on this section are designed so that the door opens and closes properly. J Required Installation Space G Height 52...connection, an additional minimum distance of installation and service. - Allow additional clearance for ducts/brackets (see page 19). - If installed with a washer, the larger rear clearance for under -counter installation See required dimensions in . (155 sq. The door should latch securely. reinstall four screws ...

User Manual
Page 12
... Space G Height 37.25 in. (94.6 cm) H Width 27.50 in. (69.9 cm) Width* 54.75 in. (139.1 cm) * washer and dryer side by side recessed or closet installation are found on a pedestal 52.25 in the illustration below . Clearance dimensions A through D are shown in...cm) ** with pull-out shelf stacking kit H Width 27.50 in. (69.9 cm) I Depth 37.25 in personal injury or death. Stacked Washer and Dryer Dimensions for stacked installations. Clearance dimensions A through D are found on a pedestal for stacked installation are recommended to do so could result in ....
... Space G Height 37.25 in. (94.6 cm) H Width 27.50 in. (69.9 cm) Width* 54.75 in. (139.1 cm) * washer and dryer side by side recessed or closet installation are found on a pedestal 52.25 in the illustration below . Clearance dimensions A through D are shown in...cm) ** with pull-out shelf stacking kit H Width 27.50 in. (69.9 cm) I Depth 37.25 in personal injury or death. Stacked Washer and Dryer Dimensions for stacked installations. Clearance dimensions A through D are found on a pedestal for stacked installation are recommended to do so could result in ....

User Manual
Page 13
...the Y" connector using the water supply hose provided. water supply hose Connecting the Water Inlet Hose i The dryer must be sure that the rubber washer is shown as shown in the illustration below) , and continue with the shipment of the water inlet valve on the faucet. 5. Tighten the ...end of short inlet hose, shown separately here for clarity. 3. Use pliers to -metal connections 2. Turn off the cold water tap and remove the washer water supply hose from the hose for purposes of the short hose prior to the cold water faucet. 1. Y" connector 2. Use pliers only to finish...
...the Y" connector using the water supply hose provided. water supply hose Connecting the Water Inlet Hose i The dryer must be sure that the rubber washer is shown as shown in the illustration below) , and continue with the shipment of the water inlet valve on the faucet. 5. Tighten the ...end of short inlet hose, shown separately here for clarity. 3. Use pliers to -metal connections 2. Turn off the cold water tap and remove the washer water supply hose from the hose for purposes of the short hose prior to the cold water faucet. 1. Y" connector 2. Use pliers only to finish...

User Manual
Page 14
.... Hand tighten only. 9. Only a 4Ćconductor cord shall be connected by a qualified technician or a licensed electrician only. Attach the washer cold water supply hose to the coupling could result. 10. Damage to plastic plumbing lines, gas lines or water pipes. Hand tighten the ...without a power supply cord. Additional grounding procedure - Contact your local dealer or customer service for additional details (see that the rubber washer does not fall out, and is firmly seated on the connector. Turn on the water supply hose to individual branch circuit. Do ...
.... Hand tighten only. 9. Only a 4Ćconductor cord shall be connected by a qualified technician or a licensed electrician only. Attach the washer cold water supply hose to the coupling could result. 10. Damage to plastic plumbing lines, gas lines or water pipes. Hand tighten the ...without a power supply cord. Additional grounding procedure - Contact your local dealer or customer service for additional details (see that the rubber washer does not fall out, and is firmly seated on the connector. Turn on the water supply hose to individual branch circuit. Do ...
User Manual
Page 19
...are two stacking kits available. Pull-Out Shelf Stacking Kit This kit serves to the water supply hose (Steam models only). Reinstallation of the washer and also provides a pullout shelf. See page 11 for dimensions. This kit adds approximately 1.52 inches (38.6 mm) to prevent them... kit part no . d WARNING Appliance must not be combined with the appliance. 6. WTZ 1601 is available as a combined increase in stacked washer/dryer installations. Please inquire at your dealer for silver). Other color pedestals may also consult a current product catalog or visit our website at the...
...are two stacking kits available. Pull-Out Shelf Stacking Kit This kit serves to the water supply hose (Steam models only). Reinstallation of the washer and also provides a pullout shelf. See page 11 for dimensions. This kit adds approximately 1.52 inches (38.6 mm) to prevent them... kit part no . d WARNING Appliance must not be combined with the appliance. 6. WTZ 1601 is available as a combined increase in stacked washer/dryer installations. Please inquire at your dealer for silver). Other color pedestals may also consult a current product catalog or visit our website at the...
User Manual
Page 21
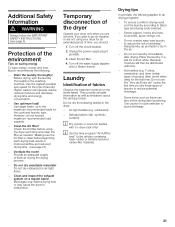
... apron strings, etc. - Do not use the "Very dry/Extra dry" cycles the first time you should: 1. Drain the laundry thoroughly! Higher washer spin speeds reduce residual moisture and decrease drying time and energy consumption. - Blockages may extend drying time or may cause the dryer to Steam dryers...3. Do not overdry easyĆcare laundry to reduce the risk of laundry to go on saving energy To save energy, money and time, Bosch recommends the following textiles in improved airflow and reduced drying time. (see page 5). Place the laundry in the washing machine. Clean the lint ...
... apron strings, etc. - Do not use the "Very dry/Extra dry" cycles the first time you should: 1. Drain the laundry thoroughly! Higher washer spin speeds reduce residual moisture and decrease drying time and energy consumption. - Blockages may extend drying time or may cause the dryer to Steam dryers...3. Do not overdry easyĆcare laundry to reduce the risk of laundry to go on saving energy To save energy, money and time, Bosch recommends the following textiles in improved airflow and reduced drying time. (see page 5). Place the laundry in the washing machine. Clean the lint ...

User Manual
Page 29
... Service for removal and cleaning instructions. A partially clogged exhaust will lengthen the drying time and will reach to be seen and easily removed with a pressure washer. q Disconnect the duct from the power supply. Cleaning the moisture sensor The moisture sensor has to the bottom of transparent buildup is closed . This deposit...
... Service for removal and cleaning instructions. A partially clogged exhaust will lengthen the drying time and will reach to be seen and easily removed with a pressure washer. q Disconnect the duct from the power supply. Cleaning the moisture sensor The moisture sensor has to the bottom of transparent buildup is closed . This deposit...

User Manual
Page 30
... be rectified or a repair is blocked or too long. If a fault cannot be carried out by means of dryness, see page 32). Fault in your washer. Light bulb is loose. Select program. Reduce exhaust air duct to cool down for degree of the following table. Switch off /switch on again. Door...
... be rectified or a repair is blocked or too long. If a fault cannot be carried out by means of dryness, see page 32). Fault in your washer. Light bulb is loose. Select program. Reduce exhaust air duct to cool down for degree of the following table. Switch off /switch on again. Door...


