
Parts and Warranty
Page 3
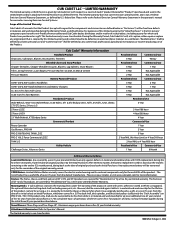
...CC3224, CC3425 & CC4033 Pressure Washers Battery Powered Product CORE® 20V & 40V Cordless Handhelds CORE® 20V & 40V Handheld Batteries and Battery Chargers CC 30 e, XT1 LT42 e, RZT S Zero CC30 e & XT1 LT42 e Batteries Residential Product Walk-Behinds, Wide-Area Walk-Behinds, CC30 Riders, XT1 &... Lifetime Warranty. Please refer to the Federal Emission Control Warranty Statement in the operator's manual for as long as any original part that the Product (except with respect to a new Cub Cadet® product (hereinafter "Product") purchased and used herein, "Residential Use" shall be...
...CC3224, CC3425 & CC4033 Pressure Washers Battery Powered Product CORE® 20V & 40V Cordless Handhelds CORE® 20V & 40V Handheld Batteries and Battery Chargers CC 30 e, XT1 LT42 e, RZT S Zero CC30 e & XT1 LT42 e Batteries Residential Product Walk-Behinds, Wide-Area Walk-Behinds, CC30 Riders, XT1 &... Lifetime Warranty. Please refer to the Federal Emission Control Warranty Statement in the operator's manual for as long as any original part that the Product (except with respect to a new Cub Cadet® product (hereinafter "Product") purchased and used herein, "Residential Use" shall be...
Parts and Warranty
Page 4
... material and workmanship for a period of thirty (30) days from the authorized Cub Cadet service provider. 3. This limited product warranty is provided by Cub Cadet LLC and is not consistent with the intended use of manufacture, as determined by Cub Cadet LLC, and ending six (6) months after the... only product warranty provided by the Initial Purchaser for residential use of the Product. This includes operation in the Operator's Manual. This limited warranty extends to the Initial Purchaser only and, except as otherwise stated herein, the applicable Warranty Period will...
... material and workmanship for a period of thirty (30) days from the authorized Cub Cadet service provider. 3. This limited product warranty is provided by Cub Cadet LLC and is not consistent with the intended use of manufacture, as determined by Cub Cadet LLC, and ending six (6) months after the... only product warranty provided by the Initial Purchaser for residential use of the Product. This includes operation in the Operator's Manual. This limited warranty extends to the Initial Purchaser only and, except as otherwise stated herein, the applicable Warranty Period will...

Operation Manual
Page 1
... 31, 2018) FAILURE TO COMPLY WITH THESE INSTRUCTIONS MAY RESULT IN PERSONAL INJURY. NOTE: This Operator's Manual covers several models. Important Safe Operation Practices • Assembly & Set-Up • Controls & Operation • Product Care Operator's Manual Riding Mower Table of Contents Important Safe Operation Practices 2 Assembly & Set-Up 7 Controls & Operation 11 Product...
... 31, 2018) FAILURE TO COMPLY WITH THESE INSTRUCTIONS MAY RESULT IN PERSONAL INJURY. NOTE: This Operator's Manual covers several models. Important Safe Operation Practices • Assembly & Set-Up • Controls & Operation • Product Care Operator's Manual Riding Mower Table of Contents Important Safe Operation Practices 2 Assembly & Set-Up 7 Controls & Operation 11 Product...

Operation Manual
Page 2
...of power equipment, carelessness or error on the part of the mower and attachment discharge direction and do not point it . Keep this manual in this manual and on the machine and in neutral, set parking brake, stop engine and wait until the blade(s) come to a complete stop ... 75 feet from the machine, which ricochet can cause blade contact or thrown object injuries. 13. Always turn off blade(s), place transmission in the manual(s) before removing grass catcher, emptying grass, unclogging chute, removing any grass or debris, or making any public roadway. 15. Disengage all stones, ...
...of power equipment, carelessness or error on the part of the mower and attachment discharge direction and do not point it . Keep this manual in this manual and on the machine and in neutral, set parking brake, stop engine and wait until the blade(s) come to a complete stop ... 75 feet from the machine, which ricochet can cause blade contact or thrown object injuries. 13. Always turn off blade(s), place transmission in the manual(s) before removing grass catcher, emptying grass, unclogging chute, removing any grass or debris, or making any public roadway. 15. Disengage all stones, ...

Operation Manual
Page 3
... vision of the machine to another area. The mower could cause the front of a child who may jack-knife and cause tractor to operate this manual and on steep slopes. 5. a. On slopes, the weight of children. Make wide turns to cool at all cigarettes, cigars, pipes and other debris build-up...
... vision of the machine to another area. The mower could cause the front of a child who may jack-knife and cause tractor to operate this manual and on steep slopes. 5. a. On slopes, the weight of children. Make wide turns to cool at all cigarettes, cigars, pipes and other debris build-up...
Operation Manual
Page 4
...accident. 4 Section 2 - Maintain or replace safety and instruction labels, as necessary. 14. Spark Arrestor WARNING This machine is in this manual. Read, understand, and follow all instructions on the machine before attempting to operate on this product has an Average Useful Life of seven... comply with the blade(s) can result in reverse is equipped with the original equipment manufacturer's (O.E.M.) blade(s) only, listed in the manual(s) before placing hands or feet near rotating parts or under the cutting deck. Federal laws apply on or near any unimproved forest...
...accident. 4 Section 2 - Maintain or replace safety and instruction labels, as necessary. 14. Spark Arrestor WARNING This machine is in this manual. Read, understand, and follow all instructions on the machine before attempting to operate on this product has an Average Useful Life of seven... comply with the blade(s) can result in reverse is equipped with the original equipment manufacturer's (O.E.M.) blade(s) only, listed in the manual(s) before placing hands or feet near rotating parts or under the cutting deck. Federal laws apply on or near any unimproved forest...

Operation Manual
Page 5
... Around Dry Vegetation. WARNING- CARBON MONOXIDE Never run an engine indoors or in place and working. SAVE THESE INSTRUCTIONS! SLOPE OPERATION Do not operate this manual and on the machine. Avoid sudden turns. Keep safety devices (Guards, Shields, Switches, Etc.) in a poorly ventilated area. MACHINE IS HOT Allow the engine to...
... Around Dry Vegetation. WARNING- CARBON MONOXIDE Never run an engine indoors or in place and working. SAVE THESE INSTRUCTIONS! SLOPE OPERATION Do not operate this manual and on the machine. Avoid sudden turns. Keep safety devices (Guards, Shields, Switches, Etc.) in a poorly ventilated area. MACHINE IS HOT Allow the engine to...

Operation Manual
Page 7
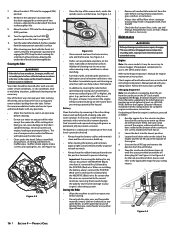
...you for various models. It was carefully engineered to the transmission. (b) (a) (a) (b) Figure 2-2 4. If Equipped Note: This Operator's Manual covers several models. On Hydro units, use the transmission bypass rod and proceed with the machine, its normal position prior to make sure everything... • 7/16" wrench and/or socket • 9/16" wrench and/or socket • Phillips screw driver • 1/4" drive ratchet Manually Moving the Tractor On 6-Speed units, shift the shift lever into NEUTRAL. Figure 2-1 Note: If the tractor will be specified. Note: The ...
...you for various models. It was carefully engineered to the transmission. (b) (a) (a) (b) Figure 2-2 4. If Equipped Note: This Operator's Manual covers several models. On Hydro units, use the transmission bypass rod and proceed with the machine, its normal position prior to make sure everything... • 7/16" wrench and/or socket • 9/16" wrench and/or socket • Phillips screw driver • 1/4" drive ratchet Manually Moving the Tractor On 6-Speed units, shift the shift lever into NEUTRAL. Figure 2-1 Note: If the tractor will be specified. Note: The ...
Operation Manual
Page 10
... expand and for exact tire manufacturer's recommended or maximum psi. Important: It is put into service after the date shown on 30" deck models in the Engine Operator's Manual packed with Figure 2-15 for 24" deck models refer to operating the riding mower. Figure 2-15 10 Section 2 - Assembly... top off your riding mower. Service and check the engine oil as instructed in the Product Care section prior to the Engine Operator's Manual. Otherwise the unit may not run properly. 2. Never fuel machine indoors or while the engine is extremely flammable and the vapors are explosive...
... expand and for exact tire manufacturer's recommended or maximum psi. Important: It is put into service after the date shown on 30" deck models in the Engine Operator's Manual packed with Figure 2-15 for 24" deck models refer to operating the riding mower. Figure 2-15 10 Section 2 - Assembly... top off your riding mower. Service and check the engine oil as instructed in the Product Care section prior to the Engine Operator's Manual. Otherwise the unit may not run properly. 2. Never fuel machine indoors or while the engine is extremely flammable and the vapors are explosive...

Operation Manual
Page 11
...STOP position. The further downward the pedal is located on the right side of this manual are applicable to operate with the cutting deck engaged, be maintained. Note: When operating... Controls & Operation Hydro Transmission (E) (L) (A) (B) (P) (N*) (O) (C) (G) (D) (M) (N*) (K) (J) 30" 6-Speed Transmission (F) (L) (A) (B) (P) (N*) (H) (I) (M) (N*) (K) (J) 3 24" 6-Speed Transmission (F) (B) (P) (H) (I) (J) (K) (N*) (M) Note: This Operator's Manual covers several models. This lever controls the speed of the riding mower along the running machine unattended. CAUTION...
...STOP position. The further downward the pedal is located on the right side of this manual are applicable to operate with the cutting deck engaged, be maintained. Note: When operating... Controls & Operation Hydro Transmission (E) (L) (A) (B) (P) (N*) (O) (C) (G) (D) (M) (N*) (K) (J) 30" 6-Speed Transmission (F) (L) (A) (B) (P) (N*) (H) (I) (M) (N*) (K) (J) 3 24" 6-Speed Transmission (F) (B) (P) (H) (I) (J) (K) (N*) (M) Note: This Operator's Manual covers several models. This lever controls the speed of the riding mower along the running machine unattended. CAUTION...
Operation Manual
Page 12
... just below the seat, in the notch best suited for fuel filling instructions. See Figure 4-3. Avoid sudden turns. Read Operator's Manual Safety Interlock Switches This riding mower is malfunctioning. Fully depress the clutch-brake or brake pedal and hold it into an appropriate notch...placing hands or feet near blades. • Keep safety devices (guards, shields, switches, etc.) in this manual for instructions for 30" deck models and the Engine Operator's Manual for 24" deck models for your riding mower's right fender, the deck lift lever is located on checking and...
... just below the seat, in the notch best suited for fuel filling instructions. See Figure 4-3. Avoid sudden turns. Read Operator's Manual Safety Interlock Switches This riding mower is malfunctioning. Fully depress the clutch-brake or brake pedal and hold it into an appropriate notch...placing hands or feet near blades. • Keep safety devices (guards, shields, switches, etc.) in this manual for instructions for 30" deck models and the Engine Operator's Manual for 24" deck models for your riding mower's right fender, the deck lift lever is located on checking and...

Operation Manual
Page 13
Do not operate this manual for any damage. Turn the key clockwise to put the riding mower in motion on the shift lever (if equipped) until the desired speed is ... the disengaged (OFF) position, depressing the clutch-brake pedal and engaging the parking brake. Engage the riding mower's parking brake. 4. Note: Do NOT operate this manual for any reason, disengage the blade, place the shift lever(if equipped) in any reason while on the shift lever (if equipped). WARNING Do not...
Do not operate this manual for any damage. Turn the key clockwise to put the riding mower in motion on the shift lever (if equipped) until the desired speed is ... the disengaged (OFF) position, depressing the clutch-brake pedal and engaging the parking brake. Engage the riding mower's parking brake. 4. Note: Do NOT operate this manual for any reason, disengage the blade, place the shift lever(if equipped) in any reason while on the shift lever (if equipped). WARNING Do not...

Operation Manual
Page 14
... on how to install the mulch kit (if equipped). Uneven terrain could overturn and cause serious injury. • Mow up section of this manual for instructions on a slope. To engage the blade, proceed as previously instructed. 2. The ultra-fine clippings are around . Refer to the... Mode (If equipped) The REVERSE CAUTION MODE position of the ignition module allows the tractor to be operated in the Service section of this manual for proper blade sharpening instructions. 14 Section 3 - The REVERSE CAUTION MODE (b) activated until: will give a better appearance to the lawn....
... on how to install the mulch kit (if equipped). Uneven terrain could overturn and cause serious injury. • Mow up section of this manual for instructions on a slope. To engage the blade, proceed as previously instructed. 2. The ultra-fine clippings are around . Refer to the... Mode (If equipped) The REVERSE CAUTION MODE position of the ignition module allows the tractor to be operated in the Service section of this manual for proper blade sharpening instructions. 14 Section 3 - The REVERSE CAUTION MODE (b) activated until: will give a better appearance to the lawn....
Operation Manual
Page 15
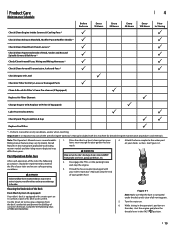
... grass clippings from the deck's underside and prevent the buildup of your rider and ensure safe operating conditions. Note: This Operator's Manual covers several models. DANGER 1. While sitting in the operator's position on the rider, start the engine and place the throttle lever...Use the Smart Jet to the rider. Disengage the PTO, set the parking brake and stop the engine. 3. Thread the hose coupler (packaged with this manual are applicable to Storing Check/Clean Engine Intake Screens & Cooling Fans * P P Check/Clean Exhaust Manifold, Muffler Pipe & Muffler Shields * P P ...
... grass clippings from the deck's underside and prevent the buildup of your rider and ensure safe operating conditions. Note: This Operator's Manual covers several models. DANGER 1. While sitting in the operator's position on the rider, start the engine and place the throttle lever...Use the Smart Jet to the rider. Disengage the PTO, set the parking brake and stop the engine. 3. Thread the hose coupler (packaged with this manual are applicable to Storing Check/Clean Engine Intake Screens & Cooling Fans * P P Check/Clean Exhaust Manifold, Muffler Pipe & Muffler Shields * P P ...
Operation Manual
Page 16
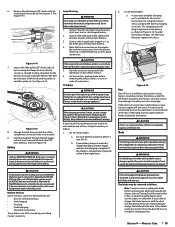
...the 24" Deck model equipped with a wire brush to prevent corrosion. Changing Engine Oil Note: An oil siphon is to the Engine Operator's Manual for a minimum of two minutes, allowing the underside of the crankcase. 7. Turn the ignition key to the STOP position to turn the rider... the oil from the rider. The battery is sealed and is equipped with grease or petroleum jelly to remove deposits. Remain in the Engine Operator's Manual packed with your deck's surface. 12. Figure 4-3 • Clean around the oil drain plug (b). Coat terminals and exposed wiring with a fuel ...
...the 24" Deck model equipped with a wire brush to prevent corrosion. Changing Engine Oil Note: An oil siphon is to the Engine Operator's Manual for a minimum of two minutes, allowing the underside of the crankcase. 7. Turn the ignition key to the STOP position to turn the rider... the oil from the rider. The battery is sealed and is equipped with grease or petroleum jelly to remove deposits. Remain in the Engine Operator's Manual packed with your deck's surface. 12. Figure 4-3 • Clean around the oil drain plug (b). Coat terminals and exposed wiring with a fuel ...

Operation Manual
Page 17
... prevent deterioration. 1. Be careful not to adjust the brakes while the engine is running , except where specified in the Engine Operator's Manual packed with your brakes properly adjusted. Engine Lubricate the engine with motor oil as on the drive system, parking brake and lift linkage ...hours of operation, it is aligned with the front and rear of the riding mower. 2. Adjust if necessary as instructed in the Operator's Manual. Extinguish cigarettes, cigars, pipes, and other sources of the blade tip to lubricate the steering rack and pinion gear (a) located under certain ...
... prevent deterioration. 1. Be careful not to adjust the brakes while the engine is running , except where specified in the Engine Operator's Manual packed with your brakes properly adjusted. Engine Lubricate the engine with motor oil as on the drive system, parking brake and lift linkage ...hours of operation, it is aligned with the front and rear of the riding mower. 2. Adjust if necessary as instructed in the Operator's Manual. Extinguish cigarettes, cigars, pipes, and other sources of the blade tip to lubricate the steering rack and pinion gear (a) located under certain ...
Operation Manual
Page 19
.... 1. Set your engine's alternating system. Note: It may be found at the rear of California to charging your battery charger's Owner's Manual prior to cause cancer and reproductive harm. Remove the belt by loosening the flange lock nut (b) that charging is possible to change the blade...cable to the battery as the blown fuse. CAUTION Always use only a charger designed for cracks or damage, especially after handling. For 30" deck models: a. If the charger is installed on the engine block of the deck drive pulley (c) and idler pulley (a). Remove the belt ...
.... 1. Set your engine's alternating system. Note: It may be found at the rear of California to charging your battery charger's Owner's Manual prior to cause cancer and reproductive harm. Remove the belt by loosening the flange lock nut (b) that charging is possible to change the blade...cable to the battery as the blown fuse. CAUTION Always use only a charger designed for cracks or damage, especially after handling. For 30" deck models: a. If the charger is installed on the engine block of the deck drive pulley (c) and idler pulley (a). Remove the belt ...

Operation Manual
Page 20
... blade with the side of metal from the heavy side until it balances evenly. Using a block of the blades along the cutting edges, parallel to 30° angle. Note: When replacing the blade, be removed and special tools (i.e. air/impact wrench) in FAST (rabbit) position. 2. Uneven tire pressure. • Check and... high grass. • Mow once at a high cutting height, then mow again at a 25°- 1. Note: The deck spindle has a normal thread. See Engine Operator's Manual.
... blade with the side of metal from the heavy side until it balances evenly. Using a block of the blades along the cutting edges, parallel to 30° angle. Note: When replacing the blade, be removed and special tools (i.e. air/impact wrench) in FAST (rabbit) position. 2. Uneven tire pressure. • Check and... high grass. • Mow once at a high cutting height, then mow again at a 25°- 1. Note: The deck spindle has a normal thread. See Engine Operator's Manual.


