
Operation Manual
Page 1
... of the deck. Not all safety rules and instructions in personal injury - WARNING CALIFORNIA PROPOSITION 65 Engine Exhaust, some of its constituents, and certain vehicle components contain or emit chemicals known to the right. NOTE: This Operator's Manual covers several models. Safe Operation Practices • Assembly • Operation • Service • Troubleshooting Operator's Manual Self Propelled Mower Rear Wheel Drive Model Series Q & R Record Product Information Before setting up and operating your new mower, please locate the model plate on...
... of the deck. Not all safety rules and instructions in personal injury - WARNING CALIFORNIA PROPOSITION 65 Engine Exhaust, some of its constituents, and certain vehicle components contain or emit chemicals known to the right. NOTE: This Operator's Manual covers several models. Safe Operation Practices • Assembly • Operation • Service • Troubleshooting Operator's Manual Self Propelled Mower Rear Wheel Drive Model Series Q & R Record Product Information Before setting up and operating your new mower, please locate the model plate on...
Operation Manual
Page 2
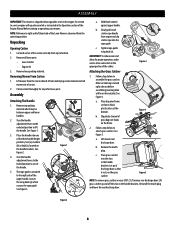
... by an adult. 4. Replace gasoline cap and tighten securely. 9. Read, understand and follow all instructions on the mower and should read and understand the instructions and safe operation practices in this machine. Never pull the mower back toward you are not worn excessively. Do not engage the drive control (if equipped) while starting engine. 2 SAFE OPERATION PRACTICES WARNING This symbol points out important safety instructions which, if not...
... by an adult. 4. Replace gasoline cap and tighten securely. 9. Read, understand and follow all instructions on the mower and should read and understand the instructions and safe operation practices in this machine. Never pull the mower back toward you are not worn excessively. Do not engage the drive control (if equipped) while starting engine. 2 SAFE OPERATION PRACTICES WARNING This symbol points out important safety instructions which, if not...
Operation Manual
Page 3
... an Electric Start Push Key, remove the key when the mower is unattended to measure slopes before storing or attempting any part of a height no more than 7" (17.5 cm). Smart phone applications can result in this manual and on that children will pull hand and arm toward the operator. 13. Do not mow on the sloped area. Never operate mower without the discharge door, chute, mulch plug or the entire grass catcher...
... an Electric Start Push Key, remove the key when the mower is unattended to measure slopes before storing or attempting any part of a height no more than 7" (17.5 cm). Smart phone applications can result in this manual and on that children will pull hand and arm toward the operator. 13. Do not mow on the sloped area. Never operate mower without the discharge door, chute, mulch plug or the entire grass catcher...
Operation Manual
Page 4
... & Fuel 1. Never over -speed the engine. When practical, remove gas-powered equipment from your clothes which do not modify engine in good working condition. Disconnect the spark plug wire and ground against the engine to prevent unintended starting the engine. 8. If the blade do not stop in handling gasoline. Regularly check the safety interlock system for tightness per the Maintenance Schedule in this manual. Only mow across slopes, never mow up oil...
... & Fuel 1. Never over -speed the engine. When practical, remove gas-powered equipment from your clothes which do not modify engine in good working condition. Disconnect the spark plug wire and ground against the engine to prevent unintended starting the engine. 8. If the blade do not stop in handling gasoline. Regularly check the safety interlock system for tightness per the Maintenance Schedule in this manual. Only mow across slopes, never mow up oil...
Operation Manual
Page 5
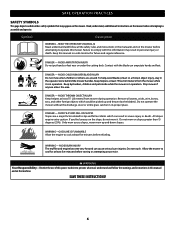
... mower while the engine is available through your model. Thoroughly inspect the mower for the muffler is running. 13. Please contact Customer Support for information regarding the evaporative emission control configuration for gas, oil, etc. SAFE OPERATION PRACTICES 11. "Use of the California Public Resources Code). Never attempt to make wheel cutting height adjustments or repairs to improper performance and compromise safety" 14. For safety protection, frequently check components and replace...
... mower while the engine is available through your model. Thoroughly inspect the mower for the muffler is running. 13. Please contact Customer Support for information regarding the evaporative emission control configuration for gas, oil, etc. SAFE OPERATION PRACTICES 11. "Use of the California Public Resources Code). Never attempt to make wheel cutting height adjustments or repairs to improper performance and compromise safety" 14. For safety protection, frequently check components and replace...
Operation Manual
Page 6
... operation. Remove all stones, sticks, wire, bones, toys, and other foreign objects which can result in severe injury or death. Do not mow on the slope, do not mow it is in operation. WARNING- SAVE THESE INSTRUCTIONS! 6 DANGER - Keep bystanders, children and pets inside while the mower is in operation. Do not operate the mower without the discharge cover or entire grass catcher in this power...
... operation. Remove all stones, sticks, wire, bones, toys, and other foreign objects which can result in severe injury or death. Do not mow on the slope, do not mow it is in operation. WARNING- SAVE THESE INSTRUCTIONS! 6 DANGER - Keep bystanders, children and pets inside while the mower is in operation. Do not operate the mower without the discharge cover or entire grass catcher in this power...

Operation Manual
Page 7
Locate a vertical object on the slope, do not mow it. Adjust gauge up and down until the left corner touches the slope (See Figure 1 and Figure 2). 5. If you feel uneasy on or behind the slope (e.g. a pole, building, fence, tree, etc.) 3. Only mow across slopes, never mow up or down slopes. Slope ... USE THIS SLOPE GAUGE TO DETERMINE IF A SLOPE IS TOO STEEP FOR SAFE OPERATION! All slopes require extra caution. If there is a gap below the gauge, the slope is too steep for safe operation (See Figure 2 above). Remove this page and fold along the dashed line. 2. Do not mow on...
Locate a vertical object on the slope, do not mow it. Adjust gauge up and down until the left corner touches the slope (See Figure 1 and Figure 2). 5. If you feel uneasy on or behind the slope (e.g. a pole, building, fence, tree, etc.) 3. Only mow across slopes, never mow up or down slopes. Slope ... USE THIS SLOPE GAUGE TO DETERMINE IF A SLOPE IS TOO STEEP FOR SAFE OPERATION! All slopes require extra caution. If there is a gap below the gauge, the slope is too steep for safe operation (See Figure 2 above). Remove this page and fold along the dashed line. 2. Do not mow on...
Operation Manual
Page 8
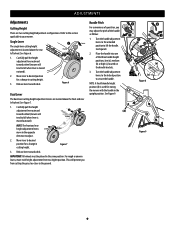
... carton vertically from the operating position. See Figure 5. Figure 4 A B a. Figure 2 8 Figure 1 (a) (b) (c) a. Lift mower rear discharge door. c. Cut each corner of the Lawn Mower is observed from top to assemble the grass catcher. Place the handle into the rope guide. Hold blade control against upper handle. Slip plastic channel of the cables. (a) c Figure 3 Attaching the Grass Catcher B 1. Follow steps below to bottom. 2. Remove all loose parts: • Grass Catcher • Engine Oil 3. Turn the handle adjustment levers to the unlocked position...
... carton vertically from the operating position. See Figure 5. Figure 4 A B a. Figure 2 8 Figure 1 (a) (b) (c) a. Lift mower rear discharge door. c. Cut each corner of the Lawn Mower is observed from top to assemble the grass catcher. Place the handle into the rope guide. Hold blade control against upper handle. Slip plastic channel of the cables. (a) c Figure 3 Attaching the Grass Catcher B 1. Follow steps below to bottom. 2. Remove all loose parts: • Grass Catcher • Engine Oil 3. Turn the handle adjustment levers to the unlocked position...
Operation Manual
Page 9
... handle. Figure 6 Dual Lever The dual lever cutting height adjustment levers are two cutting height adjustment configurations. Turn the handle adjustment levers to the unlocked position to your mower. This will tend to fall when lever is used for a change in the upright position. Handle Pitch For convenience of operation, you from cutting the grass too close to fall when lever is located above the front and rear left wheel. Carefully pull the height adjustment lever outward towards deck. Place the handle...
... handle. Figure 6 Dual Lever The dual lever cutting height adjustment levers are two cutting height adjustment configurations. Turn the handle adjustment levers to the unlocked position to your mower. This will tend to fall when lever is used for a change in the upright position. Handle Pitch For convenience of operation, you from cutting the grass too close to fall when lever is located above the front and rear left wheel. Carefully pull the height adjustment lever outward towards deck. Place the handle...
Operation Manual
Page 10
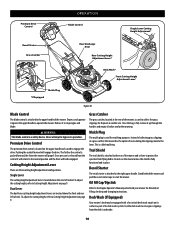
...Operator's Manual packed with a fast attach deck wash nozzle on page 9. Do not use the mower unless the shield is fully functional and in a grass catcher the mower has the option of the mower and is located above the front and rear left wheel. Depress and squeeze it to operate the mower. Pushing the control forward will engage the drive. Premium Drive Control OPERATION Blade Control Single Lever Cutting Height Adjustment* Recoil Starter Grass Catcher Rear Discharge Door Rear Cutting Height Adjustment Lever* Deck Wash* Front Cutting Height Adjustment Lever* Mulch Plug...
...Operator's Manual packed with a fast attach deck wash nozzle on page 9. Do not use the mower unless the shield is fully functional and in a grass catcher the mower has the option of the mower and is located above the front and rear left wheel. Depress and squeeze it to operate the mower. Pushing the control forward will engage the drive. Premium Drive Control OPERATION Blade Control Single Lever Cutting Height Adjustment* Recoil Starter Grass Catcher Rear Discharge Door Rear Cutting Height Adjustment Lever* Deck Wash* Front Cutting Height Adjustment Lever* Mulch Plug...

Operation Manual
Page 11
... the blade control. This mower is clear of four inches, mulching is pushed forward, the faster the mower will automatically adjust to your eyes severely. Using Your Lawn Mower Be sure lawn is shipped without gasoline or oil in any moving parts on engine and lawn mower. Once the engine is full. 2. Operate mower until grass bag is running and while continuing to hold the blade and drive controls together, push the drive control forward to propel mower. Dispose of use the grass catcher...
... the blade control. This mower is clear of four inches, mulching is pushed forward, the faster the mower will automatically adjust to your eyes severely. Using Your Lawn Mower Be sure lawn is shipped without gasoline or oil in any moving parts on engine and lawn mower. Once the engine is full. 2. Operate mower until grass bag is running and while continuing to hold the blade and drive controls together, push the drive control forward to propel mower. Dispose of use the grass catcher...
Operation Manual
Page 12
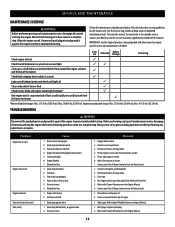
...given below. Engine oil level low. 2. Spark plug gap too close. 1. Dirty air cleaner. Run engine until all hardware is within 3 seconds P Lube control linkages/pivots and wheels with the mower for the mower only. IMPORTANT: See the Engine Operator's manual packed with light oil Clean underside of mower deck Check mower blade and engine mounting bolt torque* Run engine until all controls and stop the engine. Spark plug boot disconnected. 3. Spark plug boot loose. 2. Contact your Parts & Repair Center to have come to Air Cleaner Maintenance in fuel system...
...given below. Engine oil level low. 2. Spark plug gap too close. 1. Dirty air cleaner. Run engine until all hardware is within 3 seconds P Lube control linkages/pivots and wheels with the mower for the mower only. IMPORTANT: See the Engine Operator's manual packed with light oil Clean underside of mower deck Check mower blade and engine mounting bolt torque* Run engine until all controls and stop the engine. Spark plug boot disconnected. 3. Spark plug boot loose. 2. Contact your Parts & Repair Center to have come to Air Cleaner Maintenance in fuel system...
Operation Manual
Page 13
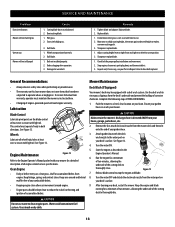
...your garden hose. 3. General Recommendations Mower Maintenance • Always observe safety rules when performing any combustible debris. • Keeping engine clean allows air movement around and behind muffler free of engine-governed speed will void engine warranty. Attach garden hose with the deck wash nozzle to the Engine Operator's Manual packed with light oil. Dull blade. 1. Debris clogging drive operation. 3. Replace blade. 1. Mow once at a high cutting height, then mow again at least once a season with your mower for proper pulley installation and...
...your garden hose. 3. General Recommendations Mower Maintenance • Always observe safety rules when performing any combustible debris. • Keeping engine clean allows air movement around and behind muffler free of engine-governed speed will void engine warranty. Attach garden hose with the deck wash nozzle to the Engine Operator's Manual packed with light oil. Dull blade. 1. Debris clogging drive operation. 3. Replace blade. 1. Mow once at a high cutting height, then mow again at least once a season with your mower for proper pulley installation and...
Operation Manual
Page 14
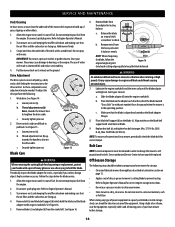
... at high speeds. Using a light oil or silicone, coat the equipment, especially cables and all moving parts of grind. To adjust the drive perform the following steps should be needed. Remove bolt (a) and blade bell support (b) which hold the blade. Balance the blade on the blade adapter flanges. 8. Refer to hold the blade and the blade adapter to check. (d) b. Figure 15 Blade Care WARNING When removing the cutting blade for correct torque. Figure 16 Grind each cutting edge...
... at high speeds. Using a light oil or silicone, coat the equipment, especially cables and all moving parts of grind. To adjust the drive perform the following steps should be needed. Remove bolt (a) and blade bell support (b) which hold the blade. Balance the blade on the blade adapter flanges. 8. Refer to hold the blade and the blade adapter to check. (d) b. Figure 15 Blade Care WARNING When removing the cutting blade for correct torque. Figure 16 Grind each cutting edge...


