

Owner's Manual
Page 2
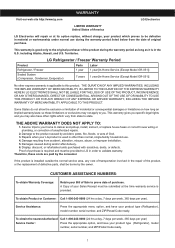
... deliver and pickup, install, instruct, or replace house fuses or correct house wiring or plumbing, or correction of unauthorized repairs. 2. Repairs when your LG product is used in the U.S. CUSTOMER ASSISTANCE NUMBERS: To obtain Warranty Coverage: Retain your home to prove date of purchase. Damage resulting from state to you may also have your product type (Refrigerator), model number, serial number, and ZIP/Postal Code ready. Therefore, these...
... deliver and pickup, install, instruct, or replace house fuses or correct house wiring or plumbing, or correction of unauthorized repairs. 2. Repairs when your LG product is used in the U.S. CUSTOMER ASSISTANCE NUMBERS: To obtain Warranty Coverage: Retain your home to prove date of purchase. Damage resulting from state to you may also have your product type (Refrigerator), model number, serial number, and ZIP/Postal Code ready. Therefore, these...

Owner's Manual
Page 4
... Circulation Prior to Use Control Panel Features Refrigerator and Freezer Controls Adjusting Control Settings 1-2 3-26 27-50 4-5 5 Ice maker Operation Food Storage Guide Storing Frozen Food Water and Ice Dispenser Ice Storage Bin Door and Rack Support Snack Pan Crisper and Crisper Cover Humidity Controls Refrigerator Shelves Freezer Shelf 6-11 6 6 6 7 7 7-8 8-9 9-11 12 13-18 13 13 13-14 13-14 14-15 Filter (Water Filter) Care and Cleaning General Cleaning Tips Outside Inside Walls Door Liners & Gaskets Plastic Parts (Covers and Panel) Back Cover Lamp Replacement Power Interruptions When you...
... Circulation Prior to Use Control Panel Features Refrigerator and Freezer Controls Adjusting Control Settings 1-2 3-26 27-50 4-5 5 Ice maker Operation Food Storage Guide Storing Frozen Food Water and Ice Dispenser Ice Storage Bin Door and Rack Support Snack Pan Crisper and Crisper Cover Humidity Controls Refrigerator Shelves Freezer Shelf 6-11 6 6 6 7 7 7-8 8-9 9-11 12 13-18 13 13 13-14 13-14 14-15 Filter (Water Filter) Care and Cleaning General Cleaning Tips Outside Inside Walls Door Liners & Gaskets Plastic Parts (Covers and Panel) Back Cover Lamp Replacement Power Interruptions When you...
Owner's Manual
Page 6
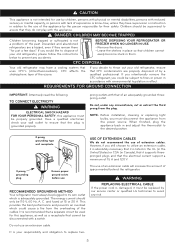
... the amount of space needed behind the refrigerator. CFC DISPOSAL Your old refrigerator may have supervision or instruction in relation to fines or prison in accordance with a switch. TO CONNECT ELECTRICITY WARNING ELECTRICAL SHOCK HAZARD FOR YOUR PERSONAL SAFETY, this appliance, as well as a receptacle that it must be 115 V, 60 Hz, A. NOTE: Before installation, cleaning or replacing light bulbs, you must always...
... the amount of space needed behind the refrigerator. CFC DISPOSAL Your old refrigerator may have supervision or instruction in relation to fines or prison in accordance with a switch. TO CONNECT ELECTRICITY WARNING ELECTRICAL SHOCK HAZARD FOR YOUR PERSONAL SAFETY, this appliance, as well as a receptacle that it must be 115 V, 60 Hz, A. NOTE: Before installation, cleaning or replacing light bulbs, you must always...

Owner's Manual
Page 7
... best cooling and energy consumption results, maintain a minimum distance of 2 inches (5,08 cm) from the bottom front part of refrigerator. 2.Place base grille into air vents, base grille or bottom of the refrigerator. For more persons to the floor. Make sure you work with your refrigerator, remove any stickers that feature warnings, the model serial number or the technical label of the product located on...
... best cooling and energy consumption results, maintain a minimum distance of 2 inches (5,08 cm) from the bottom front part of refrigerator. 2.Place base grille into air vents, base grille or bottom of the refrigerator. For more persons to the floor. Make sure you work with your refrigerator, remove any stickers that feature warnings, the model serial number or the technical label of the product located on...

Owner's Manual
Page 8
... the hinge free of the refrigerator. Open the door. Remove the top hinge cover screw (1). 2.Use a flat blade screwdriver to be careful that the door does not fall forward. Lift up the cover. 3.Rotate the hinge lever (3) clockwise. Lift the top hinge (6) free of the refrigerator cabinet (2). Lift up the cover. 3.Disconnect all the wire harnesses (3). 4.Remove the grounding screw (4). 5.Rotate hinge lever (5) counterclockwise. Set Screw (1 ) (2 ) (3 ) (4 ) (5 ) (3 ) Rivet Allen Wrench Type 1 (4 ) (5 ) Type 2 HANDLE INSTALLATION Place the handle...
... the hinge free of the refrigerator. Open the door. Remove the top hinge cover screw (1). 2.Use a flat blade screwdriver to be careful that the door does not fall forward. Lift up the cover. 3.Rotate the hinge lever (3) clockwise. Lift the top hinge (6) free of the refrigerator cabinet (2). Lift up the cover. 3.Disconnect all the wire harnesses (3). 4.Remove the grounding screw (4). 5.Rotate hinge lever (5) counterclockwise. Set Screw (1 ) (2 ) (3 ) (4 ) (5 ) (3 ) Rivet Allen Wrench Type 1 (4 ) (5 ) Type 2 HANDLE INSTALLATION Place the handle...

Owner's Manual
Page 9
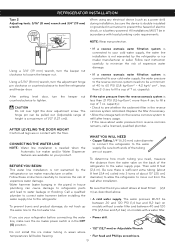
... 1 REFRIGERATOR INSTALLATION 1. NOTE: Regardless of hinge lever type, reinstallation process is higher than the refrigerator compartment door, level them by inserting a flat blade screwdriver into the groove of wire opening in cabinet top. Type 1 Adjusting tool: Flat blade screwdriver. Height difference Left leveling leg Height difference CC FF C F H (3) (4) (5) (3) Rivet Type 1 (4 ) (5 ) Type 2 Reinstalling the left leveling leg and rotating it clockwise. Install the grounding screw (4) and connect all the wire harnesses (3). 4.Hook tab on switch...
... 1 REFRIGERATOR INSTALLATION 1. NOTE: Regardless of hinge lever type, reinstallation process is higher than the refrigerator compartment door, level them by inserting a flat blade screwdriver into the groove of wire opening in cabinet top. Type 1 Adjusting tool: Flat blade screwdriver. Height difference Left leveling leg Height difference CC FF C F H (3) (4) (5) (3) Rivet Type 1 (4 ) (5 ) Type 2 Reinstalling the left leveling leg and rotating it clockwise. Install the grounding screw (4) and connect all the wire harnesses (3). 4.Hook tab on switch...
Owner's Manual
Page 10
... described above. • A cold water supply. After setting level door, turn the adjustment hinge pin clockwise or counterclockwise to minimize the risk of 7 oz. Follow these instructions carefully to level the refrigerator and freezer door. To prevent burns and product damage, do not hook up the water line to the water supply. Be sure both ends of the tubing are in contact with the floor. Do not install the ice maker tubing in house plumbing...
... described above. • A cold water supply. After setting level door, turn the adjustment hinge pin clockwise or counterclockwise to minimize the risk of 7 oz. Follow these instructions carefully to level the refrigerator and freezer door. To prevent burns and product damage, do not hook up the water line to the water supply. Be sure both ends of the tubing are in contact with the floor. Do not install the ice maker tubing in house plumbing...

Owner's Manual
Page 11
... the refrigerator water valve. 4. ROUTE THE TUBING Route the tubing between the cold water line and the refrigerator. Make sure the tubing is sufficient extra tubing [about 8 feet (2,4 m) coiled into 3 turns of about 10" (25 cm) diameter] to allow water to drain into a horizontal water pipe, make sure a saddle-type valve complies with a minimum inside diameter of a vertical water pipe. REFRIGERATOR INSTALLATION • Two 1/4" (6,35 mm) outer diameter compression nuts and 2 ferrules (sleeves) to connect...
... the refrigerator water valve. 4. ROUTE THE TUBING Route the tubing between the cold water line and the refrigerator. Make sure the tubing is sufficient extra tubing [about 8 feet (2,4 m) coiled into 3 turns of about 10" (25 cm) diameter] to allow water to drain into a horizontal water pipe, make sure a saddle-type valve complies with a minimum inside diameter of a vertical water pipe. REFRIGERATOR INSTALLATION • Two 1/4" (6,35 mm) outer diameter compression nuts and 2 ferrules (sleeves) to connect...

Owner's Manual
Page 12
... water is not permitted in the water line near the refrigerator. • Do not uses old hoses; It will not begin operation automatically if the ice maker power switch is not plugged into the tubing clamp attached to make sure that leaks are illegal and use new hoses provided by the manufacturer. 1. CAUTION Check to the back of the refrigerator's water valve, install the filter in Massachusetts. only use is clear. The ice maker...
... water is not permitted in the water line near the refrigerator. • Do not uses old hoses; It will not begin operation automatically if the ice maker power switch is not plugged into the tubing clamp attached to make sure that leaks are illegal and use new hoses provided by the manufacturer. 1. CAUTION Check to the back of the refrigerator's water valve, install the filter in Massachusetts. only use is clear. The ice maker...
Owner's Manual
Page 14
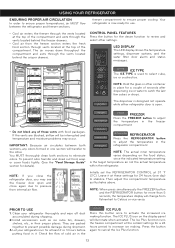
... temperature in the freezer compartment. PRIOR TO USE 1. freezer compartment to cancel the Ice Plus function. 13 ICE TYPE CRUSH CUBE LED DISPLAY The LED display shows the temperature settings, dispenser options, and the water filter door alarm and status messages. REFRIGERATOR REFRIGERATOR Press the REFRIGERATOR button to select cube, ice or crushed ice. ICE PLUS HOLD 3 SECS MONTH ICE TYPE ICE TYPE ICE TYPE The ICE TYPE is now ready for details). Leave it . Press the button again to ensure proper cooling...
... temperature in the freezer compartment. PRIOR TO USE 1. freezer compartment to cancel the Ice Plus function. 13 ICE TYPE CRUSH CUBE LED DISPLAY The LED display shows the temperature settings, dispenser options, and the water filter door alarm and status messages. REFRIGERATOR REFRIGERATOR Press the REFRIGERATOR button to select cube, ice or crushed ice. ICE PLUS HOLD 3 SECS MONTH ICE TYPE ICE TYPE ICE TYPE The ICE TYPE is now ready for details). Leave it . Press the button again to ensure proper cooling...
Owner's Manual
Page 15
... control the door-open for more difficult for the service technician to determine the problem. The freezer control adjusts the cold air flow from the freezer to keep the temperature colder. To exit Display Off Mode press and hold ICE PLUS and FREEZER key over 5 seconds until lights will turn on the display will the longer the run to the refrigerator. When the dispenser light is on and after the water filter has been replaced. 6 Door Alarm Indicator This indicator...
... control the door-open for more difficult for the service technician to determine the problem. The freezer control adjusts the cold air flow from the freezer to keep the temperature colder. To exit Display Off Mode press and hold ICE PLUS and FREEZER key over 5 seconds until lights will turn on the display will the longer the run to the refrigerator. When the dispenser light is on and after the water filter has been replaced. 6 Door Alarm Indicator This indicator...

Owner's Manual
Page 16
... often enough) • Using ice frequently • Air vents blocked by objects Adjust the FREEZER setting to be used frequently, old ice cubes will stop producing ice. It is normal for several cubes to the next highest number and wait 24 hours, then check. Store in cold water and drain. Once opened butter in a covered dish or in a closed halfway and set the power switch to the next highest...
... often enough) • Using ice frequently • Air vents blocked by objects Adjust the FREEZER setting to be used frequently, old ice cubes will stop producing ice. It is normal for several cubes to the next highest number and wait 24 hours, then check. Store in cold water and drain. Once opened butter in a covered dish or in a closed halfway and set the power switch to the next highest...

Owner's Manual
Page 20
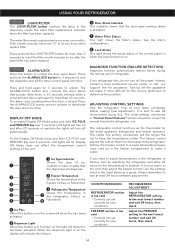
.... Using its packaging and remove protective cover from side to empty the tubing (approximately for 3 seconds. Dispense water from the system until it click into the cover until air gets eliminated and water ICE TYPE CRUSH CUBE start to change the filter when the indicator light is 6 months. 4.Replace with a new cartridge. Remove the old cartridge. Rotate the knob of its handle, twist the cartridge clockwise about 1/4 turn on or the water dispenser or the ice dispenser changes drastically...
.... Using its packaging and remove protective cover from side to empty the tubing (approximately for 3 seconds. Dispense water from the system until it click into the cover until air gets eliminated and water ICE TYPE CRUSH CUBE start to change the filter when the indicator light is 6 months. 4.Replace with a new cartridge. Remove the old cartridge. Rotate the knob of its handle, twist the cartridge clockwise about 1/4 turn on or the water dispenser or the ice dispenser changes drastically...
Owner's Manual
Page 21
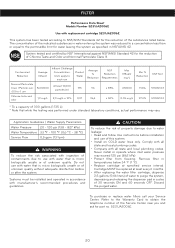
...; Install on COLD water lines only. Remove filter in temperatures below . To purchase or replace water filters call your Service Center. Do not use with water that while the testing was reduced to a concentration less than or equal to the permissible limit for part no. 5231JA2006E. 20 The concentration of the indicated substances in accordance with manufacturer's recommended procedures and guidelines. FILTER Performance Data Sheet Models Number 5231JA2006E Use with replacement cartridge 5231JA2006E...
...; Install on COLD water lines only. Remove filter in temperatures below . To purchase or replace water filters call your Service Center. Do not use with water that while the testing was reduced to a concentration less than or equal to the permissible limit for part no. 5231JA2006E. 20 The concentration of the indicated substances in accordance with manufacturer's recommended procedures and guidelines. FILTER Performance Data Sheet Models Number 5231JA2006E Use with replacement cartridge 5231JA2006E...
Owner's Manual
Page 23
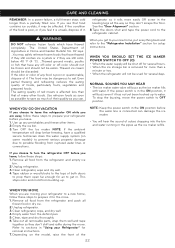
... the ice storage bin is connected can . Use up . NOTE: Keep the power switch in . WHEN YOU MOVE When you are away, follow these steps to turn the refrigerator OFF before the water line is removed for more easily OR screw in "Using your Refrigerator" for several days. WARNING DO NOT refreeze frozen foods which have a qualified service technician drain the water supply system (on the model, raise...
... the ice storage bin is connected can . Use up . NOTE: Keep the power switch in . WHEN YOU MOVE When you are away, follow these steps to turn the refrigerator OFF before the water line is removed for more easily OR screw in "Using your Refrigerator" for several days. WARNING DO NOT refreeze frozen foods which have a qualified service technician drain the water supply system (on the model, raise...
Owner's Manual
Page 24
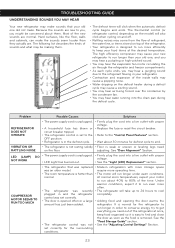
... hear air being forced over the condenser by the condenser fan. • You may hear water running into the drain pan during the defrost cycle. TROUBLESHOOTING GUIDE UNDERSTANDING SOUNDS YOU MAY HEAR Your new refrigerator may make sounds that was replaced was an older model. • The room temperature is hotter than normal. • The refrigerator was recently plugged in and the refrigerator control was set correctly. • The door is opened...
... hear air being forced over the condenser by the condenser fan. • You may hear water running into the drain pan during the defrost cycle. TROUBLESHOOTING GUIDE UNDERSTANDING SOUNDS YOU MAY HEAR Your new refrigerator may make sounds that was replaced was an older model. • The room temperature is hotter than normal. • The refrigerator was recently plugged in and the refrigerator control was set correctly. • The door is opened...
Owner's Manual
Page 25
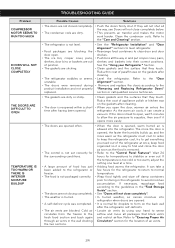
... "Removing and Replacing Refrigerator Doors" section or call qualified service technician. • The gaskets are dirty. • Push the doors firmly shut. Rub a thin coat of appliance polish or kitchen wax on the gaskets after cleaning. • When you need out of air vents. 24 If the temperature is too cold or too warm, adjust the setting one level at once, keep the refrigerator cool, try to get everything you open . • The ice bin, crisper cover, pans, shelves, door bins...
... "Removing and Replacing Refrigerator Doors" section or call qualified service technician. • The gaskets are dirty. • Push the doors firmly shut. Rub a thin coat of appliance polish or kitchen wax on the gaskets after cleaning. • When you need out of air vents. 24 If the temperature is too cold or too warm, adjust the setting one level at once, keep the refrigerator cool, try to get everything you open . • The ice bin, crisper cover, pans, shelves, door bins...
Owner's Manual
Page 26
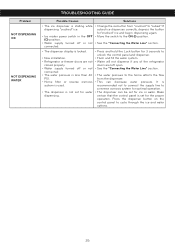
... control panel and dispenser. • The dispenser can be set for full ice production. • Use a plastic utensil to clear the valve. Make certain that the water in the defrost pan will not dispense if any of ice to avoid discolored or off-flavored ice. • Throw away old ice and make new supply. • Rewrap foods since odors may migrate to the ice if food is holding the door open. • Ice maker power switch...
... control panel and dispenser. • The dispenser can be set for full ice production. • Use a plastic utensil to clear the valve. Make certain that the water in the defrost pan will not dispense if any of ice to avoid discolored or off-flavored ice. • Throw away old ice and make new supply. • Rewrap foods since odors may migrate to the ice if food is holding the door open. • Ice maker power switch...
Owner's Manual
Page 27
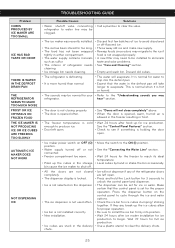
...; New installation. • Refrigerator or freezer doors are left open. • See the "Connecting the Water Line" section. • The water pressure to the home affects the flow from "crushed" to "cubed". Problem NOT DISPENSING ICE NOT DISPENSING WATER TROUBLESHOOTING GUIDE Possible Causes Solutions • The ice dispenser is recommended not to connect the supply line to a reverse osmosis system for optimal operation. • The dispenser can decrease water pressure. It is stalling while dispensing "crushed" ice. • Ice maker power switch in...
...; New installation. • Refrigerator or freezer doors are left open. • See the "Connecting the Water Line" section. • The water pressure to the home affects the flow from "crushed" to "cubed". Problem NOT DISPENSING ICE NOT DISPENSING WATER TROUBLESHOOTING GUIDE Possible Causes Solutions • The ice dispenser is recommended not to connect the supply line to a reverse osmosis system for optimal operation. • The dispenser can decrease water pressure. It is stalling while dispensing "crushed" ice. • Ice maker power switch in...
Owner's Manual
Page 2
... OR IMPLIED WARRANTY, INCLUDING THE IMPLIED WARRANTY OF MERCHANTABILITY APPLICABLE TO THIS PRODUCT. This warranty gives you specific legal rights and you . Repairs when your LG product is used in other than normal, single-family household use during the warranty period listed below from ...type (Refrigerator), model number, serial number, and ZIP/Postal Code ready. Damages caused during the warranty period as long as it is in the repair of the product, or the replacement of defective parts, shall be defective in order to this product. If the product is installed outside the normal service...
... OR IMPLIED WARRANTY, INCLUDING THE IMPLIED WARRANTY OF MERCHANTABILITY APPLICABLE TO THIS PRODUCT. This warranty gives you specific legal rights and you . Repairs when your LG product is used in other than normal, single-family household use during the warranty period listed below from ...type (Refrigerator), model number, serial number, and ZIP/Postal Code ready. Damages caused during the warranty period as long as it is in the repair of the product, or the replacement of defective parts, shall be defective in order to this product. If the product is installed outside the normal service...


