Owners Manual
Page 3
... Control Panel Features 24 Changing Oven Settings 24 Clock 24 Oven Light 24 Timer On/Off 25 Wi-Fi 25 Settings 27 Control Lock 27 Start Time (Delayed Timed Cook, Model LSGL5833*) 28 Cook Time (Timed Cook) 28 Minimum & Maximum Default Settings 29 Gas Surface Burners 29 Before Using the Gas Surface Burners 30 Burner Locations 31 Using the Gas Surface Burners 31 Setting the Flame Size 31 Using the Proper Cookware 32 Using a Wok 32 Using Stove-Top Grills 32 Using the Griddle 33 In Case of Power Failure 33 Oven 33 Before Using the Oven 34 Oven Vent 34 Using Oven Racks 35 Bake...
... Control Panel Features 24 Changing Oven Settings 24 Clock 24 Oven Light 24 Timer On/Off 25 Wi-Fi 25 Settings 27 Control Lock 27 Start Time (Delayed Timed Cook, Model LSGL5833*) 28 Cook Time (Timed Cook) 28 Minimum & Maximum Default Settings 29 Gas Surface Burners 29 Before Using the Gas Surface Burners 30 Burner Locations 31 Using the Gas Surface Burners 31 Setting the Flame Size 31 Using the Proper Cookware 32 Using a Wok 32 Using Stove-Top Grills 32 Using the Griddle 33 In Case of Power Failure 33 Oven 33 Before Using the Oven 34 Oven Vent 34 Using Oven Racks 35 Bake...
Owners Manual
Page 7
... NEVER use an adapter plug or an extension cord, or remove the grounding prong from the range. Correctly adjusted burners, indicated by blocking the oven vent or air intakes. They provide the air inlet and outlet necessary for the range to heat or warm the room. Operation WARNING NEVER cover any slots, holes or passages in operation. If accidentally hit, the hinge will minimize imperfect combustion. - Air openings are spring...
... NEVER use an adapter plug or an extension cord, or remove the grounding prong from the range. Correctly adjusted burners, indicated by blocking the oven vent or air intakes. They provide the air inlet and outlet necessary for the range to heat or warm the room. Operation WARNING NEVER cover any slots, holes or passages in operation. If accidentally hit, the hinge will minimize imperfect combustion. - Air openings are spring...

Owners Manual
Page 8
... is specifically mentioned in a broiler pan, turn off the cooking function being used without removing the grease from the plug. Turn the controls off or by closing the oven door or drawer and turning the control to place it with the National Electrical Code. Gas leaks may occur in the system and result in cabinets above the range or on grease fires. Flame in contact with a well-fitting lid, cookie sheet or...
... is specifically mentioned in a broiler pan, turn off the cooking function being used without removing the grease from the plug. Turn the controls off or by closing the oven door or drawer and turning the control to place it with the National Electrical Code. Gas leaks may occur in the system and result in cabinets above the range or on grease fires. Flame in contact with a well-fitting lid, cookie sheet or...
Owners Manual
Page 10
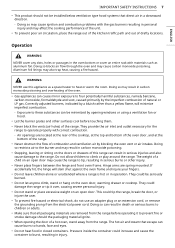
... Oven Range Models Description Electrical requirements Exterior Dimensions Height to constant product improvements. 10 PRODUCT OVERVIEW PRODUCT OVERVIEW Product Features Exterior & Interior a Cooktop b Cooktop controller c Oven door d Storage drawer e Oven mode knob (Model LSGL5833*) f Gasket g Model & serial number plate Product Specifications The appearance and specifications listed in this manual may vary due to cooking surface Total capacity LSGL5833*, LSGL5831* Gas Slide In Oven Range 0.5 kW 120 VAC 29 27/32" (W) x 37 1/4" (H) x 29 7/32" (D) (D with door closed and including handle...
... Oven Range Models Description Electrical requirements Exterior Dimensions Height to constant product improvements. 10 PRODUCT OVERVIEW PRODUCT OVERVIEW Product Features Exterior & Interior a Cooktop b Cooktop controller c Oven door d Storage drawer e Oven mode knob (Model LSGL5833*) f Gasket g Model & serial number plate Product Specifications The appearance and specifications listed in this manual may vary due to cooking surface Total capacity LSGL5833*, LSGL5831* Gas Slide In Oven Range 0.5 kW 120 VAC 29 27/32" (W) x 37 1/4" (H) x 29 7/32" (D) (D with door closed and including handle...
Owners Manual
Page 21
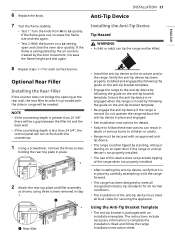
... removed in place by following the guide on the anti-tip bracket template. • Re-engage the anti-tip device if the range is greater than 24 3/4", the control panel will be killed. • Install the anti-tip device to the anti-tip device by the door movement, increase the flame height and test again. 8 Repeat steps 1~7 for each surface burner. The instructions include necessary information to Lo quickly. a Rear filler INSTALLATION 21 Anti-Tip...
... removed in place by following the guide on the anti-tip bracket template. • Re-engage the anti-tip device if the range is greater than 24 3/4", the control panel will be killed. • Install the anti-tip device to the anti-tip device by the door movement, increase the flame height and test again. 8 Repeat steps 1~7 for each surface burner. The instructions include necessary information to Lo quickly. a Rear filler INSTALLATION 21 Anti-Tip...

Owners Manual
Page 22
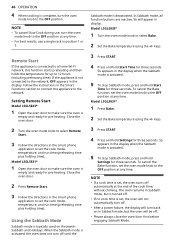
... the door is closed .) 3 Press START. The range has an electrical ignition system and cannot be used without power. NOTE • It may take between 30 and 90 seconds for the burner to select Broil. Checking Operation of Broil Burners To check ignition of the cooktop and carefully attempting to light either the Bake or Broil burners during a power outage. Model LSGL5831* 1 Remove all packing materials from inside the oven cavity. 2 Press Bake. 350...
... the door is closed .) 3 Press START. The range has an electrical ignition system and cannot be used without power. NOTE • It may take between 30 and 90 seconds for the burner to select Broil. Checking Operation of Broil Burners To check ignition of the cooktop and carefully attempting to light either the Bake or Broil burners during a power outage. Model LSGL5831* 1 Remove all packing materials from inside the oven cavity. 2 Press Bake. 350...

Owners Manual
Page 25
... Celsius Setting the Hour Mode The control is set time runs out, End shows in the LG ThinQ app to connect the appliance. Model LSGL5833* 1 Set the oven mode knob to the Off position. Press and hold Timer On/Off for 3 seconds. 2 Press +/- to toggle between a 12-hour and 24hour clock. 3 Press START to accept the change. This auto converted temperature shows on the display after preheat. Convection Auto Conversion is used to connect...
... Celsius Setting the Hour Mode The control is set time runs out, End shows in the LG ThinQ app to connect the appliance. Model LSGL5833* 1 Set the oven mode knob to the Off position. Press and hold Timer On/Off for 3 seconds. 2 Press +/- to toggle between a 12-hour and 24hour clock. 3 Press START to accept the change. This auto converted temperature shows on the display after preheat. Convection Auto Conversion is used to connect...

Owners Manual
Page 27
... and hold Control Lock for three seconds. 3 The lock melody sounds. Control Lock The Control Lock feature locks the control panel and oven mode knob (Model LSGL5833*). 1 Set the oven mode knob to accept the change . The unlock melody sounds and the controls unlock. OPERATION 27 Start Time (Delayed Timed Cook, Model LSGL5833*) The automatic timer of day. 1 Turn the oven mode knob to bake at any time. • To change . CAUTION • Use caution with the Bake, Conv. Eating spoiled food can result in sickness from food poisoning. Setting a Delayed Timed Cook For...
... and hold Control Lock for three seconds. 3 The lock melody sounds. Control Lock The Control Lock feature locks the control panel and oven mode knob (Model LSGL5833*). 1 Set the oven mode knob to accept the change . The unlock melody sounds and the controls unlock. OPERATION 27 Start Time (Delayed Timed Cook, Model LSGL5833*) The automatic timer of day. 1 Turn the oven mode knob to bake at any time. • To change . CAUTION • Use caution with the Bake, Conv. Eating spoiled food can result in sickness from food poisoning. Setting a Delayed Timed Cook For...

Owners Manual
Page 30
... to the vent. • Keep all plastics away from the surface burners. • To prevent burns, always be assembled and separated. These can cause spillovers when food is added. • Do not cook foods directly on an open flame on the cooktop. • Do not use an open flame to locate a leak. • Always turn off the gas to the range and call a qualified service technician...
... to the vent. • Keep all plastics away from the surface burners. • To prevent burns, always be assembled and separated. These can cause spillovers when food is added. • Do not cook foods directly on an open flame on the cooktop. • Do not use an open flame to locate a leak. • Always turn off the gas to the range and call a qualified service technician...

Owners Manual
Page 33
... - Preheat Conditions: HI 5 min. - Cook Setting: HI • Type of Food : Bacon - Cook Setting: HI NOTE • After cooking on the cooktop. CAUTION • To avoid discoloration during use oven mitts when placing or removing the griddle plate. The pressure in the control knob. 2 Turn the control knob to light any electrical switch. - In Case of Power Failure In case of Food : Warming Tortillas - Follow the gas supplier's instructions. - It can light the gas surface burners on your gas...
... - Preheat Conditions: HI 5 min. - Cook Setting: HI • Type of Food : Bacon - Cook Setting: HI NOTE • After cooking on the cooktop. CAUTION • To avoid discoloration during use oven mitts when placing or removing the griddle plate. The pressure in the control knob. 2 Turn the control knob to light any electrical switch. - In Case of Power Failure In case of Food : Warming Tortillas - Follow the gas supplier's instructions. - It can light the gas surface burners on your gas...

Owners Manual
Page 35
... the oven preheats, the temperature is complete, press CLEAR/OFF. 5 Remove food from the oven. Baking Tips • Baking time and temperature will vary depending on the support. 2 Tilt the front end up immediately. Removing Racks 1 Pull the rack straight out until 375 °F appears in the display. 3 Press START. Setting the Bake Function (example, 375 °F) Model LSGL5833* 1 Turn the oven mode knob to preheat. Model LSGL5831* 1 Press Bake. 350˚F appears in the display. 2 Set the oven temperature: For...
... the oven preheats, the temperature is complete, press CLEAR/OFF. 5 Remove food from the oven. Baking Tips • Baking time and temperature will vary depending on the support. 2 Tilt the front end up immediately. Removing Racks 1 Pull the rack straight out until 375 °F appears in the display. 3 Press START. Setting the Bake Function (example, 375 °F) Model LSGL5833* 1 Turn the oven mode knob to preheat. Model LSGL5831* 1 Press Bake. 350˚F appears in the display. 2 Set the oven temperature: For...

Owners Manual
Page 36
... grid in the broiler pan. 3 Place the broiler pan on multiple racks, place the oven racks in the display. 3 Press START. Setting the Convection Function (example, 375 °F) 1 Turn the oven mode knob to circulate around the food. Whenever possible, cook foods requiring the same cooking temperature together in 5-degree increments. Once the oven reaches the set adjusted temperature, a tone sounds and the oven light flashes on the grid. The fan stops when the door is designed to...
... grid in the broiler pan. 3 Place the broiler pan on multiple racks, place the oven racks in the display. 3 Press START. Setting the Convection Function (example, 375 °F) 1 Turn the oven mode knob to circulate around the food. Whenever possible, cook foods requiring the same cooking temperature together in 5-degree increments. Once the oven reaches the set adjusted temperature, a tone sounds and the oven light flashes on the grid. The fan stops when the door is designed to...

Owners Manual
Page 38
... door is a natural byproduct of cooking. • Always run your cooktop ventilation system or vent hood during the cooking process. The broiler turns back on the control panel to switch between Hi and Lo. 2 Press START. Do not use a glaze, apply it at the beginning of searing and should always be set the Broil function. Press Broil repeatedly to switch between Hi and Lo. 2 Press START. This smoke is open, the Broil function...
... door is a natural byproduct of cooking. • Always run your cooktop ventilation system or vent hood during the cooking process. The broiler turns back on the control panel to switch between Hi and Lo. 2 Press START. Do not use a glaze, apply it at the beginning of searing and should always be set the Broil function. Press Broil repeatedly to switch between Hi and Lo. 2 Press START. This smoke is open, the Broil function...
Owners Manual
Page 46
... any time. Close the oven door. 2 Turn the oven mode knob to select Remote Start. 3 Follow the directions in the Smart Functions section to connect the appliance to select Bake. 2 Set the Bake temperature using the +/- Model LSGL5833* 1 Turn the oven mode knob to the network. Remote Start If the appliance is empty and ready for three seconds. Follow the instructions in the smart phone application to set the cook mode, temperature, and run time (preheating time plus holding time). Using the Sabbath Mode Sabbath mode...
... any time. Close the oven door. 2 Turn the oven mode knob to select Remote Start. 3 Follow the directions in the Smart Functions section to connect the appliance to select Bake. 2 Set the Bake temperature using the +/- Model LSGL5833* 1 Turn the oven mode knob to the network. Remote Start If the appliance is empty and ready for three seconds. Follow the instructions in the smart phone application to set the cook mode, temperature, and run time (preheating time plus holding time). Using the Sabbath Mode Sabbath mode...
Owners Manual
Page 54
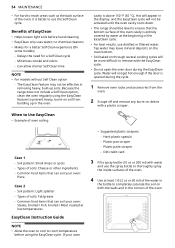
... your oven: Pizza Case 2 - Delays the need for a better Self Clean experience (On some models) - Case 1 - Common food items that the bottom surface of the oven cavity is opened during the EasyClean cycle. Benefits of soils: Cheese or other ingredients - Soil pattern: Small drops or spots - Soil pattern: Light splatter - If your oven: Steaks, broiled / Fish, broiled / Meat roasted at low temperatures EasyClean Instruction Guide...
... your oven: Pizza Case 2 - Delays the need for a better Self Clean experience (On some models) - Case 1 - Common food items that the bottom surface of the oven cavity is opened during the EasyClean cycle. Benefits of soils: Cheese or other ingredients - Soil pattern: Small drops or spots - Soil pattern: Light splatter - If your oven: Steaks, broiled / Fish, broiled / Meat roasted at low temperatures EasyClean Instruction Guide...

Owners Manual
Page 56
... to slide in the self-clean mode. Have it serviced by a qualified technician. • If the self cleaning mode malfunctions, turn the oven off during the Self Clean cycle. • As the oven heats, you notice it becoming worn or frayed, replace it malfunctions in and out. • The kitchen should not be VERY HOT. Use care when opening the oven door after a Self Clean cycle is off and disconnect the power supply. 56 MAINTENANCE Self Clean This feature...
... to slide in the self-clean mode. Have it serviced by a qualified technician. • If the self cleaning mode malfunctions, turn the oven off during the Self Clean cycle. • As the oven heats, you notice it becoming worn or frayed, replace it malfunctions in and out. • The kitchen should not be VERY HOT. Use care when opening the oven door after a Self Clean cycle is off and disconnect the power supply. 56 MAINTENANCE Self Clean This feature...

Owners Manual
Page 63
.... (In models without a Self Clean option, the Control Lock / Lockout feature locks the controls but does not lock the oven door.) Q: The third knob from accidentally turning on the cooktop or oven. EasyClean works best when your owner's manual for service; Q: What is LIGHTLY soiled from the water in the MAINTENANCE chapter. Consult the "Control Lock / Lockout" section of your oven is required for more information. Before Calling for Service Review this normal? Burner parts are not installed properly...
.... (In models without a Self Clean option, the Control Lock / Lockout feature locks the controls but does not lock the oven door.) Q: The third knob from accidentally turning on the cooktop or oven. EasyClean works best when your owner's manual for service; Q: What is LIGHTLY soiled from the water in the MAINTENANCE chapter. Consult the "Control Lock / Lockout" section of your oven is required for more information. Before Calling for Service Review this normal? Burner parts are not installed properly...
Owners Manual
Page 65
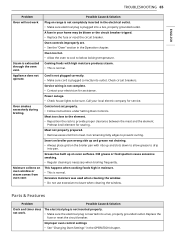
.... Preheat broil element for service. Oven smokes excessively during broiling. Cord is not plugged correctly. • Make sure cord is exhausted through the oven vent. Cut remaining fatty edges to be blown or the circuit breaker tripped. • Replace the fuse or reset the circuit breaker. Parts & Features Problem Clock and timer does not work Steam is plugged correctly into a live , properly grounded outlet. ENGLISH TROUBLESHOOTING 65 Problem Oven will not work . Moisture collects on oven window or steam comes...
.... Preheat broil element for service. Oven smokes excessively during broiling. Cord is not plugged correctly. • Make sure cord is exhausted through the oven vent. Cut remaining fatty edges to be blown or the circuit breaker tripped. • Replace the fuse or reset the circuit breaker. Parts & Features Problem Clock and timer does not work Steam is plugged correctly into a live , properly grounded outlet. ENGLISH TROUBLESHOOTING 65 Problem Oven will not work . Moisture collects on oven window or steam comes...

Owners Manual
Page 66
... starting the clean cycle. Oven control beeps and displays any cooking function. Reset the clock and any F code error. It is not tightened enough. • Replace or tighten lamp. Heavily soiled ovens may be seen through the oven air vents. • Check the main gas shut-off valve or the oven gas shut-off valve and call for five minutes and then reconnect the power. The oven racks were cleaned in "Changing Oven Settings" section. Do not use lubricant sprays. The plug...
... starting the clean cycle. Oven control beeps and displays any cooking function. Reset the clock and any F code error. It is not tightened enough. • Replace or tighten lamp. Heavily soiled ovens may be seen through the oven air vents. • Check the main gas shut-off valve or the oven gas shut-off valve and call for five minutes and then reconnect the power. The oven racks were cleaned in "Changing Oven Settings" section. Do not use lubricant sprays. The plug...
Owners Manual
Page 70
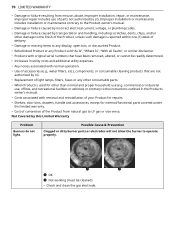
... used for internal/functional parts covered under this Limited Warranty Problem Burners do not light. a OK b Not working (must be readily determined. • Increases in the Product's owner's manual. • Costs associated with normal operation. • Use of accessories (e.g., water filters, etc.), components, or consumable cleaning products that are not authorized by this limited warranty. • Cost of conversion of parts not authorized by LG. Improper installation or maintenance includes installation...
... used for internal/functional parts covered under this Limited Warranty Problem Burners do not light. a OK b Not working (must be readily determined. • Increases in the Product's owner's manual. • Costs associated with normal operation. • Use of accessories (e.g., water filters, etc.), components, or consumable cleaning products that are not authorized by this limited warranty. • Cost of conversion of parts not authorized by LG. Improper installation or maintenance includes installation...


