

Instruction Manual
Page 3
... 27 Check / Fill Transmission Oil Level 27 Transmission Oil Filter Change 27 Purging the Air from the Hydraulic System 28 Lubrication 28 Servicing the Mower Blades 29 Seat And Ground Speed Control Lever Adjustments..... 31 Checking Tire Pressures 32 Cutting Height Adjustment 32 Floor Pan Removal and Installation 32 Neutral Adjustment 33 Suspension Adjustment 33 Parking Brake Adjustment 33 Mower Deck Removal and Installation 33 Deck Leveling Adjustment 34 Deck Lift Assist Spring 35 Mower Deck Drive Belt Replacement 35 Transmission Drive Belt Replacement 36 Battery Maintenance...
... 27 Check / Fill Transmission Oil Level 27 Transmission Oil Filter Change 27 Purging the Air from the Hydraulic System 28 Lubrication 28 Servicing the Mower Blades 29 Seat And Ground Speed Control Lever Adjustments..... 31 Checking Tire Pressures 32 Cutting Height Adjustment 32 Floor Pan Removal and Installation 32 Neutral Adjustment 33 Suspension Adjustment 33 Parking Brake Adjustment 33 Mower Deck Removal and Installation 33 Deck Leveling Adjustment 34 Deck Lift Assist Spring 35 Mower Deck Drive Belt Replacement 35 Transmission Drive Belt Replacement 36 Battery Maintenance...
Instruction Manual
Page 7
.... See attachment or accessory manual or contact your authorized STIHL servicing dealer. • Do not put hands or feet near blade(s). • When leaving machine, shut off, remove key, and set parking brake. This mowing deck is responsible for information on the unit, engine, and attachments before you operate this unit. • Failure to read English it is misused, or not properly maintained, it is the owner...
.... See attachment or accessory manual or contact your authorized STIHL servicing dealer. • Do not put hands or feet near blade(s). • When leaving machine, shut off, remove key, and set parking brake. This mowing deck is responsible for information on the unit, engine, and attachments before you operate this unit. • Failure to read English it is misused, or not properly maintained, it is the owner...

Instruction Manual
Page 8
... starting engine. They may ricochet back towards the operator. Safe operating techniques, an explanation of the product's features and controls, and maintenance information is engaged before changing directions and while backing. • Do not direct discharge material toward anyone . The LED lights supplied with safe unit operation. Exhaust gases contain carbon monoxide, a deadly poison. • Be sure all safety precautions. Stop the blade...
... starting engine. They may ricochet back towards the operator. Safe operating techniques, an explanation of the product's features and controls, and maintenance information is engaged before changing directions and while backing. • Do not direct discharge material toward anyone . The LED lights supplied with safe unit operation. Exhaust gases contain carbon monoxide, a deadly poison. • Be sure all safety precautions. Stop the blade...

Instruction Manual
Page 9
... make sudden changes in place and working. Make necessary repairs before leaving the operator's position for any condition where traction, steering, or stability is equipped with the discharge deflector raised, removed or altered, unless using a grass catcher. • Stop on level ground, disengage the PTO, engage the parking brake, shut off the engine before resuming operations. • Keep hands and feet away from the blades. • Turn off the PTO switch to...
... make sudden changes in place and working. Make necessary repairs before leaving the operator's position for any condition where traction, steering, or stability is equipped with the discharge deflector raised, removed or altered, unless using a grass catcher. • Stop on level ground, disengage the PTO, engage the parking brake, shut off the engine before resuming operations. • Keep hands and feet away from the blades. • Turn off the PTO switch to...

Instruction Manual
Page 11
...'s warranty. 11 Always place containers on the ground away from your unit. Replace all worn or damaged parts. • Never tamper with a shop towel or wear gloves, and use insulated tools. • Grass catcher components are extremely flammable. Check their proper operation regularly. • Disengage the PTO, set the parking brake, stop before adjusting, cleaning, or repairing. • Clean grass and debris from mower deck, drives, mufflers, and engine to , or drain fuel...
...'s warranty. 11 Always place containers on the ground away from your unit. Replace all worn or damaged parts. • Never tamper with a shop towel or wear gloves, and use insulated tools. • Grass catcher components are extremely flammable. Check their proper operation regularly. • Disengage the PTO, set the parking brake, stop before adjusting, cleaning, or repairing. • Clean grass and debris from mower deck, drives, mufflers, and engine to , or drain fuel...

Instruction Manual
Page 13
...; Parking brake is the slope of your lawn. Note: Once the engine has stopped, the PTO switch must be turned off, the parking brake must be engaged, and the ground speed control levers must be locked in the NEUTRAL position after electric PTO switch is not in your authorized STIHL servicing dealer. Dial type (C) or digital type (D) work, others may not. Note: A paper gauge slope identification guide is engaged, AND; • Ground speed control levers...
...; Parking brake is the slope of your lawn. Note: Once the engine has stopped, the PTO switch must be turned off, the parking brake must be engaged, and the ground speed control levers must be locked in the NEUTRAL position after electric PTO switch is not in your authorized STIHL servicing dealer. Dial type (C) or digital type (D) work, others may not. Note: A paper gauge slope identification guide is engaged, AND; • Ground speed control levers...

Instruction Manual
Page 14
...H. Ground Speed Control Levers O. Move the throttle forward to increase engine speed and back to use of the mower deck. Always operate at FULL throttle when mowing. PTO (Power Take Off) Switch F. Zero-Turn Riding Mower Controls Deck Lift Pedal, Cutting Height Adjustment Pin, and Deck Lift Lock Lever: These controls are used to adjust the cutting height of several controls applied in specific sequences. Parking Brake E. Transmission Oil Fill / Tanks (One per transmission) J. Dual USB Charging Port M. Throttle Control: The throttle controls engine speed. Slow throttle speed. 14...
...H. Ground Speed Control Levers O. Move the throttle forward to increase engine speed and back to use of the mower deck. Always operate at FULL throttle when mowing. PTO (Power Take Off) Switch F. Zero-Turn Riding Mower Controls Deck Lift Pedal, Cutting Height Adjustment Pin, and Deck Lift Lock Lever: These controls are used to adjust the cutting height of several controls applied in specific sequences. Parking Brake E. Transmission Oil Fill / Tanks (One per transmission) J. Dual USB Charging Port M. Throttle Control: The throttle controls engine speed. Slow throttle speed. 14...

Instruction Manual
Page 15
...: Fuel Tank Cap: To remove the cap, turn riding mower. PTO (Power Take Off) Switch: The PTO switch engages and disengages the mower blades. Open the choke once the engine starts. Seat Adjustment Hardware: The position of the seat can be adjusted forwards or backwards to meet the comfort needs of the zero-turn counter-clockwise. The left lever controls the left rear drive wheel and the right lever controls the right rear drive wheel. 6 OFF: Stops the engine and shuts off the electrical system. Ignition Switch: The ignition switch starts and stops the engine...
...: Fuel Tank Cap: To remove the cap, turn riding mower. PTO (Power Take Off) Switch: The PTO switch engages and disengages the mower blades. Open the choke once the engine starts. Seat Adjustment Hardware: The position of the seat can be adjusted forwards or backwards to meet the comfort needs of the zero-turn counter-clockwise. The left lever controls the left rear drive wheel and the right lever controls the right rear drive wheel. 6 OFF: Stops the engine and shuts off the electrical system. Ignition Switch: The ignition switch starts and stops the engine...

Instruction Manual
Page 17
... the engine and zero-turn riding mower free of grass, leaves, and excess grease. Set the engine throttle control to engine operator's manual for any spills. Insert the key into the ignition switch and turn riding mower on the crankcase oil fill and dipstick. Warm up any reason, engage the parking brake, disengage the PTO, stop on the PTO switch. 3. Use this zero-turn it to travel forward to the lock position. 4. For normal engine shut down on a slope. Disengage the PTO by simply turning the ignition switch...
... the engine and zero-turn riding mower free of grass, leaves, and excess grease. Set the engine throttle control to engine operator's manual for any spills. Insert the key into the ignition switch and turn riding mower on the crankcase oil fill and dipstick. Warm up any reason, engage the parking brake, disengage the PTO, stop on the PTO switch. 3. Use this zero-turn it to travel forward to the lock position. 4. For normal engine shut down on a slope. Disengage the PTO by simply turning the ignition switch...

Instruction Manual
Page 21
... the lawn surface. Mulching Mulching consists of grass in the spring. The long grass blades, quick growth, and often wetter conditions are mowing too fast, use a slower ground speed. Since mulching requires more suitable for proper mulching operation. We recommend that the grass be finely cut . Towing the unit will be dry and the appropriate amount is matched to cut . Disengage the PTO, engage the parking brake, turn the ignition switch to push or pull this...
... the lawn surface. Mulching Mulching consists of grass in the spring. The long grass blades, quick growth, and often wetter conditions are mowing too fast, use a slower ground speed. Since mulching requires more suitable for proper mulching operation. We recommend that the grass be finely cut . Towing the unit will be dry and the appropriate amount is matched to cut . Disengage the PTO, engage the parking brake, turn the ignition switch to push or pull this...
Instruction Manual
Page 24
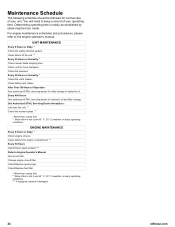
... 8 Hours or Daily. * Check the safety interlock system. Clean battery and cables. Every 400 Hours See authorized STIHL servicing dealer for hydraulic oil and filter change of Operation See authorized STIHL servicing dealer for initial change . Service air filter. Check/Replace spark plugs. For engine maintenance schedules and procedures, please refer to Engine Operator's Manual. Clean debris off the unit. ** Every 25 Hours or Annually. * Check mower blade stopping time. Check unit for loose hardware. After First 100 Hours of...
... 8 Hours or Daily. * Check the safety interlock system. Clean battery and cables. Every 400 Hours See authorized STIHL servicing dealer for hydraulic oil and filter change of Operation See authorized STIHL servicing dealer for initial change . Service air filter. Check/Replace spark plugs. For engine maintenance schedules and procedures, please refer to Engine Operator's Manual. Clean debris off the unit. ** Every 25 Hours or Annually. * Check mower blade stopping time. Check unit for loose hardware. After First 100 Hours of...
Instruction Manual
Page 25
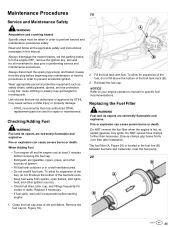
... disengage the mower blades, set the parking brake, turn the engine OFF, remove the ignition key, and wait for all cigarettes, cigars, pipes, and other ignition sources. • Check fuel lines, tank, cap, and fittings frequently for specific fuel recommendations. Use of dirt and debris. Remove the fuel cap (A, Figure 19). 25 Wear appropriate personal protective equipment such as spilled gasoline may ignite. Checking/Adding Fuel WARNING Fuel and its vapors are extremely flammable and explosive. Replacing the Fuel Filter...
... disengage the mower blades, set the parking brake, turn the engine OFF, remove the ignition key, and wait for all cigarettes, cigars, pipes, and other ignition sources. • Check fuel lines, tank, cap, and fittings frequently for specific fuel recommendations. Use of dirt and debris. Remove the fuel cap (A, Figure 19). 25 Wear appropriate personal protective equipment such as spilled gasoline may ignite. Checking/Adding Fuel WARNING Fuel and its vapors are extremely flammable and explosive. Replacing the Fuel Filter...

Instruction Manual
Page 26
.... Changing the Engine Oil and Filter This series of oil in the fill tube (E) and check the amount of mower is retained during normal operation. 5. Add engine oil (refer to engine operator's manual) in the engine using the engine oil dipstick (F). 7. Remove the oil drain hose (A, Figure 21) from the fuel filter. 4. Remove hoses from the oil drain hose and drain the engine oil. 4. Connect the negative battery cable when finished. Using the appropriate tools, remove the oil drain cap from filter. 5. Place an absorbent shop cloth under the oil drain hose to...
.... Changing the Engine Oil and Filter This series of oil in the fill tube (E) and check the amount of mower is retained during normal operation. 5. Add engine oil (refer to engine operator's manual) in the engine using the engine oil dipstick (F). 7. Remove the oil drain hose (A, Figure 21) from the fuel filter. 4. Remove hoses from the oil drain hose and drain the engine oil. 4. Connect the negative battery cable when finished. Using the appropriate tools, remove the oil drain cap from filter. 5. Place an absorbent shop cloth under the oil drain hose to...

Instruction Manual
Page 27
... oil and filter change after first 100 hours of the unit and near the muffler. 1. Carefully inspect the screen for the circuit, amperage, and approximate location of the tank is equipped with replaceable fuse(s). See the chart below this unit is cool before working around the tank cap and fill neck of the fuses. See Purging the Air from operating properly. Check / Fill Transmission Oil Level...
... oil and filter change after first 100 hours of the unit and near the muffler. 1. Carefully inspect the screen for the circuit, amperage, and approximate location of the tank is equipped with replaceable fuse(s). See the chart below this unit is cool before working around the tank cap and fill neck of the fuses. See Purging the Air from operating properly. Check / Fill Transmission Oil Level...

Instruction Manual
Page 28
... operation. • High operation temperature and excessive expansion of the bypass valves), start the engine, release the parking brake, and slowly move the unit's ground speed control levers in an area free of air in the following figures as well as the lubrication points listed below. Stop the engine. It may be: • Noisy operation. • Lack of power or drive after lubrication. 24 Purging Air from the unit, the oil level...
... operation. • High operation temperature and excessive expansion of the bypass valves), start the engine, release the parking brake, and slowly move the unit's ground speed control levers in an area free of air in the following figures as well as the lubrication points listed below. Stop the engine. It may be: • Noisy operation. • Lack of power or drive after lubrication. 24 Purging Air from the unit, the oil level...
Instruction Manual
Page 33
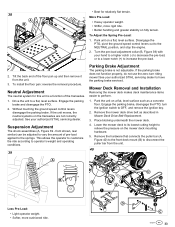
... from the unit. 40 Less Pre-Load: • Light operator weight. • Softer, more rigid ride. • Better handling and greater stability on the mower deck mounting hardware. 5. Engage the parking brake, disengage the PTO, turn riding mower! Remove the mower deck drive belt as a concrete floor. To Adjust the Spring Pre-Load: 1. See your authorized STIHL servicing dealer. front shown, rear similar) can be adjusted to operator's weight and operating conditions. 39 Parking Brake Adjustment The parking brake is a function of the transaxles. 1.
... from the unit. 40 Less Pre-Load: • Light operator weight. • Softer, more rigid ride. • Better handling and greater stability on the mower deck mounting hardware. 5. Engage the parking brake, disengage the PTO, turn riding mower! Remove the mower deck drive belt as a concrete floor. To Adjust the Spring Pre-Load: 1. See your authorized STIHL servicing dealer. front shown, rear similar) can be adjusted to operator's weight and operating conditions. 39 Parking Brake Adjustment The parking brake is a function of the transaxles. 1.

Instruction Manual
Page 34
... mower deck. 11. Slide the mower deck out from the unit. 7. Blades are facing front-to the 4" (10,2 cm) cutting height. 3. Place a 1/4" (0,64 cm) thick spacer on a flat, level surface such as a concrete floor. Verify that the tires pressures are correct. 34 stihlusa.com Engage the parking brake, disengage the PTO, turn the ignition switch to the ground. 8. Remove all four measurements are correct. • Front: 25 psi (1,72 bar...
... mower deck. 11. Slide the mower deck out from the unit. 7. Blades are facing front-to the 4" (10,2 cm) cutting height. 3. Place a 1/4" (0,64 cm) thick spacer on a flat, level surface such as a concrete floor. Verify that the tires pressures are correct. 34 stihlusa.com Engage the parking brake, disengage the PTO, turn the ignition switch to the ground. 8. Remove all four measurements are correct. • Front: 25 psi (1,72 bar...

Instruction Manual
Page 35
.... Disengage the PTO, engage the parking brake, turn the ignition switch to the mower deck drive belt. 4. Carefully release the tension on the breaker bar. 8. Remove the old belt and replace with the breaker bar, due to provide optimal lifting performance. 43 Although it is fastened with a multi-position anchor, this is under tension. 3. Carefully rotate the breaker bar clockwise and install the belt on the PTO pulley, the spindle pulleys (D), the front stationary idler pulley...
.... Disengage the PTO, engage the parking brake, turn the ignition switch to the mower deck drive belt. 4. Carefully release the tension on the breaker bar. 8. Remove the old belt and replace with the breaker bar, due to provide optimal lifting performance. 43 Although it is fastened with a multi-position anchor, this is under tension. 3. Carefully rotate the breaker bar clockwise and install the belt on the PTO pulley, the spindle pulleys (D), the front stationary idler pulley...
Instruction Manual
Page 36
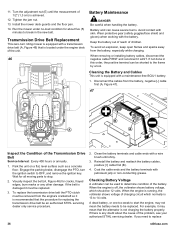
... mower deck guards and the floor pan. 14. Battery acid can be replaced. When removing or installing battery cables, disconnect the negative cable FIRST and reconnect it must be replaced. 3. Engage the parking brake, disengage the PTO, turn riding mower is equipped with a maintenance-free BCIU1 battery. 1. Wait for replacing the transmission drive belt be 12 volts. To replace the transmission drive belt the PTO clutch must be removed from the engine's crankshaft so it may not mean that the procedure for all moving parts...
... mower deck guards and the floor pan. 14. Battery acid can be replaced. When removing or installing battery cables, disconnect the negative cable FIRST and reconnect it must be replaced. 3. Engage the parking brake, disengage the PTO, turn riding mower is equipped with a maintenance-free BCIU1 battery. 1. Wait for replacing the transmission drive belt be 12 volts. To replace the transmission drive belt the PTO clutch must be removed from the engine's crankshaft so it may not mean that the procedure for all moving parts...
Instruction Manual
Page 38
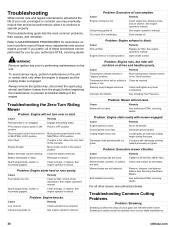
... thin strips of uncut grass are loose. WARNING Remove ignition key prior to performing maintenance on how to MAINTENANCE PROCEDURES for you by operator error or poor blade maintenance. 38 stihlusa.com Troubleshooting the Zero-Turn Riding Mower Problem: Engine will not raise. Cause Remedy Parking brake is too fast. Place in crankcase. Move choke control to cool, then fill the fuel tank. Battery terminals require cleaning. Check choke adjustment. Problem: Engine knocks. See engine operator's manual. Drain excess oil. Transmission drive belt or pulleys is in NEUTRAL...
... thin strips of uncut grass are loose. WARNING Remove ignition key prior to performing maintenance on how to MAINTENANCE PROCEDURES for you by operator error or poor blade maintenance. 38 stihlusa.com Troubleshooting the Zero-Turn Riding Mower Problem: Engine will not raise. Cause Remedy Parking brake is too fast. Place in crankcase. Move choke control to cool, then fill the fuel tank. Battery terminals require cleaning. Check choke adjustment. Problem: Engine knocks. See engine operator's manual. Drain excess oil. Transmission drive belt or pulleys is in NEUTRAL...


