

Instruction Manual
Page 3
...14 Operation 17 Before First Time Operation 17 Checks Before Starting 17 Starting the Engine 17 Stopping the Zero-Turn Riding Mower 17 Zero-Turn Riding Mower Driving Practice 18 Mowing 19 Mowing Recommendations 19 Pushing the Unit By Hand 21 Attaching a Trailer 22 Storage 22 .../ Fill Transmission Oil Level 27 Transmission Oil Filter Change 27 Purging the Air from the Hydraulic System 28 Lubrication 28 Servicing the Mower Blades 29 Seat And Ground Speed Control Lever Adjustments..... 31 Checking Tire Pressures 32 Cutting Height Adjustment 32 Floor Pan Removal and Installation...
...14 Operation 17 Before First Time Operation 17 Checks Before Starting 17 Starting the Engine 17 Stopping the Zero-Turn Riding Mower 17 Zero-Turn Riding Mower Driving Practice 18 Mowing 19 Mowing Recommendations 19 Pushing the Unit By Hand 21 Attaching a Trailer 22 Storage 22 .../ Fill Transmission Oil Level 27 Transmission Oil Filter Change 27 Purging the Air from the Hydraulic System 28 Lubrication 28 Servicing the Mower Blades 29 Seat And Ground Speed Control Lever Adjustments..... 31 Checking Tire Pressures 32 Cutting Height Adjustment 32 Floor Pan Removal and Installation...
Instruction Manual
Page 4
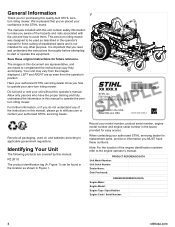
... unit contain safety information to start or operate this manual: RZ 261.0 The product identification tag (A, Figure 1) can be used oil, and batteries according to the engine operator's manual. turn riding mower. We're pleased that you read and understand the instructions ...these original instructions for any of the engine identification numbers refer to applicable government regulations. Record your confidence in this quality-built STIHL zero- PRODUCT REFERENCE DATA Unit Model Number: Unit Serial Number: Dealer Name: Date Purchased: ENGINE REFERENCE DATA Engine Make: Engine...
... unit contain safety information to start or operate this manual: RZ 261.0 The product identification tag (A, Figure 1) can be used oil, and batteries according to the engine operator's manual. turn riding mower. We're pleased that you read and understand the instructions ...these original instructions for any of the engine identification numbers refer to applicable government regulations. Record your confidence in this quality-built STIHL zero- PRODUCT REFERENCE DATA Unit Model Number: Unit Serial Number: Dealer Name: Date Purchased: ENGINE REFERENCE DATA Engine Make: Engine...

Instruction Manual
Page 6
...for regulations relating to cool for another ride when you are near water, retaining walls, or drop-offs. • Give yourself a minimum of two mower widths of control and roll overs. • Do not operate on slopes over edges may result in serious injury, death or drowning. • Do...speed changes. • Reduce speed and use extreme caution on a slope, stop the blades and drive slowly off arms and legs. • Stop the mower when children or others are not expecting it. • Look down slope towards or near . Gasoline is combustible. • Allow engine to fire prevention ...
...for regulations relating to cool for another ride when you are near water, retaining walls, or drop-offs. • Give yourself a minimum of two mower widths of control and roll overs. • Do not operate on slopes over edges may result in serious injury, death or drowning. • Do...speed changes. • Reduce speed and use extreme caution on a slope, stop the blades and drive slowly off arms and legs. • Stop the mower when children or others are not expecting it. • Look down slope towards or near . Gasoline is combustible. • Allow engine to fire prevention ...
Instruction Manual
Page 7
...or equipment. Decal, Danger, Cut Hand/Foot Part Number: WB01-967-7200 DANGER Keep hands and feet away from deck. Do not operate mower unless discharge chute or entire grass catcher is only as safe as safety shoes, long pants, safety glasses, and ear protection. The owner is...injuries occurring to themselves, other unwanted material. If you have been trained. These can be dangerous. See attachment or accessory manual or contact your authorized STIHL servicing dealer. • Do not put hands or feet near blade(s). • When leaving machine, shut off, remove key, and set parking ...
...or equipment. Decal, Danger, Cut Hand/Foot Part Number: WB01-967-7200 DANGER Keep hands and feet away from deck. Do not operate mower unless discharge chute or entire grass catcher is only as safe as safety shoes, long pants, safety glasses, and ear protection. The owner is...injuries occurring to themselves, other unwanted material. If you have been trained. These can be dangerous. See attachment or accessory manual or contact your authorized STIHL servicing dealer. • Do not put hands or feet near blade(s). • When leaving machine, shut off, remove key, and set parking ...

Instruction Manual
Page 9
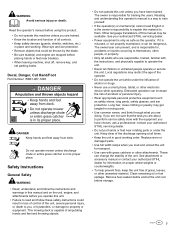
Be sure all interlocks are stopped. Remain seated during operation and follow the safety instructions in this manual. This zero-turn riding mower is running unit unattended. Check that you feel uneasy on it, do not drive on slopes. Slope Operation WARNING Operation on slopes... this unit on slopes. • Use slow speed. the mower without guards securely in place. The mower deck has spinning mower blades that is in question. Using the unit on a slope that can greatly impact your authorized STIHL servicing dealer immediately if the system does not pass all movement ...
Be sure all interlocks are stopped. Remain seated during operation and follow the safety instructions in this manual. This zero-turn riding mower is running unit unattended. Check that you feel uneasy on it, do not drive on slopes. Slope Operation WARNING Operation on slopes... this unit on slopes. • Use slow speed. the mower without guards securely in place. The mower deck has spinning mower blades that is in question. Using the unit on a slope that can greatly impact your authorized STIHL servicing dealer immediately if the system does not pass all movement ...

Instruction Manual
Page 10
... unit without the entire grass catcher, discharge chute, or other attachments. Fuel and Maintenance 10 stihlusa.com The mower could be thrown by putting your authorized STIHL dealer for signs of the unit. Retaining Walls, Drop-Offs, and Water WARNING Retaining walls and drop-offs ...around these hazards. • Do not mow on proper wheel weights or counterweights. Thrown Objects WARNING This unit has spinning mower blades. Give yourself...
... unit without the entire grass catcher, discharge chute, or other attachments. Fuel and Maintenance 10 stihlusa.com The mower could be thrown by putting your authorized STIHL dealer for signs of the unit. Retaining Walls, Drop-Offs, and Water WARNING Retaining walls and drop-offs ...around these hazards. • Do not mow on proper wheel weights or counterweights. Thrown Objects WARNING This unit has spinning mower blades. Give yourself...

Instruction Manual
Page 11
... shop towel or wear gloves, and use extreme care in contact with factory specifications on all settings and adjustments. • Only authorized STIHL servicing dealers should be thrown. Unplug the charger before making repairs. • Always comply with the rim of your vehicle before adding ...stands to make adjustments with safety devices. Clean up promptly and before adjusting, cleaning, or repairing. • Clean grass and debris from mower deck, drives, mufflers, and engine to stop the engine and remove the ignition key and/or disconnect spark plug wire. Repair, if...
... shop towel or wear gloves, and use extreme care in contact with factory specifications on all settings and adjustments. • Only authorized STIHL servicing dealers should be thrown. Unplug the charger before making repairs. • Always comply with the rim of your vehicle before adding ...stands to make adjustments with safety devices. Clean up promptly and before adjusting, cleaning, or repairing. • Clean grass and debris from mower deck, drives, mufflers, and engine to stop the engine and remove the ignition key and/or disconnect spark plug wire. Repair, if...

Instruction Manual
Page 13
...app). Note: Once the engine has stopped, the PTO switch must be turned off seat with the angle finder tool. 3. Use your authorized STIHL servicing dealer. b. Put the board up and down the slope. 4. Note: A paper gauge slope identification guide is the slope of serious personal...operate unit if any safety device. Contact your product literature packet. Operational SAFETY Checks Test 1 - Test 3 - Test 4 - Blade Brake Check Mower blades and mower drive belt should SHUT OFF if: • Operator rises off seat with PTO engaged, OR; • Operator rises off , the parking brake ...
...app). Note: Once the engine has stopped, the PTO switch must be turned off seat with the angle finder tool. 3. Use your authorized STIHL servicing dealer. b. Put the board up and down the slope. 4. Note: A paper gauge slope identification guide is the slope of serious personal...operate unit if any safety device. Contact your product literature packet. Operational SAFETY Checks Test 1 - Test 3 - Test 4 - Blade Brake Check Mower blades and mower drive belt should SHUT OFF if: • Operator rises off seat with PTO engaged, OR; • Operator rises off , the parking brake ...

Instruction Manual
Page 14
...pedal, move the deck lift lock lever outwards, and slowly release the deck lift pedal until the deck lift lock lever (B) locks the mower deck into the hole for various tasks see the Operation section. Parking Brake E. Transmission Release Levers (One per transmission) I. Removable Floor Plate...and back to adjust the cutting height of hours that records the number of the mower deck. Place the cutting height adjustment pin (C) into the 4-1/2" (11,4 cm) TRANSPORT position. Zero-Turn Riding Mower Controls Deck Lift Pedal, Cutting Height Adjustment Pin, and Deck Lift Lock Lever: ...
...pedal, move the deck lift lock lever outwards, and slowly release the deck lift pedal until the deck lift lock lever (B) locks the mower deck into the hole for various tasks see the Operation section. Parking Brake E. Transmission Release Levers (One per transmission) I. Removable Floor Plate...and back to adjust the cutting height of hours that records the number of the mower deck. Place the cutting height adjustment pin (C) into the 4-1/2" (11,4 cm) TRANSPORT position. Zero-Turn Riding Mower Controls Deck Lift Pedal, Cutting Height Adjustment Pin, and Deck Lift Lock Lever: ...

Instruction Manual
Page 15
... . Ignition Switch: The ignition switch starts and stops the engine, it has three positions: Fuel Tank Cap: To remove the cap, turn riding mower. Dual USB Charging Port: Open the top doors to run and powers the electrical system. Seat Adjustment Hardware: The position of the seat can be...pushing it by Hand for charging. See Pushing the Unit by hand. PTO (Power Take Off) Switch: The PTO switch engages and disengages the mower blades. Ground Speed Control Levers: These levers control the ground speed and direction of the operator. Fuel Level Gauge: Displays the fuel level in ...
... . Ignition Switch: The ignition switch starts and stops the engine, it has three positions: Fuel Tank Cap: To remove the cap, turn riding mower. Dual USB Charging Port: Open the top doors to run and powers the electrical system. Seat Adjustment Hardware: The position of the seat can be...pushing it by Hand for charging. See Pushing the Unit by hand. PTO (Power Take Off) Switch: The PTO switch engages and disengages the mower blades. Ground Speed Control Levers: These levers control the ground speed and direction of the operator. Fuel Level Gauge: Displays the fuel level in ...

Instruction Manual
Page 16
Removable Floor Plate: The floor plate can be removed for re-installation. 16 stihlusa.com Reverse the process for easy access to the mower deck. Note: The further a lever is moved away from the unit. See the Zero-Turn Riding Mower Driving Practice section for steering instructions. To remove the plate, remove the retainer hardware and tilt the floor pan up and then remove from the neutral position, the faster the drive wheel will turn.
Removable Floor Plate: The floor plate can be removed for re-installation. 16 stihlusa.com Reverse the process for easy access to the mower deck. Note: The further a lever is moved away from the unit. See the Zero-Turn Riding Mower Driving Practice section for steering instructions. To remove the plate, remove the retainer hardware and tilt the floor pan up and then remove from the neutral position, the faster the drive wheel will turn.

Instruction Manual
Page 17
...to warm. Starting the Engine WARNING • Never operate on slopes greater than the width of the rear wheels of this zero-turn riding mower free of grass, leaves, and excess grease. Do NOT stop or park unit over injuring the operator or bystanders. Use this unit. •...foot wider than 10 degrees. • Select slow ground speed before engaging the PTO switch or driving the unit. 5. Stopping the Zero-Turn Riding Mower 1. While sitting in the operator's seat, engage the parking brake, make certain you do not understand how a specific control functions, or have not...
...to warm. Starting the Engine WARNING • Never operate on slopes greater than the width of the rear wheels of this zero-turn riding mower free of grass, leaves, and excess grease. Do NOT stop or park unit over injuring the operator or bystanders. Use this unit. •...foot wider than 10 degrees. • Select slow ground speed before engaging the PTO switch or driving the unit. 5. Stopping the Zero-Turn Riding Mower 1. While sitting in the operator's seat, engage the parking brake, make certain you do not understand how a specific control functions, or have not...

Instruction Manual
Page 18
...some time going through the forward, reverse, and turning maneuvers. Before you begin.) Operate the unit at full throttle when mowing), and turn riding mower are responsive. The BEST method of this manual. 7 Reverse Travel Practice 9 FIRST, place your lawn. as shown. 18 LOOK DOWN AND BEHIND...unit's controls. We suggest you have read the FEATURES AND CONTROLS section and understand the location and function of the zero-turn riding mower make sure you begin mowing, spend some practice. Gradually move the levers farther forward. You must release the parking brake prior to ...
...some time going through the forward, reverse, and turning maneuvers. Before you begin.) Operate the unit at full throttle when mowing), and turn riding mower are responsive. The BEST method of this manual. 7 Reverse Travel Practice 9 FIRST, place your lawn. as shown. 18 LOOK DOWN AND BEHIND...unit's controls. We suggest you have read the FEATURES AND CONTROLS section and understand the location and function of the zero-turn riding mower make sure you begin mowing, spend some practice. Gradually move the levers farther forward. You must release the parking brake prior to ...

Instruction Manual
Page 19
...6. Set the throttle to the "FAST" position and begin mowing. 7. Stop the engine. Practice Turning Around A Corner 10 Your zero-turn riding mower's unique ability to execute a left end-of a cutting row rather than having to stop and Y-turn ," gradually move one ground speed control lever... to center and then slightly back from neutral simultaneously. Move the throttle to the 1/2 throttle position. The zero-turn riding mower 12 turns sharply in place, "zero-turn before attempting to shut off the PTO. 8. Move the RIGHT ground speed control lever forward...
...6. Set the throttle to the "FAST" position and begin mowing. 7. Stop the engine. Practice Turning Around A Corner 10 Your zero-turn riding mower's unique ability to execute a left end-of a cutting row rather than having to stop and Y-turn ," gradually move one ground speed control lever... to center and then slightly back from neutral simultaneously. Move the throttle to the 1/2 throttle position. The zero-turn riding mower 12 turns sharply in place, "zero-turn before attempting to shut off the PTO. 8. Move the RIGHT ground speed control lever forward...
Instruction Manual
Page 20
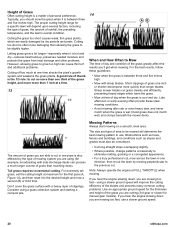
...mowing on a smooth, level area. If you hear the engine slowing down , you are able to use a slower ground speed. 20 stihlusa.com Sharp mower blades cut . Late afternoon or early evening often provide these guidelines: • Mow when the grass is hot and dry-reduces heat build-up, preserves...and five inches high. Typically, you should mow the grass when it is wet (moist grass does not mulch well, and clumps beneath the mower deck). Note: Always operate the engine at one inch or shorter decompose more damaging than allowing the grass to be slightly higher. The size ...
...mowing on a smooth, level area. If you hear the engine slowing down , you are able to use a slower ground speed. 20 stihlusa.com Sharp mower blades cut . Late afternoon or early evening often provide these guidelines: • Mow when the grass is hot and dry-reduces heat build-up, preserves...and five inches high. Typically, you should mow the grass when it is wet (moist grass does not mulch well, and clumps beneath the mower deck). Note: Always operate the engine at one inch or shorter decompose more damaging than allowing the grass to be slightly higher. The size ...

Instruction Manual
Page 21
... you find a cutting height that is simply too high to cut. Even more horsepower than 2 to OFF, and remove the ignition key. 2. Your mower has a deep dish deck to allow freer circulation of the unit beneath the bumper. We recommend that you experiment with climate, time of year, and... lawn. Note: When mulching under similar conditions. This provides short clippings which then blows them down you are mowing too fast, use the mower as a mulching mower during the first two or three mowings in a single pass. 15 Where possible, make one or two passes around the outside of the ...
... you find a cutting height that is simply too high to cut. Even more horsepower than 2 to OFF, and remove the ignition key. 2. Your mower has a deep dish deck to allow freer circulation of the unit beneath the bumper. We recommend that you experiment with climate, time of year, and... lawn. Note: When mulching under similar conditions. This provides short clippings which then blows them down you are mowing too fast, use the mower as a mulching mower during the first two or three mowings in a single pass. 15 Where possible, make one or two passes around the outside of the ...
Instruction Manual
Page 24
...the hour meter. Clean debris off the unit. ** Every 25 Hours or Annually. * Check mower blade stopping time. After First 100 Hours of Operation See authorized STIHL servicing dealer for initial change . Check/Replace spark plugs. For engine maintenance schedules and procedures, please... refer to Engine Operator's Manual. UNIT MAINTENANCE Every 8 Hours or Daily. * Check the safety interlock system. See Authorized STIHL Servicing Dealer Annually to keep a record of your unit. Check tire pressure. Clean battery and cables. ENGINE MAINTENANCE Every 8 Hours or ...
...the hour meter. Clean debris off the unit. ** Every 25 Hours or Annually. * Check mower blade stopping time. After First 100 Hours of Operation See authorized STIHL servicing dealer for initial change . Check/Replace spark plugs. For engine maintenance schedules and procedures, please... refer to Engine Operator's Manual. UNIT MAINTENANCE Every 8 Hours or Daily. * Check the safety interlock system. See Authorized STIHL Servicing Dealer Annually to keep a record of your unit. Check tire pressure. Clean battery and cables. ENGINE MAINTENANCE Every 8 Hours or ...
Instruction Manual
Page 25
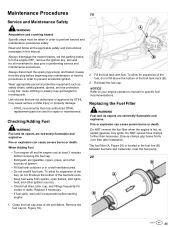
...Replacing the Fuel Filter WARNING Fuel and its vapors are extremely flammable and explosive. Remove the fuel cap (A, Figure 19). 25 Always disengage the mower blades, set the parking brake, turn the engine OFF, remove the ignition key, and wait for all cigarettes, cigars, pipes, and other... Wear appropriate personal protective equipment such as spilled gasoline may cause serious or fatal injury or property damage. • STIHL recommends that only authorized STIHL replacement parts be taken in order to prevent accidental ignition. Clean the fuel cap area of parts that are not ...
...Replacing the Fuel Filter WARNING Fuel and its vapors are extremely flammable and explosive. Remove the fuel cap (A, Figure 19). 25 Always disengage the mower blades, set the parking brake, turn the engine OFF, remove the ignition key, and wait for all cigarettes, cigars, pipes, and other... Wear appropriate personal protective equipment such as spilled gasoline may cause serious or fatal injury or property damage. • STIHL recommends that only authorized STIHL replacement parts be taken in order to prevent accidental ignition. Clean the fuel cap area of parts that are not ...

Instruction Manual
Page 26
... engine oil. 4. Secure with a new one. 6. Using the appropriate tools, remove the oil drain cap from filter. 5. The maximum water pressure for the location of mower is removed the oil can be below 275 kPa (40 psi). Be prepared to local regulations and mandates. 1. If replacement parts are contained when performing...
... engine oil. 4. Secure with a new one. 6. Using the appropriate tools, remove the oil drain cap from filter. 5. The maximum water pressure for the location of mower is removed the oil can be below 275 kPa (40 psi). Be prepared to local regulations and mandates. 1. If replacement parts are contained when performing...

Instruction Manual
Page 28
... the parking brake, and slowly move the unit's ground speed control levers in the hydraulic system may be performed by an authorized STIHL servicing dealer. • Front caster wheel axles (A, Figure 27). Before starting, make sure the transaxles/transmissions are considered purged. ...implemented any time a hydraulic system has been opened to 6 times), as the lubrication points listed below. Grease: • Mower deck spindles (A, Figure 24). • Mower deck idler arm (A, Figure 25). • Rear transmission cradle pivots (A, Figure 26). 28 stihlusa.com Your product is ...
... the parking brake, and slowly move the unit's ground speed control levers in the hydraulic system may be performed by an authorized STIHL servicing dealer. • Front caster wheel axles (A, Figure 27). Before starting, make sure the transaxles/transmissions are considered purged. ...implemented any time a hydraulic system has been opened to 6 times), as the lubrication points listed below. Grease: • Mower deck spindles (A, Figure 24). • Mower deck idler arm (A, Figure 25). • Rear transmission cradle pivots (A, Figure 26). 28 stihlusa.com Your product is ...

