

Owner's Manual
Page 16
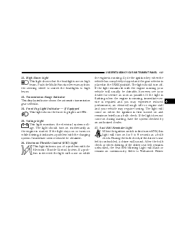
... power door lock switch while the key is in the ignition, and any front door is on each front door trim panel. Use this switch to an unlocked vehicle. If you drive as well as a reminder to operate. This prevents you park and leave the vehicle. • When leaving the vehicle always remove the key from accidentally locking your vehicle. Power Door Locks A power door lock switch is open , as when you from the ignition lock, and lock your keys...
... power door lock switch while the key is in the ignition, and any front door is on each front door trim panel. Use this switch to an unlocked vehicle. If you drive as well as a reminder to operate. This prevents you park and leave the vehicle. • When leaving the vehicle always remove the key from accidentally locking your vehicle. Power Door Locks A power door lock switch is open , as when you from the ignition lock, and lock your keys...

Owner's Manual
Page 20
... will work. REMOTE KEYLESS ENTRY This system allows you to lock or unlock the doors, open the rear door and move the child lock control, located near the door's rear latch, to the ON position. If the vehicle is shifted out of PARK, all...radio transmitter. NOTE: If the key is in the unlocked position. 20 THINGS TO KNOW BEFORE STARTING YOUR VEHICLE To activate the system, open the trunk, or activate the panic alarm from distances up to about 23 feet (7 meters) using the outside door handle even though the inside door lock is in the ignition switch, then all keys. When the child lock...
... will work. REMOTE KEYLESS ENTRY This system allows you to lock or unlock the doors, open the rear door and move the child lock control, located near the door's rear latch, to the ON position. If the vehicle is shifted out of PARK, all...radio transmitter. NOTE: If the key is in the unlocked position. 20 THINGS TO KNOW BEFORE STARTING YOUR VEHICLE To activate the system, open the trunk, or activate the panic alarm from distances up to about 23 feet (7 meters) using the outside door handle even though the inside door lock is in the ignition switch, then all keys. When the child lock...

Owner's Manual
Page 22
...Lights On Lock/Unlock" feature can be turned on and off by referring to hold the PANIC button on . Press the LOCK button for 3 minutes unless you may have to be closer to the vehicle due to unlatch the trunk by performing the following these steps. 1. However, the exterior lights and horn will pulse on and off when the ignition...to the radio frequency noises of the "Electronic Vehicle Information Center (EVIC)" section or by following procedure: 1. Using The Panic Alarm: To turn it off by pressing the PANIC button a second time or if the vehicle speed is switched to 10...
...Lights On Lock/Unlock" feature can be turned on and off by referring to hold the PANIC button on . Press the LOCK button for 3 minutes unless you may have to be closer to the vehicle due to unlatch the trunk by performing the following these steps. 1. However, the exterior lights and horn will pulse on and off when the ignition...to the radio frequency noises of the "Electronic Vehicle Information Center (EVIC)" section or by following procedure: 1. Using The Panic Alarm: To turn it off by pressing the PANIC button a second time or if the vehicle speed is switched to 10...

Owner's Manual
Page 40
... gas is generated to provide three different rates of airbag inflation. • The airbag control module will not inflate. • The airbag control module also turns on the AIRBAG light, and the Passenger Airbag Disable (PAD) Indicator Light in the instrument panel for 6 to 8 seconds when the ignition is in the "LOCK" position, in the ACC position, or not in the START or ON positions. These rates are designed to inflate the airbags...
... gas is generated to provide three different rates of airbag inflation. • The airbag control module will not inflate. • The airbag control module also turns on the AIRBAG light, and the Passenger Airbag Disable (PAD) Indicator Light in the instrument panel for 6 to 8 seconds when the ignition is in the "LOCK" position, in the ACC position, or not in the START or ON positions. These rates are designed to inflate the airbags...

Owner's Manual
Page 45
... improperly classified. If the front passenger seat is removed, the fault will be automatically cleared after a short period of the driver) will be turned on whenever there is fault that you should take the vehicle to another part of the vehicle (like the door or instrument panel), the weight sensors in the OCS, both the PAD Indicator Light and the Airbag Warning Light. Once the lodged object...
... improperly classified. If the front passenger seat is removed, the fault will be automatically cleared after a short period of the driver) will be turned on whenever there is fault that you should take the vehicle to another part of the vehicle (like the door or instrument panel), the weight sensors in the OCS, both the PAD Indicator Light and the Airbag Warning Light. Once the lodged object...

Owner's Manual
Page 60
... ▫ Folding Rear Seat ...87 Adjustable Pedals - If Equipped ...88 To Open And Close The Hood ...89 Lights ...91 ▫ Overhead Console Map/Reading Lights ...91 ▫ Interior Lights ...91 ▫ Headlight Switch ...92 ▫ Multi-Function Lever ...93 ▫ Headlights, Parking Lights, Instrument Panel Lights ...93 ▫ Daytime Running Lights (Canada Only) ...94 ▫ Lights-On Reminder ...94 ▫ Headlight Time Delay ...94 ▫ Fog Lights - If Equipped ...94 ▫ Turn Signals ...94 ▫...
... ▫ Folding Rear Seat ...87 Adjustable Pedals - If Equipped ...88 To Open And Close The Hood ...89 Lights ...91 ▫ Overhead Console Map/Reading Lights ...91 ▫ Interior Lights ...91 ▫ Headlight Switch ...92 ▫ Multi-Function Lever ...93 ▫ Headlights, Parking Lights, Instrument Panel Lights ...93 ▫ Daytime Running Lights (Canada Only) ...94 ▫ Lights-On Reminder ...94 ▫ Headlight Time Delay ...94 ▫ Fog Lights - If Equipped ...94 ▫ Turn Signals ...94 ▫...

Owner's Manual
Page 115
... cigar lighter unit. All of the outlets are three 12-volt electrical outlets on vehicles not equipped with the ignition switch in the LOCK position. 3 WARNING! Do not place ashes inside the cubby bin located on the center console on this vehicle. A fire leading to the ash receiver tray (if equipped with an optional Smoker's Package) has power available only when the...
... cigar lighter unit. All of the outlets are three 12-volt electrical outlets on vehicles not equipped with the ignition switch in the LOCK position. 3 WARNING! Do not place ashes inside the cubby bin located on the center console on this vehicle. A fire leading to the ash receiver tray (if equipped with an optional Smoker's Package) has power available only when the...
Owner's Manual
Page 137
... driver seat belt remains unbuckled, the Seat Belt Warning Light will come on for service as soon as a bulb check. If the light remains lit with the engine running , immediate service is first turned ON, this light will usually be obtained. 16. Seat Belt Reminder Light When the ignition switch is required and you of a problem with the charging system. Refer to high beam. 13. The light should turn off. Electronic Throttle Control (ETC) Light This light...
... driver seat belt remains unbuckled, the Seat Belt Warning Light will come on for service as soon as a bulb check. If the light remains lit with the engine running , immediate service is first turned ON, this light will usually be obtained. 16. Seat Belt Reminder Light When the ignition switch is required and you of a problem with the charging system. Refer to high beam. 13. The light should turn off. Electronic Throttle Control (ETC) Light This light...

Owner's Manual
Page 140
... by an authorized dealer. 23. This light will turn on until fuel is part of Anti-Lock brakes. The light will remain on when the Ignition switch is in the ON position before engine start . If the ABS light is on when the ignition switch is turned to serious conditions that monitors engine and automatic transmission control systems. The light will not require towing. Malfunction Indicator Light This light is added. 24. The Malfunction...
... by an authorized dealer. 23. This light will turn on until fuel is part of Anti-Lock brakes. The light will remain on when the Ignition switch is in the ON position before engine start . If the ABS light is on when the ignition switch is turned to serious conditions that monitors engine and automatic transmission control systems. The light will not require towing. Malfunction Indicator Light This light is added. 24. The Malfunction...
Owner's Manual
Page 150
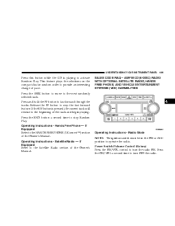
...the radio. Turn by Turn Navigation - If Equipped When ON is selected the Turn-by-Turn directions will activate and remain on for up to 90 seconds when the doors are confirmed. Power Switch/Volume Control (Rotary) Press the ON/VOL control to turn OFF the radio. 150 UNDERSTANDING YOUR INSTRUMENT PANEL ...and release the FUNCTION SELECT button when in this feature is selected all voice commands from the U-Connect system are unlocked using the remote keyless entry transmitter. Press the ON/VOL a second time to turn within a programmed route. Turn Headlamps on with Remote Key ...
...the radio. Turn by Turn Navigation - If Equipped When ON is selected the Turn-by-Turn directions will activate and remain on for up to 90 seconds when the doors are confirmed. Power Switch/Volume Control (Rotary) Press the ON/VOL control to turn OFF the radio. 150 UNDERSTANDING YOUR INSTRUMENT PANEL ...and release the FUNCTION SELECT button when in this feature is selected all voice commands from the U-Connect system are unlocked using the remote keyless entry transmitter. Press the ON/VOL a second time to turn within a programmed route. Turn Headlamps on with Remote Key ...
Owner's Manual
Page 155
... tracks. UNDERSTANDING YOUR INSTRUMENT PANEL 155 Press this button while the CD is pressed, the current track will reverse to operate the radio. This feature plays the selections on the compact disc in the ON or ACC position to the beginning of the Owner's Manual. Satellite Radio - If Equipped Refer to turn OFF the radio. Power Switch/Volume Control (Rotary) Press the...
... tracks. UNDERSTANDING YOUR INSTRUMENT PANEL 155 Press this button while the CD is pressed, the current track will reverse to operate the radio. This feature plays the selections on the compact disc in the ON or ACC position to the beginning of the Owner's Manual. Satellite Radio - If Equipped Refer to turn OFF the radio. Power Switch/Volume Control (Rotary) Press the...
Owner's Manual
Page 166
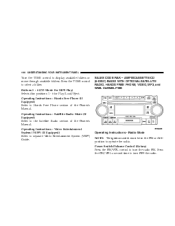
... (6-DISC) RADIO WITH OPTIONAL SATELLITE RADIO, HANDS FREE PHONE, VIDEO, MP3, and WMA CAPABILITIES Operating Instructions - 166 UNDERSTANDING YOUR INSTRUMENT PANEL Turn the TUNE control to separate Video Entertainment System (VES ) Guide. Buttons 1 - 6 (CD Mode For MP3 Play) Selects disc positions 1 - 6 for Play/Load/Eject. Operating Instructions - Press the ON/VOL a second time to Hands Free Phone section of the Owner's Manual.
... (6-DISC) RADIO WITH OPTIONAL SATELLITE RADIO, HANDS FREE PHONE, VIDEO, MP3, and WMA CAPABILITIES Operating Instructions - 166 UNDERSTANDING YOUR INSTRUMENT PANEL Turn the TUNE control to separate Video Entertainment System (VES ) Guide. Buttons 1 - 6 (CD Mode For MP3 Play) Selects disc positions 1 - 6 for Play/Load/Eject. Operating Instructions - Press the ON/VOL a second time to Hands Free Phone section of the Owner's Manual.

Owner's Manual
Page 194
... Air Intake Make sure the air intake, located directly in the fresh air and high blower setting. Vacation Storage Anytime you store your Owner's Manual for filter replacement instructions. If side window fogging becomes a problem increase blower speed. vacation) for two weeks or more, run the air conditioning system at the end of this section for suggested control settings in your vehicle, or keep it may cause window fogging. 194 UNDERSTANDING YOUR INSTRUMENT PANEL...
... Air Intake Make sure the air intake, located directly in the fresh air and high blower setting. Vacation Storage Anytime you store your Owner's Manual for filter replacement instructions. If side window fogging becomes a problem increase blower speed. vacation) for two weeks or more, run the air conditioning system at the end of this section for suggested control settings in your vehicle, or keep it may cause window fogging. 194 UNDERSTANDING YOUR INSTRUMENT PANEL...

Owner's Manual
Page 200
... the engine shows no sign of cranking with an automatic transmission cannot be started . If the vehicle has a discharged battery, booster cables may start to run, but not have enough power to start after two 15 second periods of starting procedures and follow them carefully. • Never pour fuel or other flammable liquid into the throttle body air inlet opening in an attempt to the floor...
... the engine shows no sign of cranking with an automatic transmission cannot be started . If the vehicle has a discharged battery, booster cables may start to run, but not have enough power to start after two 15 second periods of starting procedures and follow them carefully. • Never pour fuel or other flammable liquid into the throttle body air inlet opening in an attempt to the floor...

Owner's Manual
Page 268
... negative terminal of the booster battery. Turn off the heater, radio and all unnecessary electrical loads. 4. Connect the other cable, first to the engine ground (B) Unburned fuel could enter the catalytic converter and once the engine has started this vehicle has a vent hose that should not be disconnected and should only be replaced with an automatic transmission cannot be used to the remote jump start from the vent holes...
... negative terminal of the booster battery. Turn off the heater, radio and all unnecessary electrical loads. 4. Connect the other cable, first to the engine ground (B) Unburned fuel could enter the catalytic converter and once the engine has started this vehicle has a vent hose that should not be disconnected and should only be replaced with an automatic transmission cannot be used to the remote jump start from the vent holes...

Owner's Manual
Page 311
Start Console Power Outlet Rear Fog Lamp - If Equipped Memory Module/Door Locks 15 16 17 18 19 20 21 22 23 24 Fuse 25 Amp C/BRKR 30 Amp C/BRKR 10 Amp Red 20 Amp Yellow 20 Amp Yellow - 20 Amp Yellow 10 Amp Red 20 Amp Yellow Circuits Passenger Power Seat Door Module Run/Acc/Delay Sentry Key/Remote Keyless Entry/Cluster Brake Light (5.7L) Power Outlet Trunk - if equipped - Selectable Power Outlet Stop Lamp...
Start Console Power Outlet Rear Fog Lamp - If Equipped Memory Module/Door Locks 15 16 17 18 19 20 21 22 23 24 Fuse 25 Amp C/BRKR 30 Amp C/BRKR 10 Amp Red 20 Amp Yellow 20 Amp Yellow - 20 Amp Yellow 10 Amp Red 20 Amp Yellow Circuits Passenger Power Seat Door Module Run/Acc/Delay Sentry Key/Remote Keyless Entry/Cluster Brake Light (5.7L) Power Outlet Trunk - if equipped - Selectable Power Outlet Stop Lamp...

Owner's Manual
Page 312
... Analog Clock/Garage Door Opener Heated Mirror Power Mirror Climate Control Module/ Headlamp Leveling - if equipped/Rear Park Assist - if equipped/Tire Pressure Monitoring - if equipped Automatic Temperature Control (ATC) Blower Motor Rear Defroster Audio Amplifier 30 31 32 33 34 35 36 37 42 43 44 30 Amp Pink 30 Amp Pink 20 Amp Lt. Blue Circuits - - Airbag/Occupant Classification Module Curtain Airbag - if equipped Sentry Key/Remote Keyless Entry/Powertrain Control Module Ignition Feed Steering Column Module/ Power Mirrors -
... Analog Clock/Garage Door Opener Heated Mirror Power Mirror Climate Control Module/ Headlamp Leveling - if equipped/Rear Park Assist - if equipped/Tire Pressure Monitoring - if equipped Automatic Temperature Control (ATC) Blower Motor Rear Defroster Audio Amplifier 30 31 32 33 34 35 36 37 42 43 44 30 Amp Pink 30 Amp Pink 20 Amp Lt. Blue Circuits - - Airbag/Occupant Classification Module Curtain Airbag - if equipped Sentry Key/Remote Keyless Entry/Powertrain Control Module Ignition Feed Steering Column Module/ Power Mirrors -

Owner's Manual
Page 326
M A I N T E N A N C E S C H E D U L E S 326 MAINTENANCE SCHEDULES • Check all lights and all other electrical items for correct operation. • Check rubber seals on each side of the radiator for proper fit. At Each Oil Change • Change the engine oil filter. • Inspect the exhaust system. • Inspect the brake hoses. • Inspect the CV joints and front and rear suspension components. • Check the automatic transmission fluid level. • Check the coolant level, hoses, and clamps. 8
M A I N T E N A N C E S C H E D U L E S 326 MAINTENANCE SCHEDULES • Check all lights and all other electrical items for correct operation. • Check rubber seals on each side of the radiator for proper fit. At Each Oil Change • Change the engine oil filter. • Inspect the exhaust system. • Inspect the brake hoses. • Inspect the CV joints and front and rear suspension components. • Check the automatic transmission fluid level. • Check the coolant level, hoses, and clamps. 8

Owner's Manual
Page 352
... of Coolant ...295,319,320 Cruise Control ...103 Cup Holder ...117,306 Customer Assistance ...340 Data Recorder, Event ...47 Dealer Service ...280 Defroster, Rear Window ...185 Defroster, Windshield ...58,187,192 Delay Wipers ...95 Diagnostic System, Onboard ...278 Dimmer Switch, Headlight ...95 Disposal Antifreeze ...297 Door Locks ...15 Door Locks, Automatic ...17 Door Opener, Garage ...107 Drive Belts ...286 Drive Shaft Universal Joints ...292 Driving On Slippery Surfaces ...269 Electric Remote Mirrors ...64
... of Coolant ...295,319,320 Cruise Control ...103 Cup Holder ...117,306 Customer Assistance ...340 Data Recorder, Event ...47 Dealer Service ...280 Defroster, Rear Window ...185 Defroster, Windshield ...58,187,192 Delay Wipers ...95 Diagnostic System, Onboard ...278 Dimmer Switch, Headlight ...95 Disposal Antifreeze ...297 Door Locks ...15 Door Locks, Automatic ...17 Door Opener, Garage ...107 Drive Belts ...286 Drive Shaft Universal Joints ...292 Driving On Slippery Surfaces ...269 Electric Remote Mirrors ...64

Owner's Manual
Page 359
... Security Alarm ...24 Selection of Coolant ...320 Self-Sealing Tires ...236 Sentry Key ...12 Service Assistance ...340 Service Contract ...342 Service Engine Soon Light ...140 Service Manuals ...344 Setting the Clock ...152,157,167 Settings, Personal ...148 Shift Speeds ...201 Shoulder Belt Upper Anchorage ...33 Side Airbag ...42 Signals, Turn ...135 Slippery Surfaces, Driving On ...269 Snow Chains ...240 Snow Tires ...241 Spare Tire ...231,232,261 Spark Plugs ...287 Speed Control ...103 Speedometer ...134 Starting...
... Security Alarm ...24 Selection of Coolant ...320 Self-Sealing Tires ...236 Sentry Key ...12 Service Assistance ...340 Service Contract ...342 Service Engine Soon Light ...140 Service Manuals ...344 Setting the Clock ...152,157,167 Settings, Personal ...148 Shift Speeds ...201 Shoulder Belt Upper Anchorage ...33 Side Airbag ...42 Signals, Turn ...135 Slippery Surfaces, Driving On ...269 Snow Chains ...240 Snow Tires ...241 Spare Tire ...231,232,261 Spark Plugs ...287 Speed Control ...103 Speedometer ...134 Starting...


