
Owners Manual
Page 72
... load allowed 8 Identification data 9 Controls 10 Position of motorcycle controls 10 Instrument panel 11 Keys 12 Key-operated ignition switch and steering lock 12 Left switch 13 Clutch lever 14 Cold start button 15 Right switch 15 Throttle twistgrip 16 Front brake lever 16 Rear brake pedal 17 Gear change pedal 17 Adjustment of gear change and rear brake pedals 18 Main components and devices 20 Location 20 Tank filler plug 21 Seat catch and helmet hook 22...
... load allowed 8 Identification data 9 Controls 10 Position of motorcycle controls 10 Instrument panel 11 Keys 12 Key-operated ignition switch and steering lock 12 Left switch 13 Clutch lever 14 Cold start button 15 Right switch 15 Throttle twistgrip 16 Front brake lever 16 Rear brake pedal 17 Gear change pedal 17 Adjustment of gear change and rear brake pedals 18 Main components and devices 20 Location 20 Tank filler plug 21 Seat catch and helmet hook 22...
Owners Manual
Page 73
Chain tension inspection 46 Chain lubrication 46 Replacing bulbs 47 Beam setting 51 Rear view mirror adjustment 51 Tubeless tyres 52 Checking engine oil level 54 Cleaning and replacing the spark plugs 55 Cleaning the motorcycle 56 Storing the bike away 56 Important notes 56 Technical data 57 Performance data 57 Overall dimensions 57 Weights 57 Top-ups 58 Engine 59 Timing system 59 Spark plugs 59 Brakes 60 Transmission 61 Frame 62 Wheels 62 Tyres 62 Suspensions 63 Available colours 63 Electric system 63 Routine maintenance record 68 5 E
Chain tension inspection 46 Chain lubrication 46 Replacing bulbs 47 Beam setting 51 Rear view mirror adjustment 51 Tubeless tyres 52 Checking engine oil level 54 Cleaning and replacing the spark plugs 55 Cleaning the motorcycle 56 Storing the bike away 56 Important notes 56 Technical data 57 Performance data 57 Overall dimensions 57 Weights 57 Top-ups 58 Engine 59 Timing system 59 Spark plugs 59 Brakes 60 Transmission 61 Frame 62 Wheels 62 Tyres 62 Suspensions 63 Available colours 63 Electric system 63 Routine maintenance record 68 5 E
Owners Manual
Page 74
... to the motorcycles used in order to guarantee product reliability, you are referred to severe injury or death. Warning Failure to comply with these instructions may be automatically invalidated. All Ducati motorcycles come with parts other than original Ducati spare parts during the warranty period, or the warranty will help you smooth, enjoyable riding - The terms right...
... to the motorcycles used in order to guarantee product reliability, you are referred to severe injury or death. Warning Failure to comply with these instructions may be automatically invalidated. All Ducati motorcycles come with parts other than original Ducati spare parts during the warranty period, or the warranty will help you smooth, enjoyable riding - The terms right...
Owners Manual
Page 75
... ground or your clothing. Never park on the exhaust pipe when refueling. Never start or run the engine indoors. Ride within the law and observe national and local rules. Be sure you may lead to loss of consciousness or even death within a short time. Do not smoke when refueling. The engine, exhaust pipes, and mufflers stay hot for a long time. Always turn...
... ground or your clothing. Never park on the exhaust pipe when refueling. Never start or run the engine indoors. Ride within the law and observe national and local rules. Be sure you may lead to loss of consciousness or even death within a short time. Do not smoke when refueling. The engine, exhaust pipes, and mufflers stay hot for a long time. Always turn...

Owners Manual
Page 78
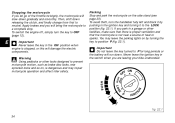
Be sure to drive your motorcycle. fig. 2 10 Position of all the controls you need to read this information carefully before you use the controls. CONTROLS E Warning This section details the position and function of motorcycle controls (fig. 2) 1) Instrument panel. 2) Key-operated ignition switch and steering lock. 3) Left switch. 4) Clutch lever. 5) Cold start button. 6) Right switch. 7) Throttle twistgrip. 8) Front brake lever. 9) Gear change pedal. 10) Rear brake pedal.
Be sure to drive your motorcycle. fig. 2 10 Position of all the controls you need to read this information carefully before you use the controls. CONTROLS E Warning This section details the position and function of motorcycle controls (fig. 2) 1) Instrument panel. 2) Key-operated ignition switch and steering lock. 3) Left switch. 4) Clutch lever. 5) Cold start button. 6) Right switch. 7) Throttle twistgrip. 8) Front brake lever. 9) Gear change pedal. 10) Rear brake pedal.
Owners Manual
Page 79
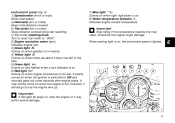
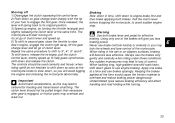
... fuel left in neutral. 4) Yellow light . value, otherwise the engine might damage. a) Odometer (km or miles). c) Trip meter resetting knob. Indicates engine coolant temperature. Instrument panel (fig. 3) 1) Speedometer (km/h or mph). b) Trip meter (km or miles). Comes on and flashes when a turn indicator is switched to "0000". 2) Engine revolution meter (rpm) Indicates engine rpm. 3) Green light N. It briefly comes on when the ignition is on . 8) Water temperature indicator . Turn...
... fuel left in neutral. 4) Yellow light . value, otherwise the engine might damage. a) Odometer (km or miles). c) Trip meter resetting knob. Indicates engine coolant temperature. Instrument panel (fig. 3) 1) Speedometer (km/h or mph). b) Trip meter (km or miles). Comes on and flashes when a turn indicator is switched to "0000". 2) Engine revolution meter (rpm) Indicates engine rpm. 3) Green light N. It briefly comes on when the ignition is on . 8) Water temperature indicator . Turn...

Owners Manual
Page 90
...position, the seat will enable you lose control of the seat until it is intended to the frame. 22 1 1 E 1 fig. 14.1 PUSH 0 0 2 fig. 14.2 Warning This system is firmly secured to lock your motorcycle. Pull gently the tail guard (2) outwards and lift it until you park your helmet safely...and refit the seat. Lower the tail guard to lock the seat. Pull the tail guard gently up to make you to its horizontal position. With the cable in the way and make sure it rests onto the fuel tank. Seat catch and helmet hook Opening (fig. 14.1) Fit the ignition key into the helmet...
...position, the seat will enable you lose control of the seat until it is intended to the frame. 22 1 1 E 1 fig. 14.1 PUSH 0 0 2 fig. 14.2 Warning This system is firmly secured to lock your motorcycle. Pull gently the tail guard (2) outwards and lift it until you park your helmet safely...and refit the seat. Lower the tail guard to lock the seat. Pull the tail guard gently up to make you to its horizontal position. With the cable in the way and make sure it rests onto the fuel tank. Seat catch and helmet hook Opening (fig. 14.1) Fit the ignition key into the helmet...
Owners Manual
Page 91
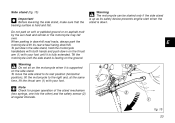
...lowering the side stand, make sure that the bearing surface is down. Warning The motorcycle can be started only if the side stand is up as its rear wheel facing downhill. Note Check for proper operation of the stand mechanism (two springs, one into the other) and the safety sensor (2) at the same time, lift the thrust arm (1) with its safety device prevents engine start.... When parking in downhill road tracts, always park the motorcycle with your foot until the side stand is fully extended. Tilt the motorcycle until it is supported on asphalt melt by the sun heat and similar...
...lowering the side stand, make sure that the bearing surface is down. Warning The motorcycle can be started only if the side stand is up as its rear wheel facing downhill. Note Check for proper operation of the stand mechanism (two springs, one into the other) and the safety sensor (2) at the same time, lift the thrust arm (1) with its safety device prevents engine start.... When parking in downhill road tracts, always park the motorcycle with your foot until the side stand is fully extended. Tilt the motorcycle until it is supported on asphalt melt by the sun heat and similar...
Owners Manual
Page 98
... comply with recommended oil if needed (page 35). Coolant level Check coolant level in the correct position (page 23). Key-operated locks Check that fuel filler plug and seat catch locks are closed firmly. Before riding, perform a thorough check-up if necessary (page 40). Controls Work the brake, clutch, throttle and gear change controls (levers, pedals and twistgrips) and check for resulting engine damage or shorter engine life. Stand Make...
... comply with recommended oil if needed (page 35). Coolant level Check coolant level in the correct position (page 23). Key-operated locks Check that fuel filler plug and seat catch locks are closed firmly. Before riding, perform a thorough check-up if necessary (page 40). Controls Work the brake, clutch, throttle and gear change controls (levers, pedals and twistgrips) and check for resulting engine damage or shorter engine life. Stand Make...
Owners Manual
Page 101
..., or friction parts may lock the wheels and lose control of control. Moving off . 4) Let go of clutch lever and speed up. 5) To shift to second gear, close the throttle to slow down engine, engage the clutch right away, lift the gear change lever sharply with the tip of your foot to engage the first gear. Underinflated tyres reduce braking efficiency and affect handling and road holding while turning.
..., or friction parts may lock the wheels and lose control of control. Moving off . 4) Let go of clutch lever and speed up. 5) To shift to second gear, close the throttle to slow down engine, engage the clutch right away, lift the gear change lever sharply with the tip of your foot to engage the first gear. Underinflated tyres reduce braking efficiency and affect handling and road holding while turning.
Owners Manual
Page 102
... turning the key to position P (fig. 22.1). Apply brakes and you are leaving your bike unattended. Parking Stop and park the motorcycle on by pushing in the switch when you will run down releasing the clutch, and finally change from first to a complete stop. Then, shift down . You may impair motorcycle operation and affect rider safety. Never leave the ignition key in the ignition key and turning...
... turning the key to position P (fig. 22.1). Apply brakes and you are leaving your bike unattended. Parking Stop and park the motorcycle on by pushing in the switch when you will run down releasing the clutch, and finally change from first to a complete stop. Then, shift down . You may impair motorcycle operation and affect rider safety. Never leave the ignition key in the ignition key and turning...

Owners Manual
Page 107
... air intake, increase fuel consumption, reduce engine power, and foul the spark plugs. Important If you have removed. Remove the cover but leave it hanging from its seat on the inner cover (3). fig. 27.1 E fig. 27.2 39 Clean the filter cartridge with compressed air or fit a new one, if needed. The air box is accessible after removing the body panels and the headlamp fairing (see Warranty...
... air intake, increase fuel consumption, reduce engine power, and foul the spark plugs. Important If you have removed. Remove the cover but leave it hanging from its seat on the inner cover (3). fig. 27.1 E fig. 27.2 39 Clean the filter cartridge with compressed air or fit a new one, if needed. The air box is accessible after removing the body panels and the headlamp fairing (see Warranty...

Owners Manual
Page 119
...perform this check in other countries will adapt said procedure to lift. The height of headlamp center. Place the motorcycle opposite a wall or a screen, 10 meters apart from ground of the light spot (measured at right angles to its longitudinal axis. E 2 1 fig. 40.2 51 Turn the screw clockwise to lower the beam, turn...at the correct pressure and one in the hole (2) with the longitudinal axis of the light beam. Rear view mirror adjustment Slacken the screw in line with a cross-point screwdriver. Owners in dim light. Set the rear view mirror by headlamp center and a ...
...perform this check in other countries will adapt said procedure to lift. The height of headlamp center. Place the motorcycle opposite a wall or a screen, 10 meters apart from ground of the light spot (measured at right angles to its longitudinal axis. E 2 1 fig. 40.2 51 Turn the screw clockwise to lower the beam, turn...at the correct pressure and one in the hole (2) with the longitudinal axis of the light beam. Rear view mirror adjustment Slacken the screw in line with a cross-point screwdriver. Owners in dim light. Set the rear view mirror by headlamp center and a ...

Owners Manual
Page 120
... roads, increase tyre pressure by 0.2 - 0.3 bar. To avoid front wheel rim distortion, when riding on one tyre, check the tyre for punctures. Replace tyres with recommended standard tyres only. Note If tyres need replacing, contact a Ducati Dealer or Authorized Workshop to rider. Be sure to tighten the valve caps securely to keep air inside. After replacing a tyre, the wheel must be balanced. Tyre repair...
... roads, increase tyre pressure by 0.2 - 0.3 bar. To avoid front wheel rim distortion, when riding on one tyre, check the tyre for punctures. Replace tyres with recommended standard tyres only. Note If tyres need replacing, contact a Ducati Dealer or Authorized Workshop to rider. Be sure to tighten the valve caps securely to keep air inside. After replacing a tyre, the wheel must be balanced. Tyre repair...

Owners Manual
Page 123
...change the spark plug and report this to let any dark deposits, change the spark plug. This is a sign of engine condition. body panel, remove the spark plug caps from the cylinder head using a small metal brush and check seal condition. Clean the seat in the cylinder head. Spark plugs should be 0.6 ÷ 0.7 mm. If color has altered or you can use spark plugs...kit to 20 Nm. Clean the electrode and the insulating material accurately using the wrench supplied with a heat rating other than recommended or a thread length other than standard. Be careful not to a Ducati ...
...change the spark plug and report this to let any dark deposits, change the spark plug. This is a sign of engine condition. body panel, remove the spark plug caps from the cylinder head using a small metal brush and check seal condition. Clean the seat in the cylinder head. Spark plugs should be 0.6 ÷ 0.7 mm. If color has altered or you can use spark plugs...kit to 20 Nm. Clean the electrode and the insulating material accurately using the wrench supplied with a heat rating other than recommended or a thread length other than standard. Be careful not to a Ducati ...

Owners Manual
Page 124
...high-pressure or hot water jets. pour a few drops of engine oil into the cylinders through the spark plug seats, then crank the engine by hand a few times so a protective film of oil will spread on , have compulsory emission and noise ...engine parts using Ducati original spare parts complying with chamois leather. This will evaporate faster and spot hot surfaces. Cleaning the motorcycle To preserve the finish of metal parts and paintwork, wash and clean your motorcycle right after washing the motorcycle. Warning Braking performance may occur. disconnect and remove the battery...
...high-pressure or hot water jets. pour a few drops of engine oil into the cylinders through the spark plug seats, then crank the engine by hand a few times so a protective film of oil will spread on , have compulsory emission and noise ...engine parts using Ducati original spare parts complying with chamois leather. This will evaporate faster and spot hot surfaces. Cleaning the motorcycle To preserve the finish of metal parts and paintwork, wash and clean your motorcycle right after washing the motorcycle. Warning Braking performance may occur. disconnect and remove the battery...
Owners Manual
Page 129
.... Size: 5/8"x1/4" Links: 94 Important The above gear ratios are the homologated ones and under no circumstances must they be glad to Ducati Motor Holding S.p.A. who will be modified. Transmission Dry clutch operated by a Ducati Dealer or Authorized Workshop. Warning If needed, have the rear sprocket replaced by a control lever on left handlebar. Gear ratio: 32/59. 6-speed gearbox with constant mesh gears, gear change pedal...
.... Size: 5/8"x1/4" Links: 94 Important The above gear ratios are the homologated ones and under no circumstances must they be glad to Ducati Motor Holding S.p.A. who will be modified. Transmission Dry clutch operated by a Ducati Dealer or Authorized Workshop. Warning If needed, have the rear sprocket replaced by a control lever on left handlebar. Gear ratio: 32/59. 6-speed gearbox with constant mesh gears, gear change pedal...

Owners Manual
Page 131
.... Starter motor, 12V-0.7 kW. Travel: 71 mm. Instrument panel, 12V-1.2W warning lights; 12V-2W instrument lights. Suspensions Front Hydraulic upside-down fork provided with outer adjusters for rebound, compression, and preload (for inner springs of the following: 12V-55W low beam unit, poly-ellipsoidal with no. 2 12V-5W bulbs. Electrical controls on a pivot pin passing through the frame and engine. Ducati Metallic Yellow code 473...
.... Starter motor, 12V-0.7 kW. Travel: 71 mm. Instrument panel, 12V-1.2W warning lights; 12V-2W instrument lights. Suspensions Front Hydraulic upside-down fork provided with outer adjusters for rebound, compression, and preload (for inner springs of the following: 12V-55W low beam unit, poly-ellipsoidal with no. 2 12V-5W bulbs. Electrical controls on a pivot pin passing through the frame and engine. Ducati Metallic Yellow code 473...

Owners Manual
Page 132
... located on it . Warning Never use a fuse with a rating other than specified. Important Switch the ignition key to OFF before replacing the fuse to fire. Failure to observe this rule may damage the electric system or even lead to avoid possible short circuits. To expose the fuses, take off the box protective cover. Mounting position and ampere capacity are marked on the frame right...
... located on it . Warning Never use a fuse with a rating other than specified. Important Switch the ignition key to OFF before replacing the fuse to fire. Failure to observe this rule may damage the electric system or even lead to avoid possible short circuits. To expose the fuses, take off the box protective cover. Mounting position and ampere capacity are marked on the frame right...

Owners Manual
Page 133
... 6) Electric fan relay 7) Starter motor 8) Solenoid starter contactor 9) Battery 10) Water sensor 11) Electric fan thermal switch 12) Electric fan 13) Rear right-turn indicator 14) Tail light 15) Number plate lighting bulb 16) Rear left-turn indicator 17) Fuel tank 18) Self-dagnosis connector 19) Vertical cylinder coil 20) Horizontal cylinder coil 21) Horizontal cylinder spark plug 22) Vertical cylinder spark plug 23) Horizontal cylinder injector 24) Vertical cylinder injector 25) Throttle position sensor 26) Air pressure sensor 27) Air temperature sensor 28) Timing/engine rpm pickup 29) Water...
... 6) Electric fan relay 7) Starter motor 8) Solenoid starter contactor 9) Battery 10) Water sensor 11) Electric fan thermal switch 12) Electric fan 13) Rear right-turn indicator 14) Tail light 15) Number plate lighting bulb 16) Rear left-turn indicator 17) Fuel tank 18) Self-dagnosis connector 19) Vertical cylinder coil 20) Horizontal cylinder coil 21) Horizontal cylinder spark plug 22) Vertical cylinder spark plug 23) Horizontal cylinder injector 24) Vertical cylinder injector 25) Throttle position sensor 26) Air pressure sensor 27) Air temperature sensor 28) Timing/engine rpm pickup 29) Water...