
Owners Manual
Page 113
... Keys 25 Code card 26 Procedure to disable imobilizer engine block through throttle twistgrip 27 Duplicate keys 28 Key-operated ignition switch and steering lock 29 Left switch 30 Clutch lever 32 Cold start lever 33 Right switch 34 4 TABLE OF CONTENTS Throttle twistgrip 35 Front brake lever 35 Rear brake pedal 36 Gear change pedal 36 Setting the gear change and rear brake pedals 37 Main components and devices 39 Location 39 Tank filler plug 40 Seat...
... Keys 25 Code card 26 Procedure to disable imobilizer engine block through throttle twistgrip 27 Duplicate keys 28 Key-operated ignition switch and steering lock 29 Left switch 30 Clutch lever 32 Cold start lever 33 Right switch 34 4 TABLE OF CONTENTS Throttle twistgrip 35 Front brake lever 35 Rear brake pedal 36 Gear change pedal 36 Setting the gear change and rear brake pedals 37 Main components and devices 39 Location 39 Tank filler plug 40 Seat...
Owners Manual
Page 114
... 64 Side panniers 69 Lifting the fuel tank 70 Cleaning and changing air filters 71 Checking the coolant level 72 Checking brake and clutch fluid level 73 Checking brake pads for wear 74 Lubricating cables and joints 75 Throttle cable adjustment 76 Charging the battery 77 Chain tensioning 78 Chain lubrication 79 Replacing bulbs 80 Beam setting 85 Tyres 86 Checking engine oil level 88 Cleaning and replacing the spark plugs 89 Cleaning the...
... 64 Side panniers 69 Lifting the fuel tank 70 Cleaning and changing air filters 71 Checking the coolant level 72 Checking brake and clutch fluid level 73 Checking brake pads for wear 74 Lubricating cables and joints 75 Throttle cable adjustment 76 Charging the battery 77 Chain tensioning 78 Chain lubrication 79 Replacing bulbs 80 Beam setting 85 Tyres 86 Checking engine oil level 88 Cleaning and replacing the spark plugs 89 Cleaning the...
Owners Manual
Page 116
... soap and water and change your motorcycle to loss of vehicles ahead. Never start or run the engine indoors. Always respect speed limits where these are riding in the road surface. Always signal your skin or clothing, immediately wash with both hands so you are frequently due to the next lane in good time using the suitable turn indicators. Warning The exhaust system...
... soap and water and change your motorcycle to loss of vehicles ahead. Never start or run the engine indoors. Always respect speed limits where these are riding in the road surface. Always signal your skin or clothing, immediately wash with both hands so you are frequently due to the next lane in good time using the suitable turn indicators. Warning The exhaust system...

Owners Manual
Page 124
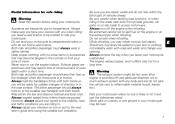
... the DUCATI Authorised Service Center that the vehicle has covered the distance corresponding to signal that the user has entered the beam vertical setting mode. 1 2 13 3 12 0 1 km/h miles mph km/L mpgal 11 4 E 10 9 8 7 6 5 fig. 6 13) Service warning. Then it should go out as the engine revs up. It may suffer severe damage. 8) Neutral light N (green). Comes on permanently. Comes on . 10) Fuel warning light...
... the DUCATI Authorised Service Center that the vehicle has covered the distance corresponding to signal that the user has entered the beam vertical setting mode. 1 2 13 3 12 0 1 km/h miles mph km/L mpgal 11 4 E 10 9 8 7 6 5 fig. 6 13) Service warning. Then it should go out as the engine revs up. It may suffer severe damage. 8) Neutral light N (green). Comes on permanently. Comes on . 10) Fuel warning light...

Owners Manual
Page 133
... lights brightness is automatically adjusted by the instrument panel according to reduce current consumption from the battery, by a special antenna incorporated in the switch when the ignition is turned on and changes every time. Pilot lights brightness function This function is active only if the parking light or the low/high beam is turned off and will be turned on upon the following engine start the engine. Auto-off headlight function...
... lights brightness is automatically adjusted by the instrument panel according to reduce current consumption from the battery, by a special antenna incorporated in the switch when the ignition is turned on and changes every time. Pilot lights brightness function This function is active only if the parking light or the low/high beam is turned off and will be turned on upon the following engine start the engine. Auto-off headlight function...

Owners Manual
Page 135
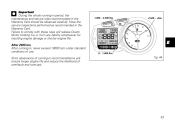
... the keys, it indicates the electronic code (A, fig. 16) to disable "engine block" function -signalled by the orange EOBD warning light (5, fig. 6). In case of faulty immobilizer system, this procedure gives the chance to be used in case of emergency start-up and the engine will not start up after the key-ON. E fig. 15 A fig. 16 26 Code card A CODE CARD...
... the keys, it indicates the electronic code (A, fig. 16) to disable "engine block" function -signalled by the orange EOBD warning light (5, fig. 6). In case of faulty immobilizer system, this procedure gives the chance to be used in case of emergency start-up and the engine will not start up after the key-ON. E fig. 15 A fig. 16 26 Code card A CODE CARD...

Owners Manual
Page 143
...: position (RUN) = run the battery flat as the lights will remain on ; Important Stopping the engine using switch (2) when riding with lights on and leaving the ignition key in emergency cases when you need to enable starting. position (OFF) = stop the engine quickly. Right switch (fig. 21) 1) Switch, light switch, three positions: right position = light off; left position = headlight, front and rear parking lights, number plate and instrument panel lights on. 2 4 E 2) Switch for use...
...: position (RUN) = run the battery flat as the lights will remain on ; Important Stopping the engine using switch (2) when riding with lights on and leaving the ignition key in emergency cases when you need to enable starting. position (OFF) = stop the engine quickly. Right switch (fig. 21) 1) Switch, light switch, three positions: right position = light off; left position = headlight, front and rear parking lights, number plate and instrument panel lights on. 2 4 E 2) Switch for use...

Owners Manual
Page 151
...parking in downhill road tracts, always park the motorcycle with your motorcycle in addition to stop for a short time. Tilt the motorcycle until it is supported on asphalt melt by the sun heat and similar or the motorcycle may impair motorcycle operation and affect the safety of rider and passenger. Warning...the steering lock when parking your foot. Anti-theft padlock (fig. 31) The anti-theft padlock (1) is hard and flat. To move the side stand to its rear wheel facing downhill. Warning Using padlocks or other locks designed to the right and, at the same time, lift the thrust arm ...
...parking in downhill road tracts, always park the motorcycle with your motorcycle in addition to stop for a short time. Tilt the motorcycle until it is supported on asphalt melt by the sun heat and similar or the motorcycle may impair motorcycle operation and affect the safety of rider and passenger. Warning...the steering lock when parking your foot. Anti-theft padlock (fig. 31) The anti-theft padlock (1) is hard and flat. To move the side stand to its rear wheel facing downhill. Warning Using padlocks or other locks designed to the right and, at the same time, lift the thrust arm ...
Owners Manual
Page 162
... engine damage or shorter engine life. Have the service inspections performed as recommended in the Warranty Card should be observed carefully. Strict observance of running -in recommendations will release Ducati Motor Holding S.p.A. Failure to comply with these rules will ensure longer engine life and reduce the likelihood of use. After 2500 km After running -in , never exceed 10000 rpm under standard conditions...
... engine damage or shorter engine life. Have the service inspections performed as recommended in the Warranty Card should be observed carefully. Strict observance of running -in recommendations will release Ducati Motor Holding S.p.A. Failure to comply with these rules will ensure longer engine life and reduce the likelihood of use. After 2500 km After running -in , never exceed 10000 rpm under standard conditions...

Owners Manual
Page 163
... passenger. Top up on . Tyre condition Check tyre pressure and condition (page 86). E Key-operated locks Check that the ABS is on your bike as follows: Fuel level in the tank Check fuel level in the tank. When the light turns off, it means that fuel filler plug and seat catch locks are in the relevant reservoirs. Before riding, perform a thorough check-up if needed (page 62). Brake and clutch fluid...
... passenger. Top up on . Tyre condition Check tyre pressure and condition (page 86). E Key-operated locks Check that the ABS is on your bike as follows: Fuel level in the tank Check fuel level in the tank. When the light turns off, it means that fuel filler plug and seat catch locks are in the relevant reservoirs. Before riding, perform a thorough check-up if needed (page 62). Brake and clutch fluid...

Owners Manual
Page 169
... these conditions. The ABS may be turned off , the vehicle provides the standard braking force offered by pressing the button incorporated in a bend. 60 Underinflated tyres reduce braking efficiency, handling accuracy and stability in the LH switch (see page 31). Any sudden manoeuvres may lock the wheels and lose control of the brake lever and pedal. E Pressure is off by the regular braking system...
... these conditions. The ABS may be turned off , the vehicle provides the standard braking force offered by pressing the button incorporated in a bend. 60 Underinflated tyres reduce braking efficiency, handling accuracy and stability in the LH switch (see page 31). Any sudden manoeuvres may lock the wheels and lose control of the brake lever and pedal. E Pressure is off by the regular braking system...

Owners Manual
Page 175
Pull out the rear control panel (2) from the instrument panel and remove the front control panel (3) complete with instrument panel. 4 4 fig. 58 6 6 6 fig. 57 66 7 fig. 59 Instrument panel covers Undo the two screws (1) securing the rear control panel (2) to remove the front control panel (3). 5 E Undo the screws (6), disconnect the wiring from the front control panel (3). Undo the screws (4) and remove the windscreen (5) to the headlight fairing.
Pull out the rear control panel (2) from the instrument panel and remove the front control panel (3) complete with instrument panel. 4 4 fig. 58 6 6 6 fig. 57 66 7 fig. 59 Instrument panel covers Undo the two screws (1) securing the rear control panel (2) to remove the front control panel (3). 5 E Undo the screws (6), disconnect the wiring from the front control panel (3). Undo the screws (4) and remove the windscreen (5) to the headlight fairing.

Owners Manual
Page 195
... take a long time to deflate, as sensors and phonic wheels) are advised to avoid leaks when riding. Correct removal and installation of the wheels is affected by 0.2 - 0.3 bar. If you find low pressure on bumpy roads, increase front tyre pressure by temperature and altitude variations, you are cold. Important Do not remove or shift the wheel balancing weights. Warning (ST4s ABS) Have the tyres replaced at a Dealer...
... take a long time to deflate, as sensors and phonic wheels) are advised to avoid leaks when riding. Correct removal and installation of the wheels is affected by 0.2 - 0.3 bar. If you find low pressure on bumpy roads, increase front tyre pressure by temperature and altitude variations, you are cold. Important Do not remove or shift the wheel balancing weights. Warning (ST4s ABS) Have the tyres replaced at a Dealer...

Owners Manual
Page 208
Horn. Starter motor, 12V-0.7 kW. Mounting position and ampere capacity are marked on handlebar. Three fuses (2 fig. 97) located under the seat protect the ABS. Electrical controls on box cover. 7 fuses are connected to the system. Generator 12V-520W. Tail light, 12V-5/21W double-filament bulb for stop light and parking light; 12V-5W bulb for relevant instructions. Remove the caps (3) to avoid possible short circuits. Fuses The main fuse box (fig. 96...
Horn. Starter motor, 12V-0.7 kW. Mounting position and ampere capacity are marked on handlebar. Three fuses (2 fig. 97) located under the seat protect the ABS. Electrical controls on box cover. 7 fuses are connected to the system. Generator 12V-520W. Tail light, 12V-5/21W double-filament bulb for stop light and parking light; 12V-5W bulb for relevant instructions. Remove the caps (3) to avoid possible short circuits. Fuses The main fuse box (fig. 96...

Owners Manual
Page 210
... cylinder injector 26) Throttle position sensor 27) Timing/rpm sensor 28) Oil temperature sensor 29) Speed sensor 30) Side stand switch 31) Neutral switch 32) Oil pressure switch 33) Rear stop switch 34) Fan relay 35) Ignition/injection control unit 36) Clutch switch 37) Front stop switch 38) Release connection 39) L.h. switch 2) Key operated switch 3) Starter motor 4) Solenoid starter 5) Battery 6) Rectifier fuse 7) Rectifier 8) Generator 9) Rear RIGHT turn indicator 10) Fuse box 11) Fuses 12) Fan 13) Tail light 14) Number plate light 15) Rear LEFT turn indicator 47) Horn 48) Grips wiring...
... cylinder injector 26) Throttle position sensor 27) Timing/rpm sensor 28) Oil temperature sensor 29) Speed sensor 30) Side stand switch 31) Neutral switch 32) Oil pressure switch 33) Rear stop switch 34) Fan relay 35) Ignition/injection control unit 36) Clutch switch 37) Front stop switch 38) Release connection 39) L.h. switch 2) Key operated switch 3) Starter motor 4) Solenoid starter 5) Battery 6) Rectifier fuse 7) Rectifier 8) Generator 9) Rear RIGHT turn indicator 10) Fuse box 11) Fuses 12) Fan 13) Tail light 14) Number plate light 15) Rear LEFT turn indicator 47) Horn 48) Grips wiring...

Owners Manual
Page 211
...) Instrument panel 43) Light relay 44) Front left turn indicator 47) Horn 48) Grip wiring release 49) Release connection 50) Rear speed sensor 51) Front speed sensor 52) ABS control unit 53) Self-diagnosis power supply E Legend to ST4s ABS wiring/injection diagram 1) R.h. switch 2) Key operated switch 3) Fuse box 4) Fuses 5) Fan 6) Starter motor 7) Solenoid starter 8) Battery 9) Rectifier fuse 10) Rectifier 11) Generator 12) Rear right turn indicator 13) Tail light 14) Number plate light 15) Rear left turn indicator 45) Headlight 46) Front right turn indicator 16) Power outlet 17) Fuel...
...) Instrument panel 43) Light relay 44) Front left turn indicator 47) Horn 48) Grip wiring release 49) Release connection 50) Rear speed sensor 51) Front speed sensor 52) ABS control unit 53) Self-diagnosis power supply E Legend to ST4s ABS wiring/injection diagram 1) R.h. switch 2) Key operated switch 3) Fuse box 4) Fuses 5) Fan 6) Starter motor 7) Solenoid starter 8) Battery 9) Rectifier fuse 10) Rectifier 11) Generator 12) Rear right turn indicator 13) Tail light 14) Number plate light 15) Rear left turn indicator 45) Headlight 46) Front right turn indicator 16) Power outlet 17) Fuel...

Owners Manual
Page 215
... throttle body. After-burning (backfiring). Federal Law prohibits the following symptoms, have the vehicle inspected and repaired by any other component which consists of fuel vapors from the crankcase emission control system. or (2) the use ; This system prevents the escape of a charcoal canister and associated piping. made except idle speed adjustments with Noise Control System Prohibited. Crankcase Emission Control System The engine...
... throttle body. After-burning (backfiring). Federal Law prohibits the following symptoms, have the vehicle inspected and repaired by any other component which consists of fuel vapors from the crankcase emission control system. or (2) the use ; This system prevents the escape of a charcoal canister and associated piping. made except idle speed adjustments with Noise Control System Prohibited. Crankcase Emission Control System The engine...

Owners Manual
Page 216
... important not only for safety and low fuel consumption but also for auxiliary braking. When going down long slopes, control vehicle speed by experienced careful riders only! Warning Before starting engine, check for safe and effective vehicle operation. High speed increases the influence of any condition affecting stability and the loss of power to control vehicle speed and less on the rear view mirror; When the roadway is...
... important not only for safety and low fuel consumption but also for auxiliary braking. When going down long slopes, control vehicle speed by experienced careful riders only! Warning Before starting engine, check for safe and effective vehicle operation. High speed increases the influence of any condition affecting stability and the loss of power to control vehicle speed and less on the rear view mirror; When the roadway is...
Owners Manual
Page 219
... REGULATIONS APPLICABLE TO 1998 MODEL YEAR NEW MOTORCYCLES 6 VEHICLE EMISSION CONTROL INFORMATION Engine displacement: 944 cc Engine family: WDUCC0944ST2 Engine exhaust control system: MFI Evap family: THIS VEHICLE CONFORMS TO U.S. IF TANK IS OVERFILLED, HEAT MAY CAUSE FUEL TO EXPAND AND FLOW INTO EVAPORATIVE EMISSION CONTROL SYSTEM RESULTING IN HARD STARTING AND ENGINE HESITATION. 8G See Service Manual Closing 0.03 ± 0.12 mm SPARK PLUG: CHAMPION RA4HC OIL: SAE 20W50 SPARK PLUG GAP...
... REGULATIONS APPLICABLE TO 1998 MODEL YEAR NEW MOTORCYCLES 6 VEHICLE EMISSION CONTROL INFORMATION Engine displacement: 944 cc Engine family: WDUCC0944ST2 Engine exhaust control system: MFI Evap family: THIS VEHICLE CONFORMS TO U.S. IF TANK IS OVERFILLED, HEAT MAY CAUSE FUEL TO EXPAND AND FLOW INTO EVAPORATIVE EMISSION CONTROL SYSTEM RESULTING IN HARD STARTING AND ENGINE HESITATION. 8G See Service Manual Closing 0.03 ± 0.12 mm SPARK PLUG: CHAMPION RA4HC OIL: SAE 20W50 SPARK PLUG GAP...
Owners Manual
Page 221
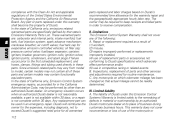
... certain models may be performed by other services and adjustments required for the warranty repair and the geographically appropriate hourly labor rate. Limitations This Emission Control System Warranty shall not cover any of the motorcycle or Any motorcycle on Ducati's recommended time allowance for routine maintenance. Limited liability A. pressure control valve; Inspections, replacement of replacement parts or accessories not conforming to receive compensation. III. These warranted parts are specifically...
... certain models may be performed by other services and adjustments required for the warranty repair and the geographically appropriate hourly labor rate. Limitations This Emission Control System Warranty shall not cover any of the motorcycle or Any motorcycle on Ducati's recommended time allowance for routine maintenance. Limited liability A. pressure control valve; Inspections, replacement of replacement parts or accessories not conforming to receive compensation. III. These warranted parts are specifically...