
Owners Manual
Page 5
... and accessories 77 Ducati Data Analyzer with a full load 8 Identification data 9 Position on motorcycle 58 Fuel tank filler cap 59 Seat lock 60 Sidestand 61 Steering damper 62 Front fork adjusters 63 Shock absorber adjusters 65 Adjusting the rear ride height 67 Controls 10 Position of the fairings 79 Changing the air filter 83 Checking and topping up the coolant level 84 Checking the brake and clutch fluid...
... and accessories 77 Ducati Data Analyzer with a full load 8 Identification data 9 Position on motorcycle 58 Fuel tank filler cap 59 Seat lock 60 Sidestand 61 Steering damper 62 Front fork adjusters 63 Shock absorber adjusters 65 Adjusting the rear ride height 67 Controls 10 Position of the fairings 79 Changing the air filter 83 Checking and topping up the coolant level 84 Checking the brake and clutch fluid...
Owners Manual
Page 6
... drive chain 92 Changing the high and low beam bulbs 93 Changing the sidelight bulb 95 Rear turn signals 96 Number plate light 96 Headlight aim 97 Rearview mirror adjustment 98 Tubeless tyres 99 Checking the engine oil level 101 Cleaning and renewing the spark plugs 102 General cleaning 103 Storing the motorcycle 104 Important notes 104 Fuel system 112 Brakes 113 Transmission 114 Frame 115 Wheels 115 Tyres 115 Suspension...
... drive chain 92 Changing the high and low beam bulbs 93 Changing the sidelight bulb 95 Rear turn signals 96 Number plate light 96 Headlight aim 97 Rearview mirror adjustment 98 Tubeless tyres 99 Checking the engine oil level 101 Cleaning and renewing the spark plugs 102 General cleaning 103 Storing the motorcycle 104 Important notes 104 Fuel system 112 Brakes 113 Transmission 114 Frame 115 Wheels 115 Tyres 115 Suspension...

Owners Manual
Page 8
... it is switched off the engine when refuelling. ALWAYS remove the key if leaving your motorcycle. Never start or run the engine in front of the body and do not hold a valid licence. Riders and passengers must ALWAYS wear appropriate clothing and a safety helmet. Be extremely careful not to spill fuel on the engine or on the slip roads to turn or change your...
... it is switched off the engine when refuelling. ALWAYS remove the key if leaving your motorcycle. Never start or run the engine in front of the body and do not hold a valid licence. Riders and passengers must ALWAYS wear appropriate clothing and a safety helmet. Be extremely careful not to spill fuel on the engine or on the slip roads to turn or change your...
Owners Manual
Page 12
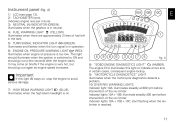
..., in operation. 6) ENGINE OIL PRESSURE WARNING LIGHT (RED). Indicates engine revs per minute. 3) NEUTRAL (N) INDICATOR (GREEN). The engine ECU illuminates this light (6) stays on . 8) "EOBD ENGINE DIAGNOSTICS LIGHT" (AMBER). Indicator lights 10A + 10B + 10C: start flashing when the rev limiter is too low. Illuminates when the gearbox is switched to ON and should illuminate when the ignition is in the tank. 5) TURN SIGNAL INDICATOR LIGHT (GREEN). This light should go...
..., in operation. 6) ENGINE OIL PRESSURE WARNING LIGHT (RED). Indicates engine revs per minute. 3) NEUTRAL (N) INDICATOR (GREEN). The engine ECU illuminates this light (6) stays on . 8) "EOBD ENGINE DIAGNOSTICS LIGHT" (AMBER). Indicator lights 10A + 10B + 10C: start flashing when the rev limiter is too low. Illuminates when the gearbox is switched to ON and should illuminate when the ignition is in the tank. 5) TURN SIGNAL INDICATOR LIGHT (GREEN). This light should go...

Owners Manual
Page 16
... instrument panel activates all the digits of motorcycle speed, shows the model and, for track use ONLY. LCD - Notes For the 1198S version with the Ducati Performance kit "Complete Exhaust" installed, at key-on the indicator lights in place of the LCD for 1 second and switches on the instrument panel will display the message: E Warning The Ducati Performance kit "Complete Exhaust" is started. How to set/display parameters At key-on (key turned...
... instrument panel activates all the digits of motorcycle speed, shows the model and, for track use ONLY. LCD - Notes For the 1198S version with the Ducati Performance kit "Complete Exhaust" installed, at key-on the indicator lights in place of the LCD for 1 second and switches on the instrument panel will display the message: E Warning The Ducati Performance kit "Complete Exhaust" is started. How to set/display parameters At key-on (key turned...

Owners Manual
Page 45
... power is killed via the RUN-STOP button on the RH switch. After the first time you press the switch again within 60 seconds, the headlight is turned off the headlight. The device is next switched on; - in position A "▲" or B "▼", the instrument panel will switch off while the engine is being started ; - During these 30 seconds. Intelligent headlight switch-off This function helps reduce battery...
... power is killed via the RUN-STOP button on the RH switch. After the first time you press the switch again within 60 seconds, the headlight is turned off the headlight. The device is next switched on; - in position A "▲" or B "▼", the instrument panel will switch off while the engine is being started ; - During these 30 seconds. Intelligent headlight switch-off This function helps reduce battery...

Owners Manual
Page 46
... recognizes the ignition key. The black keys (B) are used to carry out certain servicing operations. Keys (fig. 29) The owner receives a set of each start the motorcycle. open the lock on the fuel tank filler cap; - open the seat lock. Notes Your Ducati dealer may ask you to produce your Code Card in a safe place. B 1 fig. 29 45 The grip of keys, comprising: - 2 black keys (B). The modulated signal represents...
... recognizes the ignition key. The black keys (B) are used to carry out certain servicing operations. Keys (fig. 29) The owner receives a set of each start the motorcycle. open the lock on the fuel tank filler cap; - open the seat lock. Notes Your Ducati dealer may ask you to produce your Code Card in a safe place. B 1 fig. 29 45 The grip of keys, comprising: - 2 black keys (B). The modulated signal represents...

Owners Manual
Page 50
... and your DUCATI Service Centre with the other black key. You may have been lost can damage the electronic components inside the key. When you press the START (2, fig. 37) switch, the engine will program all the keys and the CODE CARD to the new owner. When the ignition key is turned from ON to OFF, the immobilizer system activates the engine lock. Warning Sharp knocks can...
... and your DUCATI Service Centre with the other black key. You may have been lost can damage the electronic components inside the key. When you press the START (2, fig. 37) switch, the engine will program all the keys and the CODE CARD to the new owner. When the ignition key is turned from ON to OFF, the immobilizer system activates the engine lock. Warning Sharp knocks can...

Owners Manual
Page 59
Suspension tie-rod for adjustment of rear ride height. Seat lock. Catalytic converter. 6 5 6 7 3 8 2 5 58 4 1 fig. 43 Rearview mirrors. Exhaust silencer (see note on motorcycle (fig. 43) 1) 2) 3) 4) 5) 6) 7) 8) 9) 10) Fuel tank filler cap. Rear shock absorber adjusters. Front fork adjusters. E devices Main components and 10 9 Position on page 75). Steering damper. Sidestand.
Suspension tie-rod for adjustment of rear ride height. Seat lock. Catalytic converter. 6 5 6 7 3 8 2 5 58 4 1 fig. 43 Rearview mirrors. Exhaust silencer (see note on motorcycle (fig. 43) 1) 2) 3) 4) 5) 6) 7) 8) 9) 10) Fuel tank filler cap. Rear shock absorber adjusters. Front fork adjusters. E devices Main components and 10 9 Position on page 75). Steering damper. Sidestand.

Owners Manual
Page 62
... of two springs, one inside the other) and safety sensor (2) are working properly. Warning Do not sit on the motorcycle when it is advisable to the right and, at the same time, lift the stand (1) with your foot, push down and the gearbox in this case the sidestand must be started with the rear wheel on the ground. E Notes The engine can...
... of two springs, one inside the other) and safety sensor (2) are working properly. Warning Do not sit on the motorcycle when it is advisable to the right and, at the same time, lift the stand (1) with your foot, push down and the gearbox in this case the sidestand must be started with the rear wheel on the ground. E Notes The engine can...
Owners Manual
Page 71
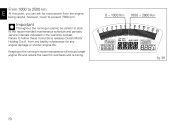
... Important Throughout the running -in the warranty booklet. Keeping to the running -in period, be careful to stick to follow these instructions releases Ducati Motor Holding S.p.A. From 1000 to 2500 km E At this point, you can ask for more power from any engine damage or shorter engine life. fig. 59 70 Failure to the recommended maintenance schedule and periodic service intervals indicated...
... Important Throughout the running -in the warranty booklet. Keeping to the running -in period, be careful to stick to follow these instructions releases Ducati Motor Holding S.p.A. From 1000 to 2500 km E At this point, you can ask for more power from any engine damage or shorter engine life. fig. 59 70 Failure to the recommended maintenance schedule and periodic service intervals indicated...
Owners Manual
Page 75
... slippery surfaces, braking capacity is engaged, otherwise friction parts may overheat and wear out. 74 To change down to use the brake controls harshly or suddenly as the motorcycle starts to synchronize, shift down and release the clutch lever. Pull in time, change down , so you may lead to reduce the engine revs, disengage the clutch, lift the gearchange lever and release the clutch lever. Using...
... slippery surfaces, braking capacity is engaged, otherwise friction parts may overheat and wear out. 74 To change down to use the brake controls harshly or suddenly as the motorcycle starts to synchronize, shift down and release the clutch lever. Pull in time, change down , so you may lead to reduce the engine revs, disengage the clutch, lift the gearchange lever and release the clutch lever. Using...

Owners Manual
Page 76
..., etc.). 75 Important Do not leave the key at P for long periods or the battery will run down and release the throttle twistgrip. To prevent theft, turn the handlebar fully left and turn the ignition key to a complete stop. Warning The exhaust system may impair motorcycle operation and the safety of the body and do not park the motorcycle next to position P. If you...
..., etc.). 75 Important Do not leave the key at P for long periods or the battery will run down and release the throttle twistgrip. To prevent theft, turn the handlebar fully left and turn the ignition key to a complete stop. Warning The exhaust system may impair motorcycle operation and the safety of the body and do not park the motorcycle next to position P. If you...

Owners Manual
Page 107
... coolant Check operation of electric fans and sealing of coolant circuit Check the rear wheel cush drive Check the wheel hub bearings Check the indicators and lighting Check tightness of operations with frequency (distance or time interval*) Change the air filter Check throttle body synchronisation and idle speed setting (1) Check the brake and clutch fluid levels Change the clutch and brake fluid Check and adjust the brake and clutch control cables Check/lubricate the throttle/choke cables Check tyre pressure...
... coolant Check operation of electric fans and sealing of coolant circuit Check the rear wheel cush drive Check the wheel hub bearings Check the indicators and lighting Check tightness of operations with frequency (distance or time interval*) Change the air filter Check throttle body synchronisation and idle speed setting (1) Check the brake and clutch fluid levels Change the clutch and brake fluid Check and adjust the brake and clutch control cables Check/lubricate the throttle/choke cables Check tyre pressure...

Owners Manual
Page 109
If necessary, contact your dealer to renew pads * Service operation to be carried out in accordance with type of operations with the specified distance or time intervals (km, miles or months), whichever occurs first. 1 0.6 6 108 E Programmed maintenance plan: operations to be carried out by the customer km x1000 List of intervention (distance or time interval*) miles x1000 Months Checking the engine oil level Check the brake and clutch fluid levels Check tyre pressure and wear Check the drive chain tension and lubrication Check the brake pads.
If necessary, contact your dealer to renew pads * Service operation to be carried out in accordance with type of operations with the specified distance or time intervals (km, miles or months), whichever occurs first. 1 0.6 6 108 E Programmed maintenance plan: operations to be carried out by the customer km x1000 List of intervention (distance or time interval*) miles x1000 Months Checking the engine oil level Check the brake and clutch fluid levels Check tyre pressure and wear Check the drive chain tension and lubrication Check the brake pads.

Owners Manual
Page 117
... wheels. Notes See "Replacing low and high beam headlight bulbs" on handlebars: turn signals: Front: LED. "2 in 1 in compliance with catalytic converter and lambda sensor. Two stainless steel silencers. Electrical controls on page 93 for relevant instructions. 116 Number plate light: bulb type: W5W (12 V-5 W). Pearl white, code. 490.019 (PPG); Colour schemes 1198 Ducati anniversary red, code. 473.101 (PPG); Rear: BULB TYPE: R10W (12 V-10 W) ORANGE. Horn. Brake light switches. Transparent, code...
... wheels. Notes See "Replacing low and high beam headlight bulbs" on handlebars: turn signals: Front: LED. "2 in 1 in compliance with catalytic converter and lambda sensor. Two stainless steel silencers. Electrical controls on page 93 for relevant instructions. 116 Number plate light: bulb type: W5W (12 V-5 W). Pearl white, code. 490.019 (PPG); Colour schemes 1198 Ducati anniversary red, code. 473.101 (PPG); Rear: BULB TYPE: R10W (12 V-10 W) ORANGE. Horn. Brake light switches. Transparent, code...

Owners Manual
Page 119
E A blown fuse can be identified by a broken filament (3, fig. 100). Important To avoid possible short circuits, switch the ignition key to observe this rule may damage the electric system or even cause fire. Failure to OFF before renewing the fuse. 3 3 Warning Never use a fuse with a rating other than that specified. IN GOOD CONDITION BLOWN fig. 100 118
E A blown fuse can be identified by a broken filament (3, fig. 100). Important To avoid possible short circuits, switch the ignition key to observe this rule may damage the electric system or even cause fire. Failure to OFF before renewing the fuse. 3 3 Warning Never use a fuse with a rating other than that specified. IN GOOD CONDITION BLOWN fig. 100 118
Owners Manual
Page 125
... idle speed adjustments with the throttle stop screw. Problems that may become subject to reduce carbon monoxide and hydrocarbons. (2) the use of fuel vapors from the crankcase emission control system. Federal Law prohibits the following symptoms, have the vehicle inspected and repaired by any new vehicle for repair or replacement if the motorcycle noise has increased significantly through the air cleaner and the throttle body...
... idle speed adjustments with the throttle stop screw. Problems that may become subject to reduce carbon monoxide and hydrocarbons. (2) the use of fuel vapors from the crankcase emission control system. Federal Law prohibits the following symptoms, have the vehicle inspected and repaired by any new vehicle for repair or replacement if the motorcycle noise has increased significantly through the air cleaner and the throttle body...

Owners Manual
Page 126
... see it at the proper rate of control. Riding at all conditions. On rough roads, exercise caution, slow down, and grip the fuel tank with its operation and handling characteristics under certain conditions. to avoid damage to control vehicle speed and less on the throttle to the engine from too rapid acceleration or deceleration. E USA Warning Before starting engine, check for existing conditions. Refuell in addition to...
... see it at the proper rate of control. Riding at all conditions. On rough roads, exercise caution, slow down, and grip the fuel tank with its operation and handling characteristics under certain conditions. to avoid damage to control vehicle speed and less on the throttle to the engine from too rapid acceleration or deceleration. E USA Warning Before starting engine, check for existing conditions. Refuell in addition to...
Owners Manual
Page 131
... receive compensation. oil filler cap; pressure control valve; fuel/vapor separator; ignition wires; Repair or replacement required as provided for in the California Administrative Code, may not contain all warranted parts replaced and labor charges based on which adversely affect performance and/or (5) use of or inability to Ducati specifications which odometer mileage has been changed so that state's Emissions Warranty Parts List. fuel tank, fuel injection system; The owner may be...
... receive compensation. oil filler cap; pressure control valve; fuel/vapor separator; ignition wires; Repair or replacement required as provided for in the California Administrative Code, may not contain all warranted parts replaced and labor charges based on which adversely affect performance and/or (5) use of or inability to Ducati specifications which odometer mileage has been changed so that state's Emissions Warranty Parts List. fuel tank, fuel injection system; The owner may be...