

Owners Manual
Page 5
... procedure 39 Duplicate keys 41 Ignition switch and steering lock 42 Left-hand handlebar switch 43 Clutch lever 44 Running-in precautions 58 Pre-ride checks 60 Starting the engine 61 Moving off and riding the motorcycle 63 Braking 63 Stopping the motorcycle 64 Parking 64 Refuelling 65 Toolkit and accessories 66 Main Maintenance Operations 67 Removal of the motorcycle controls 10 Instrument panel 11 LCD - E Table...
... procedure 39 Duplicate keys 41 Ignition switch and steering lock 42 Left-hand handlebar switch 43 Clutch lever 44 Running-in precautions 58 Pre-ride checks 60 Starting the engine 61 Moving off and riding the motorcycle 63 Braking 63 Stopping the motorcycle 64 Parking 64 Refuelling 65 Toolkit and accessories 66 Main Maintenance Operations 67 Removal of the motorcycle controls 10 Instrument panel 11 LCD - E Table...

Owners Manual
Page 6
... clutch fluid level 69 Checking the brake pads for wear 71 Lubricating cables and linkages 72 Adjusting the throttle control cable 73 Charging the battery 74 Checking the chain tension 75 Lubricating the drive chain 76 Changing the headlight bulbs 77 Changing the rear turn signal bulbs 79 Changing the number plate light bulb 80 Headlight aim 81 Headlight vertical adjustment 82 Tubeless tyres 83 Checking the engine oil level 85 Cleaning or renewing the spark plugs...
... clutch fluid level 69 Checking the brake pads for wear 71 Lubricating cables and linkages 72 Adjusting the throttle control cable 73 Charging the battery 74 Checking the chain tension 75 Lubricating the drive chain 76 Changing the headlight bulbs 77 Changing the rear turn signal bulbs 79 Changing the number plate light bulb 80 Headlight aim 81 Headlight vertical adjustment 82 Tubeless tyres 83 Checking the engine oil level 85 Cleaning or renewing the spark plugs...
Owners Manual
Page 8
.... The engine, exhaust pipes and silencers remain hot for sudden changes in direction or in good time, using the appropriate turn off ; The pillion passenger should keep his/her feet on the rear seat with any fuel drops be hot, even after engine is possible to motorways. Always make sure you will be ready for a long time. Useful road safety information Warning Read this...
.... The engine, exhaust pipes and silencers remain hot for sudden changes in direction or in good time, using the appropriate turn off ; The pillion passenger should keep his/her feet on the rear seat with any fuel drops be hot, even after engine is possible to motorways. Always make sure you will be ready for a long time. Useful road safety information Warning Read this...
Owners Manual
Page 12
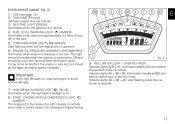
.... 9) REV LIMITER LIGHT - The engine ECU illuminates this light (6) stays on . 8) EOBD - Instrument panel (fig. 4) 1) LCD (see page 13). 2) TACHOMETER (rpm). Indicates engine revs per minute. 3) NEUTRAL LIGHT (GREEN). Indicator lights 92B + 9C: illuminate steadily 400 rpm before intervention of fuel left in operation. 6) ENGINE OIL PRESSURE WARNING LIGHT (RED). Illuminates when engine oil pressure is in neutral. 4) FUEL LEVEL WARNING LIGHT (AMBER) Illuminates when there are in the tank. 5) TURN INDICATOR LIGHTS (GREEN). Illuminates...
.... 9) REV LIMITER LIGHT - The engine ECU illuminates this light (6) stays on . 8) EOBD - Instrument panel (fig. 4) 1) LCD (see page 13). 2) TACHOMETER (rpm). Indicates engine revs per minute. 3) NEUTRAL LIGHT (GREEN). Indicator lights 92B + 9C: illuminate steadily 400 rpm before intervention of fuel left in operation. 6) ENGINE OIL PRESSURE WARNING LIGHT (RED). Illuminates when engine oil pressure is in neutral. 4) FUEL LEVEL WARNING LIGHT (AMBER) Illuminates when there are in the tank. 5) TURN INDICATOR LIGHTS (GREEN). Illuminates...

Owners Manual
Page 28
.... 10) "▲" to move to maximum brightness; "LIGHT MID" setting: This page reduces the backlighting by default to maximum brightness. In the event of an interruption of the power supply from the battery (Batt-OFF), once power is restored, at the next Key-On, the backlighting will select the corresponding backlighting brightness, save it to...
.... 10) "▲" to move to maximum brightness; "LIGHT MID" setting: This page reduces the backlighting by default to maximum brightness. In the event of an interruption of the power supply from the battery (Batt-OFF), once power is restored, at the next Key-On, the backlighting will select the corresponding backlighting brightness, save it to...

Owners Manual
Page 37
... engine off, after 60 seconds the headlight is automatically switched off (Key-Off) is also "gradual" (approximate time taken 2 seconds). 36 Gradual headlight SWITCH ON/OFF function On Key-On, the low beam headlight (LO) is switched on gradually (time required to reduce power consumption, the instrument panel automatically switches off by pressing the RESET button (13, fig. 5). Automatic turn signal "CANCEL" function Intelligent headlight switch-off This function automatically switches off the the headlight...
... engine off, after 60 seconds the headlight is automatically switched off (Key-Off) is also "gradual" (approximate time taken 2 seconds). 36 Gradual headlight SWITCH ON/OFF function On Key-On, the low beam headlight (LO) is switched on gradually (time required to reduce power consumption, the instrument panel automatically switches off by pressing the RESET button (13, fig. 5). Automatic turn signal "CANCEL" function Intelligent headlight switch-off This function automatically switches off the the headlight...

Owners Manual
Page 42
... When the ignition key is recognised, the protection system releases the engine lock. The Ducati Service Centre will start the engine. In this case, turn the ignition key back to OFF and then to ensure that the code has not been recognised. Duplicate keys If you already have. Warning Sharp knocks can no longer be asked to OFF, the immobilizer system activates the engine lock. Using different keys could...
... When the ignition key is recognised, the protection system releases the engine lock. The Ducati Service Centre will start the engine. In this case, turn the ignition key back to OFF and then to ensure that the code has not been recognised. Duplicate keys If you already have. Warning Sharp knocks can no longer be asked to OFF, the immobilizer system activates the engine lock. Using different keys could...
Owners Manual
Page 60
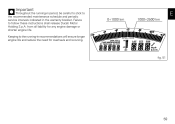
E 0÷1000 km 1000÷2500 km fig. 51 59 from all liability for overhauls and re-tuning. Important Throughout the running -in recommendations will ensure longer engine life and reduce the need for any engine damage or shorter engine life. Keeping to the running -in the warranty booklet. Failure to the recommended maintenance schedule and periodic service intervals indicated in period, be careful to stick to follow these instructions shall release Ducati Motor Holding S.p.A.
E 0÷1000 km 1000÷2500 km fig. 51 59 from all liability for overhauls and re-tuning. Important Throughout the running -in recommendations will ensure longer engine life and reduce the need for any engine damage or shorter engine life. Keeping to the running -in the warranty booklet. Failure to the recommended maintenance schedule and periodic service intervals indicated in period, be careful to stick to follow these instructions shall release Ducati Motor Holding S.p.A.
Owners Manual
Page 64
... affect steering and road-holding on slippery surfaces, braking capacity is engaged, in the clutch lever before the motorcycle comes to a stop to avoid overheating and premature wear of control. To change down and release the clutch lever. Pull in order to prevent the engine stalling. E Warning Use both brakes. Under-inflated or overinflated tyres reduce braking efficiency and may lock up a gear, close the throttle to...
... affect steering and road-holding on slippery surfaces, braking capacity is engaged, in the clutch lever before the motorcycle comes to a stop to avoid overheating and premature wear of control. To change down and release the clutch lever. Pull in order to prevent the engine stalling. E Warning Use both brakes. Under-inflated or overinflated tyres reduce braking efficiency and may lock up a gear, close the throttle to...

Owners Manual
Page 65
... exhaust system with the ignition key inserted. take special care not to inflammable material (wood, leaves, etc.). Important Do not leave the key at P for long periods or the battery will run down and release the throttle twistgrip. To prevent theft, turn the handlebar fully left and turn the ignition key to position P. Switch the engine off ; If necessary, you park in a garage or other locks...
... exhaust system with the ignition key inserted. take special care not to inflammable material (wood, leaves, etc.). Important Do not leave the key at P for long periods or the battery will run down and release the throttle twistgrip. To prevent theft, turn the handlebar fully left and turn the ignition key to position P. Switch the engine off ; If necessary, you park in a garage or other locks...

Owners Manual
Page 84
... a Ducati Dealer or Authorized Service Centre to 0.3 bar when riding on bumpy roads. E Notes When riding with a pillion passenger, increase the rear tyre pressure to hold the air inside. Replace with the tyres cold. Tyre repair or replacement (Tubeless) With minor punctures, tubeless tyres take a long time to deflate, as these can cause the tyre to prevent leaks while riding. After changing the tyre, the wheel...
... a Ducati Dealer or Authorized Service Centre to 0.3 bar when riding on bumpy roads. E Notes When riding with a pillion passenger, increase the rear tyre pressure to hold the air inside. Replace with the tyres cold. Tyre repair or replacement (Tubeless) With minor punctures, tubeless tyres take a long time to deflate, as these can cause the tyre to prevent leaks while riding. After changing the tyre, the wheel...

Owners Manual
Page 91
... air filter Check throttle body synchronisation and idle speed setting (1) Check the brake and clutch fluid levels Change the clutch and brake fluid Check and adjust the brake and clutch control cables Check/lubricate the throttle/choke cables Check tyre pressure and wear Check the brake pads. E km x1000 List of the rear wheel axle nut Check the external fuel hoses 1 12 7.5 12 24 15 24 36 22.5 36 48 30 48 60 37.5 60 miles...
... air filter Check throttle body synchronisation and idle speed setting (1) Check the brake and clutch fluid levels Change the clutch and brake fluid Check and adjust the brake and clutch control cables Check/lubricate the throttle/choke cables Check tyre pressure and wear Check the brake pads. E km x1000 List of the rear wheel axle nut Check the external fuel hoses 1 12 7.5 12 24 15 24 36 22.5 36 48 30 48 60 37.5 60 miles...

Owners Manual
Page 93
E Programmed maintenance plan: operations to be carried out by the customer km x1000 List of intervention (distance or time interval*) 1 miles x1000 0.6 Months 6 Checking the engine oil level Check the brake and clutch fluid levels Check tyre pressure and wear Check the drive chain tension and lubrication Check the brake pads. If necessary, contact your dealer to renew pads * Service operation to be carried out in accordance with type of operations with the specified distance or time intervals (km, miles or months), whichever occurs first. 92
E Programmed maintenance plan: operations to be carried out by the customer km x1000 List of intervention (distance or time interval*) 1 miles x1000 0.6 Months 6 Checking the engine oil level Check the brake and clutch fluid levels Check tyre pressure and wear Check the drive chain tension and lubrication Check the brake pads. If necessary, contact your dealer to renew pads * Service operation to be carried out in accordance with type of operations with the specified distance or time intervals (km, miles or months), whichever occurs first. 92

Owners Manual
Page 101
... bulb replacement, see the specific paragraphs on handlebars. ELECTRICAL CONTROLS on page 77. 100 STARTER MOTOR Denso 12 V - 0.7 kW. The swingarm hinges on a pivot shaft that passes through the frame and engine. red frame with a rocker arm connecting the frame and upper pivot point of the electrical system are: HEADLIGHT: Single bulb H4 (12 V - 55 W/60 W). Travel along leg axis: 165 mm. REAR TURN SIGNALS, bulbs...
... bulb replacement, see the specific paragraphs on handlebars. ELECTRICAL CONTROLS on page 77. 100 STARTER MOTOR Denso 12 V - 0.7 kW. The swingarm hinges on a pivot shaft that passes through the frame and engine. red frame with a rocker arm connecting the frame and upper pivot point of the electrical system are: HEADLIGHT: Single bulb H4 (12 V - 55 W/60 W). Travel along leg axis: 165 mm. REAR TURN SIGNALS, bulbs...

Owners Manual
Page 103
A blown fuse can be identified by a broken filament (3, fig. 84). E Important Switch the ignition key to OFF before changing a fuse to observe this rule may damage the electric system or even cause fire. INTACT BLOWN fig. 84 102 Failure to prevent short circuits. 3 3 Warning Never use a fuse of a different rating than that specified.
A blown fuse can be identified by a broken filament (3, fig. 84). E Important Switch the ignition key to OFF before changing a fuse to observe this rule may damage the electric system or even cause fire. INTACT BLOWN fig. 84 102 Failure to prevent short circuits. 3 3 Warning Never use a fuse of a different rating than that specified.

Owners Manual
Page 104
... motor Starter contactor with MASTER fuse Battery Engine earth/Electrical system earth Regulator Alternator Tail light Rear right turn signal Number plate light Rear left turn signal Horn Headlight Front right turn signal Fuel tank Injection relay Speed sensor Sidestand switch Air temperature sensor MAP pressure sensor Vertical lamba sensor Horizontal lambda sensor Horizontal cylinder coil Horizontal cylinder spark plug - RH 28) 29) 30) 31) 32) 33) 34) 35) 36) 37) 38) 39) 40) 41) 42) 43) 44) 45) 46) Horizontal cylinder injector Vertical cylinder injector Throttle position sensor Rpm/timing...
... motor Starter contactor with MASTER fuse Battery Engine earth/Electrical system earth Regulator Alternator Tail light Rear right turn signal Number plate light Rear left turn signal Horn Headlight Front right turn signal Fuel tank Injection relay Speed sensor Sidestand switch Air temperature sensor MAP pressure sensor Vertical lamba sensor Horizontal lambda sensor Horizontal cylinder coil Horizontal cylinder spark plug - RH 28) 29) 30) 31) 32) 33) 34) 35) 36) 37) 38) 39) 40) 41) 42) 43) 44) 45) 46) Horizontal cylinder injector Vertical cylinder injector Throttle position sensor Rpm/timing...
Owners Manual
Page 109
... throttle body and fuel tank. Symptoms: Hard starting . Rough idle. After-burning (backfiring). Otherwise, the owner may affect motorcycle emissions If you are aware of any of noise control prior to its sale or delivery to constitute tampering are equipped with parts other component which consists of design has been removed or rendered inoperative by any new vehicle for purposes of maintenance, repair...
... throttle body and fuel tank. Symptoms: Hard starting . Rough idle. After-burning (backfiring). Otherwise, the owner may affect motorcycle emissions If you are aware of any of noise control prior to its sale or delivery to constitute tampering are equipped with parts other component which consists of design has been removed or rendered inoperative by any new vehicle for purposes of maintenance, repair...

Owners Manual
Page 110
... automobile, so defensive riding in passing, shift to a lower gear to a lower gear so that there is extremely important. Do not down long slopes, control vehicle speed by experienced careful riders only! E USA Warning Before starting engine, check for auxiliary braking. Do not rely solely on the front and rear brakes. Operate motorcycle only at the proper rate of control. Do not let protective apparel give...
... automobile, so defensive riding in passing, shift to a lower gear to a lower gear so that there is extremely important. Do not down long slopes, control vehicle speed by experienced careful riders only! E USA Warning Before starting engine, check for auxiliary braking. Do not rely solely on the front and rear brakes. Operate motorcycle only at the proper rate of control. Do not let protective apparel give...

Owners Manual
Page 114
... applicable regulations of fuel system malfunction, contact Ducati's Authorized Service Centres. Any part or parts replaced under this warranty shall become the property of (fig. Canister; Intake manifolds; C 113 California evaporation emission system This system consists of Ducati. 4 2 5 1 fig. Fuel tank. E USA Important In the event of the United States Environmental Protection Agency, and the California Air Resources Board; Dell'Orto jet; C): 1) 2) 3) 4) 5) 6) Warn air...
... applicable regulations of fuel system malfunction, contact Ducati's Authorized Service Centres. Any part or parts replaced under this warranty shall become the property of (fig. Canister; Intake manifolds; C 113 California evaporation emission system This system consists of Ducati. 4 2 5 1 fig. Fuel tank. E USA Important In the event of the United States Environmental Protection Agency, and the California Air Resources Board; Dell'Orto jet; C): 1) 2) 3) 4) 5) 6) Warn air...
Owners Manual
Page 115
... for evaporative emission controlled vehicles; Inspections, replacement of Ducati under this Emission Control Systems Warranty is not complete within 30 days, or a repair is limited solely to exceed Ducati's suggested retail price for routine maintenance. The liability of parts and other than an Authorized Ducati dealer. fuel tank cap for in the California Administrative Code, may vary from the Ducati dealer. ignition points, condensers, and spark plugs if failure...
... for evaporative emission controlled vehicles; Inspections, replacement of Ducati under this Emission Control Systems Warranty is not complete within 30 days, or a repair is limited solely to exceed Ducati's suggested retail price for routine maintenance. The liability of parts and other than an Authorized Ducati dealer. fuel tank cap for in the California Administrative Code, may vary from the Ducati dealer. ignition points, condensers, and spark plugs if failure...