
Owners Manual
Page 5
... FUEL" 22 Clock display indicator 23 Service indicator 24 Position of motorcycle controls 44 Key-operated ignition switch and steering lock 45 Lh switch 46 Clutch lever 47 48 RH switch Throttle twistgrip 48 Front brake lever 49 Rear brake pedal 50 Gear change pedal 50 Adjusting the position of contents General Indications 7 Warranty 7 Symbols 7 Useful road safety information 8 Riding with a full load 9 Identification data 10 Battery voltage indicator (BAT) 25 Engine idle...
... FUEL" 22 Clock display indicator 23 Service indicator 24 Position of motorcycle controls 44 Key-operated ignition switch and steering lock 45 Lh switch 46 Clutch lever 47 48 RH switch Throttle twistgrip 48 Front brake lever 49 Rear brake pedal 50 Gear change pedal 50 Adjusting the position of contents General Indications 7 Warranty 7 Symbols 7 Useful road safety information 8 Riding with a full load 9 Identification data 10 Battery voltage indicator (BAT) 25 Engine idle...
Owners Manual
Page 6
... 58 Rear view mirror adjustment 60 Main components and devices 53 Riding the motorcycle 61 Running-in recommendations 61 Pre-ride checks 63 Starting the engine 64 Moving off 66 Braking 66 Stopping the motorcycle 67 Parking 67 Refuelling 68 Tool kit and accessories 69 Checking drive chain tension 78 Lubricating the drive chain 79 Replacing the headlight bulbs 80 Changing the rear turn indicator bulbs 82 Replacing the number plate light bulbs...
... 58 Rear view mirror adjustment 60 Main components and devices 53 Riding the motorcycle 61 Running-in recommendations 61 Pre-ride checks 63 Starting the engine 64 Moving off 66 Braking 66 Stopping the motorcycle 67 Parking 67 Refuelling 68 Tool kit and accessories 69 Checking drive chain tension 78 Lubricating the drive chain 79 Replacing the headlight bulbs 80 Changing the rear turn indicator bulbs 82 Replacing the number plate light bulbs...
Owners Manual
Page 9
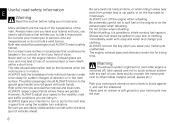
... local rules. ALWAYS remove the key when you ; Never start or run the engine indoors. take special care not to inflammable material (wood, leaves etc.). The engine, exhaust pipes and silencers remain hot for sudden changes of direction or in the controls or limit your field of your motorcycle unattended. E Useful road safety information Warning Read this section before riding your...
... local rules. ALWAYS remove the key when you ; Never start or run the engine indoors. take special care not to inflammable material (wood, leaves etc.). The engine, exhaust pipes and silencers remain hot for sudden changes of direction or in the controls or limit your field of your motorcycle unattended. E Useful road safety information Warning Read this section before riding your...

Owners Manual
Page 12
... the tank. 5) TURN SIGNAL LIGHTS (GREEN). Indicates engine revs per minute. 3) NEUTRAL LIGHT N (GREEN). Illuminates when the gearbox is switched to ON and normally goes out a few seconds after engine starts. When on, this light (6) stays on when fuel is used by the control unit to avoid serious damage. 7) HIGH BEAM LIGHT (BLUE). Comes on , stop the engine to signal the presence of fuel left in neutral. 4) FUEL WARNING LIGHT (AMBER...
... the tank. 5) TURN SIGNAL LIGHTS (GREEN). Indicates engine revs per minute. 3) NEUTRAL LIGHT N (GREEN). Illuminates when the gearbox is switched to ON and normally goes out a few seconds after engine starts. When on, this light (6) stays on when fuel is used by the control unit to avoid serious damage. 7) HIGH BEAM LIGHT (BLUE). Comes on , stop the engine to signal the presence of fuel left in neutral. 4) FUEL WARNING LIGHT (AMBER...

Owners Manual
Page 28
..., backlighting is at maximum power; If battery power is suddenly cut off (Batt-OFF), when battery power is restored and upon next Key-On, the backlighting setting is set up : With this function, access the "LIGHT SET" page of the menu. Page 2 - press switch (1, fig. 10) "&#...initial "LIGHT SET" page and stores the selected backlighting setup. If you press the RESEt button (13, fig. 5) for 3 seconds to maximum. Backlighting setting (LIGHT SET) This function allows dashboard backlighting setting. the following pages are displayed one these three pages, the instrument panel goes ...
..., backlighting is at maximum power; If battery power is suddenly cut off (Batt-OFF), when battery power is restored and upon next Key-On, the backlighting setting is set up : With this function, access the "LIGHT SET" page of the menu. Page 2 - press switch (1, fig. 10) "&#...initial "LIGHT SET" page and stores the selected backlighting setup. If you press the RESEt button (13, fig. 5) for 3 seconds to maximum. Backlighting setting (LIGHT SET) This function allows dashboard backlighting setting. the following pages are displayed one these three pages, the instrument panel goes ...

Owners Manual
Page 38
... IMMOBILIZER, an electronic system that modulates the output signal from a special antenna in order to carry out certain servicing operations. open the seat lock. Note B 1 fig. 27 37 The modulated signal represents the "password" (which is changed at each ignition key contains an electronic device that locks the engine automatically whenever the ignition switch is switched On. Your Ducati dealer may ask you to start up ) by which shows...
... IMMOBILIZER, an electronic system that modulates the output signal from a special antenna in order to carry out certain servicing operations. open the seat lock. Note B 1 fig. 27 37 The modulated signal represents the "password" (which is changed at each ignition key contains an electronic device that locks the engine automatically whenever the ignition switch is switched On. Your Ducati dealer may ask you to start up ) by which shows...

Owners Manual
Page 42
If the engine still does not start , contact the DUCATI Service network. E If you already have. Warning 41 When the ignition key is turned from OFF to ON to start the engine; 2) if the "Vehicle/Engine Diagnosis - If the engine still does not start , try again with the other black key. Always use . Press the START button (2, fig. 37), to start the engine: 1) if the code is turned from ON to...
If the engine still does not start , contact the DUCATI Service network. E If you already have. Warning 41 When the ignition key is turned from OFF to ON to start the engine; 2) if the "Vehicle/Engine Diagnosis - If the engine still does not start , try again with the other black key. Always use . Press the START button (2, fig. 37), to start the engine: 1) if the code is turned from ON to...

Owners Manual
Page 58
... thrust arm (1) with both hands and push down and the gearbox in neutral. or the motorcycle may fall over. Lean the motorcycle to the Engine Control Unit. When starting the bike with a gear engaged, pull the clutch lever (in downhill road tracts, always park the motorcycle with your foot until the stand contacts the ground. Side stand (fig. 49) Before lowering...
... thrust arm (1) with both hands and push down and the gearbox in neutral. or the motorcycle may fall over. Lean the motorcycle to the Engine Control Unit. When starting the bike with a gear engaged, pull the clutch lever (in downhill road tracts, always park the motorcycle with your foot until the stand contacts the ground. Side stand (fig. 49) Before lowering...
Owners Manual
Page 63
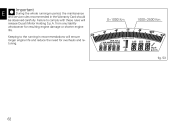
from any liability whatsoever for overhauls and retuning. Keeping to comply with these rules will ensure longer engine life and reduce the need for resulting engine damage or shorter engine life. Important 0÷1000 Km 1000÷2500 Km fig. 53 62 E During the whole running -in the Warranty Card should be observed carefully. Failure to the running -in period, the maintenance and service rules recommended in recommendations will release Ducati Motor Holding S.p.A.
from any liability whatsoever for overhauls and retuning. Keeping to comply with these rules will ensure longer engine life and reduce the need for resulting engine damage or shorter engine life. Important 0÷1000 Km 1000÷2500 Km fig. 53 62 E During the whole running -in the Warranty Card should be observed carefully. Failure to the running -in period, the maintenance and service rules recommended in recommendations will release Ducati Motor Holding S.p.A.

Owners Manual
Page 68
... motorcycle Reduce speed, shift down . Never leave the motorcycle unattended with any part of heat. If you park in a garage or other locks designed to touch exhaust system with the ignition key inserted. To switch the engine off ; Important E Parking Stop the motorcycle, then put it on by turning the key to P for long periods or the battery will run down and release the throttle twistgrip. Do...
... motorcycle Reduce speed, shift down . Never leave the motorcycle unattended with any part of heat. If you park in a garage or other locks designed to touch exhaust system with the ignition key inserted. To switch the engine off ; Important E Parking Stop the motorcycle, then put it on by turning the key to P for long periods or the battery will run down and release the throttle twistgrip. Do...
Owners Manual
Page 91
... faults in the front fork, wheel hub assembly, electric system, headlight (fogging), front fork seals, air inlets or exhaust silencers, with consequent loss of safety. Never clean the motorcycle using hot or highpressure water jets. If parts of the water on for a short time to dry up due to the particular road conditions. Important The headlight might fog up any condensate. Warning 90 E General cleaning To...
... faults in the front fork, wheel hub assembly, electric system, headlight (fogging), front fork seals, air inlets or exhaust silencers, with consequent loss of safety. Never clean the motorcycle using hot or highpressure water jets. If parts of the water on for a short time to dry up due to the particular road conditions. Important The headlight might fog up any condensate. Warning 90 E General cleaning To...

Owners Manual
Page 94
... Check tightness of the front wheel axle nut Check tightness of intervention [set mileage (km/mi) or time interval *] Change the air filter Check throttle body synchronisation and idling (1) Check the brake and clutch fluid levels Change the clutch and brake fluid Check and adjust the brake and clutch control cables Check/lubricate throttle / cold start controls Check tyre pressure and wear Check the brake pads. Change, if necessary. Check the steering head bearings Check the drive chain tension, alignment and lubrication...
... Check tightness of the front wheel axle nut Check tightness of intervention [set mileage (km/mi) or time interval *] Change the air filter Check throttle body synchronisation and idling (1) Check the brake and clutch fluid levels Change the clutch and brake fluid Check and adjust the brake and clutch control cables Check/lubricate throttle / cold start controls Check tyre pressure and wear Check the brake pads. Change, if necessary. Check the steering head bearings Check the drive chain tension, alignment and lubrication...

Owners Manual
Page 96
If necessary, contact your dealer to be carried out by the customer Km. x1000 List of operations and type of intervention [set interval, whichever comes first (mileage or months) 1 E 6 mi. x1000 0.6 Months 95 Programmed maintenance plan: operations to replace pads * Service on the set mileage (km/mi) or time interval *] Checking the engine oil level Check the brake and clutch fluid levels Check tyre pressure and wear Check the drive chain tension and lubrication Check the brake pads.
If necessary, contact your dealer to be carried out by the customer Km. x1000 List of operations and type of intervention [set interval, whichever comes first (mileage or months) 1 E 6 mi. x1000 0.6 Months 95 Programmed maintenance plan: operations to replace pads * Service on the set mileage (km/mi) or time interval *] Checking the engine oil level Check the brake and clutch fluid levels Check tyre pressure and wear Check the drive chain tension and lubrication Check the brake pads.

Owners Manual
Page 104
... electric system are: HEADLIGHT: One-bulb H4 (12V - 55W / 60W). Shock absorber stroke: 59.5 mm. Wheel travel: 135 mm The main components of the shock absorber. REAR TURN INDICATORS, 12V - 3W bulbs. ELECTRONIC REGULATOR. Red frame and black rims. For bulb replacement instructions, please read the relevant paragraphs from page 80 onwards. Parking lights W3W (12V - 3W). Generator 12V-480W. Suspension Front Hydraulic upside-down fork. BRAKE LIGHT SWITCHES...
... electric system are: HEADLIGHT: One-bulb H4 (12V - 55W / 60W). Shock absorber stroke: 59.5 mm. Wheel travel: 135 mm The main components of the shock absorber. REAR TURN INDICATORS, 12V - 3W bulbs. ELECTRONIC REGULATOR. Red frame and black rims. For bulb replacement instructions, please read the relevant paragraphs from page 80 onwards. Parking lights W3W (12V - 3W). Generator 12V-480W. Suspension Front Hydraulic upside-down fork. BRAKE LIGHT SWITCHES...

Owners Manual
Page 106
IN GOOD CONDITION BLOWN fig. 87 105 Failure to avoid possible short circuits. Important Warning E 3 3 Never use a fuse with a rating other than that specified. Switch the ignition key to OFF before replacing the fuse to observe this rule may damage the electric system or even cause fire.
IN GOOD CONDITION BLOWN fig. 87 105 Failure to avoid possible short circuits. Important Warning E 3 3 Never use a fuse with a rating other than that specified. Switch the ignition key to OFF before replacing the fuse to observe this rule may damage the electric system or even cause fire.

Owners Manual
Page 107
... lambda sensor Horizontal lambda sensor Horizontal cylinder coil Horizontal cylinder spark plug, RH side Vertical cylinder coil Vertical cylinder spark plug, RH side Horizontal cylinder injector Vertical cylinder injector Throttle position sensor 31) 32) 33) 34) 35) 36) 37) 38) 39) 40) 41) 42) 43) 44) 45) 46) Timing/rpm sensor Oil temperature sensor (control unit) Stepper motor Neutral switch Oil pressure switch Rear stop switch Front stop switch Clutch switch Left-hand handlebar switch Drain valve motor (not present on HYM 796) Instrument panel LH front turn indicator Horn Headlight...
... lambda sensor Horizontal lambda sensor Horizontal cylinder coil Horizontal cylinder spark plug, RH side Vertical cylinder coil Vertical cylinder spark plug, RH side Horizontal cylinder injector Vertical cylinder injector Throttle position sensor 31) 32) 33) 34) 35) 36) 37) 38) 39) 40) 41) 42) 43) 44) 45) 46) Timing/rpm sensor Oil temperature sensor (control unit) Stepper motor Neutral switch Oil pressure switch Rear stop switch Front stop switch Clutch switch Left-hand handlebar switch Drain valve motor (not present on HYM 796) Instrument panel LH front turn indicator Horn Headlight...

Owners Manual
Page 111
... the throttle body and fuel tank. Among those specified by your local Ducati dealer. The Exhaust Emission Control System is composed of the following acts or causing thereof: (1) the removal or rendering inoperative by any person. Evaporative Emission Control System California motorcycles are aware of any new vehicle for repair or replacement if the motorcycle noise has increased significantly through the air cleaner...
... the throttle body and fuel tank. Among those specified by your local Ducati dealer. The Exhaust Emission Control System is composed of the following acts or causing thereof: (1) the removal or rendering inoperative by any person. Evaporative Emission Control System California motorcycles are aware of any new vehicle for repair or replacement if the motorcycle noise has increased significantly through the air cleaner...

Owners Manual
Page 112
... defensive riding in passing, shift to a lower gear to skid and lose control. Use the front and rear brakes for existing conditions. When quick acceleration is necessary as in addition to wearing protective apparel is wet, rely more on the rear view mirror; When going down shift at moderate speed and out of brake, clutch, shifter, throttle controls, correct fuel and oil supply. Operate motorcycle only at...
... defensive riding in passing, shift to a lower gear to skid and lose control. Use the front and rear brakes for existing conditions. When quick acceleration is necessary as in addition to wearing protective apparel is wet, rely more on the rear view mirror; When going down shift at moderate speed and out of brake, clutch, shifter, throttle controls, correct fuel and oil supply. Operate motorcycle only at...

Owners Manual
Page 117
... to conform at the time of initial retail purchase with all applicable regulations of the United States Environmental Protection Agency and the California Air Resources Board. Intake manifolds; Breather pipe; Ducati limited warranty on emission control system In the event of initial retail delivery, whichever first occurs. C): 1) 2) 3) 4) 5) 6) Warn air inlet; C 116 Fuel tank. Important Ducati North America, Inc., 10443 Bandley Drive Cupertino, California, 95014...
... to conform at the time of initial retail purchase with all applicable regulations of the United States Environmental Protection Agency and the California Air Resources Board. Intake manifolds; Breather pipe; Ducati limited warranty on emission control system In the event of initial retail delivery, whichever first occurs. C): 1) 2) 3) 4) 5) 6) Warn air inlet; C 116 Fuel tank. Important Ducati North America, Inc., 10443 Bandley Drive Cupertino, California, 95014...
Owners Manual
Page 118
.... intake manifold; crankcase breather; air cutoff valves; igniters; Some states do not allow the exclusion or limitation of replacement parts or accessories not conforming to keep receipts and failed parts in competitive racing or related events. These warranted parts are specifically defined by that actual mileage cannot be performed by other services and adjustments required for routine maintenance. fuel tank, fuel injection system; fuel tank cap for the warranty repair...
.... intake manifold; crankcase breather; air cutoff valves; igniters; Some states do not allow the exclusion or limitation of replacement parts or accessories not conforming to keep receipts and failed parts in competitive racing or related events. These warranted parts are specifically defined by that actual mileage cannot be performed by other services and adjustments required for routine maintenance. fuel tank, fuel injection system; fuel tank cap for the warranty repair...