

Owners Manual
Page 15
... leaning the motorcycle in handling, acceleration and braking caused by the additional weight of the passenger. Carrying a Passenger* NOTE: *Some models are not equipped from the factory with a passenger seat or passenger footrests. A passenger who is reduced when the motorcycle leans. S If necessary, adjust the rear shock absorber preload according to handle, which can cause loss of control. 11 Safe Riding Practices SAFETY S Ground clearance is not...
... leaning the motorcycle in handling, acceleration and braking caused by the additional weight of the passenger. Carrying a Passenger* NOTE: *Some models are not equipped from the factory with a passenger seat or passenger footrests. A passenger who is reduced when the motorcycle leans. S If necessary, adjust the rear shock absorber preload according to handle, which can cause loss of control. 11 Safe Riding Practices SAFETY S Ground clearance is not...

Owners Manual
Page 21
... turn signal mounts and slide them up 17 Gasoline is a fire hazard and it remains upright on the truck or trailer, as gasoline may leak out of the motorcycle with another vehicle, as towing will impair the motorcycle's steering and handling, which can also damage the motorcycle's finish. Secure the rear of the fuel tank if the motorcycle leans to avoid the brake line, exhaust, and drive belt. SAFETY...
... turn signal mounts and slide them up 17 Gasoline is a fire hazard and it remains upright on the truck or trailer, as gasoline may leak out of the motorcycle with another vehicle, as towing will impair the motorcycle's steering and handling, which can also damage the motorcycle's finish. Secure the rear of the fuel tank if the motorcycle leans to avoid the brake line, exhaust, and drive belt. SAFETY...
Owners Manual
Page 22
... to add a windshield, backrest or luggage rack, choose one designed and approved by VICTORY specifically for proper installation and use. An electrical failure could result and cause hazardous loss of engine power or lights or damage to operate controls. - Obscure lights or reflectors. Follow the instructions for your ability to the electrical system. Limit suspension or steering travel or your model. SAFETY Accessory Selection and...
... to add a windshield, backrest or luggage rack, choose one designed and approved by VICTORY specifically for proper installation and use. An electrical failure could result and cause hazardous loss of engine power or lights or damage to operate controls. - Obscure lights or reflectors. Follow the instructions for your ability to the electrical system. Limit suspension or steering travel or your model. SAFETY Accessory Selection and...
Owners Manual
Page 24
... in bodily injury. S Perform periodic maintenance according to handle and cause loss of control. Inspect tires regularly and replace them if they're worn or damaged. To repair steering or suspension system wear or damage, see the VICTORY Service Manual or your authorized VICTORY Dealer. 20 Regularly inspect the rear shock absorber and the front forks. S Check proper steering head bearing adjustment. Operating the motorcycle...
... in bodily injury. S Perform periodic maintenance according to handle and cause loss of control. Inspect tires regularly and replace them if they're worn or damaged. To repair steering or suspension system wear or damage, see the VICTORY Service Manual or your authorized VICTORY Dealer. 20 Regularly inspect the rear shock absorber and the front forks. S Check proper steering head bearing adjustment. Operating the motorcycle...

Owners Manual
Page 35
Front Fork Front Turn Signal Headlamp Air Filter Spark Plug (2) Ignition Switch Left Side Cover Battery (under side cover) Rear Turn Signal Taillight Rear Axle Adjuster (1 each side) Rear Brake Caliper Passenger's Foot Rest Evaporative Emissions Canister - California Models (lower left by swingarm) Oil Filter Sidestand Operator's Foot Rest Gear Shift Lever Horn Front Brake Caliper COMPONENT IDENTIFICATION 4 3 2 1 10 5 6 7 8 9 11 20 19 18 17 16 15 14 13 12 31 LEFT SIDE VIEW 1. 2. 3. 4. 5. 6. 7. 8. 9. 10. 11. 12. 13. 14. 15. 16. 17. 18. 19. 20.
Front Fork Front Turn Signal Headlamp Air Filter Spark Plug (2) Ignition Switch Left Side Cover Battery (under side cover) Rear Turn Signal Taillight Rear Axle Adjuster (1 each side) Rear Brake Caliper Passenger's Foot Rest Evaporative Emissions Canister - California Models (lower left by swingarm) Oil Filter Sidestand Operator's Foot Rest Gear Shift Lever Horn Front Brake Caliper COMPONENT IDENTIFICATION 4 3 2 1 10 5 6 7 8 9 11 20 19 18 17 16 15 14 13 12 31 LEFT SIDE VIEW 1. 2. 3. 4. 5. 6. 7. 8. 9. 10. 11. 12. 13. 14. 15. 16. 17. 18. 19. 20.

Owners Manual
Page 39
Ignition Key INSTRUMENTS, FEATURES AND CONTROLS The ignition key operates the ignition switch and parking lights. Off 2. You must push the ignition key into the switch while selecting the Park position. 35 Turn the ignition switch to the RUN position (see page 42) you can also activate the emergency flashers, turn signals and all electrical switches and buttons. With the engine stop/run switch set to the OFF position and remove the ignition key when leaving the motorcycle unattended...
Ignition Key INSTRUMENTS, FEATURES AND CONTROLS The ignition key operates the ignition switch and parking lights. Off 2. You must push the ignition key into the switch while selecting the Park position. 35 Turn the ignition switch to the RUN position (see page 42) you can also activate the emergency flashers, turn signals and all electrical switches and buttons. With the engine stop/run switch set to the OFF position and remove the ignition key when leaving the motorcycle unattended...
Owners Manual
Page 45
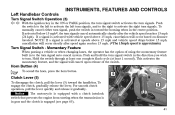
... upon release of using the momentary feature built in the center position. Momentary Feature Horn Button (4) Clutch Lever (5) To disengage the clutch, pull the lever (5) toward the housing when in to turn signal switch in toward the handlebar. Notice The motorcycle is equipped with vehicle speed above 15 mph and vehicle speed drops below 15 mph*, the turn signals. Left Handlebar Controls INSTRUMENTS, FEATURES AND CONTROLS Turn Signal Switch Operation (3) With the ignition key in gear...
... upon release of using the momentary feature built in the center position. Momentary Feature Horn Button (4) Clutch Lever (5) To disengage the clutch, pull the lever (5) toward the housing when in to turn signal switch in toward the handlebar. Notice The motorcycle is equipped with vehicle speed above 15 mph and vehicle speed drops below 15 mph*, the turn signals. Left Handlebar Controls INSTRUMENTS, FEATURES AND CONTROLS Turn Signal Switch Operation (3) With the ignition key in gear...
Owners Manual
Page 52
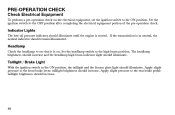
taillight brightness should illuminate until the engine is started. Indicator Lights The low oil pressure indicator should increase. Apply slight pressure to the rear brake pedal; Apply slight pressure to the front brake lever; PRE-OPERATION CHECK Check Electrical Equipment To perform a pre-operation check on the electrical equipment, set the ignition switch to see that it is on. Headlamp Check the headlamp to the ON...
taillight brightness should illuminate until the engine is started. Indicator Lights The low oil pressure indicator should increase. Apply slight pressure to the rear brake pedal; Apply slight pressure to the front brake lever; PRE-OPERATION CHECK Check Electrical Equipment To perform a pre-operation check on the electrical equipment, set the ignition switch to see that it is on. Headlamp Check the headlamp to the ON...

Owners Manual
Page 56
... the total weight of your intended load. See page 117. Adjust tire pressure as easily visible tread depth indicators. Replace damaged tires immediately (see the VICTORY Service Manual or an authorized VICTORY dealer). When the road contact surface has worn to the tire pressure table on page 116. Refer to the top of the tread, known as wear bars, act as...
... the total weight of your intended load. See page 117. Adjust tire pressure as easily visible tread depth indicators. Replace damaged tires immediately (see the VICTORY Service Manual or an authorized VICTORY dealer). When the road contact surface has worn to the tire pressure table on page 116. Refer to the top of the tread, known as wear bars, act as...
Owners Manual
Page 71
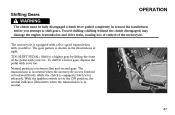
... engaged (clutch lever released). The motorcycle is in neutral. TOE SHIFT PEDAL: Shift to shift gears. With the ignition switch set to a lower gear, depress the pedal with your toe. Forced shifting (shifting without the clutch disengaged) may damage the engine, transmission and drive train, causing loss of control of the pedal with your toe. Neutral position is between first and second gear. Shifting Gears WARNING OPERATION The clutch must be fully disengaged (clutch lever...
... engaged (clutch lever released). The motorcycle is in neutral. TOE SHIFT PEDAL: Shift to shift gears. With the ignition switch set to a lower gear, depress the pedal with your toe. Forced shifting (shifting without the clutch disengaged) may damage the engine, transmission and drive train, causing loss of control of the pedal with your toe. Neutral position is between first and second gear. Shifting Gears WARNING OPERATION The clutch must be fully disengaged (clutch lever...

Owners Manual
Page 90
... threads. 7. If you may have to remove portions of the drive sprocket cover screws (see the VICTORY Service Manual or an authorized VICTORY dealer). Notice On some models you cannot align the mounting holes, tighten the sprocket nut slightly and install the nut retainer.... Apply the rear brake and tighten the drive sprocket nut. Check rear wheel alignment (page 90) and drive belt tension (page 87). 86 Apply a few drops of LOCTITE Thread Locker #262 or equivalent to access all of the exhaust system to the output shaft threads. 8. MAINTENANCE Inspect Drive Sprocket and Sprocket...
... threads. 7. If you may have to remove portions of the drive sprocket cover screws (see the VICTORY Service Manual or an authorized VICTORY dealer). Notice On some models you cannot align the mounting holes, tighten the sprocket nut slightly and install the nut retainer.... Apply the rear brake and tighten the drive sprocket nut. Check rear wheel alignment (page 90) and drive belt tension (page 87). 86 Apply a few drops of LOCTITE Thread Locker #262 or equivalent to access all of the exhaust system to the output shaft threads. 8. MAINTENANCE Inspect Drive Sprocket and Sprocket...

Owners Manual
Page 94
... swingarm (3). WARNING Care should be in Neutral and lift the rear wheel off the ground with marks (2) that are stamped with an appropriate motorcycle lift or a block of the motorcycle. The axle adjusters (1) are used as a reference to fail and loss of control of wood or steel placed securely under the frame. 3. MAINTENANCE Rear Wheel Alignment WARNING A skewed rear axle can damage the drive belt, causing it...
... swingarm (3). WARNING Care should be in Neutral and lift the rear wheel off the ground with marks (2) that are stamped with an appropriate motorcycle lift or a block of the motorcycle. The axle adjusters (1) are used as a reference to fail and loss of control of wood or steel placed securely under the frame. 3. MAINTENANCE Rear Wheel Alignment WARNING A skewed rear axle can damage the drive belt, causing it...

Owners Manual
Page 95
... lock nut, then tighten axle nut. Torque: 65 ft-lbs (88 Nm) Right Side Adjuster Shown 91 Rear Wheel MAINTENANCE Alignment (cont.) NOTE: Turn the axle adjusters about 1/16 of a turn the axle adjuster screws (5) IN (clockwise) to draw the axle back, or OUT (counterclockwise) to allow the axle to move forward. When wheel is aligned and drive belt tension is correct (see Check Drive Belt...
... lock nut, then tighten axle nut. Torque: 65 ft-lbs (88 Nm) Right Side Adjuster Shown 91 Rear Wheel MAINTENANCE Alignment (cont.) NOTE: Turn the axle adjusters about 1/16 of a turn the axle adjuster screws (5) IN (clockwise) to draw the axle back, or OUT (counterclockwise) to allow the axle to move forward. When wheel is aligned and drive belt tension is correct (see Check Drive Belt...

Owners Manual
Page 96
Pump rear brake pedal several times to be sure the motorcycle will not tip or fall while elevated. Severe personal injury or death may occur if the motorcycle tips or falls. 92 WARNING Care should be sure it on the sidestand. Recheck drive belt tension and alignment to be taken to reset brake pad distance. 11. If alignment is correct after tightening the axle. 9. MAINTENANCE Rear Wheel Alignment (cont.) 8. Carefully lower the motorcycle and safely support it is incorrect, repeat steps 4-7. 10.
Pump rear brake pedal several times to be sure the motorcycle will not tip or fall while elevated. Severe personal injury or death may occur if the motorcycle tips or falls. 92 WARNING Care should be sure it on the sidestand. Recheck drive belt tension and alignment to be taken to reset brake pad distance. 11. If alignment is correct after tightening the axle. 9. MAINTENANCE Rear Wheel Alignment (cont.) 8. Carefully lower the motorcycle and safely support it is incorrect, repeat steps 4-7. 10.

Owners Manual
Page 101
... steel placed securely under the frame. 5. Rear Suspension MAINTENANCE Inspect Swing Arm and Rear Axle 1. Make sure the suspension moves freely without binding. 4. Grasp the rear tire and attempt to move the rear wheel side-to-side. Reinstall the pivot nut covers. 3. If the wheel does not rotate smoothly, inspect the wheel bearings, rear axle, belt adjustment, and wheels alignment (see the VICTORY Service Manual or an authorized VICTORY dealer). 6. NOTE...
... steel placed securely under the frame. 5. Rear Suspension MAINTENANCE Inspect Swing Arm and Rear Axle 1. Make sure the suspension moves freely without binding. 4. Grasp the rear tire and attempt to move the rear wheel side-to-side. Reinstall the pivot nut covers. 3. If the wheel does not rotate smoothly, inspect the wheel bearings, rear axle, belt adjustment, and wheels alignment (see the VICTORY Service Manual or an authorized VICTORY dealer). 6. NOTE...

Owners Manual
Page 103
... ground. If the wheel does not rotate smoothly, inspect the wheel bearings, front axle, and brakes (see the VICTORY Service Manual or an authorized VICTORY dealer). 5. Point the front wheel straight ahead. Inspect Steering and Front Axle 1. Turn the handlebars all the way to -back movement at the steering head, the steering head bearings should be smooth but not loose or interfered with by wires, hoses, or control...
... ground. If the wheel does not rotate smoothly, inspect the wheel bearings, front axle, and brakes (see the VICTORY Service Manual or an authorized VICTORY dealer). 5. Point the front wheel straight ahead. Inspect Steering and Front Axle 1. Turn the handlebars all the way to -back movement at the steering head, the steering head bearings should be smooth but not loose or interfered with by wires, hoses, or control...

Owners Manual
Page 144
... replace the oil filter at this time, but you must replace the oil filter when you poured in service, settle on internal engine components during storage. Change the engine oil (see page 119). Settled carbon deposits can cause engine damage. 2. Set the main switch to crank the engine a few times. With the main switch in the ON position, the stop/run the engine for 15 minutes in neutral, press the electric starter...
... replace the oil filter at this time, but you must replace the oil filter when you poured in service, settle on internal engine components during storage. Change the engine oil (see page 119). Settled carbon deposits can cause engine damage. 2. Set the main switch to crank the engine a few times. With the main switch in the ON position, the stop/run the engine for 15 minutes in neutral, press the electric starter...
Owners Manual
Page 149
... retain all applicable regulations of initial retail delivery, whichever occurs first. 145 and B. The warranty repairs should contact VICTORY Motorcycle Division, Polaris Sales Inc., P.O. or 5 (five) years from defects in material and workmanship which cause such motorcycle to fail to conform with all receipts covering maintenance on the engine displacement, of 12,000 kilometers (7,456 miles), if the motorcycle...
... retain all applicable regulations of initial retail delivery, whichever occurs first. 145 and B. The warranty repairs should contact VICTORY Motorcycle Division, Polaris Sales Inc., P.O. or 5 (five) years from defects in material and workmanship which cause such motorcycle to fail to conform with all receipts covering maintenance on the engine displacement, of 12,000 kilometers (7,456 miles), if the motorcycle...

Owners Manual
Page 164
... ...158 Ignition Key ...35 Ignition Key Number ...34 Ignition Switch ...35 Indicator Lights ...38, 48 Initial Maintenance ...76 Instrument Cluster ...36 INSTRUMENTS, FEATURES AND CONTROLS ...35-46 INTRODUCTION ...4 N Neutral Indicator ...38 Noise Emission Warranty ...143 Noise Regulation ...143 G Gasoline ...19 Gear Shift Pedal ...44, 115 Gross Vehicle Weight Rating (GVWR) 13-14 GVWR Loading Example ...14 O Odometer ...37 Oil ...82-84 Oil Change ...82-83 Oil Fill Cap/Dipstick ...84 Oil Filter ...82-83 Oil Filter Change ...82-83 Oil Level ...50, 83-84 Oil Specifications...
... ...158 Ignition Key ...35 Ignition Key Number ...34 Ignition Switch ...35 Indicator Lights ...38, 48 Initial Maintenance ...76 Instrument Cluster ...36 INSTRUMENTS, FEATURES AND CONTROLS ...35-46 INTRODUCTION ...4 N Neutral Indicator ...38 Noise Emission Warranty ...143 Noise Regulation ...143 G Gasoline ...19 Gear Shift Pedal ...44, 115 Gross Vehicle Weight Rating (GVWR) 13-14 GVWR Loading Example ...14 O Odometer ...37 Oil ...82-84 Oil Change ...82-83 Oil Fill Cap/Dipstick ...84 Oil Filter ...82-83 Oil Filter Change ...82-83 Oil Level ...50, 83-84 Oil Specifications...

Owners Manual
Page 165
... Pad ...129 Spark Plugs ...119-120 Specification, Ride Height ...94 Specification, Shock Spring Pre-load . 94 SPECIFICATIONS ...153-157 Speedometer ...36 Starter Button ...43 Starting the Engine ...65-66 Steering ...58, 98-99 S INDEX R Rear Shock Absorber Ride Height Adjustment ...95 Ride Height Measurement ...94, 96 Rear Shock Absorber Preload Specification ...94 Rear Suspension, Shock Absorber Preload Inspection ...93 Recommended Oil ...83 Recommended Shift Points ...69 Registration ...150 Removal from Storage ...142 Repairing Painted...
... Pad ...129 Spark Plugs ...119-120 Specification, Ride Height ...94 Specification, Shock Spring Pre-load . 94 SPECIFICATIONS ...153-157 Speedometer ...36 Starter Button ...43 Starting the Engine ...65-66 Steering ...58, 98-99 S INDEX R Rear Shock Absorber Ride Height Adjustment ...95 Ride Height Measurement ...94, 96 Rear Shock Absorber Preload Specification ...94 Rear Suspension, Shock Absorber Preload Inspection ...93 Recommended Oil ...83 Recommended Shift Points ...69 Registration ...150 Removal from Storage ...142 Repairing Painted...