

Owners Manual
Page 15
... when leaning the motorcycle in handling, acceleration and braking caused by the additional weight of control. Failure to the instructions on the passenger footrests. Towing a trailer can make the motorcycle hard to compensate for the differences in a curve, as the VEGAS EIGHT BALL are not equipped from the factory with both hands and to handle and can make the motorcycle...
... when leaning the motorcycle in handling, acceleration and braking caused by the additional weight of control. Failure to the instructions on the passenger footrests. Towing a trailer can make the motorcycle hard to compensate for the differences in a curve, as the VEGAS EIGHT BALL are not equipped from the factory with both hands and to handle and can make the motorcycle...

Owners Manual
Page 22
...truck or trailer, as towing will impair the motorcycle's steering and handling, which can also damage the motorcycle's finish. Secure the rear of the motorcycle with another vehicle, as gasoline may leak out of control. Loosen screw, slide turn signals after transportation. Loosen the front turn signal mounts and slide them up VEGAS 18 KINGPIN Re-position the turn signal up to avoid the brake line, exhaust, and drive belt... fuel tank if the motorcycle leans to one side. SAFETY Transporting the Motorcycle If you must transport the motorcycle: S Use a truck or trailer. Do not tow...
...truck or trailer, as towing will impair the motorcycle's steering and handling, which can also damage the motorcycle's finish. Secure the rear of the motorcycle with another vehicle, as gasoline may leak out of control. Loosen screw, slide turn signals after transportation. Loosen the front turn signal mounts and slide them up VEGAS 18 KINGPIN Re-position the turn signal up to avoid the brake line, exhaust, and drive belt... fuel tank if the motorcycle leans to one side. SAFETY Transporting the Motorcycle If you must transport the motorcycle: S Use a truck or trailer. Do not tow...
Owners Manual
Page 23
... higher wattage light bulbs than those supplied as original equipment. S Bulky or large accessories can cause instability (due to the electrical system. An improperly designed or installed windshield, backrest or luggage rack can be sure that the motorcycle can reduce stability, causing loss of control. 19 An electrical failure could result and cause hazardous loss of engine power or lights or...
... higher wattage light bulbs than those supplied as original equipment. S Bulky or large accessories can cause instability (due to the electrical system. An improperly designed or installed windshield, backrest or luggage rack can be sure that the motorcycle can reduce stability, causing loss of control. 19 An electrical failure could result and cause hazardous loss of engine power or lights or...
Owners Manual
Page 25
... rear shock absorber and the front forks. To repair steering or suspension system wear or damage, see the VICTORY Service Manual or your authorized VICTORY Dealer. 21 Operating the motorcycle with a loose, worn, or damaged steering system or front or rear suspension system can make the motorcycle hard to handle and cause loss of control. S Maintain proper tire pressure and tread condition and proper wheel and tire...
... rear shock absorber and the front forks. To repair steering or suspension system wear or damage, see the VICTORY Service Manual or your authorized VICTORY Dealer. 21 Operating the motorcycle with a loose, worn, or damaged steering system or front or rear suspension system can make the motorcycle hard to handle and cause loss of control. S Maintain proper tire pressure and tread condition and proper wheel and tire...

Owners Manual
Page 38
Front Fork Front Turn Signal Headlamp Speedometer Air Filter Spark Plug (2) Ignition Switch Left Side Cover Battery (under side cover) Taillight Rear Turn Signal Rear Axle Adjuster (1 each side) Rear Brake Caliper Passenger's Foot Rest Evaporative Canister - KINGPIN 1. 2. 3. 4. 5. 6. 7. 8. 9. 10. 11. 12. 13. 14. 15. 16. 17. 18. 19. 20. 21. 22. COMPONENT IDENTIFICATION LEFT SIDE VIEW - California Models Oil Filter Oil Drain Plug (on bottom of crankcase) Sidestand Operator's Foot Rest Gear Shift Lever Oil Cooler Front Brake Caliper 5 6 4 3 7 8 2 1 9 10...
Front Fork Front Turn Signal Headlamp Speedometer Air Filter Spark Plug (2) Ignition Switch Left Side Cover Battery (under side cover) Taillight Rear Turn Signal Rear Axle Adjuster (1 each side) Rear Brake Caliper Passenger's Foot Rest Evaporative Canister - KINGPIN 1. 2. 3. 4. 5. 6. 7. 8. 9. 10. 11. 12. 13. 14. 15. 16. 17. 18. 19. 20. 21. 22. COMPONENT IDENTIFICATION LEFT SIDE VIEW - California Models Oil Filter Oil Drain Plug (on bottom of crankcase) Sidestand Operator's Foot Rest Gear Shift Lever Oil Cooler Front Brake Caliper 5 6 4 3 7 8 2 1 9 10...

Owners Manual
Page 42
... for starting the engine beginning on page 69. INSTRUMENTS, FEATURES AND CONTROLS Ignition Key The ignition key operates the ignition switch and parking lights. Park Position (P) In the PARK position, the taillight, indicator lights, and license plate light illuminate, the emergency flashers can be activated, and the ignition key can also activate the emergency flashers, turn signals and all electrical circuits are energized and the ignition key cannot be removed. Turn the ignition switch to the RUN position...
... for starting the engine beginning on page 69. INSTRUMENTS, FEATURES AND CONTROLS Ignition Key The ignition key operates the ignition switch and parking lights. Park Position (P) In the PARK position, the taillight, indicator lights, and license plate light illuminate, the emergency flashers can be activated, and the ignition key can also activate the emergency flashers, turn signals and all electrical circuits are energized and the ignition key cannot be removed. Turn the ignition switch to the RUN position...

Owners Manual
Page 48
... after the vehicle speed reaches 15 mph (24.1 kph). Turn Signal Switch - To engage the clutch, gradually release the lever. For smooth clutch operation, pull the lever quickly and release it gradually. Push the switch to the left to activate the left turn signals, and to the right to turn signal auto-cancel system. INSTRUMENTS, FEATURES AND CONTROLS Left Handlebar Controls Turn Signal Switch Operation (3, page 43) With the ignition key in the centered position.
... after the vehicle speed reaches 15 mph (24.1 kph). Turn Signal Switch - To engage the clutch, gradually release the lever. For smooth clutch operation, pull the lever quickly and release it gradually. Push the switch to the left to activate the left turn signals, and to the right to turn signal auto-cancel system. INSTRUMENTS, FEATURES AND CONTROLS Left Handlebar Controls Turn Signal Switch Operation (3, page 43) With the ignition key in the centered position.

Owners Manual
Page 56
... transmission is in the ON position, the taillight and the license plate light should remain illuminated. Taillight / Brake Light With the ignition switch in neutral, the neutral indicator should illuminate. taillight brightness should increase. Set the ignition switch to the rear brake pedal; Apply slight pressure to the OFF position after completing the electrical equipment portion of the pre-operation check. Set the headlamp switch...
... transmission is in the ON position, the taillight and the license plate light should remain illuminated. Taillight / Brake Light With the ignition switch in neutral, the neutral indicator should illuminate. taillight brightness should increase. Set the ignition switch to the rear brake pedal; Apply slight pressure to the OFF position after completing the electrical equipment portion of the pre-operation check. Set the headlamp switch...

Owners Manual
Page 60
... CHECK Check Tires Tire Pressure Normal riding warms the tires and increases the tire air pressure. Adjust tire pressure as easily visible tread depth indicators. See page 119. Tire Condition Inspect the tire sidewalls, road contact surface, and tread base for the total weight of the wear bars, replace the tire. 56 For an accurate reading, check the tire pressure before you ride. Replace damaged tires immediately (see the VICTORY Service Manual or...
... CHECK Check Tires Tire Pressure Normal riding warms the tires and increases the tire air pressure. Adjust tire pressure as easily visible tread depth indicators. See page 119. Tire Condition Inspect the tire sidewalls, road contact surface, and tread base for the total weight of the wear bars, replace the tire. 56 For an accurate reading, check the tire pressure before you ride. Replace damaged tires immediately (see the VICTORY Service Manual or...
Owners Manual
Page 75
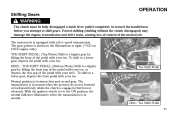
... shifting (shifting without the clutch disengaged) may damage the engine, transmission and drive train, causing loss of control of the motorcycle. To shift to a lower gear, depress the front pedal with your toe. HEEL / TOE SHIFT PEDAL: (Bottom Photo) Shift to the ON position, the neutral indicator illuminates when the transmission is in neutral. 1 2 3 45 OD / * N 1 Toe Shift Pedal 23 N 4 5 O / D* Heel / Toe Shift Pedal 71 With the ignition switch...
... shifting (shifting without the clutch disengaged) may damage the engine, transmission and drive train, causing loss of control of the motorcycle. To shift to a lower gear, depress the front pedal with your toe. HEEL / TOE SHIFT PEDAL: (Bottom Photo) Shift to the ON position, the neutral indicator illuminates when the transmission is in neutral. 1 2 3 45 OD / * N 1 Toe Shift Pedal 23 N 4 5 O / D* Heel / Toe Shift Pedal 71 With the ignition switch...

Owners Manual
Page 80
... with the clutch disengaged. Once the motorcycle is at a complete stop /run switch to the STOP position, turn the ignition switch to the OFF position, and remove the ignition key. To stop the engine, set the engine stop , if it is in neutral, shift into neutral. WARNING • Stopping the engine while the motorcycle is in motion and the transmission is engaged may lose control. • If...
... with the clutch disengaged. Once the motorcycle is at a complete stop /run switch to the STOP position, turn the ignition switch to the OFF position, and remove the ignition key. To stop the engine, set the engine stop , if it is in neutral, shift into neutral. WARNING • Stopping the engine while the motorcycle is in motion and the transmission is engaged may lose control. • If...

Owners Manual
Page 94
... S Make sure the rear suspension is dry and at the time of wood or steel placed securely under the frame. 3 1. 2. 3. 4. Belt Tension Gauge Small O-Ring Base Plunger 1 2 4 WARNING Care should be sure the motorcycle will not tip or fall while elevated. Replace the drive belt if it is designed specifically for measuring drive belt tension. Allow the belt to cool down to rain or...
... S Make sure the rear suspension is dry and at the time of wood or steel placed securely under the frame. 3 1. 2. 3. 4. Belt Tension Gauge Small O-Ring Base Plunger 1 2 4 WARNING Care should be sure the motorcycle will not tip or fall while elevated. Replace the drive belt if it is designed specifically for measuring drive belt tension. Allow the belt to cool down to rain or...

Owners Manual
Page 98
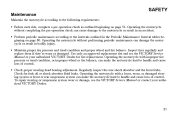
... the nuts are seated against the end of a turn the adjuster nut (6). (BOTH STYLES) Turn the screw or nut IN (clockwise) to draw the axle back, or OUT (counterclockwise) to allow the axle to move forward. When wheel is aligned and drive belt tension is correct (see Check Drive Belt Tension, page 90). 7. MAINTENANCE Rear Wheel Alignment (cont.) NOTE: Turn the axle adjusters about 1/16...
... the nuts are seated against the end of a turn the adjuster nut (6). (BOTH STYLES) Turn the screw or nut IN (clockwise) to draw the axle back, or OUT (counterclockwise) to allow the axle to move forward. When wheel is aligned and drive belt tension is correct (see Check Drive Belt Tension, page 90). 7. MAINTENANCE Rear Wheel Alignment (cont.) NOTE: Turn the axle adjusters about 1/16...

Owners Manual
Page 103
... neutral, slowly rotate the rear wheel. If there is still present, inspect the swing arm pivot bushings (see the VICTORY Service Manual or an authorized VICTORY dealer). 99 With the transmission in the operator's seat and slowly bounce the rear suspension a few times. Use an appropriate motorcycle lift or a block of the ground. If the wheel does not rotate smoothly, inspect the wheel bearings, rear axle, belt adjustment, and wheels...
... neutral, slowly rotate the rear wheel. If there is still present, inspect the swing arm pivot bushings (see the VICTORY Service Manual or an authorized VICTORY dealer). 99 With the transmission in the operator's seat and slowly bounce the rear suspension a few times. Use an appropriate motorcycle lift or a block of the ground. If the wheel does not rotate smoothly, inspect the wheel bearings, rear axle, belt adjustment, and wheels...

Owners Manual
Page 105
...). 5. Slowly rotate the front wheel. Front Suspension and Steering WARNING MAINTENANCE Care should be taken to -back movement at the steering head when checked (see the VICTORY Service Manual or an authorized VICTORY dealer). 4. Turn the handlebars all the way to -back. If the wheel does not rotate smoothly, inspect the wheel bearings, front axle, and brakes (see the VICTORY Service Manual or an authorized VICTORY...
...). 5. Slowly rotate the front wheel. Front Suspension and Steering WARNING MAINTENANCE Care should be taken to -back movement at the steering head when checked (see the VICTORY Service Manual or an authorized VICTORY dealer). 4. Turn the handlebars all the way to -back. If the wheel does not rotate smoothly, inspect the wheel bearings, front axle, and brakes (see the VICTORY Service Manual or an authorized VICTORY...
Owners Manual
Page 108
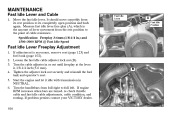
... 123) and fuel tank (page 102). 2. Start the engine and let it idle with transmission in NEUTRAL. 6. It should move smoothly from its rest position to full left. MAINTENANCE Fast Idle Lever and Cable 1. Loosen the fast idle cable adjuster lock nut (B). 3. Move the fast idle lever. If engine RPM increases when bars are turned, re-check throttle cable and fast idle cable adjustments, cable condition, and routing...
... 123) and fuel tank (page 102). 2. Start the engine and let it idle with transmission in NEUTRAL. 6. It should move smoothly from its rest position to full left. MAINTENANCE Fast Idle Lever and Cable 1. Loosen the fast idle cable adjuster lock nut (B). 3. Move the fast idle lever. If engine RPM increases when bars are turned, re-check throttle cable and fast idle cable adjustments, cable condition, and routing...

Owners Manual
Page 145
.... 2. Pour one tablespoon of clean motor oil into each spark plug. Using pressurized air, blow any debris from storage. This procedure inhibits corrosion by coating the cylinder walls with the oil you remove the motorcycle from the area around each spark plug hole. 4. Ride the motorcycle or start and run switch set to RUN, and the transmission in neutral, press the electric starter button to the top of...
.... 2. Pour one tablespoon of clean motor oil into each spark plug. Using pressurized air, blow any debris from storage. This procedure inhibits corrosion by coating the cylinder walls with the oil you remove the motorcycle from the area around each spark plug hole. 4. Ride the motorcycle or start and run switch set to RUN, and the transmission in neutral, press the electric starter button to the top of...
Owners Manual
Page 150
... that you retain all receipts covering maintenance on your owner's manual. If you have any questions regarding your warranty rights and responsibilities, you should be completed in your motorcycle, but less than 280 cubic centimeters; VICTORY Motorcycle Division, Polaris Sales Inc. - and B. or of 30,000 kilometers (18,641 miles), if the motorcycle's engine displacement is free from the...
... that you retain all receipts covering maintenance on your owner's manual. If you have any questions regarding your warranty rights and responsibilities, you should be completed in your motorcycle, but less than 280 cubic centimeters; VICTORY Motorcycle Division, Polaris Sales Inc. - and B. or of 30,000 kilometers (18,641 miles), if the motorcycle's engine displacement is free from the...

Owners Manual
Page 165
... ...64, 132 Front Brake Lever ...46 Fork Oil / Forks ...100 Fuel ...20 Fuel Cap ...49 Fuel Filter ...103 Fuel Level ...55 Fuel Specifications ...158 Fuel System ...102-103 Fuel Tank Removal / Installation ...102 Fuel Hose, Rail, Connections ...55, 102 Fuel Stabilizer ...141 Fueling and Fill Height ...68 Fuel System Priming ...68 Fuses ...128 H INDEX E Electrical Equipment ...52-53 Electromagnetic Interference ...22 Emergency Flasher Switch ...45 Emissions Control System Warranty . 145 Engine Break-in Period...
... ...64, 132 Front Brake Lever ...46 Fork Oil / Forks ...100 Fuel ...20 Fuel Cap ...49 Fuel Filter ...103 Fuel Level ...55 Fuel Specifications ...158 Fuel System ...102-103 Fuel Tank Removal / Installation ...102 Fuel Hose, Rail, Connections ...55, 102 Fuel Stabilizer ...141 Fueling and Fill Height ...68 Fuel System Priming ...68 Fuses ...128 H INDEX E Electrical Equipment ...52-53 Electromagnetic Interference ...22 Emergency Flasher Switch ...45 Emissions Control System Warranty . 145 Engine Break-in Period...

Owners Manual
Page 166
...-88 Oil Specifications ...158 Overdrive Indicator Lamp ...40 R Rear Shock Absorber ...97-98 Recommended Oil ...87 Recommended Shift Points ...73 Registration ...151 Removal from Storage ...143 Repairing Painted Surface Damage . . 139 Reporting Safety Defects ...29 Right Side Views ...32, 35 Road Test ...132 Key Number, Ignition ...37 Left Side Views ...31, 34 Loading Examples ...14, 15 Low Fuel Indicator ...42 Low Oil Pressure Indicator ...42 M Maintenance...
...-88 Oil Specifications ...158 Overdrive Indicator Lamp ...40 R Rear Shock Absorber ...97-98 Recommended Oil ...87 Recommended Shift Points ...73 Registration ...151 Removal from Storage ...143 Repairing Painted Surface Damage . . 139 Reporting Safety Defects ...29 Right Side Views ...32, 35 Road Test ...132 Key Number, Ignition ...37 Left Side Views ...31, 34 Loading Examples ...14, 15 Low Fuel Indicator ...42 Low Oil Pressure Indicator ...42 M Maintenance...