

Owners Manual
Page 14
... maintenance procedures and schedules described in a short time. Always inspect the ATV before operating increases the risk of consciousness or death in the owner's manual. 11 SAFETY Safety Warnings Handling Gasoline Gasoline is highly flammable and explosive under certain conditions. • Always exercise extreme caution whenever handling gasoline. • Always refuel with soap and water and change clothing. • Turn the fuel valve off with the engine...
... maintenance procedures and schedules described in a short time. Always inspect the ATV before operating increases the risk of consciousness or death in the owner's manual. 11 SAFETY Safety Warnings Handling Gasoline Gasoline is highly flammable and explosive under certain conditions. • Always exercise extreme caution whenever handling gasoline. • Always refuel with soap and water and change clothing. • Turn the fuel valve off with the engine...

Owners Manual
Page 30
... power to idle when the lever is released. This ATV is designed to operate the headlights. If the throttle cable should stick in the RUN position to reduce the risk of the throttle system can result in an accident. All Wheel Drive Switch See page 36 for free movement and return before operating the vehicle. Engine speed and vehicle movement are controlled by pressing the throttle...
... power to idle when the lever is released. This ATV is designed to operate the headlights. If the throttle cable should stick in the RUN position to reduce the risk of the throttle system can result in an accident. All Wheel Drive Switch See page 36 for free movement and return before operating the vehicle. Engine speed and vehicle movement are controlled by pressing the throttle...

Owners Manual
Page 36
... throttle settings during starting. Remove the fuel tank cap to add fuel to clean the fuel filter. 33 Refer to the engine starting a cold engine. Fuel Tank Cap Always refuel with a minimum pump octane number of 87=(R+ M/2) octane. Access the fuel valve through the right side panel. Refuel when the instrument gauge indicates a low fuel level. Use either leaded or unleaded gasoline with the engine stopped, and outdoors or in a well ventilated area. Fuel Tank Cap Fuel Valve...
... throttle settings during starting. Remove the fuel tank cap to add fuel to clean the fuel filter. 33 Refer to the engine starting a cold engine. Fuel Tank Cap Always refuel with a minimum pump octane number of 87=(R+ M/2) octane. Access the fuel valve through the right side panel. Refuel when the instrument gauge indicates a low fuel level. Use either leaded or unleaded gasoline with the engine stopped, and outdoors or in a well ventilated area. Fuel Tank Cap Fuel Valve...

Owners Manual
Page 39
... the vehicle is below 3100. If the rear wheels are spinning, release the throttle before getting into conditions where front wheel drive may remain in AWD, the demand drive unit will automatically disengage. When the rear wheels regain traction, the demand drive unit will automatically engage any time the rear wheels lose traction. Engaging AWD The AWD switch may cause severe drive shaft and gearcase damage. If the switch is turned off . NOTICE: Switching to AWD...
... the vehicle is below 3100. If the rear wheels are spinning, release the throttle before getting into conditions where front wheel drive may remain in AWD, the demand drive unit will automatically disengage. When the rear wheels regain traction, the demand drive unit will automatically engage any time the rear wheels lose traction. Engaging AWD The AWD switch may cause severe drive shaft and gearcase damage. If the switch is turned off . NOTICE: Switching to AWD...

Owners Manual
Page 43
... marks. 3. Fill the fuel tank with vehicle operation and handling. 4. See page 33. Do not operate at 20 hours or one month, whichever comes first. OPERATION Break-In Period Engine and Drivetrain Break-in of the clutches and drive belt will ensure a longer life and better performance. PVT Break-in (Clutches/Belt) A proper break-in 1. Change both the oil and the filter at sustained idle. 5.
... marks. 3. Fill the fuel tank with vehicle operation and handling. 4. See page 33. Do not operate at 20 hours or one month, whichever comes first. OPERATION Break-In Period Engine and Drivetrain Break-in of the clutches and drive belt will ensure a longer life and better performance. PVT Break-in (Clutches/Belt) A proper break-in 1. Change both the oil and the filter at sustained idle. 5.
Owners Manual
Page 59
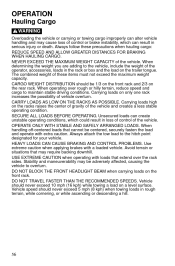
... condition. Avoid terrain or situations that extend over rough or hilly terrain, reduce speed and cargo to overturn. DO NOT TRAVEL FASTER THAN THE RECOMMENDED SPEEDS. CARRY LOADS AS LOW ON THE RACKS AS POSSIBLE. HEAVY LOADS CAN CAUSE BRAKING AND CONTROL PROBLEMS. Use extreme caution when applying brakes with a loaded vehicle. Always attach the tow load to the vehicle, include the weight...
... condition. Avoid terrain or situations that extend over rough or hilly terrain, reduce speed and cargo to overturn. DO NOT TRAVEL FASTER THAN THE RECOMMENDED SPEEDS. CARRY LOADS AS LOW ON THE RACKS AS POSSIBLE. HEAVY LOADS CAN CAUSE BRAKING AND CONTROL PROBLEMS. Use extreme caution when applying brakes with a loaded vehicle. Always attach the tow load to the vehicle, include the weight...

Owners Manual
Page 62
... USDA Forest Service Standard 5100-1C. Your Polaris vehicle has a spark arrestor that the operator perform. Electromagnetic Interference This spark ignition system complies with U.S.A. Violations are subject to achieve optimal performance. Any other adjustments should be viewed online at Polaris specifications to monetary penalties. Engine idle speed is regulated by engine design, including factory-set fuel delivery and ignition. EPA noise control requirements (40 CFR 205) and local noise level requirements...
... USDA Forest Service Standard 5100-1C. Your Polaris vehicle has a spark arrestor that the operator perform. Electromagnetic Interference This spark ignition system complies with U.S.A. Violations are subject to achieve optimal performance. Any other adjustments should be viewed online at Polaris specifications to monetary penalties. Engine idle speed is regulated by engine design, including factory-set fuel delivery and ignition. EPA noise control requirements (40 CFR 205) and local noise level requirements...
Owners Manual
Page 65
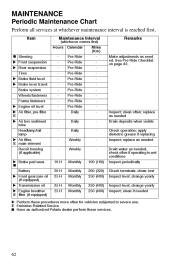
... suspension X Rear suspension Tires X Brake fluid level X Brake lever travel Brake system Wheels/fasteners Frame fasteners X Engine oil level X Air filter, pre-filter E X Air box sediment tube Headlamp/tail lamp X Air filter, E main element Recoil housing (if applicable) X Brake pad wear Q Battery X Front gearcase oil (if equipped) X Transmission oil X Engine breather E filter (if equipped) X Perform these services. 62 Item Maintenance Interval (whichever comes first) Hours Calendar Q Steering Remarks Miles (Km) 100 (160) 200 (320) 250 (400) 250 (400) 250 (400) Inspect; replace...
... suspension X Rear suspension Tires X Brake fluid level X Brake lever travel Brake system Wheels/fasteners Frame fasteners X Engine oil level X Air filter, pre-filter E X Air box sediment tube Headlamp/tail lamp X Air filter, E main element Recoil housing (if applicable) X Brake pad wear Q Battery X Front gearcase oil (if equipped) X Transmission oil X Engine breather E filter (if equipped) X Perform these services. 62 Item Maintenance Interval (whichever comes first) Hours Calendar Q Steering Remarks Miles (Km) 100 (160) 200 (320) 250 (400) 250 (400) 250 (400) Inspect; replace...

Owners Manual
Page 66
... and prior to water, mud, etc. adjust; adjust; replace as needed 1000 (1600) Inspect 1000 (1600) Inspect for proper sealing/air leaks Inspect; X Engine mounts Exhaust muffler/ pipe E E Q Spark plug Q Ignition Timing 100 H 100 H 100 H 100 H 100 H 12 M 12 M 12 M 12 M 12 M X Wiring 63 MAINTENANCE Periodic Maintenance Chart Item Maintenance Interval (whichever comes first) Hours Calendar X General lubrication Carburetor float bowl Q Throttle Cable/ E ETC Switch Remarks Miles (Km) 500 (800...
... and prior to water, mud, etc. adjust; adjust; replace as needed 1000 (1600) Inspect 1000 (1600) Inspect for proper sealing/air leaks Inspect; X Engine mounts Exhaust muffler/ pipe E E Q Spark plug Q Ignition Timing 100 H 100 H 100 H 100 H 100 H 12 M 12 M 12 M 12 M 12 M X Wiring 63 MAINTENANCE Periodic Maintenance Chart Item Maintenance Interval (whichever comes first) Hours Calendar X General lubrication Carburetor float bowl Q Throttle Cable/ E ETC Switch Remarks Miles (Km) 500 (800...

Owners Manual
Page 68
... Front Prop Shaft Yoke Bearing Carrier Control Arms 65 Item Engine Oil Brake Fluid Transmission Oil Front Demand Drive Unit (Front Gearcase) Front Prop Shaft Yoke Control Arm (front and rear) Bearing Carrier Transmission (upper pivot point) Polaris Premium U-Joint Lube Lube PS-4 PLUS Performance Synthetic 2W-50 DOT 4 Only Polaris AGL Synthetic Gearcase Lube Premium Demand Drive Hub Fluid Method See page 66. See page 31. MAINTENANCE Lubrication Guide Check and lubricate...
... Front Prop Shaft Yoke Bearing Carrier Control Arms 65 Item Engine Oil Brake Fluid Transmission Oil Front Demand Drive Unit (Front Gearcase) Front Prop Shaft Yoke Control Arm (front and rear) Bearing Carrier Transmission (upper pivot point) Polaris Premium U-Joint Lube Lube PS-4 PLUS Performance Synthetic 2W-50 DOT 4 Only Polaris AGL Synthetic Gearcase Lube Premium Demand Drive Hub Fluid Method See page 66. See page 31. MAINTENANCE Lubrication Guide Check and lubricate...

Owners Manual
Page 83
Remove the wheel nuts. 7. Remove the wheel. 80 Position the vehicle on a level surface. 2. Do not service axle nuts that have a cotter pin installed. Place the transmission in gear. 3. WARNING! MAINTENANCE Tires Wheel Removal 1. See your Polaris dealer. 5. Lock the parking brake. 4. Loosen the wheel nuts slightly. Place a suitable stand under the footrest frame to raise the wheel slightly off the ground. 6.
Remove the wheel nuts. 7. Remove the wheel. 80 Position the vehicle on a level surface. 2. Do not service axle nuts that have a cotter pin installed. Place the transmission in gear. 3. WARNING! MAINTENANCE Tires Wheel Removal 1. See your Polaris dealer. 5. Lock the parking brake. 4. Loosen the wheel nuts slightly. Place a suitable stand under the footrest frame to raise the wheel slightly off the ground. 6.

Owners Manual
Page 84
... an accident or overturn. lbs. (122 Nm) 27 ft. MAINTENANCE Tires Wheel Installation 1. Install the wheel nuts finger tight. 3. WARNING! lbs. (122 Nm) CAST ALUMINUM STEEL 27 ft. Lower the vehicle to come off during operation, which could cause a tire to the ground. 4. Place the wheel on the wheel hub with the valve stem toward the outside and the rotation arrows on...
... an accident or overturn. lbs. (122 Nm) 27 ft. MAINTENANCE Tires Wheel Installation 1. Install the wheel nuts finger tight. 3. WARNING! lbs. (122 Nm) CAST ALUMINUM STEEL 27 ft. Lower the vehicle to come off during operation, which could cause a tire to the ground. 4. Place the wheel on the wheel hub with the valve stem toward the outside and the rotation arrows on...

Owners Manual
Page 86
...Lock the parking brake. 4. Observe the headlight aim on the wall at the rear of the headlight beam should be adjusted slightly upward or downward. Adjust the beam. 9. Place the transmission in neutral. 3. Include rider weight on the wall. 7. MAINTENANCE Lights Headlight Beam Adjustment The headlight beam can be two inches (5 cm) below the mark on the seat...the vehicle on a level surface with the headlight approximately 25 ft. (7.6 m) from the floor to the center of the headlight and make the adjustment. 25 ft. (7.6 m) 2" (5 cm) 1. Start the engine.Turn the headlight switch to...
...Lock the parking brake. 4. Observe the headlight aim on the wall at the rear of the headlight beam should be adjusted slightly upward or downward. Adjust the beam. 9. Place the transmission in neutral. 3. Include rider weight on the wall. 7. MAINTENANCE Lights Headlight Beam Adjustment The headlight beam can be two inches (5 cm) below the mark on the seat...the vehicle on a level surface with the headlight approximately 25 ft. (7.6 m) from the floor to the center of the headlight and make the adjustment. 25 ft. (7.6 m) 2" (5 cm) 1. Start the engine.Turn the headlight switch to...

Owners Manual
Page 87
... headlamp. Turn the headlight harness clockwise to cool before servicing. 2. Taillight/Brakelight Lamp Replacement 1. Headlamp Replacement When servicing a halogen lamp, don't touch the lamp with a new lamp. 3. Oil from the headlight assembly. Remove the headlamp and install the new headlamp. Harness 3. CAUTION! Remove the lamp and replace it with bare fingers. From the rear of the lamp. 1. Screw Lamp Cover 84 Always make sure lights are...
... headlamp. Turn the headlight harness clockwise to cool before servicing. 2. Taillight/Brakelight Lamp Replacement 1. Headlamp Replacement When servicing a halogen lamp, don't touch the lamp with a new lamp. 3. Oil from the headlight assembly. Remove the headlamp and install the new headlamp. Harness 3. CAUTION! Remove the lamp and replace it with bare fingers. From the rear of the lamp. 1. Screw Lamp Cover 84 Always make sure lights are...

Owners Manual
Page 105
... 60. • Demand drive unit (front gearcase) • Transmission • Brake fluid (change every two years and any time the fluid looks dark or contaminated) Fog the Engine 1. MAINTENANCE Cleaning and Storage Storage Tips Fluid Levels Inspect the fluid levels. See page 101. 2. Reinstall the cap. 6. Torque to BDC and pour two ounces (59 ml) of the spark plug cap. Rotate the piston to specification. 5. Support the...
... 60. • Demand drive unit (front gearcase) • Transmission • Brake fluid (change every two years and any time the fluid looks dark or contaminated) Fog the Engine 1. MAINTENANCE Cleaning and Storage Storage Tips Fluid Levels Inspect the fluid levels. See page 101. 2. Reinstall the cap. 6. Torque to BDC and pour two ounces (59 ml) of the spark plug cap. Rotate the piston to specification. 5. Support the...

Owners Manual
Page 110
... cause poor performance, overheating or PVT or engine damage. Lock the parking brake. 3. Turn the screw out (counterclockwise) to warm up for operation above 6,000 feet and temperatures below +40 degrees F. (4 degrees C.) Tip: Continuous operation of its power for optimal performance at altitudes ranging from your area. See your Polaris dealer for more efficient operation. Idle Adjuster 107 Place the transmission in...
... cause poor performance, overheating or PVT or engine damage. Lock the parking brake. 3. Turn the screw out (counterclockwise) to warm up for operation above 6,000 feet and temperatures below +40 degrees F. (4 degrees C.) Tip: Continuous operation of its power for optimal performance at altitudes ranging from your area. See your Polaris dealer for more efficient operation. Idle Adjuster 107 Place the transmission in...

Owners Manual
Page 113
... a new belt and/or clutch. RPM/low ground speed Utility use fast, aggressive throttle application to Always warm up the belt by operating below freezing. Slippage from a stopped control and vehicle overturn. Wrong or missing belt Install the recommended belt. Poor engine performance Check for or snow ingestion into the damage if repeated leaking occurs. position Belt slippage from water Dry out the PVT. Operate 5 miles...
... a new belt and/or clutch. RPM/low ground speed Utility use fast, aggressive throttle application to Always warm up the belt by operating below freezing. Slippage from a stopped control and vehicle overturn. Wrong or missing belt Install the recommended belt. Poor engine performance Check for or snow ingestion into the damage if repeated leaking occurs. position Belt slippage from water Dry out the PVT. Operate 5 miles...

Owners Manual
Page 117
SPECIFICATIONS Sportsman 300 Maximum Weight Capacity Dry Weight Fuel Capacity Engine Oil Capacity Transmission Oil Demand Drive Fluid Front Rack Capacity Rear Rack Capacity Hitch Tongue Weight Capacity Hitch Towing Rating Unbraked Trailer Towing Capacity* Overall Length Overall Width Overall Height Wheelbase Ground Clearance Minimum Turning Radius Engine Model Number/Type Lubrication Engine Cooling Displacement Bore x Stroke Alternator Output Compression Ratio Carburetor Pilot Jet Main Jet Needle Jet Jet Needle Pilot Air Jet Ignition System Ignition Timing Spark Plug / Gap Driving System Type ...
SPECIFICATIONS Sportsman 300 Maximum Weight Capacity Dry Weight Fuel Capacity Engine Oil Capacity Transmission Oil Demand Drive Fluid Front Rack Capacity Rear Rack Capacity Hitch Tongue Weight Capacity Hitch Towing Rating Unbraked Trailer Towing Capacity* Overall Length Overall Width Overall Height Wheelbase Ground Clearance Minimum Turning Radius Engine Model Number/Type Lubrication Engine Cooling Displacement Bore x Stroke Alternator Output Compression Ratio Carburetor Pilot Jet Main Jet Needle Jet Jet Needle Pilot Air Jet Ignition System Ignition Timing Spark Plug / Gap Driving System Type ...
Owners Manual
Page 121
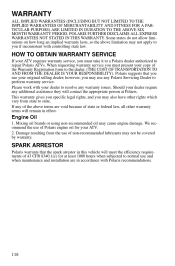
... to perform warranty service. If any warranty issues. HOW TO OBTAIN WARRANTY SERVICE If your original selling dealer; This warranty gives you specific legal rights, and you must present your ATV. 2. SPARK ARRESTOR Polaris warrants that you if inconsistent with your dealer require any Polaris Servicing Dealer to normal use your ATV requires warranty service, you may not be covered by warranty. Engine Oil 1. Please work with controlling state law. POLARIS FURTHER...
... to perform warranty service. If any warranty issues. HOW TO OBTAIN WARRANTY SERVICE If your original selling dealer; This warranty gives you specific legal rights, and you must present your ATV. 2. SPARK ARRESTOR Polaris warrants that you if inconsistent with your dealer require any Polaris Servicing Dealer to normal use your ATV requires warranty service, you may not be covered by warranty. Engine Oil 1. Please work with controlling state law. POLARIS FURTHER...

Owners Manual
Page 122
... to obtain documentation from Polaris Industries in order to register your warranty coverage. WARRANTY Exported Vehicles EXCEPT WHERE SPECIFICALLY REQUIRED BY LAW, THERE IS NO WARRANTY OR SERVICE BULLETIN COVERAGE ON THIS VEHICLE IF IT IS SOLD OUTSIDE THE COUNTRY OF THE SELLING DEALER'S AUTHORIZED LOCATION. This policy does not apply to vehicles registered to perform the warranty repair. You may not...
... to obtain documentation from Polaris Industries in order to register your warranty coverage. WARRANTY Exported Vehicles EXCEPT WHERE SPECIFICALLY REQUIRED BY LAW, THERE IS NO WARRANTY OR SERVICE BULLETIN COVERAGE ON THIS VEHICLE IF IT IS SOLD OUTSIDE THE COUNTRY OF THE SELLING DEALER'S AUTHORIZED LOCATION. This policy does not apply to vehicles registered to perform the warranty repair. You may not...