

Owners Manual
Page 5
Copyright 2008 Polaris Sales Inc. Any reprinting or reuse of Polaris Industries Inc. Depictions and/or procedures in the design and quality of publication. POLARIS and POLARIS THE WAY OUT are intended for omissions or inaccuracies. Due to constant ... information at the time of production components, some minor discrepancies may result between the actual vehicle and the information presented in this publication are registered trademarks of the depictions and/or procedures contained within, whether whole or in U.S.A. 2009 Sportsman 800 EFI Owner's Manual P/N 9921831 2 ...
Copyright 2008 Polaris Sales Inc. Any reprinting or reuse of Polaris Industries Inc. Depictions and/or procedures in the design and quality of publication. POLARIS and POLARIS THE WAY OUT are intended for omissions or inaccuracies. Due to constant ... information at the time of production components, some minor discrepancies may result between the actual vehicle and the information presented in this publication are registered trademarks of the depictions and/or procedures contained within, whether whole or in U.S.A. 2009 Sportsman 800 EFI Owner's Manual P/N 9921831 2 ...
Owners Manual
Page 36
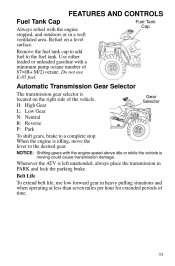
... when operating at less than seven miles per hour for extended periods of the vehicle. Belt Life To extend belt life, use E-85 fuel. Do not use low forward gear in PARK and lock the parking brake. Refuel on the right side of time. 33 Whenever the ATV is moving could cause transmission damage. FEATURES AND CONTROLS Fuel Tank Cap Always refuel with the engine stopped, and outdoors or in...
... when operating at less than seven miles per hour for extended periods of the vehicle. Belt Life To extend belt life, use E-85 fuel. Do not use low forward gear in PARK and lock the parking brake. Refuel on the right side of time. 33 Whenever the ATV is moving could cause transmission damage. FEATURES AND CONTROLS Fuel Tank Cap Always refuel with the engine stopped, and outdoors or in...

Owners Manual
Page 37
... ADC system allows engine braking to ADC 4X4 before ascending or descending a hill. When the rear wheels regain traction, the demand drive unit will automatically engage any time the rear wheels lose traction. Tip: The override switch allows activation of time the vehicle may remain in 4X4, the demand drive unit will automatically disengage. When in 4X4. FEATURES AND CONTROLS All Wheel Drive System The All Wheel Drive system is...
... ADC system allows engine braking to ADC 4X4 before ascending or descending a hill. When the rear wheels regain traction, the demand drive unit will automatically engage any time the rear wheels lose traction. Tip: The override switch allows activation of time the vehicle may remain in 4X4, the demand drive unit will automatically disengage. When in 4X4. FEATURES AND CONTROLS All Wheel Drive System The All Wheel Drive system is...
Owners Manual
Page 39
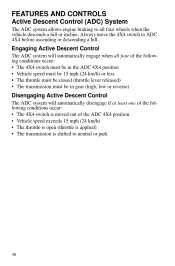
FEATURES AND CONTROLS Active Descent Control (ADC) System The ADC system allows engine braking to all four of the following conditions occur: • The 4X4 switch must be in the ADC 4X4 position • Vehicle speed must be 15 mph (24 km/h) or less • The throttle must be closed (throttle lever released) • The transmission must be in gear (high, low or reverse) Disengaging...
FEATURES AND CONTROLS Active Descent Control (ADC) System The ADC system allows engine braking to all four of the following conditions occur: • The 4X4 switch must be in the ADC 4X4 position • Vehicle speed must be 15 mph (24 km/h) or less • The throttle must be closed (throttle lever released) • The transmission must be in gear (high, low or reverse) Disengaging...
Owners Manual
Page 41
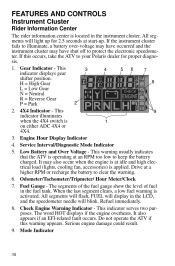
... Voltage - All segments will flash, FUEL will display in the fuel tank. Check Engine Warning Indicator - Drive at idle and high electrical load (lights, cooling fan, accessories) is operating at start-up for proper diagnosis. 1. This indicator serves two purposes. It may have occurred and the instrument cluster may also occur when the engine is activated. Fuel Gauge - If the instrument cluster fails to illuminate, a battery over-voltage may have shut...
... Voltage - All segments will flash, FUEL will display in the fuel tank. Check Engine Warning Indicator - Drive at idle and high electrical load (lights, cooling fan, accessories) is operating at start-up for proper diagnosis. 1. This indicator serves two purposes. It may have occurred and the instrument cluster may also occur when the engine is activated. Fuel Gauge - If the instrument cluster fails to illuminate, a battery over-voltage may have shut...

Owners Manual
Page 48
...-to-Battery Starter Enable: Open Load/Short-to-Ground Starter Enable: Shorted Load/Short-to-Battery Gear Sensor Signal 4X4: Open Load/Short-to-Ground 4X4: Shorted Load/Short-to-Battery Rear Differential Enable: Open Load/Short-to-Ground (if equipped) Rear Differential Enable: Shorted Load/Short-to -Ground Injector Circuit Malfunction - Cyl 1: Shorted Load/Short-to -Ground Injector Circuit Malfunction - FEATURES AND CONTROLS Instrument Cluster Rider Information Center Downloading Codes Blink Code 12...
...-to-Battery Starter Enable: Open Load/Short-to-Ground Starter Enable: Shorted Load/Short-to-Battery Gear Sensor Signal 4X4: Open Load/Short-to-Ground 4X4: Shorted Load/Short-to-Battery Rear Differential Enable: Open Load/Short-to-Ground (if equipped) Rear Differential Enable: Shorted Load/Short-to -Ground Injector Circuit Malfunction - Cyl 1: Shorted Load/Short-to -Ground Injector Circuit Malfunction - FEATURES AND CONTROLS Instrument Cluster Rider Information Center Downloading Codes Blink Code 12...

Owners Manual
Page 50
... fluid levels, controls and areas outlined on the dipstick. Avoid aggressive acceleration and high speed operation during the break-in period. 47 OPERATION Break-In Period Engine and Drivetrain Break-in of the clutches and drive belt will ensure a longer life and better performance. Change both the oil and the filter at sustained idle. 5. PVT Break-in (Clutches/Belt) A proper break-in 1. Vary the throttle...
... fluid levels, controls and areas outlined on the dipstick. Avoid aggressive acceleration and high speed operation during the break-in period. 47 OPERATION Break-In Period Engine and Drivetrain Break-in of the clutches and drive belt will ensure a longer life and better performance. Change both the oil and the filter at sustained idle. 5. PVT Break-in (Clutches/Belt) A proper break-in 1. Vary the throttle...

Owners Manual
Page 65
... BRAKING AND CONTROL PROBLEMS. Use extreme caution when applying brakes with loads that extend over rough or hilly terrain, reduce speed and cargo to the vehicle, include the weight of the vehicle. Vehicle speed should never exceed 10 mph (16 kph) while towing a load on the trailer tongue. Always attach the tow load to overturn. When determining the weight you are adding to maintain stable driving conditions...
... BRAKING AND CONTROL PROBLEMS. Use extreme caution when applying brakes with loads that extend over rough or hilly terrain, reduce speed and cargo to the vehicle, include the weight of the vehicle. Vehicle speed should never exceed 10 mph (16 kph) while towing a load on the trailer tongue. Always attach the tow load to overturn. When determining the weight you are adding to maintain stable driving conditions...

Owners Manual
Page 66
... rear rack capacity. • The total load (operator, accessories, cargo and weight on warning labels and in serious damage to the vehicle and will void your Polaris ATV. Always install Polarisapproved (or equivalent) accessories designed for your ATV on hitch) must not exceed the maximum weight capacity of this manual. Use low forward gear when hauling or towing heavy cargo to extend belt life. 2/3 Towing Loads Always attach a towed...
... rear rack capacity. • The total load (operator, accessories, cargo and weight on warning labels and in serious damage to the vehicle and will void your Polaris ATV. Always install Polarisapproved (or equivalent) accessories designed for your ATV on hitch) must not exceed the maximum weight capacity of this manual. Use low forward gear when hauling or towing heavy cargo to extend belt life. 2/3 Towing Loads Always attach a towed...
Owners Manual
Page 71
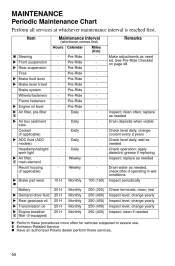
...level; clean; change yearly Inspect level; Item Maintenance Interval (whichever comes first) Hours Calendar „ Steering X Front suspension X Rear suspension Tires X Brake fluid level X Brake lever travel Brake system Wheels/fasteners Frame fasteners X Engine oil level X Air filter, pre-filter E X Air box sediment tube Coolant (if applicable) X ADC fluid (ADC models) Headlamp/taillight/ work light X Air filter, E main element Recoil housing (if applicable) X Brake pad wear „ Battery X Demand drive fluid X Rear gearcase oil X Transmission oil X Engine breather E filter (if equipped...
...level; clean; change yearly Inspect level; Item Maintenance Interval (whichever comes first) Hours Calendar „ Steering X Front suspension X Rear suspension Tires X Brake fluid level X Brake lever travel Brake system Wheels/fasteners Frame fasteners X Engine oil level X Air filter, pre-filter E X Air box sediment tube Coolant (if applicable) X ADC fluid (ADC models) Headlamp/taillight/ work light X Air filter, E main element Recoil housing (if applicable) X Brake pad wear „ Battery X Demand drive fluid X Rear gearcase oil X Transmission oil X Engine breather E filter (if equipped...

Owners Manual
Page 91
... ft. lbs. (37 Nm) Wheel Nut Torque Specifications Check the wheel nut torques occasionally and when they've been loosened for maintenance service. Always ensure that all nuts are torqued to come off during operation, which could cause a tire to specification. 90 ft. Nut Type Lug Nut 2-Piece Flange Nut Nut Torque 90 ft. Lock the parking brake. 3. lbs. (37 Nm...
... ft. lbs. (37 Nm) Wheel Nut Torque Specifications Check the wheel nut torques occasionally and when they've been loosened for maintenance service. Always ensure that all nuts are torqued to come off during operation, which could cause a tire to specification. 90 ft. Nut Type Lug Nut 2-Piece Flange Nut Nut Torque 90 ft. Lock the parking brake. 3. lbs. (37 Nm...

Owners Manual
Page 94
... lower front corners of the pod. 3. Remove the two screws on the wiring. 6. Headlight and taillight lenses become dirty during normal operation. Lift the pod cover and disconnect the speedometer harnesses from the wiring harness. Unplug the headlamp from the speedometer. Turn the... visibility when driving. Clean lights frequently and replace burned out lamps promptly. Allow lamps to cool before servicing. 5. MAINTENANCE Lights Poor lighting can cause burns to skin. Oil from the rear of the headlight pod. 2. Hot components can result in the housing. 8. Lift the pod ...
... lower front corners of the pod. 3. Remove the two screws on the wiring. 6. Headlight and taillight lenses become dirty during normal operation. Lift the pod cover and disconnect the speedometer harnesses from the wiring harness. Unplug the headlamp from the speedometer. Turn the... visibility when driving. Clean lights frequently and replace burned out lamps promptly. Allow lamps to cool before servicing. 5. MAINTENANCE Lights Poor lighting can cause burns to skin. Oil from the rear of the headlight pod. 2. Hot components can result in the housing. 8. Lift the pod ...

Owners Manual
Page 97
... the headlight housing up to release it from the headlight mounting tabs. 6. The distance from the locking tabs. 7. Use a small screwdriver to the end of the pod. 9. Lift the adjusting knob up and out of the adjustment knob stop is 5 1/8" (13 cm). 10. Lift the pod cover and disconnect the speedometer harnesses from the wiring harness. 5. Carefully pull the assembly up to...
... the headlight housing up to release it from the headlight mounting tabs. 6. The distance from the locking tabs. 7. Use a small screwdriver to the end of the pod. 9. Lift the adjusting knob up and out of the adjustment knob stop is 5 1/8" (13 cm). 10. Lift the pod cover and disconnect the speedometer harnesses from the wiring harness. 5. Carefully pull the assembly up to...

Owners Manual
Page 98
... from the back of the light assembly. 2. Turn the headlight harness clockwise to the socket and install the new Lamp lamp. 4. Test the light for proper operation. 95 Remove the headlamp and install the new headlamp. 3. Apply dielectric grease to secure the headlamp. Turn the lamp counterclockwise to remove it. 3. Remove the harness connector Connector from the headlight assembly. 2. MAINTENANCE Lights Lower Headlamp Replacement 1.
... from the back of the light assembly. 2. Turn the headlight harness clockwise to the socket and install the new Lamp lamp. 4. Test the light for proper operation. 95 Remove the headlamp and install the new headlamp. 3. Apply dielectric grease to secure the headlamp. Turn the lamp counterclockwise to remove it. 3. Remove the harness connector Connector from the headlight assembly. 2. MAINTENANCE Lights Lower Headlamp Replacement 1.

Owners Manual
Page 113
... water may have entered the engine or exhaust system. Replacement safety labels are provided by Polaris at the following items: • Wheel bearings • Electrical components • Radiator • Switches and controls • Transmission seals • Fuel system components • Cab and body panels • Labels and decals If an informational or graphic label becomes illegible or comes off, contact your vehicle. • Always use clean cloths and pads...
... water may have entered the engine or exhaust system. Replacement safety labels are provided by Polaris at the following items: • Wheel bearings • Electrical components • Radiator • Switches and controls • Transmission seals • Fuel system components • Cab and body panels • Labels and decals If an informational or graphic label becomes illegible or comes off, contact your vehicle. • Always use clean cloths and pads...

Owners Manual
Page 116
...) • ADC fluid (ADC models) (change every two years) • Rear gearcase • Transmission • Brake fluid (change every two years and any time the fluid looks dark or contaminated) • Coolant (test strength) Fog the Engine 1. Treat the fuel system with a protective film of fresh oil. 6. Reinstall the spark plugs. Change fluids as recommended in and around the piston rings and ring lands, coating the cylinder with Polaris Carbon Clean...
...) • ADC fluid (ADC models) (change every two years) • Rear gearcase • Transmission • Brake fluid (change every two years and any time the fluid looks dark or contaminated) • Coolant (test strength) Fog the Engine 1. Treat the fuel system with a protective film of fresh oil. 6. Reinstall the spark plugs. Change fluids as recommended in and around the piston rings and ring lands, coating the cylinder with Polaris Carbon Clean...

Owners Manual
Page 121
... 7 times. Poor engine performance Check for or snow ingestion into the damage if repeated leaking occurs. Use the throttle quickly and effectively. WARNING! PVT system Clutch malfunction See your dealer. Slippage from water Dry out the PVT. TROUBLESHOOTING Drive Belt Wear/Burn Possible Cause Driving onto a pickup or tall trailer in high range Starting out going up a steep incline Driving at low RPM or ground speed (3-7 MPH...
... 7 times. Poor engine performance Check for or snow ingestion into the damage if repeated leaking occurs. Use the throttle quickly and effectively. WARNING! PVT system Clutch malfunction See your dealer. Slippage from water Dry out the PVT. TROUBLESHOOTING Drive Belt Wear/Burn Possible Cause Driving onto a pickup or tall trailer in high range Starting out going up a steep incline Driving at low RPM or ground speed (3-7 MPH...

Owners Manual
Page 126
SPECIFICATIONS Sportsman 800 EFI Maximum Weight Capacity Fuel Capacity Engine Oil Capacity Coolant Capacity Rear Gearcase Oil Capacity Demand Drive Fluid Capacity Transmission Oil Capacity Front Rack/Storage Box Capacity Rear Rack Capacity Receiver Hitch Tongue Capacity Hitch Towing Rating Unbraked Trailer Towing Capacity* Overall Length Overall Width Overall Height Wheelbase Ground Clearance Dry Weight Minimum Turning Radius Engine Displacement Bore x Stroke Alternator Output Compression Ratio Starting System Fuel System Ignition System Ignition Timing Spark Plug / Gap Lubrication System ...
SPECIFICATIONS Sportsman 800 EFI Maximum Weight Capacity Fuel Capacity Engine Oil Capacity Coolant Capacity Rear Gearcase Oil Capacity Demand Drive Fluid Capacity Transmission Oil Capacity Front Rack/Storage Box Capacity Rear Rack Capacity Receiver Hitch Tongue Capacity Hitch Towing Rating Unbraked Trailer Towing Capacity* Overall Length Overall Width Overall Height Wheelbase Ground Clearance Dry Weight Minimum Turning Radius Engine Displacement Bore x Stroke Alternator Output Compression Ratio Starting System Fuel System Ignition System Ignition Timing Spark Plug / Gap Lubrication System ...

Owners Manual
Page 127
SPECIFICATIONS Sportsman 800 EFI Transmission Gear Reduction, Low Gear Reduction, Reverse Gear Reduction, High Drive Ratio, Front Drive Ratio, Final Tires/Pressure, Front Tires/Pressure, Rear Brakes, Front Brakes, Rear Brakes, Auxiliary Brake, Parking Headlight Taillights Brake Light Instrument Cluster Automatic PVT with E-Z Shift H/L/N/R/P 7.49:1 5.11:1 2.88:1 3.82:1 3.10:1 26x8-12 / 5 psi (34.5 KPa) 26x11-12 / 5 psi (34.5 KPa) Single-Control Hydraulic Disc Single-Control Hydraulic Disc Foot-Activated Hydraulic Disc Hydraulic lock, all wheel 1 Single Beam on Headlight Pod (50 watt) 2 Single ...
SPECIFICATIONS Sportsman 800 EFI Transmission Gear Reduction, Low Gear Reduction, Reverse Gear Reduction, High Drive Ratio, Front Drive Ratio, Final Tires/Pressure, Front Tires/Pressure, Rear Brakes, Front Brakes, Rear Brakes, Auxiliary Brake, Parking Headlight Taillights Brake Light Instrument Cluster Automatic PVT with E-Z Shift H/L/N/R/P 7.49:1 5.11:1 2.88:1 3.82:1 3.10:1 26x8-12 / 5 psi (34.5 KPa) 26x11-12 / 5 psi (34.5 KPa) Single-Control Hydraulic Disc Single-Control Hydraulic Disc Foot-Activated Hydraulic Disc Hydraulic lock, all wheel 1 Single Beam on Headlight Pod (50 watt) 2 Single ...

Owners Manual
Page 131
... your vehicle was purchased: Warranty or Service Bulletin repairs must show the dealer photo identification from the country of the selling dealer's authorized location. You should consult an authorized dealer to perform the warranty repair. This policy does not apply to vehicles registered to government officials or military personnel on assignment outside the country where your vehicle to Polaris Industries...
... your vehicle was purchased: Warranty or Service Bulletin repairs must show the dealer photo identification from the country of the selling dealer's authorized location. You should consult an authorized dealer to perform the warranty repair. This policy does not apply to vehicles registered to government officials or military personnel on assignment outside the country where your vehicle to Polaris Industries...