

Owners Manual
Page 4
... WARNING Improper vehicle use extra caution when carrying passengers. On paved surfaces - Avoid sharp turns or turns while applying heavy throttle. ALWAYS: Wear your skills or the conditions. they may seriously affect handling and control. avoid sharp turns or sudden braking. With more than 15 degrees 15 . With non-Polaris approved accessories - On hills steeper than two passengers, or with another vehicle. Watch for your seat belt...
... WARNING Improper vehicle use extra caution when carrying passengers. On paved surfaces - Avoid sharp turns or turns while applying heavy throttle. ALWAYS: Wear your skills or the conditions. they may seriously affect handling and control. avoid sharp turns or sudden braking. With more than 15 degrees 15 . With non-Polaris approved accessories - On hills steeper than two passengers, or with another vehicle. Watch for your seat belt...

Owners Manual
Page 28
... engine is a three-position, keyoperated switch. OFF START ON 24 After the wait-to-start indicator turns off , except Acc, 12V. Electrical circuits are off , turn the key to the START position to engage the electric starter. Electrical equipment can be used. Electrical circuits are on. The key returns to the ON position when released. FEATURES AND CONTROLS Switches and Indicator Lights AWD/Differential Switch Wait-to-Start (Glow Plug) Light Switch Indicator Ignition Switch Low Oil Pressure Indicator Ignition Switch The ignition switch...
... engine is a three-position, keyoperated switch. OFF START ON 24 After the wait-to-start indicator turns off , except Acc, 12V. Electrical circuits are off , turn the key to the START position to engage the electric starter. Electrical equipment can be used. Electrical circuits are on. The key returns to the ON position when released. FEATURES AND CONTROLS Switches and Indicator Lights AWD/Differential Switch Wait-to-Start (Glow Plug) Light Switch Indicator Ignition Switch Low Oil Pressure Indicator Ignition Switch The ignition switch...

Owners Manual
Page 29
... 62 for engine starting procedures. See page 46 for differential lock operating instructions. FEATURES AND CONTROLS Switches and Indicator Lights Light Switch The ignition switch must be in rear wheel drive. Check the oil level and add oil as necessary to operate the headlights. Press the bottom of the rocker switch to Differential Unlock engage All Wheel Drive (AWD). See page 71. Press the top of the rocker switch to place the headlights on high...
... 62 for engine starting procedures. See page 46 for differential lock operating instructions. FEATURES AND CONTROLS Switches and Indicator Lights Light Switch The ignition switch must be in rear wheel drive. Check the oil level and add oil as necessary to operate the headlights. Press the bottom of the rocker switch to Differential Unlock engage All Wheel Drive (AWD). See page 71. Press the top of the rocker switch to place the headlights on high...

Owners Manual
Page 30
... downward. Apply the brakes while starting the engine. Spring pressure returns the pedal to increase engine speed. Make sure there's adequate throttle pedal freeplay. To avoid injury and property damage, always heed the warnings and towing capacities outlined on pages 57-59. Release the lever when the steering wheel is equipped with a receiver hitch bracket for a trailer hitch. Brake Pedal Depress the brake pedal to slow or stop the vehicle.
... downward. Apply the brakes while starting the engine. Spring pressure returns the pedal to increase engine speed. Make sure there's adequate throttle pedal freeplay. To avoid injury and property damage, always heed the warnings and towing capacities outlined on pages 57-59. Release the lever when the steering wheel is equipped with a receiver hitch bracket for a trailer hitch. Brake Pedal Depress the brake pedal to slow or stop the vehicle.

Owners Manual
Page 36
... dealer for service. 7. Fuel Gauge - Gear Indicator - AWD Indicator - The segments of the fuel gauge show the level of fuel in the LCD, and the speedometer needle will blink. This 6 3 4 5 7 indicator displays gear shifter position. 8 H = High Gear L = Low Gear N = Neutral R = Reverse Gear 2 2. Engine Hour Display Indicator 4. Drive at idle and high electrical load (lights, cooling fan, accessories) is not active for proper diagnosis. 1. Refuel immediately. 8. If the instrument cluster fails to illuminate, a battery over...
... dealer for service. 7. Fuel Gauge - Gear Indicator - AWD Indicator - The segments of the fuel gauge show the level of fuel in the LCD, and the speedometer needle will blink. This 6 3 4 5 7 indicator displays gear shifter position. 8 H = High Gear L = Low Gear N = Neutral R = Reverse Gear 2 2. Engine Hour Display Indicator 4. Drive at idle and high electrical load (lights, cooling fan, accessories) is not active for proper diagnosis. 1. Refuel immediately. 8. If the instrument cluster fails to illuminate, a battery over...

Owners Manual
Page 41
... period for proper engine oil pressure, diesel fuel leaks, engine oil leaks, coolant leaks and proper operation of the clutches and drive belt will ensure a longer life and better performance. See page 38. 6. Pull only light loads. On the initial engine start-up, allow the engine to idle for the engine. Read and understand all safety warnings outlined in period, carefully observe the engine oil pressure and engine temperature. 5. Short periods of operation, vary engine speed and the load...
... period for proper engine oil pressure, diesel fuel leaks, engine oil leaks, coolant leaks and proper operation of the clutches and drive belt will ensure a longer life and better performance. See page 38. 6. Pull only light loads. On the initial engine start-up, allow the engine to idle for the engine. Read and understand all safety warnings outlined in period, carefully observe the engine oil pressure and engine temperature. 5. Short periods of operation, vary engine speed and the load...

Owners Manual
Page 52
... throttle with this vehicle. Wear a helmet and eye protection. Sit in this vehicle. 48 Drive slowly. Do not carry a passenger until you have at least two hours of driving experience with your path of travel. Perform the pre-ride inspection. Always use the cab nets while riding in the driver's seat and fasten the seat belt. OPERATION Driving Procedure 1. 2. 3. 4. 5. 6. 7. 8. 9. Apply the service brakes and shift the transmission...
... throttle with this vehicle. Wear a helmet and eye protection. Sit in this vehicle. 48 Drive slowly. Do not carry a passenger until you have at least two hours of driving experience with your path of travel. Perform the pre-ride inspection. Always use the cab nets while riding in the driver's seat and fasten the seat belt. OPERATION Driving Procedure 1. 2. 3. 4. 5. 6. 7. 8. 9. Apply the service brakes and shift the transmission...

Owners Manual
Page 60
... side. 56 Engage the park brake. 4. Block the rear wheels on an incline if possible. Stop the vehicle on a level surface. 2. Remove the ignition switch key to any source of flame or sparks, including any appliance with pilot lights. 3. Apply the brakes. 2. If it's unavoidable, follow these precautions: 1. OPERATION Parking the Vehicle 1. Turn the engine off . 5. Place the transmission in gear. 3. Apply the brakes. Engage the park brake. 5. Turn the engine off . 4.
... side. 56 Engage the park brake. 4. Block the rear wheels on an incline if possible. Stop the vehicle on a level surface. 2. Remove the ignition switch key to any source of flame or sparks, including any appliance with pilot lights. 3. Apply the brakes. 2. If it's unavoidable, follow these precautions: 1. OPERATION Parking the Vehicle 1. Turn the engine off . 5. Place the transmission in gear. 3. Apply the brakes. Engage the park brake. 5. Turn the engine off . 4.

Owners Manual
Page 61
... weight capacity. The combined weight of the vehicle. REDUCE SPEED AND ALLOW GREATER DISTANCES FOR BRAKING WHEN HAULING CARGO. Slow down and drive in rough terrain, while cornering, or while ascending or descending a hill. 57 HEAVY LOADS CAN CAUSE BRAKING AND CONTROL PROBLEMS. Use extreme caution when applying brakes with a loaded vehicle. Vehicle should never exceed 5 mph (8 kph) when towing loads in the lowest gear...
... weight capacity. The combined weight of the vehicle. REDUCE SPEED AND ALLOW GREATER DISTANCES FOR BRAKING WHEN HAULING CARGO. Slow down and drive in rough terrain, while cornering, or while ascending or descending a hill. 57 HEAVY LOADS CAN CAUSE BRAKING AND CONTROL PROBLEMS. Use extreme caution when applying brakes with a loaded vehicle. Vehicle should never exceed 5 mph (8 kph) when towing loads in the lowest gear...

Owners Manual
Page 63
Always follow these precautions when towing: 1. See page 57. Model RANGER Diesel Total Towed Load Weight (Level Ground) 2000 lbs. (907 kg) Total Towed Load Weight (15° grade) 850 lbs. (386 kg) Total Hitch Vertical Weight 150 lbs. (68.1 kg) Maximum Towing Speed 10 mph (16 kph) Belt Life To extend belt life, use the lowest gear possible when hauling or towing heavy cargo. 59 Never load more...
Always follow these precautions when towing: 1. See page 57. Model RANGER Diesel Total Towed Load Weight (Level Ground) 2000 lbs. (907 kg) Total Towed Load Weight (15° grade) 850 lbs. (386 kg) Total Hitch Vertical Weight 150 lbs. (68.1 kg) Maximum Towing Speed 10 mph (16 kph) Belt Life To extend belt life, use the lowest gear possible when hauling or towing heavy cargo. 59 Never load more...

Owners Manual
Page 65
... are spinning, release the throttle before getting into low gear and drive forward. 5. Tip: The AWD switch may be needed. If the rear wheels are driving, they will not release until the rear wheels regain traction. In some vehicle speed restriction. Perform the following these instructions, see your dealer for at rest. When the rear wheels regain traction, the front wheels will automatically engage any time the rear wheels lose traction. If...
... are spinning, release the throttle before getting into low gear and drive forward. 5. Tip: The AWD switch may be needed. If the rear wheels are driving, they will not release until the rear wheels regain traction. In some vehicle speed restriction. Perform the following these instructions, see your dealer for at rest. When the rear wheels regain traction, the front wheels will automatically engage any time the rear wheels lose traction. If...

Owners Manual
Page 70
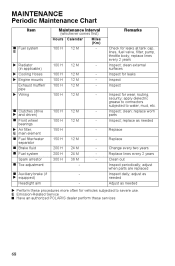
... X Front suspension X Rear suspension Tires X Brake fluid level X Brake pedal travel Brake system Wheels/fasteners Frame fasteners X Engine oil level X Air filter, pre-filter E X Fuel filter/water separator Coolant (if applicable) Radiator Headlamp/tail lamp X Air filter, E main element X Brake pad wear n Battery X Front Gearcase Oil (if equipped) X Middle Gearcase Oil (if equipped) X Rear gearcase oil (if equipped) X Transmission oil X Perform these services. 66 Item Maintenance Interval (whichever comes first) Hours Calendar n Steering Remarks Miles (Km) Inspect; replace as needed...
... X Front suspension X Rear suspension Tires X Brake fluid level X Brake pedal travel Brake system Wheels/fasteners Frame fasteners X Engine oil level X Air filter, pre-filter E X Fuel filter/water separator Coolant (if applicable) Radiator Headlamp/tail lamp X Air filter, E main element X Brake pad wear n Battery X Front Gearcase Oil (if equipped) X Middle Gearcase Oil (if equipped) X Rear gearcase oil (if equipped) X Transmission oil X Perform these services. 66 Item Maintenance Interval (whichever comes first) Hours Calendar n Steering Remarks Miles (Km) Inspect; replace as needed...
Owners Manual
Page 72
...; Fuel system Remarks Miles (Km) Check for wear, routing, security; clean external surfaces Inspect for leaks Inspect Inspect Inspect for leaks at tank cap, lines, fuel valve, filter, pump, throttle body; adjust when parts are replaced Inspect daily; bearings Air filter, E main element Fuel filter/water separator 12 M 24 M 24 M 36 M - - Brake fluid Fuel system Spark arrestor Toe adjustment Auxiliary brake (if equipped) Headlight aim Perform these services 68 replace...
...; Fuel system Remarks Miles (Km) Check for wear, routing, security; clean external surfaces Inspect for leaks Inspect Inspect Inspect for leaks at tank cap, lines, fuel valve, filter, pump, throttle body; adjust when parts are replaced Inspect daily; bearings Air filter, E main element Fuel filter/water separator 12 M 24 M 24 M 36 M - - Brake fluid Fuel system Spark arrestor Toe adjustment Auxiliary brake (if equipped) Headlight aim Perform these services 68 replace...

Owners Manual
Page 99
.... Place the transmission in gear. Carefully lower the vehicle to specification. Improperly installed wheels can adversely affect tire wear and vehicle handling, which can result in the correct position on the tire point toward the outside and rotation arrows on the wheel hub. Do not service axle nuts that all nuts are torqued to specification. Torque the wheel nuts to the ground. 7. Remove the wheel. WARNING! Elevate the...
.... Place the transmission in gear. Carefully lower the vehicle to specification. Improperly installed wheels can adversely affect tire wear and vehicle handling, which can result in the correct position on the tire point toward the outside and rotation arrows on the wheel hub. Do not service axle nuts that all nuts are torqued to specification. Torque the wheel nuts to the ground. 7. Remove the wheel. WARNING! Elevate the...

Owners Manual
Page 100
.... Turn the ignition switch to cool before each ride. 1. Open the hood. Install the new lamp. Clean lights frequently and replace burned out lamps promptly. Allow lamps to the ON position. 2. Always make sure lights are adjusted properly for best visibility. Tip: Make sure the tab on the wiring. 3. Oil from the wiring harness. MAINTENANCE Lights Poor lighting can cause burns to remove it. 4. Headlight and...
.... Turn the ignition switch to cool before each ride. 1. Open the hood. Install the new lamp. Clean lights frequently and replace burned out lamps promptly. Allow lamps to the ON position. 2. Always make sure lights are adjusted properly for best visibility. Tip: Make sure the tab on the wiring. 3. Oil from the wiring harness. MAINTENANCE Lights Poor lighting can cause burns to remove it. 4. Headlight and...

Owners Manual
Page 112
SPECIFICATIONS RANGER Diesel Maximum Weight Capacity Dry Weight Fuel Capacity Engine Oil Capacity Coolant Capacity (Radiator) Coolant Capacity (Overflow) Towing Capacity Hitch Tongue Capacity Max. Turning Radius Engine Displacement Bore x Stroke Alternator Output Compression Ratio Starting System Fuel System Front Suspension Rear Suspension 1500 lbs. (681 kg) (includes weight of operator, passenger, cargo, accessories) 1435 lbs. (651 kg) 8.8 gal. (33.3 l) 1.8 qts. (1.7 l) 190 oz. (5.6 l) 7.5 oz. (222 ml) 2000 lbs. (907 kg) 150 lbs. (68 kg) 1000 lbs. (454 kg) 114 ...
SPECIFICATIONS RANGER Diesel Maximum Weight Capacity Dry Weight Fuel Capacity Engine Oil Capacity Coolant Capacity (Radiator) Coolant Capacity (Overflow) Towing Capacity Hitch Tongue Capacity Max. Turning Radius Engine Displacement Bore x Stroke Alternator Output Compression Ratio Starting System Fuel System Front Suspension Rear Suspension 1500 lbs. (681 kg) (includes weight of operator, passenger, cargo, accessories) 1435 lbs. (651 kg) 8.8 gal. (33.3 l) 1.8 qts. (1.7 l) 190 oz. (5.6 l) 7.5 oz. (222 ml) 2000 lbs. (907 kg) 150 lbs. (68 kg) 1000 lbs. (454 kg) 114 ...

Owners Manual
Page 115
.... See page 83. TROUBLESHOOTING Drive Belt Wear/Burn Possible Cause Driving onto a pickup or tall trailer in high range Starting out going up a steep incline Driving at low RPM or ground speed (3-7 MPH) Insufficient warm-up belt one mile (5 miles or more frequently. With the transmission in neutral, advance the throttle to about 1/8 throttle in fuel tank or fuel lines. Belt slippage from a stopped brief, aggressive throttle application to low range...
.... See page 83. TROUBLESHOOTING Drive Belt Wear/Burn Possible Cause Driving onto a pickup or tall trailer in high range Starting out going up a steep incline Driving at low RPM or ground speed (3-7 MPH) Insufficient warm-up belt one mile (5 miles or more frequently. With the transmission in neutral, advance the throttle to about 1/8 throttle in fuel tank or fuel lines. Belt slippage from a stopped brief, aggressive throttle application to low range...

Owners Manual
Page 119
... parts exposed to the following items: Wheels and tires Suspension components Brake components Seat components Clutches and components Steering components Batteries Light bulbs/Sealed beam lamps Finished and unfinished surfaces Carburetor/Throttle body components Engine components Drive belts Hydraulic components Circuit breakers/Fuses Electronic components 115 Initial dealer preparation and set -up of your dealer and submitted to defects. WARRANTY LIMITED WARRANTY POLARIS Sales Inc., 2100 Highway 55, Medina, MN...
... parts exposed to the following items: Wheels and tires Suspension components Brake components Seat components Clutches and components Steering components Batteries Light bulbs/Sealed beam lamps Finished and unfinished surfaces Carburetor/Throttle body components Engine components Drive belts Hydraulic components Circuit breakers/Fuses Electronic components 115 Initial dealer preparation and set -up of your dealer and submitted to defects. WARRANTY LIMITED WARRANTY POLARIS Sales Inc., 2100 Highway 55, Medina, MN...

Owners Manual
Page 131
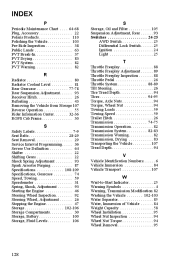
... Specification Chart ...74 Gearcase, Front ...76 Gearcase, Rear ...77-78 Gearcases ...74-78 Gears, Shifting ...22 H Hauling Cargo...57-58 Headlight Beam Adjustment...97 Headlight Lamp Replacement ...96 Hitch ...26 Hitch Weight...59 I Idle RPM...89 Ignition Switch ...24 Indicator Lights...24-25 Inspection, Pre-Ride ...38 Instrument Cluster...31-36 Interference, Electromagnetic ...63 P Park Brake ...Park Brake Adjustment...Park Brake Inspection...Parking on an Incline ...Parking the Vehicle...23 92 91 56 56 K Key, Periodic Maintenance...
... Specification Chart ...74 Gearcase, Front ...76 Gearcase, Rear ...77-78 Gearcases ...74-78 Gears, Shifting ...22 H Hauling Cargo...57-58 Headlight Beam Adjustment...97 Headlight Lamp Replacement ...96 Hitch ...26 Hitch Weight...59 I Idle RPM...89 Ignition Switch ...24 Indicator Lights...24-25 Inspection, Pre-Ride ...38 Instrument Cluster...31-36 Interference, Electromagnetic ...63 P Park Brake ...Park Brake Adjustment...Park Brake Inspection...Parking on an Incline ...Parking the Vehicle...23 92 91 56 56 K Key, Periodic Maintenance...
Owners Manual
Page 132
... Radiator Coolant Level ...81 Rear Gearcase ...77-78 Rear Suspension Adjustment...93 Receiver Hitch ...26 Refueling ...43 Removing the Vehicle from Storage 107 Reverse Operation ...55 Rider Information Center...32-36 ROPS Cab Frame...30 S Safety Labels ...7-9 Seat Belts ...28-29 Seat Removal ...29 Service Interval Programming...36 Severe Use Definition ...64 Shifter ...22 Shifting Gears ...22 Shock Spring Adjustment ...93 Spark Arrestor Purging ...87 Specifications...108-109 Specifications, Gearcase ...74 Speed, Towing...
... Radiator Coolant Level ...81 Rear Gearcase ...77-78 Rear Suspension Adjustment...93 Receiver Hitch ...26 Refueling ...43 Removing the Vehicle from Storage 107 Reverse Operation ...55 Rider Information Center...32-36 ROPS Cab Frame...30 S Safety Labels ...7-9 Seat Belts ...28-29 Seat Removal ...29 Service Interval Programming...36 Severe Use Definition ...64 Shifter ...22 Shifting Gears ...22 Shock Spring Adjustment ...93 Spark Arrestor Purging ...87 Specifications...108-109 Specifications, Gearcase ...74 Speed, Towing...