
Owners Manual
Page 33
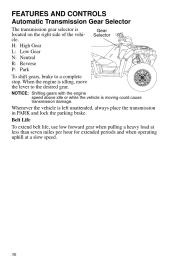
... place the transmission in PARK and lock the parking brake. Belt Life To extend belt life, use low forward gear when pulling a heavy load at less than seven miles per hour for extended periods and when operating uphill at a slow speed. 30 FEATURES AND CONTROLS Automatic Transmission Gear Selector The transmission gear selector is moving could cause transmission damage. Gear Selector NOTICE: Shifting gears with the engine speed above idle or while the vehicle is located on...
... place the transmission in PARK and lock the parking brake. Belt Life To extend belt life, use low forward gear when pulling a heavy load at less than seven miles per hour for extended periods and when operating uphill at a slow speed. 30 FEATURES AND CONTROLS Automatic Transmission Gear Selector The transmission gear selector is moving could cause transmission damage. Gear Selector NOTICE: Shifting gears with the engine speed above idle or while the vehicle is located on...

Owners Manual
Page 35
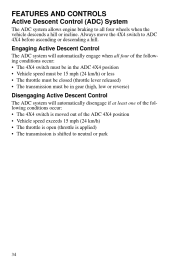
... indicator light in the instrument cluster will automatically engage any time the rear wheels lose traction. There is controlled by the 4X4 switch. When the rear wheels regain traction, the demand drive unit will automatically disengage. FEATURES AND CONTROLS All Wheel Drive System The All Wheel Drive system is no limit to the length of 4X4 in reverse if the 4X4 switch is on ADC 4X4, the ADC system allows engine braking to...
... indicator light in the instrument cluster will automatically engage any time the rear wheels lose traction. There is controlled by the 4X4 switch. When the rear wheels regain traction, the demand drive unit will automatically disengage. FEATURES AND CONTROLS All Wheel Drive System The All Wheel Drive system is no limit to the length of 4X4 in reverse if the 4X4 switch is on ADC 4X4, the ADC system allows engine braking to...
Owners Manual
Page 37
... Descent Control The ADC system will automatically engage when all four wheels when the vehicle descends a hill or incline. FEATURES AND CONTROLS Active Descent Control (ADC) System The ADC system allows engine braking to all four of the ADC 4X4 position • Vehicle speed exceeds 15 mph (24 km/h) • The throttle is open (throttle is applied) • The transmission is shifted to neutral or park 34...
... Descent Control The ADC system will automatically engage when all four wheels when the vehicle descends a hill or incline. FEATURES AND CONTROLS Active Descent Control (ADC) System The ADC system allows engine braking to all four of the ADC 4X4 position • Vehicle speed exceeds 15 mph (24 km/h) • The throttle is open (throttle is applied) • The transmission is shifted to neutral or park 34...

Owners Manual
Page 42
... hazard signal is set to indicate an overheated engine. See your dealer. 39 FEATURES AND CONTROLS Instrument Cluster Digital/Analog Gauge Indicator Lamps Lamp Indicates Vehicle Speed Over Temperature Condition When standard mode is in the ON position. This lamp illuminates when the transmission is in neutral and the ignition key is selected, speed displays in kilometers per hour. Do not operate the vehicle if this warning appears...
... hazard signal is set to indicate an overheated engine. See your dealer. 39 FEATURES AND CONTROLS Instrument Cluster Digital/Analog Gauge Indicator Lamps Lamp Indicates Vehicle Speed Over Temperature Condition When standard mode is in the ON position. This lamp illuminates when the transmission is in neutral and the ignition key is selected, speed displays in kilometers per hour. Do not operate the vehicle if this warning appears...

Owners Manual
Page 44
... fuel tank. Service Reminder Display - Fuel Gauge Display - The clock displays time in a 12-hour or 24-hour format. This icon displays when the 4X4 system is engaged (switch is on either ADC 4X4 or 4X4). 8. This area displays gear shifter position. A flashing wrench symbol alerts the operator that the preset service interval has been reached. FEATURES AND CONTROLS Instrument Cluster Digital/Analog Gauge...
... fuel tank. Service Reminder Display - Fuel Gauge Display - The clock displays time in a 12-hour or 24-hour format. This icon displays when the 4X4 system is engaged (switch is on either ADC 4X4 or 4X4). 8. This area displays gear shifter position. A flashing wrench symbol alerts the operator that the preset service interval has been reached. FEATURES AND CONTROLS Instrument Cluster Digital/Analog Gauge...

Owners Manual
Page 50
... 636 523 523 523 651 651 1268 1268 1347 1347 1071 1071 520193 520193 1321 520207 168 168 520194 520194 520194 520194 FMI 3 4 3 4 16 0 3 4 3 4 8 4 3 2 5 3 5 3 5 3 5 3 5 11 3 3 3 4 3 4 2 7 Intake Air Temperature Sensor Manifold Absolute Pressure Sensor Crankshaft Position Sensor Gear Sensor Signal Injector 1 (MAG) Ignition Coil Primary Driver 1 (MAG) Fuel Pump Driver Circuit Fan Relay Driver Circuit Idle Air Control Starter Enable Circuit All Wheel Drive Control System Power Throttle Safety Signal *Assumes unipolar configuration of stepper motor 47
... 636 523 523 523 651 651 1268 1268 1347 1347 1071 1071 520193 520193 1321 520207 168 168 520194 520194 520194 520194 FMI 3 4 3 4 16 0 3 4 3 4 8 4 3 2 5 3 5 3 5 3 5 3 5 11 3 3 3 4 3 4 2 7 Intake Air Temperature Sensor Manifold Absolute Pressure Sensor Crankshaft Position Sensor Gear Sensor Signal Injector 1 (MAG) Ignition Coil Primary Driver 1 (MAG) Fuel Pump Driver Circuit Fan Relay Driver Circuit Idle Air Control Starter Enable Circuit All Wheel Drive Control System Power Throttle Safety Signal *Assumes unipolar configuration of stepper motor 47

Owners Manual
Page 51
... POLARIS vehicle is as important as recommended. See page 49. 6. PVT Break-in (Clutches/Belt) A proper break-in of this owner's manual. Change both the oil and the filter at sustained idle. 5. Read and understand all safety warnings outlined in the safety section of the clutches and drive belt will result in more efficient performance and longer life for your part is the first ten hours of control...
... POLARIS vehicle is as important as recommended. See page 49. 6. PVT Break-in (Clutches/Belt) A proper break-in of this owner's manual. Change both the oil and the filter at sustained idle. 5. Read and understand all safety warnings outlined in the safety section of the clutches and drive belt will result in more efficient performance and longer life for your part is the first ten hours of control...

Owners Manual
Page 69
... the vehicle warning labels. • Never carry cargo in the rear box when operating the vehicle in the 2-up mode with loads extending beyond the rack or cargo bed. When operating over rough or hilly terrain, reduce speed and cargo to the hitch point designated for this vehicle. Unsecured loads may cause loss of control or brake instability. Never exceed 8 km/h when towing...
... the vehicle warning labels. • Never carry cargo in the rear box when operating the vehicle in the 2-up mode with loads extending beyond the rack or cargo bed. When operating over rough or hilly terrain, reduce speed and cargo to the hitch point designated for this vehicle. Unsecured loads may cause loss of control or brake instability. Never exceed 8 km/h when towing...

Owners Manual
Page 70
... hauling or towing loads. OPERATION Hauling Cargo Never exceed the weight capacities specified for your vehicle on warning labels and in the rear of this manual. 1. Always operate the vehicle with the load as far forward as possible. 2. Balance, handling, and control may be mounted as low as possible. 4. When operating over rough or hilly terrain, reduce speed and cargo weight to extend belt life...
... hauling or towing loads. OPERATION Hauling Cargo Never exceed the weight capacities specified for your vehicle on warning labels and in the rear of this manual. 1. Always operate the vehicle with the load as far forward as possible. 2. Balance, handling, and control may be mounted as low as possible. 4. When operating over rough or hilly terrain, reduce speed and cargo weight to extend belt life...

Owners Manual
Page 71
... exceed the following maximum capacities when towing. Maximum Towing Capacities Maximum Towed Load (Level Ground) Maximum Vertical Hitch Weight 1500 lbs. (680 kg) 150 lbs. (68 kg) 68 Never install a hitch longer than 15 Always attach a towed load to the vehicle and will void your Polaris dealer about configuring the vehicle to be certified to tow a trailer on-road. • Do not tow any trailer on a grade steeper...
... exceed the following maximum capacities when towing. Maximum Towing Capacities Maximum Towed Load (Level Ground) Maximum Vertical Hitch Weight 1500 lbs. (680 kg) 150 lbs. (68 kg) 68 Never install a hitch longer than 15 Always attach a towed load to the vehicle and will void your Polaris dealer about configuring the vehicle to be certified to tow a trailer on-road. • Do not tow any trailer on a grade steeper...
Owners Manual
Page 77
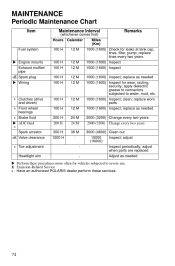
... two years 2000 (3200) Change every two years 3000 (4800) Clean out 10000 (16000) Inspect; E Emission-Related Service n Have an authorized POLARIS dealer perform these procedures more often for wear, routing, security; clean; MAINTENANCE Periodic Maintenance Chart Item Maintenance Interval (whichever comes first) Hours Calendar Fuel system Engine mounts Exhaust muffler/ pipe nE Spark plug Remarks Miles (Km) 1000 (1600) Check for leaks at tank cap, lines, filter, pump;
... two years 2000 (3200) Change every two years 3000 (4800) Clean out 10000 (16000) Inspect; E Emission-Related Service n Have an authorized POLARIS dealer perform these procedures more often for wear, routing, security; clean; MAINTENANCE Periodic Maintenance Chart Item Maintenance Interval (whichever comes first) Hours Calendar Fuel system Engine mounts Exhaust muffler/ pipe nE Spark plug Remarks Miles (Km) 1000 (1600) Check for leaks at tank cap, lines, filter, pump;

Owners Manual
Page 98
... Steel 45 ft. Wheel Type Aluminum Steel Nut Type Lug Nut Lug Nut Nut Torque 75 ft. Lock the parking brake. 3. Always ensure that all nuts are torqued to specification. lbs. (61 Nm) Wheel Nut Torque Specifications Check the wheel nut torques occasionally and when they've been loosened for service. Place the wheel on the hub with the valve stem toward the...
... Steel 45 ft. Wheel Type Aluminum Steel Nut Type Lug Nut Lug Nut Nut Torque 75 ft. Lock the parking brake. 3. Always ensure that all nuts are torqued to specification. lbs. (61 Nm) Wheel Nut Torque Specifications Check the wheel nut torques occasionally and when they've been loosened for service. Place the wheel on the hub with the valve stem toward the...

Owners Manual
Page 101
.... Lift the pod cover and disconnect the speedometer harnesses from the wiring harness. Make sure the tab on the wiring. 4. Headlight Lamp Replacement When servicing a halogen lamp, avoid touching the lamp with denatured alcohol. 1. Remove the five (5) headlight pod screws. 2. Install the new lamp. Always make sure lights are adjusted properly for best visibility. Unplug the headlamp from the speedometer. Oil from...
.... Lift the pod cover and disconnect the speedometer harnesses from the wiring harness. Make sure the tab on the wiring. 4. Headlight Lamp Replacement When servicing a halogen lamp, avoid touching the lamp with denatured alcohol. 1. Remove the five (5) headlight pod screws. 2. Install the new lamp. Always make sure lights are adjusted properly for best visibility. Unplug the headlamp from the speedometer. Oil from...

Owners Manual
Page 103
... at the rear of the pod. 7. Phillips Screw Headlight Housing Replacement 1. Remove the five (5) headlight pod screws. 2. Replace the entire signal lamp assembly. 100 MAINTENANCE Lights Low Beam Adjustment The low beam can be replaced. Lift the pod cover and disconnect the speedometer harnesses from the wiring harness. 4. Unplug the headlamp from the speedometer. 3. Reverse the steps to remove the o-rings from the locking tabs. 6. Use...
... at the rear of the pod. 7. Phillips Screw Headlight Housing Replacement 1. Remove the five (5) headlight pod screws. 2. Replace the entire signal lamp assembly. 100 MAINTENANCE Lights Low Beam Adjustment The low beam can be replaced. Lift the pod cover and disconnect the speedometer harnesses from the wiring harness. 4. Unplug the headlamp from the speedometer. 3. Reverse the steps to remove the o-rings from the locking tabs. 6. Use...

Owners Manual
Page 104
... the headlight assembly. 2. Turn the back of the light assembly. 5. Grasp the entire taillight assembly and pull it . 6. Test the light for proper operation. 9. MAINTENANCE Lights Lower Headlamp Replacement 1. Reinstall the harness assembly into the headlight assembly. 4. Remove the two screws near the tailgate latch. 3. Remove the headlamp and install the new headlamp. 3. Remove the harness connector from the back of the headlight harness counterclockwise and pull the harness assembly away...
... the headlight assembly. 2. Turn the back of the light assembly. 5. Grasp the entire taillight assembly and pull it . 6. Test the light for proper operation. 9. MAINTENANCE Lights Lower Headlamp Replacement 1. Reinstall the harness assembly into the headlight assembly. 4. Remove the two screws near the tailgate latch. 3. Remove the headlamp and install the new headlamp. 3. Remove the harness connector from the back of the headlight harness counterclockwise and pull the harness assembly away...
Owners Manual
Page 124
... by fogging and damage could occur. Oil and Filter Change the oil and filter. Add or change fluids as recommended. Add POLARIS Carbon Clean Fuel Treatment or POLARIS Fuel Stabilizer. Carbon Clean removes water from fuel systems, stabilizes fuel and removes carbon deposits from pistons, rings, valves and exhaust systems. 3. See page 119. Allow the engine to run for the recommended amount. MAINTENANCE Cleaning and Storage Storage Tips NOTICE: Starting the engine...
... by fogging and damage could occur. Oil and Filter Change the oil and filter. Add or change fluids as recommended. Add POLARIS Carbon Clean Fuel Treatment or POLARIS Fuel Stabilizer. Carbon Clean removes water from fuel systems, stabilizes fuel and removes carbon deposits from pistons, rings, valves and exhaust systems. 3. See page 119. Allow the engine to run for the recommended amount. MAINTENANCE Cleaning and Storage Storage Tips NOTICE: Starting the engine...

Owners Manual
Page 126
... engage clutch. See your POLARIS dealer. Excessive throttle may cause loss of control and vehicle overturn. Slippage from water Dry out the PVT. See page 108. With the transmission in neutral, advance the throttle to about 1/8 throttle in short bursts, 5 to Always warm up the belt by operating below freezing). TROUBLESHOOTING Drive Belt Wear/Burn Possible Cause Driving onto a pickup or tall trailer in high range Starting...
... engage clutch. See your POLARIS dealer. Excessive throttle may cause loss of control and vehicle overturn. Slippage from water Dry out the PVT. See page 108. With the transmission in neutral, advance the throttle to about 1/8 throttle in short bursts, 5 to Always warm up the belt by operating below freezing). TROUBLESHOOTING Drive Belt Wear/Burn Possible Cause Driving onto a pickup or tall trailer in high range Starting...
Owners Manual
Page 131
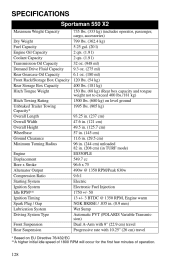
SPECIFICATIONS Sportsman 550 X2 Maximum Weight Capacity 735 lbs. (333 kg) (includes operator, passenger, cargo, accessories) Dry Weight 799 lbs. (362.4 kg) Fuel Capacity 5.25 gal. (20 l) Engine Oil Capacity 2 qts. (1.9 l) Coolant Capacity 2 qts. (1.9 l) Transmission Oil Capacity 32 oz. (948 ml) Demand Drive Fluid Capacity 9.3 oz. (275 ml) Rear Gearcase Oil Capacity 6.1 oz. (180 ml) Front Rack/Storage Box Capacity 120 lbs. (54 kg) Rear Storage Box Capacity 400 lbs. (181 kg) Hitch Tongue Weight 150 lbs. (68 kg) (Rear box capacity and tongue...
SPECIFICATIONS Sportsman 550 X2 Maximum Weight Capacity 735 lbs. (333 kg) (includes operator, passenger, cargo, accessories) Dry Weight 799 lbs. (362.4 kg) Fuel Capacity 5.25 gal. (20 l) Engine Oil Capacity 2 qts. (1.9 l) Coolant Capacity 2 qts. (1.9 l) Transmission Oil Capacity 32 oz. (948 ml) Demand Drive Fluid Capacity 9.3 oz. (275 ml) Rear Gearcase Oil Capacity 6.1 oz. (180 ml) Front Rack/Storage Box Capacity 120 lbs. (54 kg) Rear Storage Box Capacity 400 lbs. (181 kg) Hitch Tongue Weight 150 lbs. (68 kg) (Rear box capacity and tongue...

Owners Manual
Page 142
... Demand Drive...83 Engine Oil ...77 Radiator...90 Rear Gearcase ...86 Transmission Oil...80 Foot Brake, Auxiliary ...29 Footwell Removal...93 Front Box/Compartment ...37 Front Gearcase (Demand Drive). 82-83 Fuel Recommendations...31 Fuel Safety ...15 Fuel Tank Cap...31 Fuse Replacement ...97 K Key Switch ...22 K-Turn ...60-61 L Lights ...98-101 Headlight Housing ...100 Headlight Lamp ...98 High Beam Adjustment ...99 Low Beam Adjustment ...100 Lower Headlamp Replacement 101 Taillight/Brakelight...101 Turn Signal Replacement ...100...
... Demand Drive...83 Engine Oil ...77 Radiator...90 Rear Gearcase ...86 Transmission Oil...80 Foot Brake, Auxiliary ...29 Footwell Removal...93 Front Box/Compartment ...37 Front Gearcase (Demand Drive). 82-83 Fuel Recommendations...31 Fuel Safety ...15 Fuel Tank Cap...31 Fuse Replacement ...97 K Key Switch ...22 K-Turn ...60-61 L Lights ...98-101 Headlight Housing ...100 Headlight Lamp ...98 High Beam Adjustment ...99 Low Beam Adjustment ...100 Lower Headlamp Replacement 101 Taillight/Brakelight...101 Turn Signal Replacement ...100...

Owners Manual
Page 143
... the Vehicle ...118 Turn Signal Lamp Replacement ...100 Turn Signal Switch ...23 Turning Around on a Hill ...60-61 Turning the Vehicle ...53 S Safe Operation Practices ...50 Safety Labels ...18-21 Safety Training ...6 Seat Removal ...93 Severe Use ...71 Side Panel Removal...93 Sidehilling ...58 Signal Words ...4 Spark Arrestor ...105 Spark Arrestor Requirements ...70 Spark Plug Inspection ...102-103 Spark Plug Recommendations...102 Spark Plugs ...102-103 Speedometer ...38 Spring Adjustment, Shock ...117 Starting the Engine ...51 Steering Assembly ...92 Steering Lock...
... the Vehicle ...118 Turn Signal Lamp Replacement ...100 Turn Signal Switch ...23 Turning Around on a Hill ...60-61 Turning the Vehicle ...53 S Safe Operation Practices ...50 Safety Labels ...18-21 Safety Training ...6 Seat Removal ...93 Severe Use ...71 Side Panel Removal...93 Sidehilling ...58 Signal Words ...4 Spark Arrestor ...105 Spark Arrestor Requirements ...70 Spark Plug Inspection ...102-103 Spark Plug Recommendations...102 Spark Plugs ...102-103 Speedometer ...38 Spring Adjustment, Shock ...117 Starting the Engine ...51 Steering Assembly ...92 Steering Lock...