

Owners Manual
Page 14
... cargo or accessories to the engine and cause overheating. • Do not exceed the maximum cargo weight limit of this manual for model-specific information. Cargo in or on apparel • weight of any accessory. The maximum load capacity of your motorcycle can also block air flow to the motorcycle. Refer to a minimum. Refer to carry cargo. Safety Gross Vehicle Weight Rating (GVWR) WARNING! These areas...
... cargo or accessories to the engine and cause overheating. • Do not exceed the maximum cargo weight limit of this manual for model-specific information. Cargo in or on apparel • weight of any accessory. The maximum load capacity of your motorcycle can also block air flow to the motorcycle. Refer to a minimum. Refer to carry cargo. Safety Gross Vehicle Weight Rating (GVWR) WARNING! These areas...
Owners Manual
Page 17
... choosing and installing accessories: • Do not install accessories that impair the stability, handling or operation of the motorcycle, immediately rinse it run in a short time. • Never start the engine or let it off with soap and water and change clothing. • If gasoline spills on your model, especially a windshield, backrest or luggage rack. Never install higher wattage light bulbs than a few breaths...
... choosing and installing accessories: • Do not install accessories that impair the stability, handling or operation of the motorcycle, immediately rinse it run in a short time. • Never start the engine or let it off with soap and water and change clothing. • If gasoline spills on your model, especially a windshield, backrest or luggage rack. Never install higher wattage light bulbs than a few breaths...
Owners Manual
Page 18
...; Perform maintenance at www.safercar.gov, or write to: ADMINISTRATOR, NHTSA 1200 New Jersey Avenue, SE West Building Washington, DC 20590 14 Make any necessary repairs promptly. • Clean the motorcycle thoroughly to ensure safety. Use only approved replacement tires. • Always ensure proper steering head bearing adjustment. • Regularly inspect the rear shock absorber and the front forks for service...
...; Perform maintenance at www.safercar.gov, or write to: ADMINISTRATOR, NHTSA 1200 New Jersey Avenue, SE West Building Washington, DC 20590 14 Make any necessary repairs promptly. • Clean the motorcycle thoroughly to ensure safety. Use only approved replacement tires. • Always ensure proper steering head bearing adjustment. • Regularly inspect the rear shock absorber and the front forks for service...

Owners Manual
Page 20
.... Clutch Lever Mirror Speedometer Indicator Light Panel Tachometer (if equipped) Front Brake Fluid Reservoir Front Brake Lever Throttle Control Grip Switches Throttle Cables Fuel Cap 2 3 1 (Models differ in appearance, but locations are the same as shown) 5 6 4 7 9 11 9 10 8 Left Side View 1. 2. 3. 4. 5. 6. 7. 8. 9. 10. 11. 12. 13. 14. 15. 16. 17. 18. 19. 20. Component Identification Handlebar Area 1. 2. 3. 4. 5. 6. 7. 8. 9. 10. 11. Front Turn Signal Headlamp Air Filter Spark Plugs Ignition Switch Battery (under side cover) Taillight Rear Turn Signal Rear Axle Adjuster...
.... Clutch Lever Mirror Speedometer Indicator Light Panel Tachometer (if equipped) Front Brake Fluid Reservoir Front Brake Lever Throttle Control Grip Switches Throttle Cables Fuel Cap 2 3 1 (Models differ in appearance, but locations are the same as shown) 5 6 4 7 9 11 9 10 8 Left Side View 1. 2. 3. 4. 5. 6. 7. 8. 9. 10. 11. 12. 13. 14. 15. 16. 17. 18. 19. 20. Component Identification Handlebar Area 1. 2. 3. 4. 5. 6. 7. 8. 9. 10. 11. Front Turn Signal Headlamp Air Filter Spark Plugs Ignition Switch Battery (under side cover) Taillight Rear Turn Signal Rear Axle Adjuster...

Owners Manual
Page 22
... on page 88. Engine Identification Number Ignition Switch The ignition switch provides electrical power to the ignition, the lighting system and all electrical switches and buttons. Push the ignition key inward while selecting the PARK position. The headlamp, taillight, and instrument lights illuminate. The first 8 digits are the serial number. The last 5 digits are the engine model number. OFF All electrical circuits are energized and the ignition key cannot be removed...
... on page 88. Engine Identification Number Ignition Switch The ignition switch provides electrical power to the ignition, the lighting system and all electrical switches and buttons. Push the ignition key inward while selecting the PARK position. The headlamp, taillight, and instrument lights illuminate. The first 8 digits are the serial number. The last 5 digits are the engine model number. OFF All electrical circuits are energized and the ignition key cannot be removed...

Owners Manual
Page 29
... press inward firmly to its fully retracted position. Fuel Cap Key Slot Cover Close the fuel cap 1. Instruments, Features and Controls Fuel Cap Use the ignition key to open the cap. Insert the key into the cap. Remove the key and close the fuel cap. Sidestand WARNING! While the motorcycle is fully extended. 2. Remove the right side cover to access the battery. To reinstall the side cover, make sure the sidestand is completely empty.
... press inward firmly to its fully retracted position. Fuel Cap Key Slot Cover Close the fuel cap 1. Instruments, Features and Controls Fuel Cap Use the ignition key to open the cap. Insert the key into the cap. Remove the key and close the fuel cap. Sidestand WARNING! While the motorcycle is fully extended. 2. Remove the right side cover to access the battery. To reinstall the side cover, make sure the sidestand is completely empty.
Owners Manual
Page 30
..., replacement or repair: • refer to the maintenance section of this page. Slide the switch to the ON position before making a long trip and when removing the motorcycle from storage. Verify that all instruments and controls to the left turn signal switch to perform the pre-ride inspections. Engine Stop/Run Start the engine. Verify that are potentially hazardous, such as the light on . WARNING Failure...
..., replacement or repair: • refer to the maintenance section of this page. Slide the switch to the ON position before making a long trip and when removing the motorcycle from storage. Verify that all instruments and controls to the left turn signal switch to perform the pre-ride inspections. Engine Stop/Run Start the engine. Verify that are potentially hazardous, such as the light on . WARNING Failure...

Owners Manual
Page 40
... Always heed fuel warnings. Do not allow the engine control module to restart the engine. 1. If gasoline spills on level ground with water. Turn the ignition switch to contact hot components. Move the engine stop /run switch to the STOP position. 6. Operation Engine Break-in serious injury or death. Fill the fuel tank to five times. 36 NOTICE: Fuel can damage painted surfaces and plastic parts. Move the engine stop /run switch from...
... Always heed fuel warnings. Do not allow the engine control module to restart the engine. 1. If gasoline spills on level ground with water. Turn the ignition switch to contact hot components. Move the engine stop /run switch to the STOP position. 6. Operation Engine Break-in serious injury or death. Fill the fuel tank to five times. 36 NOTICE: Fuel can damage painted surfaces and plastic parts. Move the engine stop /run switch from...

Owners Manual
Page 42
... to the engine, transmission and drive train. Tip: Within the recommended speed ranges, you feel it stop at idle speed, pull the front brake lever toward the handlebars to disengage the clutch before entering the curve. 38 Move the shift pedal downward until you feel it stop at the next gear. WARNING! Downshift before shifting gears. Such damage could cause loss of control, which...
... to the engine, transmission and drive train. Tip: Within the recommended speed ranges, you feel it stop at idle speed, pull the front brake lever toward the handlebars to disengage the clutch before entering the curve. 38 Move the shift pedal downward until you feel it stop at the next gear. WARNING! Downshift before shifting gears. Such damage could cause loss of control, which...

Owners Manual
Page 43
... the clutch, or downshift each time the engine stop /run switch is put into neutral. 2. WARNING! Stopping the Engine Before stopping the engine, bring the motorcycle to a complete stop the engine after the motorcycle is fully stopped and the transmission is moving , guide the motorcycle to shift rearward suddenly, which could result in serious injury or death. Tip: Idle air control (IAC) noise is a normal engine management calibration...
... the clutch, or downshift each time the engine stop /run switch is put into neutral. 2. WARNING! Stopping the Engine Before stopping the engine, bring the motorcycle to a complete stop the engine after the motorcycle is fully stopped and the transmission is moving , guide the motorcycle to shift rearward suddenly, which could result in serious injury or death. Tip: Idle air control (IAC) noise is a normal engine management calibration...

Owners Manual
Page 52
... in neutral. 3. Nut style adjusters: Use a deep 14-mm socket to reset brake pad distance. 48 See page 44. 8. Pump the rear brake pedal several times to turn the axle adjuster screws. The marks should be sure the ends of the adjuster screws or nuts are stamped with the wheel slightly above the ground. Lock Nut Axle Adjuster Screw Screw-Style Adjuster Axle Adjuster...
... in neutral. 3. Nut style adjusters: Use a deep 14-mm socket to reset brake pad distance. 48 See page 44. 8. Pump the rear brake pedal several times to turn the axle adjuster screws. The marks should be sure the ends of the adjuster screws or nuts are stamped with the wheel slightly above the ground. Lock Nut Axle Adjuster Screw Screw-Style Adjuster Axle Adjuster...

Owners Manual
Page 55
... Tube Fork Seal Outer Tube VEGAS 51 Maintenance Rear Suspension Swing Arm and Rear Axle Inspection 1. Sit in neutral, slowly rotate the rear wheel. Elevate and support the rear of the motorcycle with the wheel slightly above the ground. CAUTION! Make sure the motorcycle is no fork oil present on the sidestand and inspect the front forks. See the VICTORY Service Manual or your authorized VICTORY...
... Tube Fork Seal Outer Tube VEGAS 51 Maintenance Rear Suspension Swing Arm and Rear Axle Inspection 1. Sit in neutral, slowly rotate the rear wheel. Elevate and support the rear of the motorcycle with the wheel slightly above the ground. CAUTION! Make sure the motorcycle is no fork oil present on the sidestand and inspect the front forks. See the VICTORY Service Manual or your authorized VICTORY...

Owners Manual
Page 56
... or stains that would indicate a fuel leak. Make sure wires, hoses and control cables do not interfere with the wheel slightly above the ground. If the wheel does not rotate smoothly, inspect the wheel bearings, front axle and brakes. Inspect hose connections at the fuel pump and at the front axle, inspect the wheel bearings and front axle. The fuel filters are tight. See the VICTORY Service Manual or your authorized VICTORY dealer...
... or stains that would indicate a fuel leak. Make sure wires, hoses and control cables do not interfere with the wheel slightly above the ground. If the wheel does not rotate smoothly, inspect the wheel bearings, front axle and brakes. Inspect hose connections at the fuel pump and at the front axle, inspect the wheel bearings and front axle. The fuel filters are tight. See the VICTORY Service Manual or your authorized VICTORY dealer...

Owners Manual
Page 63
... 8-BALL Front 130/70 B18 63H Dunlop 491 Elite ll Rear 180/55 B18 74H Dunlop D417 Tire Condition Inspect the tire sidewalls, road contact surface and tread base for your vehicle. Always maintain proper tire pressure as recommended for the total weight of tires specified for cuts, punctures and cracking. Adjust tire pressure as recommended in the owner's manual and on safety labels. Replace damaged tires immediately...
... 8-BALL Front 130/70 B18 63H Dunlop 491 Elite ll Rear 180/55 B18 74H Dunlop D417 Tire Condition Inspect the tire sidewalls, road contact surface and tread base for your vehicle. Always maintain proper tire pressure as recommended for the total weight of tires specified for cuts, punctures and cracking. Adjust tire pressure as recommended in the owner's manual and on safety labels. Replace damaged tires immediately...
Owners Manual
Page 81
... conform at the time of use, depending on Emission Control System VICTORY Motorcycle Division, Polaris Sales Inc., (hereinafter VICTORY) warrants that each new 2010 and later VICTORY Motorcycle that VICTORY may deny your warranty coverage if your warranty rights and responsibilities, you should contact VICTORY Motorcycle Division, Polaris Sales Inc., P.O. You are responsible for your owner's manual. The warranty repairs should be...
... conform at the time of use, depending on Emission Control System VICTORY Motorcycle Division, Polaris Sales Inc., (hereinafter VICTORY) warrants that each new 2010 and later VICTORY Motorcycle that VICTORY may deny your warranty coverage if your warranty rights and responsibilities, you should contact VICTORY Motorcycle Division, Polaris Sales Inc., P.O. You are responsible for your owner's manual. The warranty repairs should be...
Owners Manual
Page 82
... VICTORY's suggested retail price for evaporative emission controlled vehicles; intake manifold; fuel tank; fuel injection system; crankcase breather; fuel tank cap for all of California only, emission related warranted parts are : carburetor and internal parts; oil filler cap; pressure control valve; fuel/vapor separator; condensers, and spark plugs if failure occurs prior to receive compensation. and hoses, clamps, fittings and tubing used in compliance with the Clean Air Act and applicable...
... VICTORY's suggested retail price for evaporative emission controlled vehicles; intake manifold; fuel tank; fuel injection system; crankcase breather; fuel tank cap for all of California only, emission related warranted parts are : carburetor and internal parts; oil filler cap; pressure control valve; fuel/vapor separator; condensers, and spark plugs if failure occurs prior to receive compensation. and hoses, clamps, fittings and tubing used in compliance with the Clean Air Act and applicable...
Owners Manual
Page 89
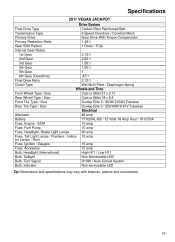
... Tubeless Electrical Alternator 48 amp Battery YTX20HL-BS / 12 Volts 18 Amp Hour / 310 CCA Fuse, Engine / ECM 15 amp Fuse, Fuel Pump 10 amp Fuse, Headlight / Brake Light Lamps 20 amp Fuse, Tail Light Lamps / Flashers / Indica- 15 amp tor Lamps / Horn Fuse, Ignition / Gauges 15 amp Fuse, Accessory 15 amp Bulb, Headlight (International) High H11 / Low H11 Bulb, Taillight Non-Serviceable LED Bulb, Turn Signal R10W / Auto-Cancel System Bulb, Indicator Non-serviceable LED Tip: Dimensions and specifications may vary with features...
... Tubeless Electrical Alternator 48 amp Battery YTX20HL-BS / 12 Volts 18 Amp Hour / 310 CCA Fuse, Engine / ECM 15 amp Fuse, Fuel Pump 10 amp Fuse, Headlight / Brake Light Lamps 20 amp Fuse, Tail Light Lamps / Flashers / Indica- 15 amp tor Lamps / Horn Fuse, Ignition / Gauges 15 amp Fuse, Accessory 15 amp Bulb, Headlight (International) High H11 / Low H11 Bulb, Taillight Non-Serviceable LED Bulb, Turn Signal R10W / Auto-Cancel System Bulb, Indicator Non-serviceable LED Tip: Dimensions and specifications may vary with features...
Owners Manual
Page 95
... Engine Oil Change ...43 Engine Oil Level...27 Engine Starting ...37 Engine Stopping ...39 Equipment Modifications ...11 Error Codes, Engine ...22 Evaporative Emission Control System ...28, 52 Exhaust Safety ...13 Exhaust System Inspection ...61 F Fastener Inspection ...34 Fluid Clutch (Hydraulic) ...56 Front Brake ...57 Rear Brake ...57 Fluid Level, Front Brake...29 Fluid Level, Hydraulic Clutch ...32 Fluid Level, Rear Brake ...31 Fork Inspection ...51 Front Axle Inspection ...52 Front Brake Lever...24, 29 Front Fork Inspection ...51 Fuel Cap...
... Engine Oil Change ...43 Engine Oil Level...27 Engine Starting ...37 Engine Stopping ...39 Equipment Modifications ...11 Error Codes, Engine ...22 Evaporative Emission Control System ...28, 52 Exhaust Safety ...13 Exhaust System Inspection ...61 F Fastener Inspection ...34 Fluid Clutch (Hydraulic) ...56 Front Brake ...57 Rear Brake ...57 Fluid Level, Front Brake...29 Fluid Level, Hydraulic Clutch ...32 Fluid Level, Rear Brake ...31 Fork Inspection ...51 Front Axle Inspection ...52 Front Brake Lever...24, 29 Front Fork Inspection ...51 Fuel Cap...

Owners Manual
Page 96
... Inspection, Rear Shock...49 Priming the Fuel System ...36 Protectant, Leather, Rubber and Vinyl ...73 Protective Equipment ...9 Pure VICTORY Products ...69 I Identification Number, Engine ...18 Identification Number, Vehicle ...17 Identification Numbers Record ...88 Ignition Key Number...18 Ignition Key Record ...88 Ignition Switch...18 Indicator Lamps ...19 Information Labels...15 Inspections, Pre-Ride...26-34 Instrument Cluster ...19-22 K Key Number...18 R Rear Axle Inspection ...51 Rear Brake Pedal...
... Inspection, Rear Shock...49 Priming the Fuel System ...36 Protectant, Leather, Rubber and Vinyl ...73 Protective Equipment ...9 Pure VICTORY Products ...69 I Identification Number, Engine ...18 Identification Number, Vehicle ...17 Identification Numbers Record ...88 Ignition Key Number...18 Ignition Key Record ...88 Ignition Switch...18 Indicator Lamps ...19 Information Labels...15 Inspections, Pre-Ride...26-34 Instrument Cluster ...19-22 K Key Number...18 R Rear Axle Inspection ...51 Rear Brake Pedal...

Owners Manual
Page 97
...51, 52 Suspension Maintenance, Rear ...49-51 Swing Arm Inspection ...51 Switches Emergency Flasher Switch ...23 Engine Stop/Run Switch ...24 Hazard Switch ...23 High Beam/Low Beam Switch ...23 Horn Button ...23 Ignition Switch...18 Mode Button ...23 Starter Button ...24 Turn Signal Switch ...23 T Throttle Cable Lubrication ...Throttle Control Grip ...Throttle Freeplay ...Throttle Freeplay Adjustment...Throttle Inspection ...Throttle Operation ...Throttle System Maintenance ...Tilt Sensor...Tire Condition...Tire Pressure ...Tire Tread Depth...Tire Condition...Tire Pressure ...Tire Tread Depth...
...51, 52 Suspension Maintenance, Rear ...49-51 Swing Arm Inspection ...51 Switches Emergency Flasher Switch ...23 Engine Stop/Run Switch ...24 Hazard Switch ...23 High Beam/Low Beam Switch ...23 Horn Button ...23 Ignition Switch...18 Mode Button ...23 Starter Button ...24 Turn Signal Switch ...23 T Throttle Cable Lubrication ...Throttle Control Grip ...Throttle Freeplay ...Throttle Freeplay Adjustment...Throttle Inspection ...Throttle Operation ...Throttle System Maintenance ...Tilt Sensor...Tire Condition...Tire Pressure ...Tire Tread Depth...Tire Condition...Tire Pressure ...Tire Tread Depth...