

Owners Manual
Page 1
2014 Rider's Manual Victory Cross Roads Victory Cross Roads 8-Ball Victory Cross Country Victory Cross Country Victory Cross Country Tour Victory Cross Country Tour 15th Anniversary Limited Edition Ness Signature Series
2014 Rider's Manual Victory Cross Roads Victory Cross Roads 8-Ball Victory Cross Country Victory Cross Country Victory Cross Country Tour Victory Cross Country Tour 15th Anniversary Limited Edition Ness Signature Series

Owners Manual
Page 3
2014 Rider's Manual Victory Cross Roads® Victory Cross Roads® 8-Ball® Victory Cross Country® Victory Cross Country® Tour Ness Signature Series Victory Cross Country® Victory Cross Country® Tour 15th Anniversary Limited Edition 1
2014 Rider's Manual Victory Cross Roads® Victory Cross Roads® 8-Ball® Victory Cross Country® Victory Cross Country® Tour Ness Signature Series Victory Cross Country® Victory Cross Country® Tour 15th Anniversary Limited Edition 1
Owners Manual
Page 21
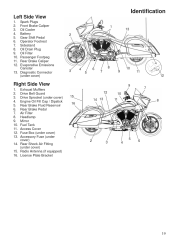
.... Identification Left Side View 1. 2. 3. 4. 5. 6. 7. 8. 9. 10. 11. 12. License Plate Bracket 12 15 16 14 13 10 11 7 8 1 2 3 4 5 6 19 Diagnostic Connector (under cover) 15. Rear Shock Air Fitting (under cover) 1 2 13 3 4 5 6 8 7 9 10 11 12 9 Right Side View 1. 2. 3. 4. 5. 6. 7. 8. 9. 10. 11. 12. 13. Exhaust Mufflers Drive Belt Guard Drive Sprocket (under cover) Engine Oil Fill Cap / Dipstick Rear Brake Fluid Reservoir Rear Brake Pedal Air Filter Headlamp Mirror Fuel Tank Access Cover Fuse Box (under cover) Accessory Fuse (under cover) 14. Radio Antenna (if equipped) 16.
.... Identification Left Side View 1. 2. 3. 4. 5. 6. 7. 8. 9. 10. 11. 12. License Plate Bracket 12 15 16 14 13 10 11 7 8 1 2 3 4 5 6 19 Diagnostic Connector (under cover) 15. Rear Shock Air Fitting (under cover) 1 2 13 3 4 5 6 8 7 9 10 11 12 9 Right Side View 1. 2. 3. 4. 5. 6. 7. 8. 9. 10. 11. 12. 13. Exhaust Mufflers Drive Belt Guard Drive Sprocket (under cover) Engine Oil Fill Cap / Dipstick Rear Brake Fluid Reservoir Rear Brake Pedal Air Filter Headlamp Mirror Fuel Tank Access Cover Fuse Box (under cover) Accessory Fuse (under cover) 14. Radio Antenna (if equipped) 16.

Owners Manual
Page 22
...iPod Cord and 12-Volt Outlet (TOUR model, left compartment) Audio Control Switches 12-Volt Accessory Outlet Radio Display Heated Grip Switch (if equipped) Cruise Control Switches (if equipped) Right Handlebar Switches 3 4 5 6 7 8 1 1 2 9 10 11 12 13 14 15 16 Console (CROSS ROADS) 1. 2. 3. 4. 5. 6. 7. 8. 9. 10. 11. 12. Cruise Control Switches 2 3 1 5 4 6 7 9 12 11 10 9 13 8 20 Windshield Clutch Lever Fuel Filler Cap Operator Seat Passenger Seat Saddlebag Latch Turn Signals Tail Lamps Front Brake Lever Front Brake Fluid Reservoir 1 2 10 9 8 3 4 5 6 7 Console (CROSS COUNTRY...
...iPod Cord and 12-Volt Outlet (TOUR model, left compartment) Audio Control Switches 12-Volt Accessory Outlet Radio Display Heated Grip Switch (if equipped) Cruise Control Switches (if equipped) Right Handlebar Switches 3 4 5 6 7 8 1 1 2 9 10 11 12 13 14 15 16 Console (CROSS ROADS) 1. 2. 3. 4. 5. 6. 7. 8. 9. 10. 11. 12. Cruise Control Switches 2 3 1 5 4 6 7 9 12 11 10 9 13 8 20 Windshield Clutch Lever Fuel Filler Cap Operator Seat Passenger Seat Saddlebag Latch Turn Signals Tail Lamps Front Brake Lever Front Brake Fluid Reservoir 1 2 10 9 8 3 4 5 6 7 Console (CROSS COUNTRY...

Owners Manual
Page 23
... (CROSS COUNTRY TOUR) The seat heater switches are energized and the ignition key cannot be removed. Toggle Up: High Toggle Down: Low Toggle Center: Off Driver's Seat Switch Passenger's Seat Switch 21 The headlamp, taillight, and instrument lights illuminate. The ignition switch provides electrical power to the ignition, the lighting system and all electrical circuits are located on the lower left edge of the seat. Instruments, Features and Controls Ignition Switch The ignition key operates the ignition switch and parking lights. See page 48. The engine stop/run...
... (CROSS COUNTRY TOUR) The seat heater switches are energized and the ignition key cannot be removed. Toggle Up: High Toggle Down: Low Toggle Center: Off Driver's Seat Switch Passenger's Seat Switch 21 The headlamp, taillight, and instrument lights illuminate. The ignition switch provides electrical power to the ignition, the lighting system and all electrical circuits are located on the lower left edge of the seat. Instruments, Features and Controls Ignition Switch The ignition key operates the ignition switch and parking lights. See page 48. The engine stop/run...

Owners Manual
Page 29
... on until the anti-lock system activates, which occurs when vehicle speed exceeds 6 MPH (10 km/h). Retrieve the error codes for diagnosis. Instruments, Features and Controls Instrument Cluster (CROSS COUNTRY) Indicator Lamps High Beam Left Turn Anti-Lock Brake System (ABS) Low Fuel Right Turn Cruise Control Oil Pressure Check Engine Lamp Indicates Neutral High Beam Check Engine Neutral Battery Warning Condition This lamp illuminates when the transmission is in neutral and the ignition key is in the...
... on until the anti-lock system activates, which occurs when vehicle speed exceeds 6 MPH (10 km/h). Retrieve the error codes for diagnosis. Instruments, Features and Controls Instrument Cluster (CROSS COUNTRY) Indicator Lamps High Beam Left Turn Anti-Lock Brake System (ABS) Low Fuel Right Turn Cruise Control Oil Pressure Check Engine Lamp Indicates Neutral High Beam Check Engine Neutral Battery Warning Condition This lamp illuminates when the transmission is in neutral and the ignition key is in the...
Owners Manual
Page 33
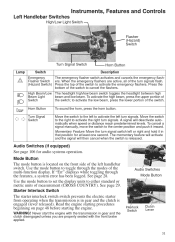
... start the engine with the front brake applied. Instruments, Features and Controls Left Handlebar Switches High/Low Light Switch Flasher (Hazard) Switch Turn Signal Switch Lamp Switch Horn Button Description Emergency The emergency flasher switch activates and cancels the emergency flashFlasher Switch ers. High Beam/Low The headlight high/low beam switch toggles the headlight between high Beam Light beam and low beam. The momentary feature will activate and the signal will deactivate automatically...
... start the engine with the front brake applied. Instruments, Features and Controls Left Handlebar Switches High/Low Light Switch Flasher (Hazard) Switch Turn Signal Switch Lamp Switch Horn Button Description Emergency The emergency flasher switch activates and cancels the emergency flashFlasher Switch ers. High Beam/Low The headlight high/low beam switch toggles the headlight between high Beam Light beam and low beam. The momentary feature will activate and the signal will deactivate automatically...

Owners Manual
Page 38
... the height, remove both attachment screws. Instruments, Features and Controls Tilt Sensor A tilt sensor stops the engine if the motorcycle tips beyond 45 degrees to open beyond the vent pivot stop . Storage Compartments (CROSS COUNTRY TOUR) A storage compartment is five pounds (2.3 kg). Do not force a vent to one side. WARNING! Passenger Floorboard Supports (CROSS COUNTRY TOUR) The passenger floorboard height and angle can be adjusted...
... the height, remove both attachment screws. Instruments, Features and Controls Tilt Sensor A tilt sensor stops the engine if the motorcycle tips beyond 45 degrees to open beyond the vent pivot stop . Storage Compartments (CROSS COUNTRY TOUR) A storage compartment is five pounds (2.3 kg). Do not force a vent to one side. WARNING! Passenger Floorboard Supports (CROSS COUNTRY TOUR) The passenger floorboard height and angle can be adjusted...

Owners Manual
Page 41
... operation. Rear Suspension Check shock movement and air pressure, verify ground clearance. Taillight/Brakelight Verify that the low oil pressure lamp illuminates. Display Engine Stop/Run Start the engine. Clutch (Mechanical) Check lever operation and freeplay. Push the switch inward to high beam. Horn Press the horn button. Brake Fluid Levels Check front and rear brake fluid levels. Verify that the low oil pressure display goes off in the gear position display. Tires Inspect condition, pressure and...
... operation. Rear Suspension Check shock movement and air pressure, verify ground clearance. Taillight/Brakelight Verify that the low oil pressure lamp illuminates. Display Engine Stop/Run Start the engine. Clutch (Mechanical) Check lever operation and freeplay. Push the switch inward to high beam. Horn Press the horn button. Brake Fluid Levels Check front and rear brake fluid levels. Verify that the low oil pressure display goes off in the gear position display. Tires Inspect condition, pressure and...

Owners Manual
Page 42
... clean. View the fuel level in the information bar (CROSS ROADS). 3. Always use the MODE button to toggle to the fuel display in the fuel gauge (CROSS COUNTRY), or use the recommended oil. Place the transmission in loss of the vehicle. Remove the oil fill cap/dipstick and wipe it to idle for fuel specifications. Refuel as needed . Pre-Ride Inspections Engine Oil Level The oil fill cap/dipstick is located...
... clean. View the fuel level in the information bar (CROSS ROADS). 3. Always use the MODE button to toggle to the fuel display in the fuel gauge (CROSS COUNTRY), or use the recommended oil. Place the transmission in loss of the vehicle. Remove the oil fill cap/dipstick and wipe it to idle for fuel specifications. Refuel as needed . Pre-Ride Inspections Engine Oil Level The oil fill cap/dipstick is located...
Owners Manual
Page 51
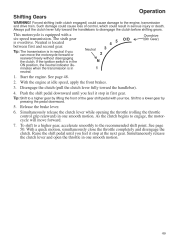
... the gear shift pedal with a six-speed transmission. Always pull the clutch lever fully toward the handlebar). The sixth gear is in neutral if you feel it stop at idle speed, apply the front brakes. Start the engine. See page 48. Release the brake lever. 6. Simultaneously release the clutch lever while opening the throttle (rolling the throttle control grip rearward) in one smooth motion. Simultaneously release the clutch lever...
... the gear shift pedal with a six-speed transmission. Always pull the clutch lever fully toward the handlebar). The sixth gear is in neutral if you feel it stop at idle speed, apply the front brakes. Start the engine. See page 48. Release the brake lever. 6. Simultaneously release the clutch lever while opening the throttle (rolling the throttle control grip rearward) in one smooth motion. Simultaneously release the clutch lever...

Owners Manual
Page 71
... the rear suspension a few times. Maintenance Rear Suspension Adjustment 1. Park the motorcycle with the rear tire slightly off the floor. Remove the right side cover. Install the hose fitting of the tire and try to move the wheel side-to determine the recommended air pressure. 4. Read the air pressure on the gauge. Tip: A small oil leak from the fitting. See your authorized VICTORY dealer. To increase pressure, pump the handle until the desired pressure is...
... the rear suspension a few times. Maintenance Rear Suspension Adjustment 1. Park the motorcycle with the rear tire slightly off the floor. Remove the right side cover. Install the hose fitting of the tire and try to move the wheel side-to determine the recommended air pressure. 4. Read the air pressure on the gauge. Tip: A small oil leak from the fitting. See your authorized VICTORY dealer. To increase pressure, pump the handle until the desired pressure is...

Owners Manual
Page 84
... access the fuses, rear suspension air fitting, clutch cable adjuster, purge valve and flasher unit. Make sure the trunk support legs are secure before operating the motorcycle. 82 Maintenance Side Covers Remove the left saddlebag and side cover. Grommets Trunk Removal (CROSS COUNTRY TOUR) 1. Remove the left side cover to disengage the trunk support legs from the motorcycle. 3. Pull the trunk assembly rearward to access the electronic control module, diagnostic...
... access the fuses, rear suspension air fitting, clutch cable adjuster, purge valve and flasher unit. Make sure the trunk support legs are secure before operating the motorcycle. 82 Maintenance Side Covers Remove the left saddlebag and side cover. Grommets Trunk Removal (CROSS COUNTRY TOUR) 1. Remove the left side cover to disengage the trunk support legs from the motorcycle. 3. Pull the trunk assembly rearward to access the electronic control module, diagnostic...

Owners Manual
Page 88
... a fuse. 1. Release the tabs on rear tire debris flap) CROSS COUNTRY ONLY Accessory (under right side cover) Radio (in fairing behind headlight) 12-Volt Storage Compartment Outlet (TOUR model) (under electrical cover above battery) Fuse Size 25 amp 20 amp 25 amp 10 amp Tip: Use the fuse puller provided in its place. 4. Lift the release tab and slide the fuse box upward to the electrical system. Fuse Recommendations Fuse Application Engine Fuel Pump/Ignition Coil Lights Turn Signals/Horn Ignition Chassis Anti-Lock Brakes (ABS) Fuse Size 15...
... a fuse. 1. Release the tabs on rear tire debris flap) CROSS COUNTRY ONLY Accessory (under right side cover) Radio (in fairing behind headlight) 12-Volt Storage Compartment Outlet (TOUR model) (under electrical cover above battery) Fuse Size 25 amp 20 amp 25 amp 10 amp Tip: Use the fuse puller provided in its place. 4. Lift the release tab and slide the fuse box upward to the electrical system. Fuse Recommendations Fuse Application Engine Fuel Pump/Ignition Coil Lights Turn Signals/Horn Ignition Chassis Anti-Lock Brakes (ABS) Fuse Size 15...
Owners Manual
Page 91
... Spark Plug(s) Fouled Spark Plug Wire(s) Loose or Wet Contaminated Fuel Engine Oil Level Incorrect Or Wrong Type Loose, Broken, Shorted Ignition Coil Wires Air Intake Restricted Possible Remedy/Action Fully charge the battery. See dealer. Turn key ON. See page 86. See page 80. Shift transmission into neutral or pull the clutch lever in to RUN. Inspect battery cables and connections. Inspect air filter. Engine Cranks But Will Not Start Possible Cause Low Fuel Fuel pump...
... Spark Plug(s) Fouled Spark Plug Wire(s) Loose or Wet Contaminated Fuel Engine Oil Level Incorrect Or Wrong Type Loose, Broken, Shorted Ignition Coil Wires Air Intake Restricted Possible Remedy/Action Fully charge the battery. See dealer. Turn key ON. See page 86. See page 80. Shift transmission into neutral or pull the clutch lever in to RUN. Inspect battery cables and connections. Inspect air filter. Engine Cranks But Will Not Start Possible Cause Low Fuel Fuel pump...

Owners Manual
Page 102
... model, certain models may be readily determined. 100 intake manifold; The owner may not contain all warranted parts replaced and labor charges based on the engine displacement, of initial retail delivery, whichever occurs first. air cutoff valves; ignition wires; Repair or replacement required as standard equipment a headlight, taillight and stoplight, and is less than an authorized VICTORY dealer. Warranty Emissions Control System Warranty VICTORY Motorcycle Division, Polaris Sales Inc. - fuel...
... model, certain models may be readily determined. 100 intake manifold; The owner may not contain all warranted parts replaced and labor charges based on the engine displacement, of initial retail delivery, whichever occurs first. air cutoff valves; ignition wires; Repair or replacement required as standard equipment a headlight, taillight and stoplight, and is less than an authorized VICTORY dealer. Warranty Emissions Control System Warranty VICTORY Motorcycle Division, Polaris Sales Inc. - fuel...
Owners Manual
Page 106
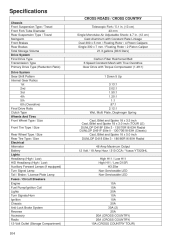
... Tires Front Wheel Type / Size Front Tire Type / Size Rear Wheel Type / Size Rear Tire Type / Size Electrical Alternator Battery Lights Headlamp (High / Low) HID Headlamp (High / Low) Auxiliary Forward Lamps (if equipped) Turn Signal Lamp Tail / Brake / License Plate Lamp Fuses / Circuit Breakers Engine Fuel Pump/Ignition Coil Lights Turn Signals/Horn Ignition Chassis Anti-Lock Brake System Reverse Accessory Radio 12-Volt Outlet (Storage Compartment) Telescopic Fork / 5.1 in. (13 cm) 43 mm Single Monotube Air Adjustable Shock: 4.7 in. (12 cm) Cast Aluminum with Constant Rate...
... Tires Front Wheel Type / Size Front Tire Type / Size Rear Wheel Type / Size Rear Tire Type / Size Electrical Alternator Battery Lights Headlamp (High / Low) HID Headlamp (High / Low) Auxiliary Forward Lamps (if equipped) Turn Signal Lamp Tail / Brake / License Plate Lamp Fuses / Circuit Breakers Engine Fuel Pump/Ignition Coil Lights Turn Signals/Horn Ignition Chassis Anti-Lock Brake System Reverse Accessory Radio 12-Volt Outlet (Storage Compartment) Telescopic Fork / 5.1 in. (13 cm) 43 mm Single Monotube Air Adjustable Shock: 4.7 in. (12 cm) Cast Aluminum with Constant Rate...

Owners Manual
Page 127
...'s audio system control NAV MP3 volume, but navigation instructions may need to turn the audio system on. NAV MP3 Navigation MP3 Introduction Please read this manual and the GARMIN ZUMO 660 NAV MP3 information provided with your player to become familiar with the vehicle's audio system. AUX ICOM CB19 AUX Navigation MP3 Operation Tips • Signals coming from radio to MP3 player, change...
...'s audio system control NAV MP3 volume, but navigation instructions may need to turn the audio system on. NAV MP3 Navigation MP3 Introduction Please read this manual and the GARMIN ZUMO 660 NAV MP3 information provided with your player to become familiar with the vehicle's audio system. AUX ICOM CB19 AUX Navigation MP3 Operation Tips • Signals coming from radio to MP3 player, change...

Owners Manual
Page 129
... Analysis...64 Drive Belt Inspection ...44 Drive Belt/Rear Wheel Alignment ...67 F Fueling ...47 Fuse Recommendations ...86 Fuse Replacement ...86 G Gasoline Handling Safety ...14 Gear Shift Pedal ...33 Gear Shift Pedal Adjustment ...35 Gear Shifting...49-50 Gross Vehicle Weight Rating ...16 GVWR ...16 E Electrical Precautions ...87 Elevating the Motorcycle ...88 Emission Control System Inspection ...71 Engine Break-In ...46 Engine Compression Test ...87 Engine Identification Number ...18 Engine Starter Switch ...32 Engine Stop/Run Switch ...32 Engine, Starting ...48 Engine, Stopping...
... Analysis...64 Drive Belt Inspection ...44 Drive Belt/Rear Wheel Alignment ...67 F Fueling ...47 Fuse Recommendations ...86 Fuse Replacement ...86 G Gasoline Handling Safety ...14 Gear Shift Pedal ...33 Gear Shift Pedal Adjustment ...35 Gear Shifting...49-50 Gross Vehicle Weight Rating ...16 GVWR ...16 E Electrical Precautions ...87 Elevating the Motorcycle ...88 Emission Control System Inspection ...71 Engine Break-In ...46 Engine Compression Test ...87 Engine Identification Number ...18 Engine Starter Switch ...32 Engine Stop/Run Switch ...32 Engine, Starting ...48 Engine, Stopping...

Owners Manual
Page 130
... Servicing ...55 Seat Removal/Installation ...84 Service Manual ...90 Service Procedure Safety...55 Shift Points ...50 Shifting Gears ...49-50 Side Covers, Removal/Installation ...82 Sidestand ...33 Sidestand Inspection ...45 Sidestand Lubrication ...80 Signal Words ...7 SiriusXM Radio Categories...124 SiriusXM Radio Channels ...124 SiriusXM Radio Introduction ...122 SiriusXM Radio Menu Options...123 SiriusXM Radio Reception ...123 Spark Plugs ...78 Speedometer ...22, 26 Squelch ...117 Starter Interlock Switch ...31 Steering...
... Servicing ...55 Seat Removal/Installation ...84 Service Manual ...90 Service Procedure Safety...55 Shift Points ...50 Shifting Gears ...49-50 Side Covers, Removal/Installation ...82 Sidestand ...33 Sidestand Inspection ...45 Sidestand Lubrication ...80 Signal Words ...7 SiriusXM Radio Categories...124 SiriusXM Radio Channels ...124 SiriusXM Radio Introduction ...122 SiriusXM Radio Menu Options...123 SiriusXM Radio Reception ...123 Spark Plugs ...78 Speedometer ...22, 26 Squelch ...117 Starter Interlock Switch ...31 Steering...