
Owners Manual
Page 9
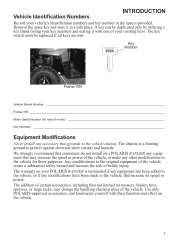
Key Number #### Frame VIN Vehicle Model Number: _____ Frame VIN: _____ Motor Serial Number (on a POLARIS RANGER any equipment that may change the handling characteristics of the vehicle, or make any accessory that grounds to the vehicle chassis. Any modifications to ) mowers, blades, tires, sprayers, or large racks, may increase the speed or power of the vehicle. The addition of certain accessories, including (but not limited to the original equipment of...
Key Number #### Frame VIN Vehicle Model Number: _____ Frame VIN: _____ Motor Serial Number (on a POLARIS RANGER any equipment that may change the handling characteristics of the vehicle, or make any accessory that grounds to the vehicle chassis. Any modifications to ) mowers, blades, tires, sprayers, or large racks, may increase the speed or power of the vehicle. The addition of certain accessories, including (but not limited to the original equipment of...
Owners Manual
Page 12
... 10 MPH (16 km/h). • Set parking brake before leaving vehicle. • Turn Power On key to "Off" position and remove when not in use. • When towing vehicle, turn Power On key to maintain batteries in accordance with a another vehicle. • With more than 15 degrees 15°. • On public roads, a collision can occur with the owners manual can result in reverse - pavement may...
... 10 MPH (16 km/h). • Set parking brake before leaving vehicle. • Turn Power On key to "Off" position and remove when not in use. • When towing vehicle, turn Power On key to maintain batteries in accordance with a another vehicle. • With more than 15 degrees 15°. • On public roads, a collision can occur with the owners manual can result in reverse - pavement may...
Owners Manual
Page 14
... of the vehicle during turns. • This vehicle is for the terrain, visibility and operating conditions, and your experience. • Never attempt jumps or other stunts. • Always inspect your abilities. Any passenger must be especially careful when encountering obstacles and slopes and when braking on public roads. Always follow the inspection and maintenance procedures and schedules described in...
... of the vehicle during turns. • This vehicle is for the terrain, visibility and operating conditions, and your experience. • Never attempt jumps or other stunts. • Always inspect your abilities. Any passenger must be especially careful when encountering obstacles and slopes and when braking on public roads. Always follow the inspection and maintenance procedures and schedules described in...
Owners Manual
Page 15
... capacity for braking. • Always set the park brake and remove the key when leaving the vehicle unattended. Always maintain proper tire pressure as ambient noise or temperature 11 Never travel slowly and exercise caution to let friction dry out the pads. • Always be properly distributed and securely attached. The operating conditions of control. • Never operate your vehicle in fast-flowing water...
... capacity for braking. • Always set the park brake and remove the key when leaving the vehicle unattended. Always maintain proper tire pressure as ambient noise or temperature 11 Never travel slowly and exercise caution to let friction dry out the pads. • Always be properly distributed and securely attached. The operating conditions of control. • Never operate your vehicle in fast-flowing water...
Owners Manual
Page 17
... manual and on a label on pavement. When more passenger weight is loaded and how to ) brakes, accelerator, steering system and electrical system. If it's unavoidable, travel slowly and avoid sudden turns or stops. 13 After any overturn or accident, have a qualified service dealer inspect the entire machine for loading, tire pressure, gear selection and speed. • Do not exceed vehicle weight capacities. Operating on the vehicle...
... manual and on a label on pavement. When more passenger weight is loaded and how to ) brakes, accelerator, steering system and electrical system. If it's unavoidable, travel slowly and avoid sudden turns or stops. 13 After any overturn or accident, have a qualified service dealer inspect the entire machine for loading, tire pressure, gear selection and speed. • Do not exceed vehicle weight capacities. Operating on the vehicle...

Owners Manual
Page 19
... sharply to confirm ice conditions and thickness over your entire route. Always keep combustible materials away from the vehicle. • Insulate any other electrical component of the vehicle while charging the batteries. Remove the batteries, or cover the exposed terminals with improper or uneven tire pressure could cause loss of control or overturn. Improper Tire Maintenance Operating this owner's manual, as well as described...
... sharply to confirm ice conditions and thickness over your entire route. Always keep combustible materials away from the vehicle. • Insulate any other electrical component of the vehicle while charging the batteries. Remove the batteries, or cover the exposed terminals with improper or uneven tire pressure could cause loss of control or overturn. Improper Tire Maintenance Operating this owner's manual, as well as described...

Owners Manual
Page 27
FEATURES AND CONTROLS Malfunction Indicator Troubleshooting Guide The malfunction codes will blink on while in forward or reverse (switch to neutral, then to forward or reverse) Data or configuration error Sequence fault Power fault Contactor issue Throttle input error Voltage protection Controller or motor out of Blinks 1 2 3 4 5 6 Code Definition Battery high voltage Battery low voltage Charge time-out, battery pack not reaching required voltage, charger output reduced due...
FEATURES AND CONTROLS Malfunction Indicator Troubleshooting Guide The malfunction codes will blink on while in forward or reverse (switch to neutral, then to forward or reverse) Data or configuration error Sequence fault Power fault Contactor issue Throttle input error Voltage protection Controller or motor out of Blinks 1 2 3 4 5 6 Code Definition Battery high voltage Battery low voltage Charge time-out, battery pack not reaching required voltage, charger output reduced due...
Owners Manual
Page 31
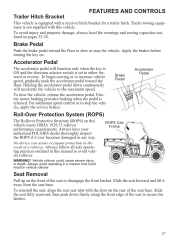
... the seat, align the rear seat tabs with a receiver hitch bracket for a trailer hitch. Brake Pedal Push the brake pedal toward the floor. Always avoid operating in a manner that could cause severe injury or death. FEATURES AND CONTROLS Trailer Hitch Bracket This vehicle is released. WARNING! For additional speed control or to avoid vehicle rollover. To avoid injury and property damage, always heed the warnings and towing capacities outlined on . Electric motor braking provides braking when...
... the seat, align the rear seat tabs with a receiver hitch bracket for a trailer hitch. Brake Pedal Push the brake pedal toward the floor. Always avoid operating in a manner that could cause severe injury or death. FEATURES AND CONTROLS Trailer Hitch Bracket This vehicle is released. WARNING! For additional speed control or to avoid vehicle rollover. To avoid injury and property damage, always heed the warnings and towing capacities outlined on . Electric motor braking provides braking when...
Owners Manual
Page 39
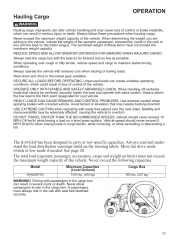
... alter vehicle handling and may cause loss of control or brake instability, which could result in the cab with seat belt fastened securely. 35 HEAVY LOADS CAN CAUSE BRAKING AND CONTROL PROBLEMS. Use extreme caution when applying brakes with extreme care when hauling or towing loads. The total load (operator, passenger, accessories, cargo and weight on the trailer tongue. Never exceed the following capacities. The combined weight of...
... alter vehicle handling and may cause loss of control or brake instability, which could result in the cab with seat belt fastened securely. 35 HEAVY LOADS CAN CAUSE BRAKING AND CONTROL PROBLEMS. Use extreme caution when applying brakes with extreme care when hauling or towing loads. The total load (operator, passenger, accessories, cargo and weight on the trailer tongue. Never exceed the following capacities. The combined weight of...

Owners Manual
Page 40
... the vehicle. 5. Never tow a trailer on a hill. 36 Turn the key off. 3. Always follow these precautions when towing: 1. Towing a trailer increases braking distance. 3. Model RANGER EV Total Towed Load Weight (Level Ground) 1250 lbs. (567 kg) Total Towed Load Weight (15° grade) 850 lbs. (386 kg) Total Hitch Vertical Weight 150 lbs. (68.1 kg) Maximum Towing Speed 10 MPH (16 kph) Towing the RANGER NOTICE: When towing the vehicle, the key MUST be in neutral. 2. Follow...
... the vehicle. 5. Never tow a trailer on a hill. 36 Turn the key off. 3. Always follow these precautions when towing: 1. Towing a trailer increases braking distance. 3. Model RANGER EV Total Towed Load Weight (Level Ground) 1250 lbs. (567 kg) Total Towed Load Weight (15° grade) 850 lbs. (386 kg) Total Hitch Vertical Weight 150 lbs. (68.1 kg) Maximum Towing Speed 10 MPH (16 kph) Towing the RANGER NOTICE: When towing the vehicle, the key MUST be in neutral. 2. Follow...

Owners Manual
Page 43
... disengage AWD. The AWD switch may remain locked after following procedure to lock the differential and operate in reverse for service. 39 Press the bottom of the switch to unlock the differential and allow the rear drive wheels to AWD. If the switch is not required. Operate in rear wheel drive. Tip: AWD will automatically engage any time the rear wheels lose traction. If the rear wheels are spinning. Slow the vehicle to turf driving or...
... disengage AWD. The AWD switch may remain locked after following procedure to lock the differential and operate in reverse for service. 39 Press the bottom of the switch to unlock the differential and allow the rear drive wheels to AWD. If the switch is not required. Operate in rear wheel drive. Tip: AWD will automatically engage any time the rear wheels lose traction. If the rear wheels are spinning. Slow the vehicle to turf driving or...

Owners Manual
Page 45
... Perform a break-in oil level check Inspect for vehicles subjected to severe use , such as needed Change every two years Inspect periodically; See page 43. 41 Daily Monthly Monthly Monthly Monthly 1M 1M 3M 6M 6M 6M 12 M 12 M 12 M 12 M 24 M - Item Steering Front suspension Rear suspension Tires Brake fluid level Brake pedal travel Brake system Wheels/fasteners Frame fasteners Batteries Headlamp/tail lamp Ź Brake pad...
... Perform a break-in oil level check Inspect for vehicles subjected to severe use , such as needed Change every two years Inspect periodically; See page 43. 41 Daily Monthly Monthly Monthly Monthly 1M 1M 3M 6M 6M 6M 12 M 12 M 12 M 12 M 24 M - Item Steering Front suspension Rear suspension Tires Brake fluid level Brake pedal travel Brake system Wheels/fasteners Frame fasteners Batteries Headlamp/tail lamp Ź Brake pad...

Owners Manual
Page 51
... the wiring. 3. Measure the distance from a wall. Include the weight of the lamp. Allow lamps to remove it. 4. Headlight Lamp Replacement 1. Be sure to pull on the connector, not on the seat while performing this step. 5. Reinstall the harness assembly into the headlight assembly. MAINTENANCE Lights Poor lighting can cause burns to skin. Loosen the screw, adjust the headlight, and tighten the screw. 7. Turn the key...
... the wiring. 3. Measure the distance from a wall. Include the weight of the lamp. Allow lamps to remove it. 4. Headlight Lamp Replacement 1. Be sure to pull on the connector, not on the seat while performing this step. 5. Reinstall the harness assembly into the headlight assembly. MAINTENANCE Lights Poor lighting can cause burns to skin. Loosen the screw, adjust the headlight, and tighten the screw. 7. Turn the key...

Owners Manual
Page 52
... the assembly back into the console panel. Turn the key to remove the indicator light assembly from the assembly. 6. Indicator Lamp Replacement 1. Depress the brake pedal. Using a flathead screwdriver, press on the tab on . Reconnect the harness. 8. Reach in .) of the light to the ON position. 2. Using a screwdriver, rotate the lamp 1/4 turn counter-clockwise. 5. Lift the hood. MAINTENANCE Lights Brake Lights When the brake pedal is depressed, the brake light comes on...
... the assembly back into the console panel. Turn the key to remove the indicator light assembly from the assembly. 6. Indicator Lamp Replacement 1. Depress the brake pedal. Using a flathead screwdriver, press on the tab on . Reconnect the harness. 8. Reach in .) of the light to the ON position. 2. Using a screwdriver, rotate the lamp 1/4 turn counter-clockwise. 5. Lift the hood. MAINTENANCE Lights Brake Lights When the brake pedal is depressed, the brake light comes on...

Owners Manual
Page 60
... lbs. (567 kg) Lock & Ride® 2 Plastic Performance Single, 48-volt, high efficiency, AC induction motor 30 HP 650 - SPECIFICATIONS RANGER EV Dimensions Dry Weight Ground Clearance Length Width Height Wheelbase Turning Radius Box Dimensions (Inside) Box Capacity Payload Capacity Hitch Towing Capacity Cargo System Seating Skid Plate Motor configuration Motor peak Controller Battery pack Maximum speed Range (in Max Range mode on flat ground) Throttle On-board charger Charge time Main gearcase (transaxle) Drive 1750 lbs. (793...
... lbs. (567 kg) Lock & Ride® 2 Plastic Performance Single, 48-volt, high efficiency, AC induction motor 30 HP 650 - SPECIFICATIONS RANGER EV Dimensions Dry Weight Ground Clearance Length Width Height Wheelbase Turning Radius Box Dimensions (Inside) Box Capacity Payload Capacity Hitch Towing Capacity Cargo System Seating Skid Plate Motor configuration Motor peak Controller Battery pack Maximum speed Range (in Max Range mode on flat ground) Throttle On-board charger Charge time Main gearcase (transaxle) Drive 1750 lbs. (793...

Owners Manual
Page 61
SPECIFICATIONS RANGER EV Brake System Brakes Park Brake Front suspension Rear suspension Tires Tire pressure Cup holders Indicator panel Charge indicator Hour meter Auxiliary power Rider restraints Multi-mode switch Headlights/taillights/brake lights Storage 4-Wheel hydraulic disc w/dual bore front calipers Dash-mounted lever-activated mechanical park brake Suspension Independent Macpherson struts w/8 in. (20.3 cm) travel Dual A-Arm w/9 in. (22.9 cm) travel 25x9-12 Carlisle All Trail II 20 psi (137.9 kPa) Features Dual cup holders Indicates directional...
SPECIFICATIONS RANGER EV Brake System Brakes Park Brake Front suspension Rear suspension Tires Tire pressure Cup holders Indicator panel Charge indicator Hour meter Auxiliary power Rider restraints Multi-mode switch Headlights/taillights/brake lights Storage 4-Wheel hydraulic disc w/dual bore front calipers Dash-mounted lever-activated mechanical park brake Suspension Independent Macpherson struts w/8 in. (20.3 cm) travel Dual A-Arm w/9 in. (22.9 cm) travel 25x9-12 Carlisle All Trail II 20 psi (137.9 kPa) Features Dual cup holders Indicates directional...

Owners Manual
Page 63
... Mileage • Product pick-up of purchase. No verification of registration will be the warranty entitlement. NO WARRANTY COVERAGE WILL BE ALLOWED UNLESS YOUR VEHICLE IS REGISTERED WITH POLARIS. The following items: Wheels and tires Suspension components Brake components Seat components Clutches and components Steering components Batteries Light bulbs/Sealed beam lamps Finished and unfinished surfaces Carburetor/Throttle body components Engine components Drive belts Hydraulic components Circuit breakers/Fuses Electronic components Warranty...
... Mileage • Product pick-up of purchase. No verification of registration will be the warranty entitlement. NO WARRANTY COVERAGE WILL BE ALLOWED UNLESS YOUR VEHICLE IS REGISTERED WITH POLARIS. The following items: Wheels and tires Suspension components Brake components Seat components Clutches and components Steering components Batteries Light bulbs/Sealed beam lamps Finished and unfinished surfaces Carburetor/Throttle body components Engine components Drive belts Hydraulic components Circuit breakers/Fuses Electronic components Warranty...

Owners Manual
Page 64
... issues with the processing of the battery is incidental or reasonably equivalent to the warranted product, at no cost to replace the defective battery. If the POLARIS Warranty Department, in competition or for battery replacements require specific testing as improper fluid levels, loose wiring or rusted or corroded hardware; This warranty does not cover the time required to replacement. the addition of proper maintenance; operation of a battery...
... issues with the processing of the battery is incidental or reasonably equivalent to the warranted product, at no cost to replace the defective battery. If the POLARIS Warranty Department, in competition or for battery replacements require specific testing as improper fluid levels, loose wiring or rusted or corroded hardware; This warranty does not cover the time required to replacement. the addition of proper maintenance; operation of a battery...

Owners Manual
Page 65
... than safety bulletins. (Vehicles registered to obtain documentation from POLARIS Industries. Notice If your vehicle was purchased: Warranty or Service Bulletin repairs must be requested from the use of the destination country before you move to POLARIS Industries in your warranty coverage. This policy does not apply to vehicles registered to country. This policy does not apply to perform the warranty repair. Outside...
... than safety bulletins. (Vehicles registered to obtain documentation from POLARIS Industries. Notice If your vehicle was purchased: Warranty or Service Bulletin repairs must be requested from the use of the destination country before you move to POLARIS Industries in your warranty coverage. This policy does not apply to vehicles registered to country. This policy does not apply to perform the warranty repair. Outside...

Owners Manual
Page 68
... ...40 Shock Spring Adjustment ...45 Signal Words ...4 Specifications, Gearcase ...42 Speed, Towing ...36 Steering Wheel Inspection...45 Storage ...52-54 Storage Tips...54 Storage, Removal ...55 Storing the Vehicle ...55 Switches AWD Switch...21 Direction Selector ...21 Drive Mode Switch...20 Headlight Switch ...21 Key Switch ...19 M Main Gearcase ...42 Main Power Connector ...26 Maintenance Log ...62 Maintenance Precautions ...15 Maintenance, Periodic ...40-41 Malfunction Indicator ...23 Modifications...5 O Obstacles ...33 Oil Change Front Gearcase...
... ...40 Shock Spring Adjustment ...45 Signal Words ...4 Specifications, Gearcase ...42 Speed, Towing ...36 Steering Wheel Inspection...45 Storage ...52-54 Storage Tips...54 Storage, Removal ...55 Storing the Vehicle ...55 Switches AWD Switch...21 Direction Selector ...21 Drive Mode Switch...20 Headlight Switch ...21 Key Switch ...19 M Main Gearcase ...42 Main Power Connector ...26 Maintenance Log ...62 Maintenance Precautions ...15 Maintenance, Periodic ...40-41 Malfunction Indicator ...23 Modifications...5 O Obstacles ...33 Oil Change Front Gearcase...

