

Owners Manual
Page 4
...contained within this vehicle are in the design and quality of publication. Other languages are provided as translations of POLARIS Industries Inc. ...time of production components, some minor discrepancies may result between the actual vehicle and the information presented in U.S.A. 2013 SPORTSMAN FOREST 800 Owner's Manual P/N 9923936 2 The original instructions for omissions or inaccuracies. No liability can be accepted for this publication is expressly prohibited. POLARIS and SPORTSMAN are registered trademarks of the original instructions. Copyright 2012 POLARIS Sales...
...contained within this vehicle are in the design and quality of publication. Other languages are provided as translations of POLARIS Industries Inc. ...time of production components, some minor discrepancies may result between the actual vehicle and the information presented in U.S.A. 2013 SPORTSMAN FOREST 800 Owner's Manual P/N 9923936 2 The original instructions for omissions or inaccuracies. No liability can be accepted for this publication is expressly prohibited. POLARIS and SPORTSMAN are registered trademarks of the original instructions. Copyright 2012 POLARIS Sales...

Owners Manual
Page 22
... promptly. 20 SAFETY Safety Warnings Improper Cargo Loading Overloading the ATV or carrying/towing cargo improperly may cause changes in handling, which could result in a collision or accident, especially if operating on a frozen body of water unless you have independently verified that the ice is not equipped with highway-approved lights. Use caution and drive at reduced speeds in conditions of the...
... promptly. 20 SAFETY Safety Warnings Improper Cargo Loading Overloading the ATV or carrying/towing cargo improperly may cause changes in handling, which could result in a collision or accident, especially if operating on a frozen body of water unless you have independently verified that the ice is not equipped with highway-approved lights. Use caution and drive at reduced speeds in conditions of the...
Owners Manual
Page 35
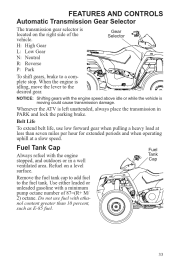
... for extended periods and when operating uphill at a slow speed. Remove the fuel tank cap to add fuel to a complete stop. Fuel Tank Cap 33 FEATURES AND CONTROLS Automatic Transmission Gear Selector The transmission gear selector is located on a level surface. Gear Selector NOTICE: Shifting gears with a minimum pump octane number of the vehicle. Refuel on the right side of 87=(R+ M/ 2) octane. Use either leaded or unleaded gasoline with the engine speed above idle...
... for extended periods and when operating uphill at a slow speed. Remove the fuel tank cap to add fuel to a complete stop. Fuel Tank Cap 33 FEATURES AND CONTROLS Automatic Transmission Gear Selector The transmission gear selector is located on a level surface. Gear Selector NOTICE: Shifting gears with a minimum pump octane number of the vehicle. Refuel on the right side of 87=(R+ M/ 2) octane. Use either leaded or unleaded gasoline with the engine speed above idle...

Owners Manual
Page 36
... demand drive unit will automatically engage any time the rear wheels lose traction. Once enabled, AWD remains enabled until the AWD switch is in AWD, the demand drive unit will automatically disengage. When the switch is on or off while the vehicle is no limit to AWD while the rear wheels are spinning may remain in the instrument cluster will Switch be on. NOTICE: Switching to the length of time the vehicle may...
... demand drive unit will automatically engage any time the rear wheels lose traction. Once enabled, AWD remains enabled until the AWD switch is in AWD, the demand drive unit will automatically disengage. When the switch is on or off while the vehicle is no limit to AWD while the rear wheels are spinning may remain in the instrument cluster will Switch be on. NOTICE: Switching to the length of time the vehicle may...
Owners Manual
Page 38
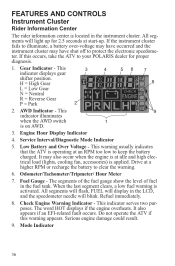
... instrument cluster may also occur when the engine is located in the instrument cluster. Low Battery and Over Voltage - Drive at start-up for proper diagnosis. 1. Fuel Gauge - Do not operate the ATV if this occurs, take the ATV to your POLARIS dealer for 2.5 seconds at a higher RPM or recharge the battery to clear the warning. 6. All segments will blink. FEATURES AND CONTROLS Instrument Cluster Rider Information Center...
... instrument cluster may also occur when the engine is located in the instrument cluster. Low Battery and Over Voltage - Drive at start-up for proper diagnosis. 1. Fuel Gauge - Do not operate the ATV if this occurs, take the ATV to your POLARIS dealer for 2.5 seconds at a higher RPM or recharge the battery to clear the warning. 6. All segments will blink. FEATURES AND CONTROLS Instrument Cluster Rider Information Center...

Owners Manual
Page 45
...-Battery Fan Circuit: Open Load/Short-to-Ground Fan Circuit: Shorted Load/Short-to-Battery Starter Enable: Open Load/Short-to-Ground Starter Enable: Shorted Load/Short-to-Battery Gear Sensor Signal 4X4: Open Load/Short-to-Ground 4X4: Shorted Load/Short-to-Battery Rear Differential Enable: Open Load/Short-to-Ground (if equipped) Rear Differential Enable: Shorted Load/Short-to -Battery Injector Circuit Malfunction - FEATURES AND CONTROLS Instrument Cluster Rider Information Center Downloading Codes Blink Code...
...-Battery Fan Circuit: Open Load/Short-to-Ground Fan Circuit: Shorted Load/Short-to-Battery Starter Enable: Open Load/Short-to-Ground Starter Enable: Shorted Load/Short-to-Battery Gear Sensor Signal 4X4: Open Load/Short-to-Ground 4X4: Shorted Load/Short-to-Battery Rear Differential Enable: Open Load/Short-to-Ground (if equipped) Rear Differential Enable: Shorted Load/Short-to -Battery Injector Circuit Malfunction - FEATURES AND CONTROLS Instrument Cluster Rider Information Center Downloading Codes Blink Code...
Owners Manual
Page 47
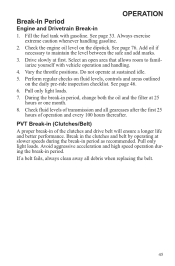
... speeds during the break-in of transmission and all debris when replacing the belt. 45 Perform regular checks on fluid levels, controls and areas outlined on the dipstick. See page 33. Break in 1. See page 46. 6. Check fluid levels of the clutches and drive belt will ensure a longer life and better performance. Always exercise extreme caution whenever handling gasoline. 2. OPERATION Break-In Period Engine...
... speeds during the break-in of transmission and all debris when replacing the belt. 45 Perform regular checks on fluid levels, controls and areas outlined on the dipstick. See page 33. Break in 1. See page 46. 6. Check fluid levels of the clutches and drive belt will ensure a longer life and better performance. Always exercise extreme caution whenever handling gasoline. 2. OPERATION Break-In Period Engine...

Owners Manual
Page 62
... tow load to maintain stable driving conditions. NEVER EXCEED THE MAXIMUM WEIGHT CAPACITY of the vehicle and creates a less stable operating condition. The combined weight of these precautions when hauling cargo: REDUCE SPEED AND ALLOW GREATER DISTANCES FOR BRAKING WHEN HAULING CARGO. When operating over the rack sides. HEAVY LOADS CAN CAUSE BRAKING AND CONTROL PROBLEMS. Use extreme caution when applying brakes with loads that extend...
... tow load to maintain stable driving conditions. NEVER EXCEED THE MAXIMUM WEIGHT CAPACITY of the vehicle and creates a less stable operating condition. The combined weight of these precautions when hauling cargo: REDUCE SPEED AND ALLOW GREATER DISTANCES FOR BRAKING WHEN HAULING CARGO. When operating over the rack sides. HEAVY LOADS CAN CAUSE BRAKING AND CONTROL PROBLEMS. Use extreme caution when applying brakes with loads that extend...

Owners Manual
Page 63
... attach a towed load to extend belt life. If towing a load, reduce rear rack cargo weight by the amount of tongue weight. • The combination of rear rack cargo weight and tongue weight must not exceed the rear rack capacity. • The total load (operator, accessories, cargo and weight on hitch) must not exceed the maximum weight capacity of this manual. 1/3 Cargo weight should be evenly distributed (1/3 on the front rack and 2/3 on warning labels...
... attach a towed load to extend belt life. If towing a load, reduce rear rack cargo weight by the amount of tongue weight. • The combination of rear rack cargo weight and tongue weight must not exceed the rear rack capacity. • The total load (operator, accessories, cargo and weight on hitch) must not exceed the maximum weight capacity of this manual. 1/3 Cargo weight should be evenly distributed (1/3 on the front rack and 2/3 on warning labels...

Owners Manual
Page 75
MAINTENANCE Periodic Maintenance Chart Item Maintenance Interval (whichever comes first) Hours Calendar Ź General lubrication D Throttle Cable/ Throttle Release Switch Throttle Body Intake Duct Drive belt Cooling system (if applicable) Ź Engine oil and filter change Ź Oil tank vent hose (if equipped) Ź Demand drive fluid (front gearcase) Ź Rear gearcase oil (if equipped) Ź Transmission oil D Valve clearance Fuel system 50 50 3M 6M Miles (Km) 500 (800) 500 (800) Lubricate all fittings, pivots, cables, etc. pressure test system yearly 1000...
MAINTENANCE Periodic Maintenance Chart Item Maintenance Interval (whichever comes first) Hours Calendar Ź General lubrication D Throttle Cable/ Throttle Release Switch Throttle Body Intake Duct Drive belt Cooling system (if applicable) Ź Engine oil and filter change Ź Oil tank vent hose (if equipped) Ź Demand drive fluid (front gearcase) Ź Rear gearcase oil (if equipped) Ź Transmission oil D Valve clearance Fuel system 50 50 3M 6M Miles (Km) 500 (800) 500 (800) Lubricate all fittings, pivots, cables, etc. pressure test system yearly 1000...

Owners Manual
Page 92
...'ve been loosened for maintenance service. Place the wheel on the hub with the valve stem toward the outside and rotation arrows on the tire pointing toward forward rotation. 4. Install the wheel nuts and finger-tighten them. 5. WARNING! lbs. (41 Nm) PLUS 1/4 TURN 2-Piece Flange Nut (Steel Wheels) 27 ft. Lock the parking brake. 3. Lower the vehicle to specification. Place the transmission in an accident or...
...'ve been loosened for maintenance service. Place the wheel on the hub with the valve stem toward the outside and rotation arrows on the tire pointing toward forward rotation. 4. Install the wheel nuts and finger-tighten them. 5. WARNING! lbs. (41 Nm) PLUS 1/4 TURN 2-Piece Flange Nut (Steel Wheels) 27 ft. Lock the parking brake. 3. Lower the vehicle to specification. Place the transmission in an accident or...

Owners Manual
Page 95
Headlight Lamp Replacement When servicing a halogen lamp, don't touch the lamp with bare fingers. Remove the two screws on the lower front corners of the pod. 3. Remove the ...Lift the pod slightly while depressing the tabs at the rear of the lamp. 1. Lift the pod cover and disconnect the speedometer harnesses from the wiring harness. Make sure the tab on the wiring. 6. Always make sure lights are adjusted properly for best visibility. MAINTENANCE Lights Poor lighting can cause burns to skin. Allow lamps to cool before servicing. 5. Oil from the rear of the headlight...
Headlight Lamp Replacement When servicing a halogen lamp, don't touch the lamp with bare fingers. Remove the two screws on the lower front corners of the pod. 3. Remove the ...Lift the pod slightly while depressing the tabs at the rear of the lamp. 1. Lift the pod cover and disconnect the speedometer harnesses from the wiring harness. Make sure the tab on the wiring. 6. Always make sure lights are adjusted properly for best visibility. MAINTENANCE Lights Poor lighting can cause burns to skin. Allow lamps to cool before servicing. 5. Oil from the rear of the headlight...

Owners Manual
Page 98
... pull the assembly up to release it from the headlamp parting line to remove it from the headlight mounting tabs. 6. Remove the two screws on the lower front corners of the pod. 3. Reverse the steps to remove the o-rings from the locking tabs. 7. Lift the pod cover and disconnect the speedometer harnesses from the wiring harness. 5. Pull the headlight housing up and...
... pull the assembly up to release it from the headlamp parting line to remove it from the headlight mounting tabs. 6. Remove the two screws on the lower front corners of the pod. 3. Reverse the steps to remove the o-rings from the locking tabs. 7. Lift the pod cover and disconnect the speedometer harnesses from the wiring harness. 5. Pull the headlight housing up and...

Owners Manual
Page 99
... it. 3. Remove the harness connector Connector from the headlight assembly. 2. Harness Taillight/Brakelight Lamp Replacement 1. Remove the headlamp and install the new headlamp. 3. MAINTENANCE Lights Lower Headlamp Replacement 1. Apply dielectric grease to the socket and install the new Lamp lamp. 4. Turn the back of the headlight harness counter-clockwise and pull the harness assembly away from the back of the light assembly. 2. Reinstall the harness assembly into the headlight assembly. 4.
... it. 3. Remove the harness connector Connector from the headlight assembly. 2. Harness Taillight/Brakelight Lamp Replacement 1. Remove the headlamp and install the new headlamp. 3. MAINTENANCE Lights Lower Headlamp Replacement 1. Apply dielectric grease to the socket and install the new Lamp lamp. 4. Turn the back of the headlight harness counter-clockwise and pull the harness assembly away from the back of the light assembly. 2. Reinstall the harness assembly into the headlight assembly. 4.

Owners Manual
Page 114
... your POLARIS dealer to purchase a replacement. Replacement safety labels are provided by POLARIS at the following items: • Wheel bearings • Electrical components • Radiator • Switches and controls • Transmission seals • Fuel system components • Cab and body panels • Labels and decals If an informational or graphic label becomes illegible or comes off, contact your POLARIS vehicle. MAINTENANCE Cleaning and Storage Washing the Vehicle If a high pressure water system...
... your POLARIS dealer to purchase a replacement. Replacement safety labels are provided by POLARIS at the following items: • Wheel bearings • Electrical components • Radiator • Switches and controls • Transmission seals • Fuel system components • Cab and body panels • Labels and decals If an informational or graphic label becomes illegible or comes off, contact your POLARIS vehicle. MAINTENANCE Cleaning and Storage Washing the Vehicle If a high pressure water system...

Owners Manual
Page 117
..., following fluid levels. If POLARIS fuel system additive is not used, the fuel tank, fuel lines, and injectors should be forced in the Periodic Maintenance Chart beginning on the can. Run the engine for several times. Reinstall the spark plugs. Apply dielectric grease to specification. 4. Torque to the inside of engine oil. Remove the spark plugs and add 2-3 tablespoons of each spark plug cap and reinstall the caps onto the plugs. 5. MAINTENANCE Cleaning...
..., following fluid levels. If POLARIS fuel system additive is not used, the fuel tank, fuel lines, and injectors should be forced in the Periodic Maintenance Chart beginning on the can. Run the engine for several times. Reinstall the spark plugs. Apply dielectric grease to specification. 4. Torque to the inside of engine oil. Remove the spark plugs and add 2-3 tablespoons of each spark plug cap and reinstall the caps onto the plugs. 5. MAINTENANCE Cleaning...

Owners Manual
Page 120
... a stopped brief, aggressive throttle application to Always warm up belt one mile (5 miles or more flexible and prevent belt burning. position WARNING! Belt slippage from failure to engage clutch. Poor engine performance Check for fouled plugs or foreign material in short bursts, 5 to about 1/8 throttle in gas tank or fuel lines. With the transmission in neutral, advance the throttle to 7 times. ment Towing/pushing at least 5 minutes. Drive at low ambient...
... a stopped brief, aggressive throttle application to Always warm up belt one mile (5 miles or more flexible and prevent belt burning. position WARNING! Belt slippage from failure to engage clutch. Poor engine performance Check for fouled plugs or foreign material in short bursts, 5 to about 1/8 throttle in gas tank or fuel lines. With the transmission in neutral, advance the throttle to 7 times. ment Towing/pushing at least 5 minutes. Drive at low ambient...

Owners Manual
Page 124
SPECIFICATIONS SPORTSMAN FOREST 800 Maximum Weight Capacity Dry Weight Fuel Capacity Engine Oil Capacity Coolant Capacity Demand Drive Fluid Capacity Transmission Oil Capacity Front Rack/Storage Box Capacity Rear Rack Capacity Unbraked Trailer Towing Capacity* Overall Length Overall Width Overall Height Wheelbase Ground Clearance Minimum Turning Radius Engine Displacement Engine Power Bore x Stroke Alternator Output Compression Ratio Starting System Fuel System Ignition System Ignition Timing Spark Plug / Gap Lubrication System Seat Steering System Transmission Power System Driving System Type...
SPECIFICATIONS SPORTSMAN FOREST 800 Maximum Weight Capacity Dry Weight Fuel Capacity Engine Oil Capacity Coolant Capacity Demand Drive Fluid Capacity Transmission Oil Capacity Front Rack/Storage Box Capacity Rear Rack Capacity Unbraked Trailer Towing Capacity* Overall Length Overall Width Overall Height Wheelbase Ground Clearance Minimum Turning Radius Engine Displacement Engine Power Bore x Stroke Alternator Output Compression Ratio Starting System Fuel System Ignition System Ignition Timing Spark Plug / Gap Lubrication System Seat Steering System Transmission Power System Driving System Type...

Owners Manual
Page 125
SPECIFICATIONS SPORTSMAN FOREST 800 Transmission Gear Reduction, Low Gear Reduction, Reverse Gear Reduction, High Drive Ratio, Front Tires/Pressure, Front Tires/Pressure, Rear Brakes, Front Brakes, Rear Brakes, Auxiliary Brake, Parking Hitch Winch Headlight Taillights Brake Light Instrument Cluster Automatic PVT with E-Z Shift H/L/N/R/P 23.91:1 21.74:1 8.28:1 3.82:1 Off Road Style, Deep Tread Design Size 25x8-12 / 5 psi (34.5 KPa) Off Road Style, Deep Tread Design Size 25x11-12 / 5 psi (34.5 KPa) Single-Control Hydraulic Disc Single-Control Hydraulic Disc Foot-Activated Hydraulic Disc...
SPECIFICATIONS SPORTSMAN FOREST 800 Transmission Gear Reduction, Low Gear Reduction, Reverse Gear Reduction, High Drive Ratio, Front Tires/Pressure, Front Tires/Pressure, Rear Brakes, Front Brakes, Rear Brakes, Auxiliary Brake, Parking Hitch Winch Headlight Taillights Brake Light Instrument Cluster Automatic PVT with E-Z Shift H/L/N/R/P 23.91:1 21.74:1 8.28:1 3.82:1 Off Road Style, Deep Tread Design Size 25x8-12 / 5 psi (34.5 KPa) Off Road Style, Deep Tread Design Size 25x11-12 / 5 psi (34.5 KPa) Single-Control Hydraulic Disc Single-Control Hydraulic Disc Foot-Activated Hydraulic Disc...

Owners Manual
Page 133
... Gloves ...9 N Noise Emission Control System ...69 O Oil Engine ...76-78 Transmission ...79-80 Oil and Filter Change ...77-78 Oil Level, Engine ...76 Oil Recommendations ...76 Override Switch ...26 H Hand Brake ...84 Handlebar Adjustment ...86 Hauling Cargo...60-61 Headlight Housing Replacement ...96 Headlight Lamp Replacement ...93 Headlight Switch...27 Helmet...8 High Beam Adjustment ...94 High Range Use ...104 P Parking Brake ...31 Parking on an Incline ...62 Periodic Maintenance Chart ...70-74 Polaris Product...
... Gloves ...9 N Noise Emission Control System ...69 O Oil Engine ...76-78 Transmission ...79-80 Oil and Filter Change ...77-78 Oil Level, Engine ...76 Oil Recommendations ...76 Override Switch ...26 H Hand Brake ...84 Handlebar Adjustment ...86 Hauling Cargo...60-61 Headlight Housing Replacement ...96 Headlight Lamp Replacement ...93 Headlight Switch...27 Helmet...8 High Beam Adjustment ...94 High Range Use ...104 P Parking Brake ...31 Parking on an Incline ...62 Periodic Maintenance Chart ...70-74 Polaris Product...