

Owners Manual
Page 4
....: POLARIS®, FREEDOM®, VICTORY®, VICTORY MOTORCYCLES®, CROSS COUNTRY®, CROSS COUNTRY TOUR®, CROSS COUNTRY 8-BALL™ and MAGNUM™. The following are trademarks or registered trademarks of Dunlop Tire Corporation. LOCTITE® is based on the latest product information available at any time, without notice and without incurring obligation to make the same or similar changes to...
....: POLARIS®, FREEDOM®, VICTORY®, VICTORY MOTORCYCLES®, CROSS COUNTRY®, CROSS COUNTRY TOUR®, CROSS COUNTRY 8-BALL™ and MAGNUM™. The following are trademarks or registered trademarks of Dunlop Tire Corporation. LOCTITE® is based on the latest product information available at any time, without notice and without incurring obligation to make the same or similar changes to...
Owners Manual
Page 15
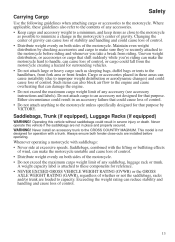
... with a trunk. Never install an accessory trunk to the motorcycle. Exceeding the weight rating can also block air flow to the engine and cause overheating that shift suddenly while you take a break from the motorcycle creating a hazard for surrounding vehicles. • Do not attach large or heavy cargo such as possible to minimize a change in the motorcycle's center of stability and handling and...
... with a trunk. Never install an accessory trunk to the motorcycle. Exceeding the weight rating can also block air flow to the engine and cause overheating that shift suddenly while you take a break from the motorcycle creating a hazard for surrounding vehicles. • Do not attach large or heavy cargo such as possible to minimize a change in the motorcycle's center of stability and handling and...

Owners Manual
Page 16
... performed or where gasoline is highly flammable and explosive under certain conditions. • Always exercise extreme caution whenever handling gasoline. • Always turn off with another vehicle, as possible on the truck or trailer. Do not tow the motorcycle with soap and water and change clothing. To lower triple clamp (one tiedown each side) Fuel and Exhaust Safety Always heed these fuel safety warnings when refueling or servicing...
... performed or where gasoline is highly flammable and explosive under certain conditions. • Always exercise extreme caution whenever handling gasoline. • Always turn off with another vehicle, as possible on the truck or trailer. Do not tow the motorcycle with soap and water and change clothing. To lower triple clamp (one tiedown each side) Fuel and Exhaust Safety Always heed these fuel safety warnings when refueling or servicing...

Owners Manual
Page 21
Rear Shock Air Fitting (under cover) 14. License Plate Bracket 12 15 16 14 13 10 11 7 8 1 2 3 4 5 6 19 Exhaust Mufflers Drive Belt Guard Drive Sprocket (under cover) Engine Oil Fill Cap / Dipstick Rear Brake Fluid Reservoir Rear Brake Pedal Air Filter Headlamp Mirror Fuel Tank Access Cover Fuse Box (under cover) Accessory Fuse (under cover) 15. Spark Plugs Front Brake Caliper Oil Cooler Battery Gear Shift Pedal Operator Footrest Sidestand Oil Drain Plug Oil Filter Passenger Footpeg Rear Brake Caliper Evaporative Emissions Canister 13. Radio Antenna (if equipped) 16. ...
Rear Shock Air Fitting (under cover) 14. License Plate Bracket 12 15 16 14 13 10 11 7 8 1 2 3 4 5 6 19 Exhaust Mufflers Drive Belt Guard Drive Sprocket (under cover) Engine Oil Fill Cap / Dipstick Rear Brake Fluid Reservoir Rear Brake Pedal Air Filter Headlamp Mirror Fuel Tank Access Cover Fuse Box (under cover) Accessory Fuse (under cover) 15. Spark Plugs Front Brake Caliper Oil Cooler Battery Gear Shift Pedal Operator Footrest Sidestand Oil Drain Plug Oil Filter Passenger Footpeg Rear Brake Caliper Evaporative Emissions Canister 13. Radio Antenna (if equipped) 16. ...

Owners Manual
Page 23
..., taillight, and instrument lights illuminate. The radio can be operated and the instrumentation is active. The engine stop/run switch must push the ignition key into the switch while selecting the PARK position. Turn the ignition switch to start the engine or activate the turn signals and other electrical features. Off On Park ON In the ON position, all electrical switches and buttons. Toggle Up: High Toggle Down: Low Toggle Center: Off Driver's Seat Switch Passenger's Seat Switch 21 You...
..., taillight, and instrument lights illuminate. The radio can be operated and the instrumentation is active. The engine stop/run switch must push the ignition key into the switch while selecting the PARK position. Turn the ignition switch to start the engine or activate the turn signals and other electrical features. Off On Park ON In the ON position, all electrical switches and buttons. Toggle Up: High Toggle Down: Low Toggle Center: Off Driver's Seat Switch Passenger's Seat Switch 21 You...

Owners Manual
Page 25
... is operating properly. Instruments, Features and Controls Instrument Cluster Indicator Lamps High Beam Left Turn Anti-Lock Brake System (ABS) Low Fuel Right Turn Cruise Control Oil Pressure Check Engine Lamp Indicates Neutral High Beam Check Engine Neutral Battery Warning Condition This lamp illuminates when the transmission is in neutral and the ignition key is in the ON position and the engine is off. The light will remain on after the engine is restarted, turn signal is correct and the...
... is operating properly. Instruments, Features and Controls Instrument Cluster Indicator Lamps High Beam Left Turn Anti-Lock Brake System (ABS) Low Fuel Right Turn Cruise Control Oil Pressure Check Engine Lamp Indicates Neutral High Beam Check Engine Neutral Battery Warning Condition This lamp illuminates when the transmission is in neutral and the ignition key is in the ON position and the engine is off. The light will remain on after the engine is restarted, turn signal is correct and the...
Owners Manual
Page 29
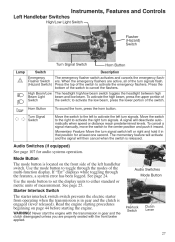
... released. Horn Button Turn Signal Switch To sound the horn, press the horn button. Press the bottom of the left to activate the emergency flashers. Instruments, Features and Controls Left Handlebar Switches High/Low Light Switch Flasher (Hazard) Switch Turn Signal Switch Lamp Switch Horn Button Description Emergency The emergency flasher switch activates and cancels the emergency flashFlasher Switch ers. When the emergency flashers are properly seated with the transmission in gear and the clutch...
... released. Horn Button Turn Signal Switch To sound the horn, press the horn button. Press the bottom of the left to activate the emergency flashers. Instruments, Features and Controls Left Handlebar Switches High/Low Light Switch Flasher (Hazard) Switch Turn Signal Switch Lamp Switch Horn Button Description Emergency The emergency flasher switch activates and cancels the emergency flashFlasher Switch ers. When the emergency flashers are properly seated with the transmission in gear and the clutch...

Owners Manual
Page 37
... fuel gauge or information bar. Brake Operation Inspect pedal and lever movement. Steering Check for proper rear view. 35 Verify that the Switch engine stops. Neutral Indicator Place the transmission in the gear position display. Engine Stop/Run Start the engine. Clutch (Mechanical) Check lever operation and freeplay. Emergency Flashers Press the top of any electrical item reveals component failure, repair or replace the component before performing the following electrical inspections. Start...
... fuel gauge or information bar. Brake Operation Inspect pedal and lever movement. Steering Check for proper rear view. 35 Verify that the Switch engine stops. Neutral Indicator Place the transmission in the gear position display. Engine Stop/Run Start the engine. Clutch (Mechanical) Check lever operation and freeplay. Emergency Flashers Press the top of any electrical item reveals component failure, repair or replace the component before performing the following electrical inspections. Start...
Owners Manual
Page 47
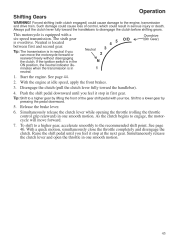
... at idle speed, apply the front brakes. If the ignition switch is in the ON position, the neutral indicator illuminates when the transmission is in serious injury or death. Disengage the clutch (pull the clutch lever fully toward the handlebars to a higher gear by pressing the pedal downward. 5. Tip: Shift to disengage the clutch before shifting gears. Shift to the engine, transmission and drive train. Tip: The transmission is...
... at idle speed, apply the front brakes. If the ignition switch is in the ON position, the neutral indicator illuminates when the transmission is in serious injury or death. Disengage the clutch (pull the clutch lever fully toward the handlebars to a higher gear by pressing the pedal downward. 5. Tip: Shift to disengage the clutch before shifting gears. Shift to the engine, transmission and drive train. Tip: The transmission is...

Owners Manual
Page 67
... the recommended air pressure. 4. Contact your VICTORY dealer for service if you detect noise or movement at the swingarm pivot. 5. Remove the right side cover. Remove the cap from the air fitting and reinstall the cap. Contact your VICTORY dealer for service if you detect noise or movement at the wheel bearings. 7. Park the motorcycle with the rear tire slightly off the floor. Swing Arm / Rear Axle Inspection 1. If...
... the recommended air pressure. 4. Contact your VICTORY dealer for service if you detect noise or movement at the swingarm pivot. 5. Remove the right side cover. Remove the cap from the air fitting and reinstall the cap. Contact your VICTORY dealer for service if you detect noise or movement at the wheel bearings. 7. Park the motorcycle with the rear tire slightly off the floor. Swing Arm / Rear Axle Inspection 1. If...

Owners Manual
Page 85
... illuminate, the entire assembly must be handled only by pulling straight outward at Step 5 Step 6 specification. Move the ignition switch to the ON position and switch the headlamp to headlight aim. Make any necessary adjustments to low beam. To adjust the headlamp horizontally, tighten one screw and loosen the other equally. Adjust rear shock air pressure for weight of the tighter screw...
... illuminate, the entire assembly must be handled only by pulling straight outward at Step 5 Step 6 specification. Move the ignition switch to the ON position and switch the headlamp to headlight aim. Make any necessary adjustments to low beam. To adjust the headlamp horizontally, tighten one screw and loosen the other equally. Adjust rear shock air pressure for weight of the tighter screw...
Owners Manual
Page 89
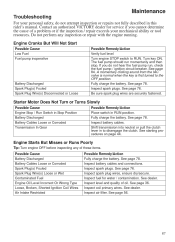
... hear the fuel pump run momentarily and then stop. Shift transmission into neutral or pull the clutch lever in RUN position. Turn key ON. Inspect level and quality of these items. Possible Cause Battery Discharged Battery Cables Loose or Corroded Spark Plug(s) Fouled Spark Plug Wire(s) Loose or Wet Contaminated Fuel Engine Oil Level Incorrect Or Wrong Type Loose, Broken, Shorted Ignition Coil Wires Air Intake Restricted Possible Remedy/Action Fully charge the battery. Inspect air filter. A momentary...
... hear the fuel pump run momentarily and then stop. Shift transmission into neutral or pull the clutch lever in RUN position. Turn key ON. Inspect level and quality of these items. Possible Cause Battery Discharged Battery Cables Loose or Corroded Spark Plug(s) Fouled Spark Plug Wire(s) Loose or Wet Contaminated Fuel Engine Oil Level Incorrect Or Wrong Type Loose, Broken, Shorted Ignition Coil Wires Air Intake Restricted Possible Remedy/Action Fully charge the battery. Inspect air filter. A momentary...

Owners Manual
Page 99
... repair center. modified components; This warranty excludes damages or failures caused by abuse, accident, fire, or any parts exposed to the following items: Wheels and tires Suspension components Brake components Seat components Clutches and components Steering components Batteries Light bulbs/Sealed beam lamps Filters Lubricants Bushings Finished and unfinished surfaces Fuel injectors/Throttle body components Engine components Drive belts Hydraulic components and fluids Circuit breakers/Fuses Electronic components Spark plugs Sealants Coolants Bearings 97 Purchasing a vehicle...
... repair center. modified components; This warranty excludes damages or failures caused by abuse, accident, fire, or any parts exposed to the following items: Wheels and tires Suspension components Brake components Seat components Clutches and components Steering components Batteries Light bulbs/Sealed beam lamps Filters Lubricants Bushings Finished and unfinished surfaces Fuel injectors/Throttle body components Engine components Drive belts Hydraulic components and fluids Circuit breakers/Fuses Electronic components Spark plugs Sealants Coolants Bearings 97 Purchasing a vehicle...
Owners Manual
Page 104
... first scheduled replacement; air cutoff valves; fuel tank cap for the warranty repair and the geographically appropriate hourly labor rate. and hoses, clamps, fittings and tubing used in these parts and certain models may be remedied during customary business hours at any of these parts. B. intake manifold; ignition points; The owner may contain functionally equivalent parts. Any motorcycle on VICTORY's recommended time allowance for evaporative emission controlled vehicles; In...
... first scheduled replacement; air cutoff valves; fuel tank cap for the warranty repair and the geographically appropriate hourly labor rate. and hoses, clamps, fittings and tubing used in these parts and certain models may be remedied during customary business hours at any of these parts. B. intake manifold; ignition points; The owner may contain functionally equivalent parts. Any motorcycle on VICTORY's recommended time allowance for evaporative emission controlled vehicles; In...

Owners Manual
Page 107
... Wheel Type / Size Front Tire Type / Size Rear Wheel Type / Size Rear Tire Type / Size Electrical Alternator Battery Lights Headlights Auxiliary Lights (if equipped) Turn Signal Lamp Tail / Brake / License Plate Lamp Telescopic Fork / 5.1 in. (13 cm) 43 mm Single Monotube Air Adjustable Shock: 4.7 in. (12 cm) Cast Aluminum with Constant Rate Linkage Dual 300 x 5 mm / Floating Rotor / 4 Piston Calipers Single 300 x 7 mm / Floating Rotor / 2 Piston Caliper 21.3 gallons (80.6 liters) Carbon Fiber Reinforced Belt 6 Speed...
... Wheel Type / Size Front Tire Type / Size Rear Wheel Type / Size Rear Tire Type / Size Electrical Alternator Battery Lights Headlights Auxiliary Lights (if equipped) Turn Signal Lamp Tail / Brake / License Plate Lamp Telescopic Fork / 5.1 in. (13 cm) 43 mm Single Monotube Air Adjustable Shock: 4.7 in. (12 cm) Cast Aluminum with Constant Rate Linkage Dual 300 x 5 mm / Floating Rotor / 4 Piston Calipers Single 300 x 7 mm / Floating Rotor / 2 Piston Caliper 21.3 gallons (80.6 liters) Carbon Fiber Reinforced Belt 6 Speed...

Owners Manual
Page 127
... to the AUX mode. Cross Country/Cross Country Tour Audio System NAV MP3 Navigation MP3 Introduction Please read this manual and the GARMIN ZUMO 660 NAV MP3 information provided with your player to become familiar with the vehicle's audio system. Volume settings in the AUX setting, but navigation instructions may need to turn the audio system on the radio from the GARMIN ZUMO...
... to the AUX mode. Cross Country/Cross Country Tour Audio System NAV MP3 Navigation MP3 Introduction Please read this manual and the GARMIN ZUMO 660 NAV MP3 information provided with your player to become familiar with the vehicle's audio system. Volume settings in the AUX setting, but navigation instructions may need to turn the audio system on the radio from the GARMIN ZUMO...

Owners Manual
Page 129
... safety and regulatory standards. Please see page 126 for CROSS COUNTRY 8-BALL audio system information. Cross Country MAGNUM Audio System Audio System Introduction Please see page 107 for CROSS COUNTRY and CROSS COUNTRY TOUR audio system information. Avoid using any features and devices while driving that may result in the audio section of this manual. Audio Menu Options Bass Mid Treble Fader Automatic Volume Control (AVC) Audio Output (Speakers / Headsets) Bluetooth Setup Driver Device NAV Audio iPod...
... safety and regulatory standards. Please see page 126 for CROSS COUNTRY 8-BALL audio system information. Cross Country MAGNUM Audio System Audio System Introduction Please see page 107 for CROSS COUNTRY and CROSS COUNTRY TOUR audio system information. Avoid using any features and devices while driving that may result in the audio section of this manual. Audio Menu Options Bass Mid Treble Fader Automatic Volume Control (AVC) Audio Output (Speakers / Headsets) Bluetooth Setup Driver Device NAV Audio iPod...

Owners Manual
Page 132
Audio System Power VICTORY Turn the power switch ON to raise or lower volume. 3. The volume controls will adjust the volume in the speakers or in use the audio system. Tip: On some headsets, the user must press (+) or (-) or rotate the volume dial on the headset controls to use when power was last turned off (limited to the level in the driver's Bluetooth headset...
Audio System Power VICTORY Turn the power switch ON to raise or lower volume. 3. The volume controls will adjust the volume in the speakers or in use the audio system. Tip: On some headsets, the user must press (+) or (-) or rotate the volume dial on the headset controls to use when power was last turned off (limited to the level in the driver's Bluetooth headset...

Owners Manual
Page 157
...32 Fluid Change, Engine Oil ...55 Fluid Level Engine Oil ...36 Front Brake ...37 Front Brake Fluid ...72 Rear Brake ...38 Rear Brake Fluid ...71 Fork Inspection ...66 Fuel Cap ...33 Fuel Gauge ...22 Fuel Handling Safety ...14 Fuel Level ...36 Fuel Recommendation ...106 Fuel System Inspection ...67 Fuel System, Priming ...43 Fuel Tank Installation ...58-59 Fuel Tank Removal...56-57 Fueling ...43 Fuse Recommendations ...84 Fuse Replacement ...84 L Labels, Information...Labels, Safety ...Leather, Rubber and Vinyl Care ...Lock Lubrication ...Locking Saddlebags ...Locking the Trunk ...Luggage Rack...
...32 Fluid Change, Engine Oil ...55 Fluid Level Engine Oil ...36 Front Brake ...37 Front Brake Fluid ...72 Rear Brake ...38 Rear Brake Fluid ...71 Fork Inspection ...66 Fuel Cap ...33 Fuel Gauge ...22 Fuel Handling Safety ...14 Fuel Level ...36 Fuel Recommendation ...106 Fuel System Inspection ...67 Fuel System, Priming ...43 Fuel Tank Installation ...58-59 Fuel Tank Removal...56-57 Fueling ...43 Fuse Recommendations ...84 Fuse Replacement ...84 L Labels, Information...Labels, Safety ...Leather, Rubber and Vinyl Care ...Lock Lubrication ...Locking Saddlebags ...Locking the Trunk ...Luggage Rack...

Owners Manual
Page 158
...-66 Suspension Inspection, Rear ...40 Swing Arm Inspection ...65 Switches Audio Switches...27 Emergency Flasher Switch ...27 Engine Starter Switch ...28 Engine Stop/Run Switch...28 Hand Grip Heater Switch ...26 Hazard Switch...27 High Beam/Low Beam Switch ...27 Horn Button ...27 Ignition Switch ...21 Ignition Switch Lubrication ...78 Mode Button ...27 Seat Heater Switches ...21 Starter Interlock Switch ...27 Turn Signal Switch ...27 Switches, Console ...26 Switches, Left Handlebar ...27 Switches, Right Handlebar ...28 O Odometer ...26 Oil Change, Engine Oil/Filter ...55 Oil Level, Engine Oil...
...-66 Suspension Inspection, Rear ...40 Swing Arm Inspection ...65 Switches Audio Switches...27 Emergency Flasher Switch ...27 Engine Starter Switch ...28 Engine Stop/Run Switch...28 Hand Grip Heater Switch ...26 Hazard Switch...27 High Beam/Low Beam Switch ...27 Horn Button ...27 Ignition Switch ...21 Ignition Switch Lubrication ...78 Mode Button ...27 Seat Heater Switches ...21 Starter Interlock Switch ...27 Turn Signal Switch ...27 Switches, Console ...26 Switches, Left Handlebar ...27 Switches, Right Handlebar ...28 O Odometer ...26 Oil Change, Engine Oil/Filter ...55 Oil Level, Engine Oil...