

Owners Manual
Page 27
... uphill at a slow speed. 25 Gear Selector NOTICE: Shifting gears with the engine speed above idle or while the vehicle is left or right to the OFF position to stop switch to the OFF RUN OFF RUN position before attempting to start the engine. FEATURES AND CONTROLS Switches Engine Stop Switch Move the stop switch either left unattended, always place the transmission in PARK and lock the parking brake. Belt Life To extend belt life, use low...
... uphill at a slow speed. 25 Gear Selector NOTICE: Shifting gears with the engine speed above idle or while the vehicle is left or right to the OFF position to stop switch to the OFF RUN OFF RUN position before attempting to start the engine. FEATURES AND CONTROLS Switches Engine Stop Switch Move the stop switch either left unattended, always place the transmission in PARK and lock the parking brake. Belt Life To extend belt life, use low...

Owners Manual
Page 35
... allows engine braking to all four of the ADC 4X4 position • Vehicle speed exceeds 15 mph (25 km/h) • The throttle is open (throttle is applied) • The transmission is shifted to 4X4. Always move the 4X4 switch to ADC 4X4 before switching to neutral or park 33 FEATURES AND CONTROLS All Wheel Drive System Engaging 4X4 The 4X4 switch may be needed. If the rear wheels are...
... allows engine braking to all four of the ADC 4X4 position • Vehicle speed exceeds 15 mph (25 km/h) • The throttle is open (throttle is applied) • The transmission is shifted to 4X4. Always move the 4X4 switch to ADC 4X4 before switching to neutral or park 33 FEATURES AND CONTROLS All Wheel Drive System Engaging 4X4 The 4X4 switch may be needed. If the rear wheels are...

Owners Manual
Page 37
FEATURES AND CONTROLS Instrument Cluster Digital/Analog Gauge Indicator Lamps Lamp Indicates Vehicle Speed Over Temperature Condition When standard mode is selected, speed displays in miles per hour. Neutral High Beam This lamp illuminates when the transmission is in neutral and the ignition key is in kilometers per hour. If the light remains on after starting the engine, the EPS system is set to high beam. This lamp flashes...
FEATURES AND CONTROLS Instrument Cluster Digital/Analog Gauge Indicator Lamps Lamp Indicates Vehicle Speed Over Temperature Condition When standard mode is selected, speed displays in miles per hour. Neutral High Beam This lamp illuminates when the transmission is in neutral and the ignition key is in kilometers per hour. If the light remains on after starting the engine, the EPS system is set to high beam. This lamp flashes...

Owners Manual
Page 39
Gear Display - H = High Gear L = Low Gear N = Neutral R = Reverse Gear P = Park -- = Gear Signal Error (or shifter between gears) 2. Refuel immediately. See your dealer for resetting instructions. 7. 4X4 Display - If the engine is activated. Service Reminder Display - A flashing wrench symbol alerts the operator that the preset service interval has been reached. FEATURES AND CONTROLS Instrument Cluster Digital/Analog Gauge Rider Information Center 1. All segments including the fuel icon will display for resetting...
Gear Display - H = High Gear L = Low Gear N = Neutral R = Reverse Gear P = Park -- = Gear Signal Error (or shifter between gears) 2. Refuel immediately. See your dealer for resetting instructions. 7. 4X4 Display - If the engine is activated. Service Reminder Display - A flashing wrench symbol alerts the operator that the preset service interval has been reached. FEATURES AND CONTROLS Instrument Cluster Digital/Analog Gauge Rider Information Center 1. All segments including the fuel icon will display for resetting...

Owners Manual
Page 44
... to B+ Driver Circuit Grounded SPN 51 51 110 110 110 110 105 105 102 102 102 636 636 84 84 523 523 523 651 651 651 652 652 652 FMI 3 4 3 4 16 0 3 4 3 4 2 8 2 8 2 4 3 2 5 3 4 5 3 4 Intake Air Temperature Sensor Manifold Absolute Pressure Sensor Crankshaft Position Sensor Vehicle Speed Signal Gear Sensor Signal Injector 1 (MAG) (SDI Part Load) Injector 2 (PTO) (SDI Part Load) 42 Diagnostic Codes Component Throttle Position Sensor Engine Temperature Sensor Condition Voltage Too...
... to B+ Driver Circuit Grounded SPN 51 51 110 110 110 110 105 105 102 102 102 636 636 84 84 523 523 523 651 651 651 652 652 652 FMI 3 4 3 4 16 0 3 4 3 4 2 8 2 8 2 4 3 2 5 3 4 5 3 4 Intake Air Temperature Sensor Manifold Absolute Pressure Sensor Crankshaft Position Sensor Vehicle Speed Signal Gear Sensor Signal Injector 1 (MAG) (SDI Part Load) Injector 2 (PTO) (SDI Part Load) 42 Diagnostic Codes Component Throttle Position Sensor Engine Temperature Sensor Condition Voltage Too...

Owners Manual
Page 49
... this owner's manual. Perform regular checks on fluid levels, controls and areas outlined on the dipstick. Read and understand all debris when replacing the belt. 47 Break-In Period The break-in period for a proper break-in period. Do not operate at sustained idle. 5. Engine and Drivetrain Break-in of operation. Fill the fuel tank with vehicle operation and handling. 4. See page 83. Drive...
... this owner's manual. Perform regular checks on fluid levels, controls and areas outlined on the dipstick. Read and understand all debris when replacing the belt. 47 Break-In Period The break-in period for a proper break-in period. Do not operate at sustained idle. 5. Engine and Drivetrain Break-in of operation. Fill the fuel tank with vehicle operation and handling. 4. See page 83. Drive...

Owners Manual
Page 65
... over rough or hilly terrain, reduce speed and cargo weight to extend belt life. 63 Use low forward gear when hauling or towing heavy cargo to maintain stable driving conditions. 4. Never exceed the weight capacities specified for your ATV on the rear rack) and mounted as low as possible. 3. NEVER exceed 10 MPH (16 km/h) when rear cargo loads are above 200 lbs. (91...
... over rough or hilly terrain, reduce speed and cargo weight to extend belt life. 63 Use low forward gear when hauling or towing heavy cargo to maintain stable driving conditions. 4. Never exceed the weight capacities specified for your ATV on the rear rack) and mounted as low as possible. 3. NEVER exceed 10 MPH (16 km/h) when rear cargo loads are above 200 lbs. (91...

Owners Manual
Page 66
... rear rack cargo weight by the amount of tongue weight. • The combination of the vehicle. Always install POLARIS-approved (or equivalent) accessories designed for ATV use. Avoid towing on hitch) must not exceed the maximum weight capacity of rear rack cargo weight and tongue weight must not exceed the rear rack capacity. • The total load (operator, accessories, cargo and weight on inclines. 850 Maximum Towed Load (Level Ground) Maximum Vertical Hitch Weight 1500...
... rear rack cargo weight by the amount of tongue weight. • The combination of the vehicle. Always install POLARIS-approved (or equivalent) accessories designed for ATV use. Avoid towing on hitch) must not exceed the maximum weight capacity of rear rack cargo weight and tongue weight must not exceed the rear rack capacity. • The total load (operator, accessories, cargo and weight on inclines. 850 Maximum Towed Load (Level Ground) Maximum Vertical Hitch Weight 1500...
Owners Manual
Page 82
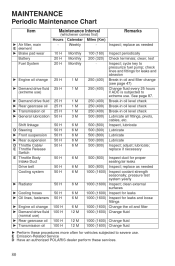
...; Ź D E Shift linkage Steering Front suspension Rear suspension Throttle Cable/ Throttle Release Switch E Throttle Body Intake Duct Drive belt Cooling system Ź Radiator Ź Cooling hoses Ź Oil lines, fasteners Ź Engine oil change (see page 47) Change fluid every 25 hours if ADC is subjected to extreme use ) Ź Rear gearcase oil Ź Transmission oil 1000 (1600) Change fluid 1000 (1600) Change fluid Ź Perform these services. 80 Break-in oil level check Break-in oil level check Break-in oil and filter change Ź Demand drive fluid (normal use .
...; Ź D E Shift linkage Steering Front suspension Rear suspension Throttle Cable/ Throttle Release Switch E Throttle Body Intake Duct Drive belt Cooling system Ź Radiator Ź Cooling hoses Ź Oil lines, fasteners Ź Engine oil change (see page 47) Change fluid every 25 hours if ADC is subjected to extreme use ) Ź Rear gearcase oil Ź Transmission oil 1000 (1600) Change fluid 1000 (1600) Change fluid Ź Perform these services. 80 Break-in oil level check Break-in oil level check Break-in oil and filter change Ź Demand drive fluid (normal use .

Owners Manual
Page 100
... or overturn. Install the wheel nuts and finger-tighten them. 5. Wheel Type All Nut Torque 75 ft-lbs (102 Nm) 98 Lock the parking brake. 3. Place the wheel on the hub with the valve stem toward the outside and rotation arrows on the tire pointing toward forward rotation (if equipped). 4. Lower the vehicle to specification. Torque the wheel nuts to the ground. 6. MAINTENANCE Tires Wheel Installation 1.
... or overturn. Install the wheel nuts and finger-tighten them. 5. Wheel Type All Nut Torque 75 ft-lbs (102 Nm) 98 Lock the parking brake. 3. Place the wheel on the hub with the valve stem toward the outside and rotation arrows on the tire pointing toward forward rotation (if equipped). 4. Lower the vehicle to specification. Torque the wheel nuts to the ground. 6. MAINTENANCE Tires Wheel Installation 1.

Owners Manual
Page 103
... of the lamp. Remove the five (5) headlight pod screws. 2. Lift the pod cover and disconnect the speedometer harnesses from the speedometer. Be sure to cool before servicing. 3. Make sure the tab on the wiring. 4. Install the new lamp. Always make sure lights are adjusted properly for best visibility. Clean lights frequently and replace burned out lamps promptly. CAUTION! If fingers...
... of the lamp. Remove the five (5) headlight pod screws. 2. Lift the pod cover and disconnect the speedometer harnesses from the speedometer. Be sure to cool before servicing. 3. Make sure the tab on the wiring. 4. Install the new lamp. Always make sure lights are adjusted properly for best visibility. Clean lights frequently and replace burned out lamps promptly. CAUTION! If fingers...

Owners Manual
Page 104
... the following procedure to the center of the headlight beam should be adjusted slightly upward or downward. MAINTENANCE Lights High Beam Adjustment The headlight beam can be two inches (5 cm) below the mark on the wall. To adjust the beam, loosen the screw. Position the vehicle on the wall. Start the engine. Observe the headlight aim on a level surface...
... the following procedure to the center of the headlight beam should be adjusted slightly upward or downward. MAINTENANCE Lights High Beam Adjustment The headlight beam can be two inches (5 cm) below the mark on the wall. To adjust the beam, loosen the screw. Position the vehicle on the wall. Start the engine. Observe the headlight aim on a level surface...

Owners Manual
Page 106
Unplug the headlamp from the speedometer. 3. Pull the headlight housing up and out of the pod. 7. Reverse the steps to release it from the headlight mounting tabs. 5. MAINTENANCE Lights Headlight Housing Replacement 1. Remove the five (5) headlight pod screws. 2. Lift the pod cover and disconnect the speedometer harnesses from the wiring harness. 4. Carefully pull the assembly up to install the new housing and reassemble the pod. 104 Use a small screwdriver to remove the o-rings from the locking tabs. 6.
Unplug the headlamp from the speedometer. 3. Pull the headlight housing up and out of the pod. 7. Reverse the steps to release it from the headlight mounting tabs. 5. MAINTENANCE Lights Headlight Housing Replacement 1. Remove the five (5) headlight pod screws. 2. Lift the pod cover and disconnect the speedometer harnesses from the wiring harness. 4. Carefully pull the assembly up to install the new housing and reassemble the pod. 104 Use a small screwdriver to remove the o-rings from the locking tabs. 6.

Owners Manual
Page 107
.... Remove the headlamp and install the new headlamp. 3. Install the new lamp. 4. MAINTENANCE Lights Lower Headlamp Replacement 1. Turn the headlight harness clockwise to remove it. 3. Remove the harness connector from the headlight assembly. 2. Reinstall the harness connector. 5. Harness Taillight/Brakelight Lamp Replacement Taillight 105 Turn the back of the headlight harness counter-clockwise and pull the harness assembly away from the back of the light assembly. 2. Reinstall the harness assembly into the headlight assembly. 4.
.... Remove the headlamp and install the new headlamp. 3. Install the new lamp. 4. MAINTENANCE Lights Lower Headlamp Replacement 1. Turn the headlight harness clockwise to remove it. 3. Remove the harness connector from the headlight assembly. 2. Reinstall the harness connector. 5. Harness Taillight/Brakelight Lamp Replacement Taillight 105 Turn the back of the headlight harness counter-clockwise and pull the harness assembly away from the back of the light assembly. 2. Reinstall the harness assembly into the headlight assembly. 4.
Owners Manual
Page 124
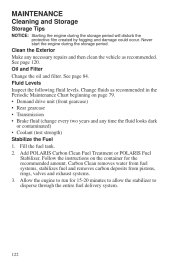
... water from fuel systems, stabilizes fuel and removes carbon deposits from pistons, rings, valves and exhaust systems. 3. Change fluids as recommended. Oil and Filter Change the oil and filter. See page 84. Follow the instructions on page 79. • Demand drive unit (front gearcase) • Rear gearcase • Transmission • Brake fluid (change every two years and any necessary repairs and then clean the vehicle as recommended in the Periodic Maintenance...
... water from fuel systems, stabilizes fuel and removes carbon deposits from pistons, rings, valves and exhaust systems. 3. Change fluids as recommended. Oil and Filter Change the oil and filter. See page 84. Follow the instructions on page 79. • Demand drive unit (front gearcase) • Rear gearcase • Transmission • Brake fluid (change every two years and any necessary repairs and then clean the vehicle as recommended in the Periodic Maintenance...
Owners Manual
Page 132
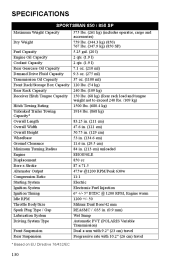
... x 71.5 Alternator Output 475w @1200 RPM/Peak 630w Compression Ratio 11:1 Starting System Electric Ignition System Electronic Fuel Injection Ignition Timing 6° +/- 5° BTDC @ 1200 RPM, Engine warm Idle RPM 1200 +/- 50 Throttle Body/Size Mikuni Dual Bore/42 mm Spark Plug Type / Gap REA6MC / .035 in. (0.9 mm) Lubrication System Wet Sump Driving System Type Automatic PVT (POLARIS Variable Transmission) Front Suspension Dual a-arm with 9.2" (23 cm) travel Rear Suspension Progressive rate with...
... x 71.5 Alternator Output 475w @1200 RPM/Peak 630w Compression Ratio 11:1 Starting System Electric Ignition System Electronic Fuel Injection Ignition Timing 6° +/- 5° BTDC @ 1200 RPM, Engine warm Idle RPM 1200 +/- 50 Throttle Body/Size Mikuni Dual Bore/42 mm Spark Plug Type / Gap REA6MC / .035 in. (0.9 mm) Lubrication System Wet Sump Driving System Type Automatic PVT (POLARIS Variable Transmission) Front Suspension Dual a-arm with 9.2" (23 cm) travel Rear Suspension Progressive rate with...
Owners Manual
Page 134
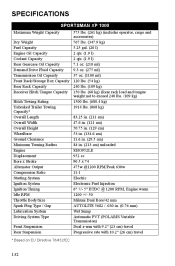
... Alternator Output 475w @1200 RPM/Peak 630w Compression Ratio 11:1 Starting System Electric Ignition System Electronic Fuel Injection Ignition Timing 6° +/- 5° BTDC @ 1200 RPM, Engine warm Idle RPM 1200 +/- 50 Throttle Body/Size Mikuni Dual Bore/42 mm Spark Plug Type / Gap AUTOLITE 5682 / .030 in. (0.76 mm) Lubrication System Wet Sump Driving System Type Automatic PVT (POLARIS Variable Transmission) Front Suspension Dual a-arm with 9.2" (23 cm) travel Rear Suspension Progressive rate...
... Alternator Output 475w @1200 RPM/Peak 630w Compression Ratio 11:1 Starting System Electric Ignition System Electronic Fuel Injection Ignition Timing 6° +/- 5° BTDC @ 1200 RPM, Engine warm Idle RPM 1200 +/- 50 Throttle Body/Size Mikuni Dual Bore/42 mm Spark Plug Type / Gap AUTOLITE 5682 / .030 in. (0.76 mm) Lubrication System Wet Sump Driving System Type Automatic PVT (POLARIS Variable Transmission) Front Suspension Dual a-arm with 9.2" (23 cm) travel Rear Suspension Progressive rate...

Owners Manual
Page 138
... safety information and notices regarding your vehicle. You must nonetheless register your product under your name and address with a local POLARIS dealer in your new country immediately after you move . however, you may be authorized to perform the warranty repair. You may not give authorization for export from any authorized POLARIS dealer that have any POLARIS Servicing Dealer to perform warranty service...
... safety information and notices regarding your vehicle. You must nonetheless register your product under your name and address with a local POLARIS dealer in your new country immediately after you move . however, you may be authorized to perform the warranty repair. You may not give authorization for export from any authorized POLARIS dealer that have any POLARIS Servicing Dealer to perform warranty service...
Owners Manual
Page 140
... is extended for at the time it to fail to the following systems: • Air-induction system • Fuel system • Ignition system • Exhaust gas recirculation systems The following parts are also considered emission-related components for a period of 250 hours of engine operation, 2500 kilometers (1550 miles) of systems whose failure does not increase the vehicle's regulated emissions. WARRANTY U.S.A. POLARIS warrants...
... is extended for at the time it to fail to the following systems: • Air-induction system • Fuel system • Ignition system • Exhaust gas recirculation systems The following parts are also considered emission-related components for a period of 250 hours of engine operation, 2500 kilometers (1550 miles) of systems whose failure does not increase the vehicle's regulated emissions. WARRANTY U.S.A. POLARIS warrants...

Owners Manual
Page 148
... Switch ...24 Rider Information Center...36-41 Riding Area ...50 Riding Gear ...8-9 S Safe Operation Practices ...49 Safety Labels ...20-23 Safety Training ...7 Safety Warnings...10-19 Safety, Winch Maintenance...76 Severe Use ...78 Shock Loading the Winch ...74-75 Side Panel Removal...95 Sidehilling ...56 Signal Words ...4 Spark Arrester ...109 Spark Plug Inspection ...106-107 Spark Plug Recommendations...106 Spark Plugs ...106-107 Speedometer ...34 Spring Adjustment, Shock ...113 Starting the Engine ...51 Steering Assembly...
... Switch ...24 Rider Information Center...36-41 Riding Area ...50 Riding Gear ...8-9 S Safe Operation Practices ...49 Safety Labels ...20-23 Safety Training ...7 Safety Warnings...10-19 Safety, Winch Maintenance...76 Severe Use ...78 Shock Loading the Winch ...74-75 Side Panel Removal...95 Sidehilling ...56 Signal Words ...4 Spark Arrester ...109 Spark Plug Inspection ...106-107 Spark Plug Recommendations...106 Spark Plugs ...106-107 Speedometer ...34 Spring Adjustment, Shock ...113 Starting the Engine ...51 Steering Assembly...