

Owners Manual
Page 13
... riding position may result if hands, feet, or clothing become entangled in a position that the hood and side panels are installed and securely latched before starting the engine. We recommend having your vehicle. 11 Rider positions may vary with the engine running boards and both hands on the handlebar grips for proper throttle, brake and steering control. Always ride in the track. WARNING!
... riding position may result if hands, feet, or clothing become entangled in a position that the hood and side panels are installed and securely latched before starting the engine. We recommend having your vehicle. 11 Rider positions may vary with the engine running boards and both hands on the handlebar grips for proper throttle, brake and steering control. Always ride in the track. WARNING!

Owners Manual
Page 23
... a passenger. 21 Intake Silencer Do not operate the engine with the drive belt removed. Each clutch is dynamically balanced before attempting to service the clutches. Cold Weather Drive-Away Whenever your body weight. The clutch is achieved by your dealer. Any servicing that rotates at high speeds. Clutches Do not attempt to drive. Maneuverability While much control and maneuverability is achieved through the steering system and skis, maximum control is...
... a passenger. 21 Intake Silencer Do not operate the engine with the drive belt removed. Each clutch is dynamically balanced before attempting to service the clutches. Cold Weather Drive-Away Whenever your body weight. The clutch is achieved by your dealer. Any servicing that rotates at high speeds. Clutches Do not attempt to drive. Maneuverability While much control and maneuverability is achieved through the steering system and skis, maximum control is...
Owners Manual
Page 28
... terrain changes, to avoid unexpected obstacles, or to stop the engine. Be seated and in position to control the vehicle. • When operating on approved models only) reduce speed and allow extra space to turn or stop. • To maintain vehicle control on the top of high speeds. Do not leave brake engaged for more than five minutes. • Before starting engine, check throttle, brake, and steering...
... terrain changes, to avoid unexpected obstacles, or to stop the engine. Be seated and in position to control the vehicle. • When operating on approved models only) reduce speed and allow extra space to turn or stop. • To maintain vehicle control on the top of high speeds. Do not leave brake engaged for more than five minutes. • Before starting engine, check throttle, brake, and steering...

Owners Manual
Page 32
... or the approximate weight of the rider on a level surface with the headlight approximately 25 feet (7.6 m) from the floor to lower the beam. Start the engine. The most intense part of the headlight and make a mark on Raise the wall. Turn the adjuster counterclockwise to high beam. 5. Turn the adjuster knob clockwise to the center of the headlight beam should be...
... or the approximate weight of the rider on a level surface with the headlight approximately 25 feet (7.6 m) from the floor to lower the beam. Start the engine. The most intense part of the headlight and make a mark on Raise the wall. Turn the adjuster counterclockwise to high beam. 5. Turn the adjuster knob clockwise to the center of the headlight beam should be...

Owners Manual
Page 73
... desired position. 4. Torque: 70 in the image. Loosen the brake master cylinder (A) mounting screws and move the control block slightly to the left or right to specification in the sequence shown in -lbs (7.9 Nm) 71 Do not damage the brake light signal wire. 2. CAUTION! Tighten the clamp screws to specification beginning with the front screw first, then the screw next...
... desired position. 4. Torque: 70 in the image. Loosen the brake master cylinder (A) mounting screws and move the control block slightly to the left or right to specification in the sequence shown in -lbs (7.9 Nm) 71 Do not damage the brake light signal wire. 2. CAUTION! Tighten the clamp screws to specification beginning with the front screw first, then the screw next...

Owners Manual
Page 84
... Before Starting the Engine beginning on page 78. Auxiliary Engine Stop Switch Check the auxiliary shut-off switch for proper operation. NOTE: If the brake light does not illuminate when the brake lever is turned to allow restarting. Replace the fuse. Tether Switch (if equipped) If your surroundings. Pull it is running. See page 124. Ignition Key Switch Make sure the engine stops when the ignition key switch is pulled...
... Before Starting the Engine beginning on page 78. Auxiliary Engine Stop Switch Check the auxiliary shut-off switch for proper operation. NOTE: If the brake light does not illuminate when the brake lever is turned to allow restarting. Replace the fuse. Tether Switch (if equipped) If your surroundings. Pull it is running. See page 124. Ignition Key Switch Make sure the engine stops when the ignition key switch is pulled...

Owners Manual
Page 85
... turned off Vehicle / IDD power on Activates starter motor (if equipped) If equipped with a battery. The IDD is not dependent on the battery while the engine is running, but the IDD will turn off . SYSTEM Ignition Switch Brake Auxiliary Engine Stop Switch Throttle Release Switch Tether Switch (Option) WHAT IT DOES Interrupts ignition circuit Slows jackshaft Interrupts ignition circuit Enables Engine Control Unit (ECU) software RPM limit Interrupts ignition circuit 83 Snowmobiles equipped with electric start...
... turned off Vehicle / IDD power on Activates starter motor (if equipped) If equipped with a battery. The IDD is not dependent on the battery while the engine is running, but the IDD will turn off . SYSTEM Ignition Switch Brake Auxiliary Engine Stop Switch Throttle Release Switch Tether Switch (Option) WHAT IT DOES Interrupts ignition circuit Slows jackshaft Interrupts ignition circuit Enables Engine Control Unit (ECU) software RPM limit Interrupts ignition circuit 83 Snowmobiles equipped with electric start...
Owners Manual
Page 87
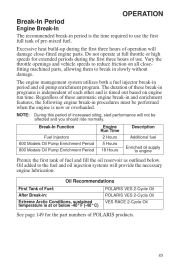
Vary the throttle openings and vehicle speeds to reduce friction on engine run time. Break-In Function Fuel Injectors 600 Models Oil Pump Enrichment Period 800 Models Oil Pump Enrichment Period Engine Run Time 2 Hours 5 Hours 18 Hours Description Additional fuel Enriched oil supply to engine Premix the first tank of pre-mixed fuel. OPERATION Break-In Period Engine Break-In The recommended break-in period is timed out based on all closefitting machined parts...
Vary the throttle openings and vehicle speeds to reduce friction on engine run time. Break-In Function Fuel Injectors 600 Models Oil Pump Enrichment Period 800 Models Oil Pump Enrichment Period Engine Run Time 2 Hours 5 Hours 18 Hours Description Additional fuel Enriched oil supply to engine Premix the first tank of pre-mixed fuel. OPERATION Break-In Period Engine Break-In The recommended break-in period is timed out based on all closefitting machined parts...

Owners Manual
Page 98
.... WARNING! Always remove the drive belt from a disabled snowmobile before towing, and have no braking power and can result in serious injury or death. Remove the key and cover the snowmobile. If the snowmobile becomes inoperable and must be suspended approximately 4 inches (10 cm) off the ground. Objects towed with a rope. WARNING! OPERATION Daily Storage At the end of each ride, park...
.... WARNING! Always remove the drive belt from a disabled snowmobile before towing, and have no braking power and can result in serious injury or death. Remove the key and cover the snowmobile. If the snowmobile becomes inoperable and must be suspended approximately 4 inches (10 cm) off the ground. Objects towed with a rope. WARNING! OPERATION Daily Storage At the end of each ride, park...
Owners Manual
Page 99
... a factory-installed emissions information hangtag. If your snowmobile is equipped at the time of your snowmobile. Owner's Responsibilities Please read the Snowmobile Engine Emissions Limited Warranty, and read the maintenance section of sale with a check engine light and it comes on, you must not be removed, even after you contact an authorized POLARIS dealer to perform any service that apply to this vehicle...
... a factory-installed emissions information hangtag. If your snowmobile is equipped at the time of your snowmobile. Owner's Responsibilities Please read the Snowmobile Engine Emissions Limited Warranty, and read the maintenance section of sale with a check engine light and it comes on, you must not be removed, even after you contact an authorized POLARIS dealer to perform any service that apply to this vehicle...

Owners Manual
Page 125
If an LED fails to illuminate in either the headlight or taillight, the entire assembly must be replaced. Please see your POLARIS dealer. Headlight Taillight 123 MAINTENANCE Lights The headlight and taillight assemblies feature LED elements and are not serviceable.
If an LED fails to illuminate in either the headlight or taillight, the entire assembly must be replaced. Please see your POLARIS dealer. Headlight Taillight 123 MAINTENANCE Lights The headlight and taillight assemblies feature LED elements and are not serviceable.

Owners Manual
Page 126
... amperage rating. Replace the fuse. Repair or replace any damaged components before replacing the fuse. 124 See page 124. NOTICE: Always replace a blown fuse with electric start or an IDD have caused the blown fuse, then replace the fuse. KEY ON power supplies battery voltage to verify it is protected by a 2-amp accessory power fuse located in the protective bag above the clutch cover. If the IDD does not turn on the electric start wire harness next...
... amperage rating. Replace the fuse. Repair or replace any damaged components before replacing the fuse. 124 See page 124. NOTICE: Always replace a blown fuse with electric start or an IDD have caused the blown fuse, then replace the fuse. KEY ON power supplies battery voltage to verify it is protected by a 2-amp accessory power fuse located in the protective bag above the clutch cover. If the IDD does not turn on the electric start wire harness next...

Owners Manual
Page 166
...87 oxygenated minimum) 164 SPECIFICATIONS 800 SWITCHBACK PRO-S Capacities and Dimensions Body Style Rider Capacity Coolant Capacity Chaincase Oil Capacity Fuel Tank Capacity Height Length Estimated Dry Weight Oil Capacity Designed Width Ski Center Distance Brake Type Fluid Drive Clutch Center Distance Drive Belt Type Projected Width Drive / Driven Clutches Reverse Front / Rear Travel Engine Displacement Cylinders Bore x Stroke (mm) Alternator Output Throttle Body Oil Injection Throttle Body Bore Size Idle RPM Operating RPM Thermostat Opening Temp Ignition Type Ignition Timing Spark Plug / Gap...
...87 oxygenated minimum) 164 SPECIFICATIONS 800 SWITCHBACK PRO-S Capacities and Dimensions Body Style Rider Capacity Coolant Capacity Chaincase Oil Capacity Fuel Tank Capacity Height Length Estimated Dry Weight Oil Capacity Designed Width Ski Center Distance Brake Type Fluid Drive Clutch Center Distance Drive Belt Type Projected Width Drive / Driven Clutches Reverse Front / Rear Travel Engine Displacement Cylinders Bore x Stroke (mm) Alternator Output Throttle Body Oil Injection Throttle Body Bore Size Idle RPM Operating RPM Thermostat Opening Temp Ignition Type Ignition Timing Spark Plug / Gap...

Owners Manual
Page 168
SPECIFICATIONS 800 SWITCHBACK ADVENTURE Capacities and Dimensions Body Style Rider Capacity Coolant Capacity Chaincase Oil Capacity Fuel Tank Capacity Height Length Estimated Dry Weight Oil Capacity Designed Width Ski Center Distance Brake Type Fluid Drive Clutch Center Distance Drive Belt Type Projected Width Drive / Driven Clutches Reverse Front / Rear Travel Engine Displacement Cylinders Bore x Stroke (mm) Alternator Output Throttle Body Oil Injection Throttle Body Bore Size Idle RPM Operating RPM Thermostat Opening Temp Ignition Type Ignition Timing Spark Plug / Gap Recommended Fuel Octane...
SPECIFICATIONS 800 SWITCHBACK ADVENTURE Capacities and Dimensions Body Style Rider Capacity Coolant Capacity Chaincase Oil Capacity Fuel Tank Capacity Height Length Estimated Dry Weight Oil Capacity Designed Width Ski Center Distance Brake Type Fluid Drive Clutch Center Distance Drive Belt Type Projected Width Drive / Driven Clutches Reverse Front / Rear Travel Engine Displacement Cylinders Bore x Stroke (mm) Alternator Output Throttle Body Oil Injection Throttle Body Bore Size Idle RPM Operating RPM Thermostat Opening Temp Ignition Type Ignition Timing Spark Plug / Gap Recommended Fuel Octane...

Owners Manual
Page 174
... to engine Plugged fuel filter or tank pick-up sock Incorrect clutching Engine continually backfires Faulty plug(s) Fuel System Incorrect throttle freeplay or faulty switch Engine requires more than normal pulls to start Poor fuel Not enough fuel getting to nonethanol fuel at all times for spark. No fuel to engine Poor engine compression Engine lacks power Fouled or defective spark plug(s) Fuel filter (loss of high RPM power) Plugged fuel filter or tank pick-up sock • Replace with fresh winter fuel. •...
... to engine Plugged fuel filter or tank pick-up sock Incorrect clutching Engine continually backfires Faulty plug(s) Fuel System Incorrect throttle freeplay or faulty switch Engine requires more than normal pulls to start Poor fuel Not enough fuel getting to nonethanol fuel at all times for spark. No fuel to engine Poor engine compression Engine lacks power Fouled or defective spark plug(s) Fuel filter (loss of high RPM power) Plugged fuel filter or tank pick-up sock • Replace with fresh winter fuel. •...

Owners Manual
Page 181
... are traveling within the country where your product. Upon residence verification, the servicing dealer will be authorized to perform the warranty repair. If you purchase from any authorized POLARIS dealer that you receive safety information and notices regarding your vehicle requires warranty service, you use any POLARIS Servicing Dealer to perform warranty service. You must be requested from a private party: If you move to...
... are traveling within the country where your product. Upon residence verification, the servicing dealer will be authorized to perform the warranty repair. If you purchase from any authorized POLARIS dealer that you receive safety information and notices regarding your vehicle requires warranty service, you use any POLARIS Servicing Dealer to perform warranty service. You must be requested from a private party: If you move to...

Owners Manual
Page 183
... the vehicle's regulated emissions. Repairing or replacing other components not covered by this emissions-certified vehicle starts on the date the vehicle is free from the date of the vehicle owner. POLARIS warrants that the vehicle is first purchased and continues for evaporative emissions Fuel Tank Fuel Cap Fuel Line Fuel Line Fittings Clamps* Pressure Relief Valves* Control Valves* Control Solenoids* Electronic Controls Vacuum Control Diaphragms* Control Cables* Control Linkages* Purge Valves Vapor Hoses Liquid/Vapor Separator Carbon Canister Canister Mounting...
... the vehicle's regulated emissions. Repairing or replacing other components not covered by this emissions-certified vehicle starts on the date the vehicle is free from the date of the vehicle owner. POLARIS warrants that the vehicle is first purchased and continues for evaporative emissions Fuel Tank Fuel Cap Fuel Line Fuel Line Fittings Clamps* Pressure Relief Valves* Control Valves* Control Solenoids* Electronic Controls Vacuum Control Diaphragms* Control Cables* Control Linkages* Purge Valves Vapor Hoses Liquid/Vapor Separator Carbon Canister Canister Mounting...

Owners Manual
Page 188
... Engine Protection, Storage ...148 Engine Restarting ...84 Engine Safety...11 Engine Serial Number ...8 Engine Starting ...84 Engine Stop Switch ...91 Environment Preservation ...6 Exhaust System ...118 Extended Idle Engine Shutoff ...39 C Carbide Skags ...75 Chaincase Gearing ...75 Chaincase Oil...108-111 Cleaning for Matte Finishes...146 Cleaning/Preservation, Storage ...147 Clutch Alignment Offset ...125 Clutch Safety ...21 Clutch System ...125-129 Clutch/Drive System Care, Storage 148 Cold Weather Drive-Away ...21 Constant Power Fuse ...124 Control Arm...
... Engine Protection, Storage ...148 Engine Restarting ...84 Engine Safety...11 Engine Serial Number ...8 Engine Starting ...84 Engine Stop Switch ...91 Environment Preservation ...6 Exhaust System ...118 Extended Idle Engine Shutoff ...39 C Carbide Skags ...75 Chaincase Gearing ...75 Chaincase Oil...108-111 Cleaning for Matte Finishes...146 Cleaning/Preservation, Storage ...147 Clutch Alignment Offset ...125 Clutch Safety ...21 Clutch System ...125-129 Clutch/Drive System Care, Storage 148 Cold Weather Drive-Away ...21 Constant Power Fuse ...124 Control Arm...

Owners Manual
Page 189
... Deep Snow...19 Operator Safety ...9-23 Overheating, Engine ...38-39 G Guide, Suspension Set-Up ...55-66 H Handlebar Adjustments...67-69 Handlebar Angle ...69 Handlebar Component Fasteners ...70 Handlebar Component Locations ...72 Handlebar Control Adjustment, Left 71 Headlight Replacement...123 High RPM/Voltage ...32 Hood ...104 Hood Removal / Installation ...105 P Parking Brake Lever Lock ...80 Passenger's Responsibilities ...15 Playback Function ...45 Polaris Products and Part Numbers...
... Deep Snow...19 Operator Safety ...9-23 Overheating, Engine ...38-39 G Guide, Suspension Set-Up ...55-66 H Handlebar Adjustments...67-69 Handlebar Angle ...69 Handlebar Component Fasteners ...70 Handlebar Component Locations ...72 Handlebar Control Adjustment, Left 71 Headlight Replacement...123 High RPM/Voltage ...32 Hood ...104 Hood Removal / Installation ...105 P Parking Brake Lever Lock ...80 Passenger's Responsibilities ...15 Playback Function ...45 Polaris Products and Part Numbers...

Owners Manual
Page 190
... Set-Up Guide, Suspension ...55-66 Shock Air Pressure, Rear Track (if equipped) ...64-65 Shock Lubrication, Rear Shock ...108 Side Panel Fasteners ...81 Side Panels...104 Side Panels (Opening/Removing) . 104 Signal Words ...9 Skags, Carbide ...75 Ski Alignment ...135 Ski Skags ...136 Ski Toe Settings...135 Slide Rail and Track Cooling ...87 Snow Conditions ...19 Spark Plug Condition...114 Spark Plug Inspection ...114 Spark Plug Recommendations...113 Spark Plugs ...113-114 Specifications/Clutching 600 RUSH...
... Set-Up Guide, Suspension ...55-66 Shock Air Pressure, Rear Track (if equipped) ...64-65 Shock Lubrication, Rear Shock ...108 Side Panel Fasteners ...81 Side Panels...104 Side Panels (Opening/Removing) . 104 Signal Words ...9 Skags, Carbide ...75 Ski Alignment ...135 Ski Skags ...136 Ski Toe Settings...135 Slide Rail and Track Cooling ...87 Snow Conditions ...19 Spark Plug Condition...114 Spark Plug Inspection ...114 Spark Plug Recommendations...113 Spark Plugs ...113-114 Specifications/Clutching 600 RUSH...