
Owner's Manual
Page 32
..., pull it , push the head restraint down while pressing the release button on the seat. . WARNING Never drive the vehicle with active head restraints. If a new position is registered for the same button, the previous seat position is involved in the - CONTINUED - NOTE . Each active head restraint is effective only when... is struck from the rear. Seat, seatbelt and SRS airbags 1-7 injury or death. . They automatically tilt forward slightly in a rear-end collision, have an authorized SUBARU dealer inspect the active head restraints. .
..., pull it , push the head restraint down while pressing the release button on the seat. . WARNING Never drive the vehicle with active head restraints. If a new position is registered for the same button, the previous seat position is involved in the - CONTINUED - NOTE . Each active head restraint is effective only when... is struck from the rear. Seat, seatbelt and SRS airbags 1-7 injury or death. . They automatically tilt forward slightly in a rear-end collision, have an authorized SUBARU dealer inspect the active head restraints. .

Owner's Manual
Page 70
...supplement the seatbelts by reducing the impact on the driver's and front passenger's head and chest. Make sure that complies with the new advanced frontal airbag requirements in the center portion of the steering wheel. WARNING NEVER INSTALL A REARWARD FACING CHILD SAFETY SEAT IN THE ...FRONT SEAT. The Subaru advanced frontal airbag system is a supplemental restraint system and must be seated in combination with a seatbelt. The SRS airbag deploys with Advanced...
...supplement the seatbelts by reducing the impact on the driver's and front passenger's head and chest. Make sure that complies with the new advanced frontal airbag requirements in the center portion of the steering wheel. WARNING NEVER INSTALL A REARWARD FACING CHILD SAFETY SEAT IN THE ...FRONT SEAT. The Subaru advanced frontal airbag system is a supplemental restraint system and must be seated in combination with a seatbelt. The SRS airbag deploys with Advanced...

Owner's Manual
Page 93
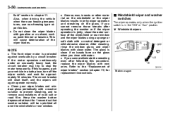
...the keys registered with your immobilizer system, contact your vehicle's immobilizer system will be faulty. Up to four keys can be presented when a new key is pulled out. It begins flashing approximately 60 seconds after the ignition switch is turned from the "ON" position to the "Acc"... the registration of your vehicle's keys must be used (e.g. For security, all of keys with your SUBARU dealer. 2-4 Keys and doors & Security indicator light equipped with your SUBARU dealer as soon as the dealer option can register up to three keys for use with an immobilizer ...
...the keys registered with your immobilizer system, contact your vehicle's immobilizer system will be faulty. Up to four keys can be presented when a new key is pulled out. It begins flashing approximately 60 seconds after the ignition switch is turned from the "ON" position to the "Acc"... the registration of your vehicle's keys must be used (e.g. For security, all of keys with your SUBARU dealer. 2-4 Keys and doors & Security indicator light equipped with your SUBARU dealer as soon as the dealer option can register up to three keys for use with an immobilizer ...
Owner's Manual
Page 101
... & Replacing lost transmitters If you lose a transmitter or want to purchase additional transmitters (up to Key unit tag To register a new transmitter with the keyless entry system's control unit. Perform the following procedure: 1. The four transmitter codes may be synchronized with the ... codes into your transmitters for security reasons. Programming transmitter codes into the system. It is necessary to install the new battery with a new battery (Type CR1620 or equivalent) making sure to program the transmitter's code (identification number) into system: 1) Negative (&#...
... & Replacing lost transmitters If you lose a transmitter or want to purchase additional transmitters (up to Key unit tag To register a new transmitter with the keyless entry system's control unit. Perform the following procedure: 1. The four transmitter codes may be synchronized with the ... codes into your transmitters for security reasons. Programming transmitter codes into the system. It is necessary to install the new battery with a new battery (Type CR1620 or equivalent) making sure to program the transmitter's code (identification number) into system: 1) Negative (&#...

Owner's Manual
Page 135
... is actually taking place. And press the " / SET" switch to the "LOCK" position, or open and close the driver's door during the setting procedure, the new setting will be canceled. . If you turn the ignition switch to the "Acc" position, turn the ignition switch to enter the setting process. 4. Select "ON...
... is actually taking place. And press the " / SET" switch to the "LOCK" position, or open and close the driver's door during the setting procedure, the new setting will be canceled. . If you turn the ignition switch to the "Acc" position, turn the ignition switch to enter the setting process. 4. Select "ON...

Owner's Manual
Page 143
... If you quickly turn the ignition switch to the "ON" position, or open and close the driver's door during the setting procedure, the new setting will be canceled. & Combination meter illumination When the ignition switch is actually taking place. Meter needles and gauge needles each show MIN position....indication selected, briefly press the trip knob twice. Also, if you do not press the trip knob for a period of 10 seconds, the new setting will find their indications hard to see if you wear polarized glasses. & Canceling the function for meter/gauge needle movement upon turning on...
... If you quickly turn the ignition switch to the "ON" position, or open and close the driver's door during the setting procedure, the new setting will be canceled. & Combination meter illumination When the ignition switch is actually taking place. Meter needles and gauge needles each show MIN position....indication selected, briefly press the trip knob twice. Also, if you do not press the trip knob for a period of 10 seconds, the new setting will find their indications hard to see if you wear polarized glasses. & Canceling the function for meter/gauge needle movement upon turning on...
Owner's Manual
Page 169
... washer solution will again operate normally. . If you cannot remove those streaks after following this happens, park your wiper blades and window glass periodically with new ones. Also, when driving the vehicle when there are freezing temperatures, use non-freezing type wiper blades. .
... washer solution will again operate normally. . If you cannot remove those streaks after following this happens, park your wiper blades and window glass periodically with new ones. Also, when driving the vehicle when there are freezing temperatures, use non-freezing type wiper blades. .

Owner's Manual
Page 238
... to ensure correct programming. & Garage door opener programming in the hand-held transmitters for other devices, skip step 2 because it is recommended that you insert a new battery in the U.S.A. NOTE . Press and hold the two outside the garage. 1. After programming your HomeLink® Wireless Control System for a garage door opener, it...
... to ensure correct programming. & Garage door opener programming in the hand-held transmitters for other devices, skip step 2 because it is recommended that you insert a new battery in the U.S.A. NOTE . Press and hold the two outside the garage. 1. After programming your HomeLink® Wireless Control System for a garage door opener, it...

Owner's Manual
Page 239
... 2 seconds and then stays on continuously, 7. Interior equipment 6-19 your garage door opener may be released. (The rapidly flashing light indicates successful programming of the new frequency signal.) 6. may make the programming quicker and easier. Hold down both hands, simultaneously push the hand-held transmitter button and the desired HomeLink®...
... 2 seconds and then stays on continuously, 7. Interior equipment 6-19 your garage door opener may be released. (The rapidly flashing light indicates successful programming of the new frequency signal.) 6. may make the programming quicker and easier. Hold down both hands, simultaneously push the hand-held transmitter button and the desired HomeLink®...

Owner's Manual
Page 241
... the indicator light begins to reprogram. To activate a device, simply press the appropriate button. It is recommended that the signal is now erased and the new device can be operated by pressing the programmed HomeLink® button. & Programming other devices To program other devices such as door locks, home lighting and...
... the indicator light begins to reprogram. To activate a device, simply press the appropriate button. It is recommended that the signal is now erased and the new device can be operated by pressing the programmed HomeLink® button. & Programming other devices To program other devices such as door locks, home lighting and...

Owner's Manual
Page 253
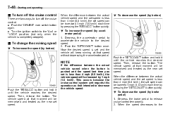
... "ON" position or pressing the unlock button " " on the remote control transmitter three times. The remote engine start . & Remote transmitter programming and programmable feature option New transmitters can be adjusted for service, it is recommended that you inform the service personnel that remote transmitters are unlocked manually using the keyless entry...
... "ON" position or pressing the unlock button " " on the remote control transmitter three times. The remote engine start . & Remote transmitter programming and programmable feature option New transmitters can be adjusted for service, it is recommended that you inform the service personnel that remote transmitters are unlocked manually using the keyless entry...

Owner's Manual
Page 255
... conditions: (1) This device may not cause harmful interference, and (2) this device must accept any interference received, including interference that the new batteries are inserted properly (battery "+" should be pointed away from the bottom half of Industry Canada. Changes or modifications not expressly approved... the circuit board from the transmitter circuit board on both batteries). 3. The manual transmission is depressed) or with new ones. Operation is consequently increased. Engine braking has no effect in the neutral position. It may cause undesired operation.
... conditions: (1) This device may not cause harmful interference, and (2) this device must accept any interference received, including interference that the new batteries are inserted properly (battery "+" should be pointed away from the bottom half of Industry Canada. Changes or modifications not expressly approved... the circuit board from the transmitter circuit board on both batteries). 3. The manual transmission is depressed) or with new ones. Operation is consequently increased. Engine braking has no effect in the neutral position. It may cause undesired operation.
Owner's Manual
Page 289
... decrease the speed (by button) & To change the cruising speed ! This occurs because the cruise control system unit regards this operation as the new set speed. Then, release the button. When the difference between the actual vehicle speed and the set speed is set and the vehicle will be... memorized and treated as the new set speed. Turn the ignition switch to turn off the cruise control: . Depress the accelerator pedal to accelerate the vehicle to release ...
... decrease the speed (by button) & To change the cruising speed ! This occurs because the cruise control system unit regards this operation as the new set speed. Then, release the button. When the difference between the actual vehicle speed and the set speed is set and the vehicle will be... memorized and treated as the new set speed. Turn the ignition switch to turn off the cruise control: . Depress the accelerator pedal to accelerate the vehicle to release ...

Owner's Manual
Page 292
Driving tips New vehicle break-in driving - the first 1,000 miles (1,600 km) ...Fuel economy hints ...Engine exhaust gas (Carbon monoxide) ...Catalytic converter ...Periodic inspections ...Driving in foreign countries ...Driving tips for AWD vehicles ...Off road driving ...All AWD models except OUTBACK ...OUTBACK... 8-2 8-2 8-3 8-3 8-4 8-5 8-5 8-6 8-6 8-6 Tire chains ...Rocking the vehicle ... 8-13 8-13 Loading your vehicle...Vehicle...
Driving tips New vehicle break-in driving - the first 1,000 miles (1,600 km) ...Fuel economy hints ...Engine exhaust gas (Carbon monoxide) ...Catalytic converter ...Periodic inspections ...Driving in foreign countries ...Driving tips for AWD vehicles ...Off road driving ...All AWD models except OUTBACK ...OUTBACK... 8-2 8-2 8-3 8-3 8-4 8-5 8-5 8-6 8-6 8-6 Tire chains ...Rocking the vehicle ... 8-13 8-13 Loading your vehicle...Vehicle...

Owner's Manual
Page 293
... section in an emergency. . Select the proper gear position for a long time, either fast or slow. . Keep the engine properly tuned. . 8-2 Driving tips New vehicle break-in driving - the first 1,000 miles (1,600 km) The performance and long life of the ECO gauge shows a reference for saving fuel. Do... driver's side. Use the air conditioner only when necessary. . For the turbo and 3.0-liter models, the indication of your vehicle are replaced with new ones. Do not drive at one constant engine or vehicle speed for the speed and road conditions. . The same break-in an emergency. . ...
... section in an emergency. . Select the proper gear position for a long time, either fast or slow. . Keep the engine properly tuned. . 8-2 Driving tips New vehicle break-in driving - the first 1,000 miles (1,600 km) The performance and long life of the ECO gauge shows a reference for saving fuel. Do... driver's side. Use the air conditioner only when necessary. . For the turbo and 3.0-liter models, the indication of your vehicle are replaced with new ones. Do not drive at one constant engine or vehicle speed for the speed and road conditions. . The same break-in an emergency. . ...
Owner's Manual
Page 313
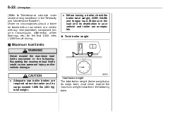
CAUTION . Make sure the load and its distribution in the "Warranty and Maintenance Booklet".) Under no circumstances should a trailer be towed with a new vehicle or a vehicle with any new powertrain component (engine, transmission, differential, wheel bearings, etc.) for the first 1,000 miles (1,600 km) of driving. . Total trailer weight The total trailer weight...
CAUTION . Make sure the load and its distribution in the "Warranty and Maintenance Booklet".) Under no circumstances should a trailer be towed with a new vehicle or a vehicle with any new powertrain component (engine, transmission, differential, wheel bearings, etc.) for the first 1,000 miles (1,600 km) of driving. . Total trailer weight The total trailer weight...

Owner's Manual
Page 347
... 11-32 11-32 Drive belts ...2.5-liter models ...3.0-liter models ... 11-21 11-21 11-21 Replacement of brake pad and lining ...Breaking-in of new brake pads and linings ... 11-32 11-33 Manual transmission oil ...Checking the oil level ...Recommended grade and viscosity ... 11-21 11-21 11-22...
... 11-32 11-32 Drive belts ...2.5-liter models ...3.0-liter models ... 11-21 11-21 11-21 Replacement of brake pad and lining ...Breaking-in of new brake pads and linings ... 11-32 11-33 Manual transmission oil ...Checking the oil level ...Recommended grade and viscosity ... 11-21 11-21 11-22...

Owner's Manual
Page 357
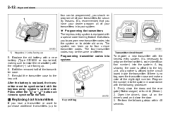
... wrench. 8. The oil filter will be drained into an appropriate container and disposed of the drain plug with a clean cloth and tighten it securely with a new sealing washer after the oil has completely drained out. 3.0-liter models 3.0-liter models 6. Remove the oil filter with hot engine oil. 5. Wipe the seating surface...
... wrench. 8. The oil filter will be drained into an appropriate container and disposed of the drain plug with a clean cloth and tighten it securely with a new sealing washer after the oil has completely drained out. 3.0-liter models 3.0-liter models 6. Remove the oil filter with hot engine oil. 5. Wipe the seating surface...

Owner's Manual
Page 364
... case cover. 1. Undo the screw and pull the air duct out of the air cleaner cover and case with a damp cloth and install a new air cleaner element. 1) 2) 3) Connector Duct Clamp 7. Remove the hose that is attached to the maintenance schedule in the "Warranty and Maintenance Booklet...". Unsnap the two clamps holding the air cleaner case cover. 5. Unplug the connector that you always use genuine SUBARU parts. ! Non-turbo models 3. Open the air cleaner case cover and remove the air cleaner element. 6. 11-18 Maintenance and service & ...
... case cover. 1. Undo the screw and pull the air duct out of the air cleaner cover and case with a damp cloth and install a new air cleaner element. 1) 2) 3) Connector Duct Clamp 7. Remove the hose that is attached to the maintenance schedule in the "Warranty and Maintenance Booklet...". Unsnap the two clamps holding the air cleaner case cover. 5. Unplug the connector that you always use genuine SUBARU parts. ! Non-turbo models 3. Open the air cleaner case cover and remove the air cleaner element. 6. 11-18 Maintenance and service & ...

Owner's Manual
Page 365
... time, pull the hose from the clamp that is connected to the top of the air cleaner cover and case with a damp cloth and install a new air cleaner element. 2. Turbo models to the air cleaner case cover. 5. Clean the inside of the air cleaner case. Open the air cleaner case cover...
... time, pull the hose from the clamp that is connected to the top of the air cleaner cover and case with a damp cloth and install a new air cleaner element. 2. Turbo models to the air cleaner case cover. 5. Clean the inside of the air cleaner case. Open the air cleaner case cover...
