

Owners Manual
Page 5
...OFF-ROAD noise level and spark arrester laws and regulations in Japan. Please check your local riding laws and regulations before operating this ATV on any public street, road or highway. Any reprinting or unauthorized use only. Printed in effect at the time of Yamaha Motor ...Corporation, U.S.A. P/N LIT-11626-19-60 EBU15000 2- is designed and manufactured for OFF-ROAD use without the written permission of manufacture. EBU00981 AFFIX DEALER LABEL HERE YFM66FAV OWNER'S MANUAL ©2005 by Yamaha Motor Corporation, U.S.A. 1st edition, June 2005...
...OFF-ROAD noise level and spark arrester laws and regulations in Japan. Please check your local riding laws and regulations before operating this ATV on any public street, road or highway. Any reprinting or unauthorized use only. Printed in effect at the time of Yamaha Motor ...Corporation, U.S.A. P/N LIT-11626-19-60 EBU15000 2- is designed and manufactured for OFF-ROAD use without the written permission of manufacture. EBU00981 AFFIX DEALER LABEL HERE YFM66FAV OWNER'S MANUAL ©2005 by Yamaha Motor Corporation, U.S.A. 1st edition, June 2005...

Owners Manual
Page 6
... Key identification number...3-2 Vehicle identification number ...3-3 Model label ...3-3 2 3 CONTROL FUNCTIONS...4-1 Main switch ...4-1 Indicator and warning lights ...4-2 Speedometer unit ...4-4 Handlebar switches ...4-6 Throttle lever ...4-13 Speed limiter ...4-14 Front brake lever...4-15 Brake pedal and rear brake lever ...4-15 Drive select lever ...4-16 Recoil starter...4-16 Fuel tank cap ...4-17 Fuel cock...4-18 Starter (choke) ...4-19 Seat...4-20 Storage compartment ...4-21 Front carrier ...4-21 Rear carrier ...4-21 Front and rear shock absorber adjustment ...4-22 Auxiliary DC jack...
... Key identification number...3-2 Vehicle identification number ...3-3 Model label ...3-3 2 3 CONTROL FUNCTIONS...4-1 Main switch ...4-1 Indicator and warning lights ...4-2 Speedometer unit ...4-4 Handlebar switches ...4-6 Throttle lever ...4-13 Speed limiter ...4-14 Front brake lever...4-15 Brake pedal and rear brake lever ...4-15 Drive select lever ...4-16 Recoil starter...4-16 Fuel tank cap ...4-17 Fuel cock...4-18 Starter (choke) ...4-19 Seat...4-20 Storage compartment ...4-21 Front carrier ...4-21 Rear carrier ...4-21 Front and rear shock absorber adjustment ...4-22 Auxiliary DC jack...
Owners Manual
Page 7
5 PRE-OPERATION CHECKS ...5-1 Front and rear brakes ...5-3 Fuel ...5-5 Engine oil ...5-7 Final gear oil...5-7 Differential gear oil ...5-8 Coolant...5-9 Throttle lever ...5-10 Fittings and fasteners...5-10 Lights...5-10 Switches...5-10 Tires ...5-11 How to measure tire pressure...5-13 Tire wear limit...5-14 OPERATION...6-1 Starting a cold engine ...6-1 Starting a warm engine...6-3 Warming up...6-3 Drive select lever operation and reverse driving...6-4 Engine break-in...6-7 Parking ...6-8 Parking on a slope...6-9 Accessories and loading ...6-10 7 RIDING YOUR ATV ...7-1 Getting to know your ...
5 PRE-OPERATION CHECKS ...5-1 Front and rear brakes ...5-3 Fuel ...5-5 Engine oil ...5-7 Final gear oil...5-7 Differential gear oil ...5-8 Coolant...5-9 Throttle lever ...5-10 Fittings and fasteners...5-10 Lights...5-10 Switches...5-10 Tires ...5-11 How to measure tire pressure...5-13 Tire wear limit...5-14 OPERATION...6-1 Starting a cold engine ...6-1 Starting a warm engine...6-3 Warming up...6-3 Drive select lever operation and reverse driving...6-4 Engine break-in...6-7 Parking ...6-8 Parking on a slope...6-9 Accessories and loading ...6-10 7 RIDING YOUR ATV ...7-1 Getting to know your ...
Owners Manual
Page 8
... Final gear oil ...8-21 Differential gear oil...8-23 Cooling system...8-25 Changing the coolant ...8-27 Axle boots...8-31 Spark plug inspection...8-32 Air filter element cleaning...8-34 Spark arrester cleaning ...8-38 V-belt cooling duct check hose ...8-39 V-belt case drain plug...8-40 Carburetor adjustment...8-40 Idle speed adjustment ...8-41 Valve clearance adjustment ...8-41 Select lever safety system cable adjustment ...8-42 Throttle lever adjustment ...8-42 Front brake pad check ...8-43 Checking the rear brake pads ...8-43 Checking the brake fluid level...8-44 Brake fluid replacement...
... Final gear oil ...8-21 Differential gear oil...8-23 Cooling system...8-25 Changing the coolant ...8-27 Axle boots...8-31 Spark plug inspection...8-32 Air filter element cleaning...8-34 Spark arrester cleaning ...8-38 V-belt cooling duct check hose ...8-39 V-belt case drain plug...8-40 Carburetor adjustment...8-40 Idle speed adjustment ...8-41 Valve clearance adjustment ...8-41 Select lever safety system cable adjustment ...8-42 Throttle lever adjustment ...8-42 Front brake pad check ...8-43 Checking the rear brake pads ...8-43 Checking the brake fluid level...8-44 Brake fluid replacement...

Owners Manual
Page 9
Storage ...9-3 SPECIFICATIONS...10-1 NOISE REGULATION...11-1 MAINTENANCE RECORD ...12-1 ATV LIMITED WARRANTY ...13-1 YAMAHA EXTENDED SERVICE (Y.E.S.) ...14-1 10 11 12 13 14 Headlight beam adjustment ...8-60 Tail/brake light bulb replacement ...8-61 Troubleshooting ...8-62 Troubleshooting charts ...8-63 9 CLEANING AND STORAGE...9-1 A. Cleaning...9-1 B.
Storage ...9-3 SPECIFICATIONS...10-1 NOISE REGULATION...11-1 MAINTENANCE RECORD ...12-1 ATV LIMITED WARRANTY ...13-1 YAMAHA EXTENDED SERVICE (Y.E.S.) ...14-1 10 11 12 13 14 Headlight beam adjustment ...8-60 Tail/brake light bulb replacement ...8-61 Troubleshooting ...8-62 Troubleshooting charts ...8-63 9 CLEANING AND STORAGE...9-1 A. Cleaning...9-1 B.
Owners Manual
Page 20
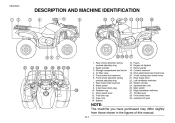
... and tool kit 4. Air filter case 5. Front brake fluid reservoir 6. V-belt case drain plug 10. Fuses Engine oil dipstick Recoil starter Coolant reservoir Drive select lever box check hose V-belt cooling duct check hose Rear brake lever Left handlebar switches Starter (choke) Speedometer unit Main switch Right handlebar switches Throttle lever Front brake lever Auxiliary DC jack NOTE: The machine you have purchased may differ slightly from those shown in the figures of this manual. 3-1 Radiator cap 11. EBU00032...
... and tool kit 4. Air filter case 5. Front brake fluid reservoir 6. V-belt case drain plug 10. Fuses Engine oil dipstick Recoil starter Coolant reservoir Drive select lever box check hose V-belt cooling duct check hose Rear brake lever Left handlebar switches Starter (choke) Speedometer unit Main switch Right handlebar switches Throttle lever Front brake lever Auxiliary DC jack NOTE: The machine you have purchased may differ slightly from those shown in the figures of this manual. 3-1 Radiator cap 11. EBU00032...

Owners Manual
Page 24
Differential gear lock indicator light "DIFF. EBU01064 High-range indicator light "H" This indicator light comes on when the differential gear lock switch is set to "LOCK", the differential gear lock indicator light will flash until the differential gear is set to the "4WD-LOCK" position. LOCK" Low-range indicator light "L" High-range indicator light "H" Neutral indicator light "N" Reverse indicator light "R" Park indicator light "P" Four-wheel-drive indicator " "/" " Coolant temperature warning light " " DIFF. NOTE: When the switch is locked. _ _ 1. 2. 3. 4. 5. 6. 7. 8. LOCK ...
Differential gear lock indicator light "DIFF. EBU01064 High-range indicator light "H" This indicator light comes on when the differential gear lock switch is set to "LOCK", the differential gear lock indicator light will flash until the differential gear is set to the "4WD-LOCK" position. LOCK" Low-range indicator light "L" High-range indicator light "H" Neutral indicator light "N" Reverse indicator light "R" Park indicator light "P" Four-wheel-drive indicator " "/" " Coolant temperature warning light " " DIFF. NOTE: When the switch is locked. _ _ 1. 2. 3. 4. 5. 6. 7. 8. LOCK ...

Owners Manual
Page 29
... Start switch " " The starter motor cranks the engine when this should happen, remove the battery and recharge it. _ Engine stop switch is pushed. If this switch is set to the point that the engine stop switch " / " Make sure that the starter motor will not start or run when the engine stop switch is set to " " before starting instructions prior to stop switch controls ignition and can be used at all times to starting...
... Start switch " " The starter motor cranks the engine when this should happen, remove the battery and recharge it. _ Engine stop switch is pushed. If this switch is set to the point that the engine stop switch " / " Make sure that the starter motor will not start or run when the engine stop switch is set to " " before starting instructions prior to stop switch controls ignition and can be used at all times to starting...
Owners Manual
Page 35
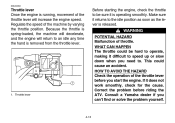
... or solve the problem yourself. 1. Regulate the speed of throttle. Consult a Yamaha dealer if you start the engine. Because the throttle is spring-loaded, the machine will decelerate, and the engine will increase the engine speed. WHAT CAN HAPPEN The throttle could cause an accident. Throttle lever 4-13 EBU00062 Throttle lever Once the engine is running, movement of the throttle lever will return to the idle position as soon...
... or solve the problem yourself. 1. Regulate the speed of throttle. Consult a Yamaha dealer if you start the engine. Because the throttle is spring-loaded, the machine will decelerate, and the engine will increase the engine speed. WHAT CAN HAPPEN The throttle could cause an accident. Throttle lever 4-13 EBU00062 Throttle lever Once the engine is running, movement of the throttle lever will return to the idle position as soon...
Owners Manual
Page 51
If a problem cannot be corrected by the adjustment procedures provided in this manual, have a Yamaha dealer check for the cause. 5-4 Do not ride the ATV if you find any problem with improperly operating brakes. HOW TO AVOID THE HAZARD Always check the brakes at the start of every ride. WARNING POTENTIAL HAZARD Riding with the brakes. WHAT CAN HAPPEN You could lose braking ability, which could lead to an accident.
If a problem cannot be corrected by the adjustment procedures provided in this manual, have a Yamaha dealer check for the cause. 5-4 Do not ride the ATV if you find any problem with improperly operating brakes. HOW TO AVOID THE HAZARD Always check the brakes at the start of every ride. WARNING POTENTIAL HAZARD Riding with the brakes. WHAT CAN HAPPEN You could lose braking ability, which could lead to an accident.

Owners Manual
Page 62
Apply the rear brake lever. 2. Shift the drive select lever into the neutral or park position. HOW TO AVOID THE HAZARD Read the Owner's Manual carefully. Turn the main switch to "ON" and the engine stop switch to "ON". 3. WHAT CAN HAPPEN Loss of control, which could lead to control the ATV, which could cause an accident or injury. Starting a cold engine WARNING POTENTIAL HAZARD Freezing control cables...
Apply the rear brake lever. 2. Shift the drive select lever into the neutral or park position. HOW TO AVOID THE HAZARD Read the Owner's Manual carefully. Turn the main switch to "ON" and the engine stop switch to "ON". 3. WHAT CAN HAPPEN Loss of control, which could lead to control the ATV, which could cause an accident or injury. Starting a cold engine WARNING POTENTIAL HAZARD Freezing control cables...

Owners Manual
Page 63
... close the throttle lever and start the engine by pushing the start position. 1 2 3 4 5 6 7 8 9 10 5. Starter (choke) 2. NOTE: G When the drive select lever is in the neutral or park position, if either indicator light does not come on, ask a Yamaha dealer to shift into neutral or park before starting the engine. _ _ Position 3 : Cold engine startambient temperature above 25 °C (80 °F) and warm engine start switch. 6-2 However, it...
... close the throttle lever and start the engine by pushing the start position. 1 2 3 4 5 6 7 8 9 10 5. Starter (choke) 2. NOTE: G When the drive select lever is in the neutral or park position, if either indicator light does not come on, ask a Yamaha dealer to shift into neutral or park before starting the engine. _ _ Position 3 : Cold engine startambient temperature above 25 °C (80 °F) and warm engine start switch. 6-2 However, it...

Owners Manual
Page 66
... neutral to the closed position. 2. If the light does not come on until the ATV starts moving the drive select lever along the shift guide. 1. Check behind for people or obstacles, and then release the brake pedal. 6-5 Bring the ATV to a complete stop and return the throttle lever to reverse or from reverse or park without applying the rear brake. _ _ 1.
... neutral to the closed position. 2. If the light does not come on until the ATV starts moving the drive select lever along the shift guide. 1. Check behind for people or obstacles, and then release the brake pedal. 6-5 Bring the ATV to a complete stop and return the throttle lever to reverse or from reverse or park without applying the rear brake. _ _ 1.

Owners Manual
Page 94
... pavement. You should practice control of obstacles and other riders. When slowing down or stopping, release the throttle and apply the brakes smoothly and evenly. The centrifugal clutch will engage and you are more difficult terrain. Improper use only, and handling maneuvers are thoroughly familiar with your ATV. With the engine idling, shift the drive select lever to become...
... pavement. You should practice control of obstacles and other riders. When slowing down or stopping, release the throttle and apply the brakes smoothly and evenly. The centrifugal clutch will engage and you are more difficult terrain. Improper use only, and handling maneuvers are thoroughly familiar with your ATV. With the engine idling, shift the drive select lever to become...

Owners Manual
Page 143
... the radiator until it is damaged, install the coolant drain bolt, and then tighten it is full, and then install the radiator cap. 11. Antifreeze and water mixing ratio: 1:1 Total amount: 1.8 L (1.58 Imp qt, 1.90 US qt) Coolant reservoir capacity (up to the maximum level mark, and then install the reservoir cap and panel D. 13. Coolant reservoir drain hose 9. Install the coolant reservoir hose...
... the radiator until it is damaged, install the coolant drain bolt, and then tighten it is full, and then install the radiator cap. 11. Antifreeze and water mixing ratio: 1:1 Total amount: 1.8 L (1.58 Imp qt, 1.90 US qt) Coolant reservoir capacity (up to the maximum level mark, and then install the reservoir cap and panel D. 13. Coolant reservoir drain hose 9. Install the coolant reservoir hose...

Owners Manual
Page 164
... Adjusting the rear brake light switch The rear brake light switch, which is activated by the brake pedal and rear brake lever, is properly adjusted when the brake light comes on later, turn the adjusting nut in direction a. Remove panel B. (See page 8-9 for panel removal and installation procedures.) 2. To make the brake light come on just before braking takes effect. Install the panel. 8-50 Rear brake light switch 2. If necessary, adjust the brake light switch as follows...
... Adjusting the rear brake light switch The rear brake light switch, which is activated by the brake pedal and rear brake lever, is properly adjusted when the brake light comes on later, turn the adjusting nut in direction a. Remove panel B. (See page 8-9 for panel removal and installation procedures.) 2. To make the brake light come on just before braking takes effect. Install the panel. 8-50 Rear brake light switch 2. If necessary, adjust the brake light switch as follows...

Owners Manual
Page 165
... Cable inspection and lubrication WARNING POTENTIAL HAZARD Damaged control cables. Cables can result when the outer covering of controls could be restricted, which could cause an accident or injury. HOW TO AVOID THE HAZARD Inspect cables frequently. Recommended lubricant: Yamaha chain and cable lube or SAE 10W30 motor oil 8-51 Lubricating the brake levers and brake pedal Lubricate the pivoting...
... Cable inspection and lubrication WARNING POTENTIAL HAZARD Damaged control cables. Cables can result when the outer covering of controls could be restricted, which could cause an accident or injury. HOW TO AVOID THE HAZARD Inspect cables frequently. Recommended lubricant: Yamaha chain and cable lube or SAE 10W30 motor oil 8-51 Lubricating the brake levers and brake pedal Lubricate the pivoting...

Owners Manual
Page 171
... cause damage to the electrical system which could lead to a fire. Ignition fuse Auxiliary DC jack fuse 6. Four-wheel drive fuse Signaling system fuse Backup fuse (for odometer and clock) Spare fuse (× 3) CAUTION: _ Specified fuses: Main fuse: Headlight fuse: Ignition fuse: Auxiliary DC jack fuse: Four-wheel drive fuse: Signaling system fuse: Backup fuse: 30 A 15 A 10 A 10 A 3A 10 A 10 A 8-57 To prevent accidental short-circuiting, turn off the main switch when checking or replacing a fuse. _ HOW TO AVOID...
... cause damage to the electrical system which could lead to a fire. Ignition fuse Auxiliary DC jack fuse 6. Four-wheel drive fuse Signaling system fuse Backup fuse (for odometer and clock) Spare fuse (× 3) CAUTION: _ Specified fuses: Main fuse: Headlight fuse: Ignition fuse: Auxiliary DC jack fuse: Four-wheel drive fuse: Signaling system fuse: Backup fuse: 30 A 15 A 10 A 10 A 3A 10 A 10 A 8-57 To prevent accidental short-circuiting, turn off the main switch when checking or replacing a fuse. _ HOW TO AVOID...
Owners Manual
Page 179
... wheel bearings, brakes, transmission seals and electrical devices. Use only enough pressure to the wheel axles. 3. A. Make sure the spark plug and all surfaces with a paint brush. If the engine case is handy for hard-to prevent water entry. Do not apply degreaser to do the job. 9-1 Many expensive repair bills have resulted from improper high pressure detergent applications such as those available in coin-operated car...
... wheel bearings, brakes, transmission seals and electrical devices. Use only enough pressure to the wheel axles. 3. A. Make sure the spark plug and all surfaces with a paint brush. If the engine case is handy for hard-to prevent water entry. Do not apply degreaser to do the job. 9-1 Many expensive repair bills have resulted from improper high pressure detergent applications such as those available in coin-operated car...

Owners Manual
Page 188
Model Bulb voltage, wattage × quantity: Headlight Tail/brake light Indicator light: Neutral indicator light Reverse indicator light Coolant temperature warning light Park indicator light High-range indicator light Low-range indicator light Differential gear lock indicator light Fuses: Main fuse Headlight fuse Ignition fuse Auxiliary DC jack fuse Four-wheel-drive fuse Signaling system fuse Backup fuse 12 V, 30 W / 30 W × 2 12 V, 5 W / 21 W × 1 LED LED LED LED LED LED LED 30A 15A 10A 10A 3A 10A 10A YFM66FA 10-6
Model Bulb voltage, wattage × quantity: Headlight Tail/brake light Indicator light: Neutral indicator light Reverse indicator light Coolant temperature warning light Park indicator light High-range indicator light Low-range indicator light Differential gear lock indicator light Fuses: Main fuse Headlight fuse Ignition fuse Auxiliary DC jack fuse Four-wheel-drive fuse Signaling system fuse Backup fuse 12 V, 30 W / 30 W × 2 12 V, 5 W / 21 W × 1 LED LED LED LED LED LED LED 30A 15A 10A 10A 3A 10A 10A YFM66FA 10-6