

Owners Manual
Page 6
... up a cold engine ...6-1 Starting a warm engine ...6-2 Shifting ...6-2 Engine break-in ...6-4 Parking ...6-5 PERIODIC MAINTENANCE AND ADJUSTMENT ...7-1 Owner's tool kit ...7-2 Periodic maintenance chart for the emission control system ...7-3 General maintenance and lubrication chart ...7-4 Removing and installing panels ...7-8 Checking the spark plugs ...7-9 Canister (for California only) ...7-10 Engine oil and oil filter element ...7-11 Final gear oil ...7-13 Cleaning the air filter element ...7-14 Carburetors ...7-16 Checking the engine idling speed ...7-16 Checking the throttle cable free...
... up a cold engine ...6-1 Starting a warm engine ...6-2 Shifting ...6-2 Engine break-in ...6-4 Parking ...6-5 PERIODIC MAINTENANCE AND ADJUSTMENT ...7-1 Owner's tool kit ...7-2 Periodic maintenance chart for the emission control system ...7-3 General maintenance and lubrication chart ...7-4 Removing and installing panels ...7-8 Checking the spark plugs ...7-9 Canister (for California only) ...7-10 Engine oil and oil filter element ...7-11 Final gear oil ...7-13 Cleaning the air filter element ...7-14 Carburetors ...7-16 Checking the engine idling speed ...7-16 Checking the throttle cable free...

Owners Manual
Page 7
... the wheel bearings ...7-30 Battery ...7-30 Replacing the fuses ...7-31 Replacing the headlight bulb ...7-32 Replacing a turn signal light bulb or the tail/brake light bulb ...7-34 Supporting the motorcycle ...7-34 Front wheel ...7-35 Rear wheel ...7-36 Troubleshooting ...7-38 Troubleshooting chart ...7-39 MOTORCYCLE CARE AND STORAGE ...8-1 Matte color caution ...8-1 Care ...8-1 Storage ...8-3 SPECIFICATIONS ...9-1 CONSUMER INFORMATION...10-1 Identification numbers ...10-1 Reporting safety defects ...10-3 Motorcycle noise regulation ...10-4 Maintenance record ...10-5 YAMAHA MOTOR CORPORATION...
... the wheel bearings ...7-30 Battery ...7-30 Replacing the fuses ...7-31 Replacing the headlight bulb ...7-32 Replacing a turn signal light bulb or the tail/brake light bulb ...7-34 Supporting the motorcycle ...7-34 Front wheel ...7-35 Rear wheel ...7-36 Troubleshooting ...7-38 Troubleshooting chart ...7-39 MOTORCYCLE CARE AND STORAGE ...8-1 Matte color caution ...8-1 Care ...8-1 Storage ...8-3 SPECIFICATIONS ...9-1 CONSUMER INFORMATION...10-1 Identification numbers ...10-1 Reporting safety defects ...10-3 Motorcycle noise regulation ...10-4 Maintenance record ...10-5 YAMAHA MOTOR CORPORATION...

Owners Manual
Page 13
.... • Properly adjust the suspension for your vehicle is an important decision. Do not run engine in mind: G Cargo and accessory weight should be kept as low and close to the center of your motorcycle can create a sudden imbalance. SAFETY INFORMATION G G Do not run engine outdoors where engine exhaust can be drawn into a building through openings such as windows and doors. Maximum load: XVS65ATZ...
.... • Properly adjust the suspension for your vehicle is an important decision. Do not run engine in mind: G Cargo and accessory weight should be kept as low and close to the center of your motorcycle can create a sudden imbalance. SAFETY INFORMATION G G Do not run engine outdoors where engine exhaust can be drawn into a building through openings such as windows and doors. Maximum load: XVS65ATZ...
Owners Manual
Page 14
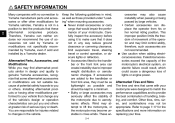
... risk of lights or engine power. Aftermarket Parts, Accessories, and Modifications While you may limit control ability, therefore, such accessories are responsible for tire specifications and more information on replacing your motorcycle. Use caution when adding electrical accessories. G Never install accessories or carry cargo that came with no connection to Yamaha manufacture parts and accessories or offer other modifications performed to make sure that some aftermarket accessories or...
... risk of lights or engine power. Aftermarket Parts, Accessories, and Modifications While you may limit control ability, therefore, such accessories are responsible for tire specifications and more information on replacing your motorcycle. Use caution when adding electrical accessories. G Never install accessories or carry cargo that came with no connection to Yamaha manufacture parts and accessories or offer other modifications performed to make sure that some aftermarket accessories or...
Owners Manual
Page 21
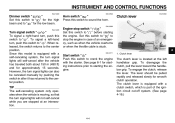
... clutch, release the lever. Since this model is stuck. 4 EAU12711 Start switch " " Push this switch to " ". Clutch lever The clutch lever is equipped with the starter. The lever should be canceled manually by pushing the switch in case of the ignition circuit cut-off system. (See page 4-16.) 4-4 INSTRUMENT AND CONTROL FUNCTIONS EAU12400 EAU12500 EAU12820 Dimmer switch " / " Set this switch to sound the horn. EAU12430 Horn switch " " Press this switch...
... clutch, release the lever. Since this model is stuck. 4 EAU12711 Start switch " " Push this switch to " ". Clutch lever The clutch lever is equipped with the starter. The lever should be canceled manually by pushing the switch in case of the ignition circuit cut-off system. (See page 4-16.) 4-4 INSTRUMENT AND CONTROL FUNCTIONS EAU12400 EAU12500 EAU12820 Dimmer switch " / " Set this switch to sound the horn. EAU12430 Horn switch " " Press this switch...

Owners Manual
Page 24
INSTRUMENT AND CONTROL FUNCTIONS EAU13221 Fuel Make sure there is poisonous and can cause fuel to use regular unleaded gasoline with soap and water. If gasoline spills on the vehicle. Before refueling, turn off spilled fuel with care. Do not overfill the fuel tank. Because fuel expands when it heats up any spilled fuel immediately. Wipe up , heat from the engine or the sun can cause...
INSTRUMENT AND CONTROL FUNCTIONS EAU13221 Fuel Make sure there is poisonous and can cause fuel to use regular unleaded gasoline with soap and water. If gasoline spills on the vehicle. Before refueling, turn off spilled fuel with care. Do not overfill the fuel tank. Because fuel expands when it heats up any spilled fuel immediately. Wipe up , heat from the engine or the sun can cause...

Owners Manual
Page 31
... suspension, turn the adjusting ring in poor damping performance. ECA10101 NOTICE To avoid damaging the mechanism, do not attempt to excessive gas pressure. Spring preload setting: Minimum (soft): 1 Standard: 3 Maximum (hard): 7 EWA10221 WARNING This shock absorber assembly contains highly pressurized nitrogen gas. G Do not dispose of a damaged or worn-out shock absorber assembly yourself. INSTRUMENT AND CONTROL FUNCTIONS EAU14863 Adjusting the shock absorber assembly 1. 2. 3. 4. Take the shock absorber assembly...
... suspension, turn the adjusting ring in poor damping performance. ECA10101 NOTICE To avoid damaging the mechanism, do not attempt to excessive gas pressure. Spring preload setting: Minimum (soft): 1 Standard: 3 Maximum (hard): 7 EWA10221 WARNING This shock absorber assembly contains highly pressurized nitrogen gas. G Do not dispose of a damaged or worn-out shock absorber assembly yourself. INSTRUMENT AND CONTROL FUNCTIONS EAU14863 Adjusting the shock absorber assembly 1. 2. 3. 4. Take the shock absorber assembly...
Owners Manual
Page 35
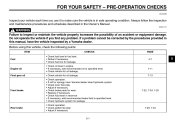
... or spongy, have the vehicle inspected by a Yamaha dealer. Adjust if necessary. Check fluid level in the Owner's Manual. If a problem cannot be corrected by the procedures provided in this vehicle, check the following points: ITEM Fuel • Check fuel level in safe operating condition. Replace if necessary. CHECKS PAGE 4-7 5 Engine oil Final gear oil 7-11 7-13 Front brake 7-22, 7-24, 7-25 Rear brake • Check operation. •...
... or spongy, have the vehicle inspected by a Yamaha dealer. Adjust if necessary. Check fluid level in the Owner's Manual. If a problem cannot be corrected by the procedures provided in this vehicle, check the following points: ITEM Fuel • Check fuel level in safe operating condition. Replace if necessary. CHECKS PAGE 4-7 5 Engine oil Final gear oil 7-11 7-13 Front brake 7-22, 7-24, 7-25 Rear brake • Check operation. •...
Owners Manual
Page 37
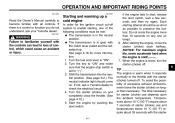
... neutral indicator light should be met: G The transmission is in gear with the clutch lever pulled and the sidestand up. Start the engine by pushing the start switch, wait a few seconds, and then try again. To avoid the possibility of the following conditions must be as short as possible to preserve the battery. Turn the fuel cock lever to check the electrical circuit. 4. Turn the starter...
... neutral indicator light should be met: G The transmission is in gear with the clutch lever pulled and the sidestand up. Start the engine by pushing the start switch, wait a few seconds, and then try again. To avoid the possibility of the following conditions must be as short as possible to preserve the battery. Turn the fuel cock lever to check the electrical circuit. 4. Turn the starter...
Owners Manual
Page 39
... the engine, transmission, To start out and accelerate 1. At the recommended shift points shown in the following table, close the throttle, and at the same time, release the clutch lever slowly. 4. To decelerate 1. ECA10260 and drive train, which are shown in the table below. 6-3 Always use the clutch while changing gears to disengage the clutch. 2. The neutral indicator light should come on. Open the throttle gradually...
... the engine, transmission, To start out and accelerate 1. At the recommended shift points shown in the following table, close the throttle, and at the same time, release the clutch lever slowly. 4. To decelerate 1. ECA10260 and drive train, which are shown in the table below. 6-3 Always use the clutch while changing gears to disengage the clutch. 2. The neutral indicator light should come on. Open the throttle gradually...
Owners Manual
Page 44
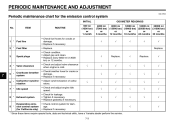
... of carburetors. • Check and adjust engine idle speed. • Check for leakage. • Tighten if necessary. • Replace gasket(s) if necessary. • Check control system for California only) 9 * √ √ * Since these items require special tools, data and technical skills, have a Yamaha dealer perform the service. 7-3 PERIODIC MAINTENANCE AND ADJUSTMENT EAU17600 Periodic maintenance chart for the emission control system INITIAL No.
... of carburetors. • Check and adjust engine idle speed. • Check for leakage. • Tighten if necessary. • Replace gasket(s) if necessary. • Check control system for California only) 9 * √ √ * Since these items require special tools, data and technical skills, have a Yamaha dealer perform the service. 7-3 PERIODIC MAINTENANCE AND ADJUSTMENT EAU17600 Periodic maintenance chart for the emission control system INITIAL No.

Owners Manual
Page 73
... luminosity of the headlight bulb to keep it as follows. Turn the key to "ON" and turn on the headlight bulb using a cloth moistened with a quartz bulb headlight. PERIODIC MAINTENANCE AND ADJUSTMENT avoid causing extensive damage to the electrical system and possibly a fire. [EWA15131] EAU23795 Specified fuses: Main fuse: 30.0 A Signaling system fuse: 10.0 A Ignition fuse: 10.0 A Headlight fuse: 15.0 A Carburetor heater fuse: 15.0 A Ignitor unit fuse: 5.0 A Replacing the headlight bulb This model is equipped with alcohol...
... luminosity of the headlight bulb to keep it as follows. Turn the key to "ON" and turn on the headlight bulb using a cloth moistened with a quartz bulb headlight. PERIODIC MAINTENANCE AND ADJUSTMENT avoid causing extensive damage to the electrical system and possibly a fire. [EWA15131] EAU23795 Specified fuses: Main fuse: 30.0 A Signaling system fuse: 10.0 A Ignition fuse: 10.0 A Headlight fuse: 15.0 A Carburetor heater fuse: 15.0 A Ignitor unit fuse: 5.0 A Replacing the headlight bulb This model is equipped with alcohol...

Owners Manual
Page 78
... the brake rod. 4. Install the brake torque rod bolt and nut at the brake shoe plate. 5. PERIODIC MAINTENANCE AND ADJUSTMENT 4. Install the rear wheel, wheel axle, final gear case, and drive shaft by pushing the wheel forward and guiding the drive shaft into the middle gear universal joint. 1. Remove the bolts that secure the final gear case to the procedure on page 7-34. 8. Middle gear universal joint 2. Install the panel. 7-37...
... the brake rod. 4. Install the brake torque rod bolt and nut at the brake shoe plate. 5. PERIODIC MAINTENANCE AND ADJUSTMENT 4. Install the rear wheel, wheel axle, final gear case, and drive shaft by pushing the wheel forward and guiding the drive shaft into the middle gear universal joint. 1. Remove the bolts that secure the final gear case to the procedure on page 7-34. 8. Middle gear universal joint 2. Install the panel. 7-37...

Owners Manual
Page 84
.... 6. 7. 8 8. 9. Alternatively, turn the wheels a little every month in an excessively cold or warm place [less than 30 8-4 e. Fill up . from the spark plugs, and then install the spark plugs and the spark plug caps. Perform the following steps to ground the spark plug electrodes while turning the engine over several times with the starter. (This will limit sparking during the next step.) d. Check and, if necessary, correct the tire air pressure, and then lift...
.... 6. 7. 8 8. 9. Alternatively, turn the wheels a little every month in an excessively cold or warm place [less than 30 8-4 e. Fill up . from the spark plugs, and then install the spark plugs and the spark plug caps. Perform the following steps to ground the spark plug electrodes while turning the engine over several times with the starter. (This will limit sparking during the next step.) d. Check and, if necessary, correct the tire air pressure, and then lift...

Owners Manual
Page 85
... (518 lb) Engine: Engine type: Air cooled 4-stroke, SOHC Cylinder arrangement: V-type 2-cylinder Displacement: 649 cm³ Bore × stroke: 81.0 × 63.0 mm (3.19 × 2.48 in) Compression ratio: 9.00 :1 Starting system: Electric starter Recommended engine oil grade: API service SG type or higher, JASO standard MA Engine oil quantity: Without oil filter element replacement: 2.60 L (2.75 US qt, 2.29 Imp.qt) With oil filter element replacement: 2.80 L (2.96...
... (518 lb) Engine: Engine type: Air cooled 4-stroke, SOHC Cylinder arrangement: V-type 2-cylinder Displacement: 649 cm³ Bore × stroke: 81.0 × 63.0 mm (3.19 × 2.48 in) Compression ratio: 9.00 :1 Starting system: Electric starter Recommended engine oil grade: API service SG type or higher, JASO standard MA Engine oil quantity: Without oil filter element replacement: 2.60 L (2.75 US qt, 2.29 Imp.qt) With oil filter element replacement: 2.80 L (2.96...

Owners Manual
Page 88
...W × 1 Engine trouble warning light: 12 V, 1.7 W × 1 Fuses: Main fuse: 30.0 A Headlight fuse: 15.0 A Signaling system fuse: 10.0 A Ignition fuse: 10.0 A Carburetor heater fuse: 15.0 A Ignitor unit fuse: 5.0 A Electrical system: Ignition system: TCI (digital) Charging system: AC magneto Battery: Model: GT12B-4 Voltage, capacity: 12 V, 10.0 Ah Headlight: Bulb type: Halogen bulb Bulb voltage, wattage × quantity: Headlight: 12 V, 60 W/55 W × 1 Tail/brake light: 12 V, 8.0 W/27.0 W × 1 Front turn signal/position light: 12 V, 23 W/8.0 W × 2 Rear turn signal light: 12...
...W × 1 Engine trouble warning light: 12 V, 1.7 W × 1 Fuses: Main fuse: 30.0 A Headlight fuse: 15.0 A Signaling system fuse: 10.0 A Ignition fuse: 10.0 A Carburetor heater fuse: 15.0 A Ignitor unit fuse: 5.0 A Electrical system: Ignition system: TCI (digital) Charging system: AC magneto Battery: Model: GT12B-4 Voltage, capacity: 12 V, 10.0 Ah Headlight: Bulb type: Halogen bulb Bulb voltage, wattage × quantity: Headlight: 12 V, 60 W/55 W × 1 Tail/brake light: 12 V, 8.0 W/27.0 W × 1 Front turn signal/position light: 12 V, 23 W/8.0 W × 2 Rear turn signal light: 12...

Owners Manual
Page 95
... with headlight, stoplight, and turn signals shall be inspected and registered for non-Yamaha-authorized renting, leasing or other than those used in warranty repairs will , free of business. AND EXCLUDED FROM THIS WARRANTY. EMISSION CONTROL SYSTEM WARRANTY: Yamaha Motor Corporation, U.S.A. YAMAHA MOTOR CORPORATION, U.S.A. Engine Displacement Under 50cc 50cc to 169cc 170cc to original parts. SPECIFIC EXCLUSIONS from defects in effect, this warranty to conform at the time...
... with headlight, stoplight, and turn signals shall be inspected and registered for non-Yamaha-authorized renting, leasing or other than those used in warranty repairs will , free of business. AND EXCLUDED FROM THIS WARRANTY. EMISSION CONTROL SYSTEM WARRANTY: Yamaha Motor Corporation, U.S.A. YAMAHA MOTOR CORPORATION, U.S.A. Engine Displacement Under 50cc 50cc to 169cc 170cc to original parts. SPECIFIC EXCLUSIONS from defects in effect, this warranty to conform at the time...
Owners Manual
Page 96
... for the policy to repair of normal maintenance services, non-warranty repairs, accident and collision damages, and oil, oil filters, air filters, spark plugs, and brake shoes. If you have purchased your new motorcycle, please advise us of oil, sustained high rpm, full-throttle, operating the machine with federal law. 10 10-8 The customer's responsibility includes all of the recommended maintenance shown in the Owner's and Service Manual. No.
... for the policy to repair of normal maintenance services, non-warranty repairs, accident and collision damages, and oil, oil filters, air filters, spark plugs, and brake shoes. If you have purchased your new motorcycle, please advise us of oil, sustained high rpm, full-throttle, operating the machine with federal law. 10 10-8 The customer's responsibility includes all of the recommended maintenance shown in the Owner's and Service Manual. No.

Owners Manual
Page 99
...M Main switch/steering lock ...4-1 Maintenance and lubrication, periodic...7-4 Maintenance, emission control system ...7-3 Maintenance record ...10-5 Matte color, caution...8-1 Model label...10-2 D Dimmer switch ...4-4 E Engine break-in ...6-4 Engine idling speed, checking ...7-16 Engine oil and oil filter element...7-11 Engine, starting a warm...6-2 Engine stop switch...4-4 Engine trouble warning light ...4-2 T Throttle cable free play, checking ...7-16 Throttle grip and cable, checking and lubricating ...7-26 Tires...7-17 Tool kit ...7-2 N Neutral indicator light ...4-2 Noise regulation...
...M Main switch/steering lock ...4-1 Maintenance and lubrication, periodic...7-4 Maintenance, emission control system ...7-3 Maintenance record ...10-5 Matte color, caution...8-1 Model label...10-2 D Dimmer switch ...4-4 E Engine break-in ...6-4 Engine idling speed, checking ...7-16 Engine oil and oil filter element...7-11 Engine, starting a warm...6-2 Engine stop switch...4-4 Engine trouble warning light ...4-2 T Throttle cable free play, checking ...7-16 Throttle grip and cable, checking and lubricating ...7-26 Tires...7-17 Tool kit ...7-2 N Neutral indicator light ...4-2 Noise regulation...

Owners Manual
Page 100
INDEX Troubleshooting ...7-38 Troubleshooting chart ...7-39 Turn signal indicator light ...4-2 Turn signal light bulb or tail/brake light bulb, replacing ...7-34 Turn signal switch ...4-4 V Valve clearance ...7-17 Vehicle Emission Control Information label ...10-2 Vehicle identification number ...10-1 W Warranty, extended...10-9 Warranty, limited ...10-7 Wheel bearings, checking...7-30 Wheel (front) ...7-35 Wheel (rear) ...7-36 Wheels ...7-20
INDEX Troubleshooting ...7-38 Troubleshooting chart ...7-39 Turn signal indicator light ...4-2 Turn signal light bulb or tail/brake light bulb, replacing ...7-34 Turn signal switch ...4-4 V Valve clearance ...7-17 Vehicle Emission Control Information label ...10-2 Vehicle identification number ...10-1 W Warranty, extended...10-9 Warranty, limited ...10-7 Wheel bearings, checking...7-30 Wheel (front) ...7-35 Wheel (rear) ...7-36 Wheels ...7-20