

Owners Manual
Page 6
... wheel bearings ...7-25 Battery ...7-25 Replacing the fuses ...7-26 Replacing the headlight bulb ...7-28 Tail/brake light ...7-29 TABLE OF CONTENTS LOCATION OF IMPORTANT LABELS ...1-1 SAFETY INFORMATION ...2-1 DESCRIPTION ...3-1 Left view ...3-1 Right view ...3-2 Controls and instruments...3-3 INSTRUMENT AND CONTROL FUNCTIONS ...4-1 Main switch ...4-1 Indicator lights and warning lights ...4-1 Multi-function meter unit ...4-2 Handlebar switches ...4-5 Clutch lever ...4-7 Shift pedal ...4-7 Brake lever ...4-8 Brake pedal ...4-8 Fuel tank cap ...4-8 Fuel ...4-9 Fuel tank breather/overflow hose...
... wheel bearings ...7-25 Battery ...7-25 Replacing the fuses ...7-26 Replacing the headlight bulb ...7-28 Tail/brake light ...7-29 TABLE OF CONTENTS LOCATION OF IMPORTANT LABELS ...1-1 SAFETY INFORMATION ...2-1 DESCRIPTION ...3-1 Left view ...3-1 Right view ...3-2 Controls and instruments...3-3 INSTRUMENT AND CONTROL FUNCTIONS ...4-1 Main switch ...4-1 Indicator lights and warning lights ...4-1 Multi-function meter unit ...4-2 Handlebar switches ...4-5 Clutch lever ...4-7 Shift pedal ...4-7 Brake lever ...4-8 Brake pedal ...4-8 Fuel tank cap ...4-8 Fuel ...4-9 Fuel tank breather/overflow hose...
Owners Manual
Page 12
... accessories not sold by Yamaha or modifications not specifically recommended by Yamaha, even if sold and installed by Yamaha for your load (suspension-adjustable models only), and check the condition and pressure of your tires. • Never attach any large or heavy items to your motorcycle: The total weight of an overloaded vehicle could cause an accident. SAFETY INFORMATION G G 2 Do not run engine outdoors where engine exhaust...
... accessories not sold by Yamaha or modifications not specifically recommended by Yamaha, even if sold and installed by Yamaha for your load (suspension-adjustable models only), and check the condition and pressure of your tires. • Never attach any large or heavy items to your motorcycle: The total weight of an overloaded vehicle could cause an accident. SAFETY INFORMATION G G 2 Do not run engine outdoors where engine exhaust...
Owners Manual
Page 13
... reduce ground clearance or cornering clearance, limit suspension travel, steering travel or control operation, or obscure lights or reflectors. • Accessories fitted to the handlebar or the front fork area can create instability due to improper weight distribution or aerodynamic changes. SAFETY INFORMATION Aftermarket Parts, Accessories, and Modifications While you may find aftermarket products similar in design and quality to genuine Yamaha accessories, recognize...
... reduce ground clearance or cornering clearance, limit suspension travel, steering travel or control operation, or obscure lights or reflectors. • Accessories fitted to the handlebar or the front fork area can create instability due to improper weight distribution or aerodynamic changes. SAFETY INFORMATION Aftermarket Parts, Accessories, and Modifications While you may find aftermarket products similar in design and quality to genuine Yamaha accessories, recognize...

Owners Manual
Page 16
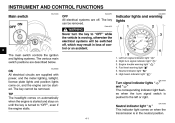
DESCRIPTION EAU10420 Right view 1 2,3,4 5 6 7 3 10,11 1. 2. 3. 4. 5. 6. 7. 8. Rear brake light switch (page 7-18) 10.Engine oil drain bolt (oil tank) (page 7-10) 11.Shock absorber assembly spring preload adjusting nut (page 4-14) Helmet holder (page 4-13) Rear brake fluid reservoir (page 7-19) Fuel injection system fuse (page 7-26) Fuse box (page 7-26) Engine oil filler cap (page 7-10) Fuel tank cap (page 4-8) Steering lock (page 4-11) Brake pedal (page 4-8) 3-2 9 8 9.
DESCRIPTION EAU10420 Right view 1 2,3,4 5 6 7 3 10,11 1. 2. 3. 4. 5. 6. 7. 8. Rear brake light switch (page 7-18) 10.Engine oil drain bolt (oil tank) (page 7-10) 11.Shock absorber assembly spring preload adjusting nut (page 4-14) Helmet holder (page 4-13) Rear brake fluid reservoir (page 7-19) Fuel injection system fuse (page 7-26) Fuse box (page 7-26) Engine oil filler cap (page 7-10) Fuel tank cap (page 4-8) Steering lock (page 4-11) Brake pedal (page 4-8) 3-2 9 8 9.
Owners Manual
Page 18
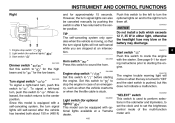
... headlight comes on when the transmission is started . The main switch controls the ignition and lighting systems. The various main switch positions are supplied with power, and the meter lighting, taillight, license plate lights and position lights come on, and the engine can be started and stays on until the key is moving, otherwise the electrical systems will be removed. Left turn signal indicator light " " Right turn signal indicator light " " Engine trouble warning light " " Fuel level warning light " " Neutral...
... headlight comes on when the transmission is started . The main switch controls the ignition and lighting systems. The various main switch positions are supplied with power, and the meter lighting, taillight, license plate lights and position lights come on, and the engine can be started and stays on until the key is moving, otherwise the electrical systems will be removed. Left turn signal indicator light " " Right turn signal indicator light " " Engine trouble warning light " " Fuel level warning light " " Neutral...
Owners Manual
Page 23
... the horn. INSTRUMENT AND CONTROL FUNCTIONS Right and for optional lights) " 3. ECA15321 NOTICE Do not install a bulb which exceeds 12 V, 35 W in after the vehicle has traveled both about 150 m (490 ft) Engine stop switch " / " Set this switch to the left -hand turn, push this switch to turn signal lights can be canceled manually by pushing the switch in either light, otherwise the headlight fuse may blow or the battery...
... the horn. INSTRUMENT AND CONTROL FUNCTIONS Right and for optional lights) " 3. ECA15321 NOTICE Do not install a bulb which exceeds 12 V, 35 W in after the vehicle has traveled both about 150 m (490 ft) Engine stop switch " / " Set this switch to the left -hand turn, push this switch to turn signal lights can be canceled manually by pushing the switch in either light, otherwise the headlight fuse may blow or the battery...

Owners Manual
Page 32
... Yamaha factory. ECA10191 NOTICE G WARNING This shock absorber assembly contains highly pressurized nitrogen gas. G Do not tamper with or attempt to the specified torque. Cylinder damage will result in accordance with Yamaha's EXUP (EXhaust Ultimate Power valve) system. Do not deform or damage the cylinder in any service. Take the shock absorber assembly to excessive gas pressure. The EXUP system valve is constantly adjusted in poor damping performance. INSTRUMENT AND CONTROL FUNCTIONS Spring...
... Yamaha factory. ECA10191 NOTICE G WARNING This shock absorber assembly contains highly pressurized nitrogen gas. G Do not tamper with or attempt to the specified torque. Cylinder damage will result in accordance with Yamaha's EXUP (EXhaust Ultimate Power valve) system. Do not deform or damage the cylinder in any service. Take the shock absorber assembly to excessive gas pressure. The EXUP system valve is constantly adjusted in poor damping performance. INSTRUMENT AND CONTROL FUNCTIONS Spring...
Owners Manual
Page 35
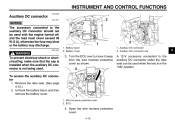
... away from the wire harness protective cover as shown. 2 A 12-V accessory connected to the auxiliary DC connector should not be used when the key is not being used with the engine turned off, and the load must never exceed 36 W (3 A), otherwise the fuse may blow or the battery may discharge. ECU 4. Auxiliary DC connector cap 4 WARNING To prevent electrical shock or shortcircuiting, make...
... away from the wire harness protective cover as shown. 2 A 12-V accessory connected to the auxiliary DC connector should not be used when the key is not being used with the engine turned off, and the load must never exceed 36 W (3 A), otherwise the fuse may blow or the battery may discharge. ECU 4. Auxiliary DC connector cap 4 WARNING To prevent electrical shock or shortcircuiting, make...

Owners Manual
Page 39
...: G The transmission is in gear with all controls. G an engine auto-stop switch is not a malfunction. OPERATION AND IMPORTANT RIDING POINTS EAU15951 EAU47150 EAU16247 Starting the engine Read the Owner's Manual carefully to become familiar with the clutch lever pulled and the sidestand up. EWA10271 WARNING Failure to familiarize yourself with : G a lean angle sensor to stop the engine in the neutral position. Turn the key to "OFF...
...: G The transmission is in gear with all controls. G an engine auto-stop switch is not a malfunction. OPERATION AND IMPORTANT RIDING POINTS EAU15951 EAU47150 EAU16247 Starting the engine Read the Owner's Manual carefully to become familiar with the clutch lever pulled and the sidestand up. EWA10271 WARNING Failure to familiarize yourself with : G a lean angle sensor to stop the engine in the neutral position. Turn the key to "OFF...

Owners Manual
Page 40
... you control the amount of forced shifting. TIP To shift the transmission into the neutral position, press the shift pedal down repeatedly until it . Open the throttle gradually, and at the same time, release the clutch lever slowly. 6-2 Pull the clutch lever to check the electrical circuit. 3. If not, ask a Yamaha dealer to disengage the clutch. 2. Always use the clutch while changing gears to withstand the shock of engine power...
... you control the amount of forced shifting. TIP To shift the transmission into the neutral position, press the shift pedal down repeatedly until it . Open the throttle gradually, and at the same time, release the clutch lever slowly. 6-2 Pull the clutch lever to check the electrical circuit. 3. If not, ask a Yamaha dealer to disengage the clutch. 2. Always use the clutch while changing gears to withstand the shock of engine power...

Owners Manual
Page 50
... G G 7 Air filter • This model's air filter is equipped with a disposable oil-coated paper element, which must not be cleaned with compressed air to avoid damaging it. • The air filter element needs to be replaced more frequently when riding in unusually wet or dusty areas. Hydraulic brake and clutch systems • After disassembling the brake or clutch master cylinders, caliper cylinders or clutch release cylinder, always change the fluid. PERIODIC MAINTENANCE...
... G G 7 Air filter • This model's air filter is equipped with a disposable oil-coated paper element, which must not be cleaned with compressed air to avoid damaging it. • The air filter element needs to be replaced more frequently when riding in unusually wet or dusty areas. Hydraulic brake and clutch systems • After disassembling the brake or clutch master cylinders, caliper cylinders or clutch release cylinder, always change the fluid. PERIODIC MAINTENANCE...

Owners Manual
Page 55
... several times, and then turn the engine off . 14. Remove the engine oil filler cap, and then gradually fill the oil tank with a diesel specification of "CD" or oils of recommended engine oil through the filler hole, insert the dipstick, and then tighten the oil filler cap. 13. Recommended engine oil: See page 9-1. In addition, the transfer case oil level should be checked and the oil must be changed by a Yamaha...
... several times, and then turn the engine off . 14. Remove the engine oil filler cap, and then gradually fill the oil tank with a diesel specification of "CD" or oils of recommended engine oil through the filler hole, insert the dipstick, and then tighten the oil filler cap. 13. Recommended engine oil: See page 9-1. In addition, the transfer case oil level should be checked and the oil must be changed by a Yamaha...

Owners Manual
Page 60
... checked for damage and measure the lining thickness. Turn the rear brake light switch adjusting nut while holding the rear brake light switch in ), have a Yamaha dealer replace the brake pads as a set . Lining thickness 1. EAU22430 indicator grooves have almost disappeared, have a Yamaha dealer replace the brake pads as a set . 7-18 Rear brake light switch 2. PERIODIC MAINTENANCE AND ADJUSTMENT EAU22273 EAU22392 Brake light switches Checking the front and rear brake pads The front and rear brake pads must be adjusted by...
... checked for damage and measure the lining thickness. Turn the rear brake light switch adjusting nut while holding the rear brake light switch in ), have a Yamaha dealer replace the brake pads as a set . Lining thickness 1. EAU22430 indicator grooves have almost disappeared, have a Yamaha dealer replace the brake pads as a set . 7-18 Rear brake light switch 2. PERIODIC MAINTENANCE AND ADJUSTMENT EAU22273 EAU22392 Brake light switches Checking the front and rear brake pads The front and rear brake pads must be adjusted by...

Owners Manual
Page 69
Turn the key to "ON" and turn on the electrical circuit in question to the electrical system and possibly a fire. [EWA15131] Specified fuses: Main fuse: 50.0 A Headlight fuse: 20.0 A Signaling system fuse: 10.0 A Taillight fuse: 7.5 A Ignition fuse: 25.0 A Fuel injection system fuse: 15.0 A Backup fuse: 7.5 A Auxiliary DC connector fuse: 3.0 A 1. 2. 3. 4. PERIODIC MAINTENANCE AND ADJUSTMENT avoid causing extensive damage to check if the device operates. 5. If the fuse immediately blows again, have a Yamaha dealer check...
Turn the key to "ON" and turn on the electrical circuit in question to the electrical system and possibly a fire. [EWA15131] Specified fuses: Main fuse: 50.0 A Headlight fuse: 20.0 A Signaling system fuse: 10.0 A Taillight fuse: 7.5 A Ignition fuse: 25.0 A Fuel injection system fuse: 15.0 A Backup fuse: 7.5 A Auxiliary DC connector fuse: 3.0 A 1. 2. 3. 4. PERIODIC MAINTENANCE AND ADJUSTMENT avoid causing extensive damage to check if the device operates. 5. If the fuse immediately blows again, have a Yamaha dealer check...

Owners Manual
Page 78
... the spark plugs and the spark plug caps. Install the spark plug caps onto the spark plugs, and then place the spark plugs on storing the battery, see page 7-25. Check and, if necessary, correct the tire air pressure, and then lift the motorcycle so that the electrodes are off the ground. Remove the battery and fully charge it once a month. Alternatively, turn the wheels a little every month in one spot. 6. Perform the...
... the spark plugs and the spark plug caps. Install the spark plug caps onto the spark plugs, and then place the spark plugs on storing the battery, see page 7-25. Check and, if necessary, correct the tire air pressure, and then lift the motorcycle so that the electrodes are off the ground. Remove the battery and fully charge it once a month. Alternatively, turn the wheels a little every month in one spot. 6. Perform the...
Owners Manual
Page 79
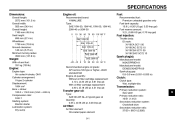
... 10 Spark plug(s): Manufacturer/model: NGK/DPR8EA-9 Manufacturer/model: DENSO/X24EPR-U9 Spark plug gap: 0.8-0.9 mm (0.031-0.035 in) Weight: With oil and fuel: 331 kg (730 lb) Engine: Engine type: Air cooled 4-stroke, OHV Cylinder arrangement: V-type 2-cylinder Displacement: 1854 cm³ Bore × stroke: 100.0 × 118.0 mm (3.94 × 4.65 in) Compression ratio: 9.48 :1 Starting system: Electric starter Lubrication system: Dry sump Recommended engine oil grade: API service...
... 10 Spark plug(s): Manufacturer/model: NGK/DPR8EA-9 Manufacturer/model: DENSO/X24EPR-U9 Spark plug gap: 0.8-0.9 mm (0.031-0.035 in) Weight: With oil and fuel: 331 kg (730 lb) Engine: Engine type: Air cooled 4-stroke, OHV Cylinder arrangement: V-type 2-cylinder Displacement: 1854 cm³ Bore × stroke: 100.0 × 118.0 mm (3.94 × 4.65 in) Compression ratio: 9.48 :1 Starting system: Electric starter Lubrication system: Dry sump Recommended engine oil grade: API service...

Owners Manual
Page 81
SPECIFICATIONS Voltage, capacity: 12 V, 12.0 Ah Headlight: Bulb type: Halogen bulb Bulb voltage, wattage × quantity: Headlight: 12 V, 60 W/55 W × 1 Tail/brake light: LED Front turn signal/position light: 12 V, 23 W/8.0 W × 2 Rear turn signal light: 12 V, 21.0 W × 2 License plate light: 12 V, 3.8 W × 2 Meter lighting: LED Neutral indicator light: LED High beam indicator light: LED Turn signal indicator light: LED Fuel level warning light: LED Engine trouble warning light: LED Taillight fuse: 7.5 A Signaling system fuse: 10.0 A Ignition fuse: 25.0 A Fuel injection ...
SPECIFICATIONS Voltage, capacity: 12 V, 12.0 Ah Headlight: Bulb type: Halogen bulb Bulb voltage, wattage × quantity: Headlight: 12 V, 60 W/55 W × 1 Tail/brake light: LED Front turn signal/position light: 12 V, 23 W/8.0 W × 2 Rear turn signal light: 12 V, 21.0 W × 2 License plate light: 12 V, 3.8 W × 2 Meter lighting: LED Neutral indicator light: LED High beam indicator light: LED Turn signal indicator light: LED Fuel level warning light: LED Engine trouble warning light: LED Taillight fuse: 7.5 A Signaling system fuse: 10.0 A Ignition fuse: 25.0 A Fuel injection ...
Owners Manual
Page 88
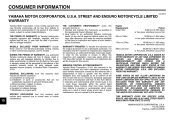
... the time of sale with headlight, stoplight, and turn signals shall be free from defects in material and workmanship for this warranty shall include parts replaced due to the ultimate purchaser and each subsequent purchaser of business. emissions standards applicable at such dealer's place of each Yamaha motorcycle covered by an authorized Yamaha motorcycle dealer. YAMAHA MOTOR CORPORATION, U.S.A. THE PERIOD OF WARRANTY for...
... the time of sale with headlight, stoplight, and turn signals shall be free from defects in material and workmanship for this warranty shall include parts replaced due to the ultimate purchaser and each subsequent purchaser of business. emissions standards applicable at such dealer's place of each Yamaha motorcycle covered by an authorized Yamaha motorcycle dealer. YAMAHA MOTOR CORPORATION, U.S.A. THE PERIOD OF WARRANTY for...
Owners Manual
Page 89
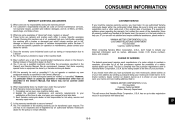
... the Owner's Manual, that failure may not be "voided" or "cancelled." Explain the operation, maintenance, and warranty requirements to : YAMAHA MOTOR CORPORATION, U.S.A. A. Yes. Box 6555 Cypress, California 90630 Attention: Warranty Department This will ensure that items requiring special tools or equipment be transferred upon your request at the time of normal maintenance services, non-warranty repairs, accident and collision damages, and oil, oil filters, air filters, spark plugs, and brake...
... the Owner's Manual, that failure may not be "voided" or "cancelled." Explain the operation, maintenance, and warranty requirements to : YAMAHA MOTOR CORPORATION, U.S.A. A. Yes. Box 6555 Cypress, California 90630 Attention: Warranty Department This will ensure that items requiring special tools or equipment be transferred upon your request at the time of normal maintenance services, non-warranty repairs, accident and collision damages, and oil, oil filters, air filters, spark plugs, and brake...

Owners Manual
Page 92
INDEX A Air filter element ...7-14 Auxiliary DC connector ...4-18 Fuel...4-9 Fuel level warning light ...4-2 Fuel tank breather/overflow hose ...4-10 Fuel tank cap ...4-8 Fuses, replacing ...7-26 Part locations ...3-1 R Rear suspension, lubricating...7-23 Rider seat...4-12 B Battery...7-25 Brake and clutch fluid levels, checking ...7-19 Brake and clutch fluids, changing ...7-20 Brake and clutch levers, checking and lubricating ...7-22 Brake and shift pedals, checking and lubricating ...7-22 Brake lever...4-8 Brake lever free play, checking...7-17 Brake light switches ...7-18 Brake pedal...
INDEX A Air filter element ...7-14 Auxiliary DC connector ...4-18 Fuel...4-9 Fuel level warning light ...4-2 Fuel tank breather/overflow hose ...4-10 Fuel tank cap ...4-8 Fuses, replacing ...7-26 Part locations ...3-1 R Rear suspension, lubricating...7-23 Rider seat...4-12 B Battery...7-25 Brake and clutch fluid levels, checking ...7-19 Brake and clutch fluids, changing ...7-20 Brake and clutch levers, checking and lubricating ...7-22 Brake and shift pedals, checking and lubricating ...7-22 Brake lever...4-8 Brake lever free play, checking...7-17 Brake light switches ...7-18 Brake pedal...