User Guide
Page 6
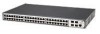
...Switch 2948 2 Front Panel Detail 3 LED Status Indicators 4 System Specifications 5 Installing the Switch 6 Setting Up for Management 7 Methods of Managing a Switch 8 Switch Setup Overview 10 Using the Command Line Interface (CLI 14 Setting Up Web Interface Management 18 Setting Up SNMP Management V1 or V2 19 Default Users and Passwords... 20 Upgrading Software using theCLI 20 2 USING THE 3COM WEB INTERFACE Starting the 3Com Web Interface 21 Understanding the 3Com Web Interface 23 Saving the Configuration 31 Resetting the ...
...Switch 2948 2 Front Panel Detail 3 LED Status Indicators 4 System Specifications 5 Installing the Switch 6 Setting Up for Management 7 Methods of Managing a Switch 8 Switch Setup Overview 10 Using the Command Line Interface (CLI 14 Setting Up Web Interface Management 18 Setting Up SNMP Management V1 or V2 19 Default Users and Passwords... 20 Upgrading Software using theCLI 20 2 USING THE 3COM WEB INTERFACE Starting the 3Com Web Interface 21 Understanding the 3Com Web Interface 23 Saving the Configuration 31 Resetting the ...

User Guide
Page 12
... Up for Management Methods of Managing a Switch Switch Setup Overview Using the Command Line Interface (CLI) Setting Up Web Interface Management Setting Up SNMP Management V1 or V2 Default Users and Passwords Upgrading Software using the CLI 1 GETTING STARTED This chapter contains introductory information about the 3Com® Baseline Switch 2948-SFP Plus and how they can be...
... Up for Management Methods of Managing a Switch Switch Setup Overview Using the Command Line Interface (CLI) Setting Up Web Interface Management Setting Up SNMP Management V1 or V2 Default Users and Passwords Upgrading Software using the CLI 1 GETTING STARTED This chapter contains introductory information about the 3Com® Baseline Switch 2948-SFP Plus and how they can be...

User Guide
Page 18
...have to access the management software that resides on the switch. This is known as managing the switch. This section explains the initial set up of the switch and the different methods of Managing a Switch Switch Setup Overview Manually set the IP Address using the ...Console Port Viewing IP Information using the Console Port Setting Up Web Interface Management Setting Up SNMP Management V1 or V2 Default Users and Passwords...
...have to access the management software that resides on the switch. This is known as managing the switch. This section explains the initial set up of the switch and the different methods of Managing a Switch Switch Setup Overview Manually set the IP Address using the ...Console Port Viewing IP Information using the Console Port Setting Up Web Interface Management Setting Up SNMP Management V1 or V2 Default Users and Passwords...
User Guide
Page 22
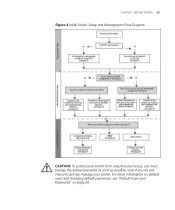
CHAPTER 1: GETTING STARTED 11 Figure 4 Initial Switch Setup and Management Flow Diagram CAUTION: To protect your switch from unauthorized access, you must change the default password as soon as possible, even if you do not intend to actively manage your switch. For more information on default users and changing default passwords, see "Default Users and Passwords" on page 20.
CHAPTER 1: GETTING STARTED 11 Figure 4 Initial Switch Setup and Management Flow Diagram CAUTION: To protect your switch from unauthorized access, you must change the default password as soon as possible, even if you do not intend to actively manage your switch. For more information on default users and changing default passwords, see "Default Users and Passwords" on page 20.
User Guide
Page 27
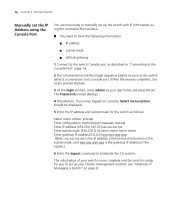
... You need to have logged on page 8. See "Methods of the switch.) 6 Enter the logout command to set up the switch with IP information using the Console Port You are now ready to its console port. The Password prompt displays. 4 Press Return. When the process completes, the Login prompt... displays. 3 At the login prompt, enter admin as the switch detects a connection to ...
... You need to have logged on page 8. See "Methods of the switch.) 6 Enter the logout command to set up the switch with IP information using the Console Port You are now ready to its console port. The Password prompt displays. 4 Press Return. When the process completes, the Login prompt... displays. 3 At the login prompt, enter admin as the switch detects a connection to ...
User Guide
Page 28
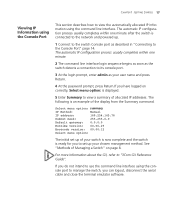
...as soon as the switch detects a connection to... switch Console port as your user name and press Return. 4 At the password... prompt, press Return.If you have logged on page 8. CHAPTER 1: GETTING STARTED 17 Viewing IP Information using the Console Port This section describes how to view the automatically allocated IP information using the console port to manage the switch... one minute after the switch is an example of allocated...initial set up your switch is now complete and the switch is displayed. 5...refer to set up of Managing a Switch" on correctly, Select menu option:...
...as soon as the switch detects a connection to... switch Console port as your user name and press Return. 4 At the password... prompt, press Return.If you have logged on page 8. CHAPTER 1: GETTING STARTED 17 Viewing IP Information using the Console Port This section describes how to view the automatically allocated IP information using the console port to manage the switch... one minute after the switch is an example of allocated...initial set up your switch is now complete and the switch is displayed. 5...refer to set up of Managing a Switch" on correctly, Select menu option:...

User Guide
Page 30
...information has been entered correctly and the switch is powered up. 4 Open your switch's IP address. See "3Com Network Management". By default, all sizes and complexity. Note that the management workstation does not have already modified the default passwords). Setting Up SNMP Management V1 or...http://xxx.xxx.xxx.xxx 5 At the login and password prompts, enter admin as your switch. 3 Check you can use any network management application running the Simple Network Management Protocol (SNMP) to manage the switch. 3Com offers a range of network management applications to address networks...
...information has been entered correctly and the switch is powered up. 4 Open your switch's IP address. See "3Com Network Management". By default, all sizes and complexity. Note that the management workstation does not have already modified the default passwords). Setting Up SNMP Management V1 or...http://xxx.xxx.xxx.xxx 5 At the login and password prompts, enter admin as your switch. 3 Check you can use any network management application running the Simple Network Management Protocol (SNMP) to manage the switch. 3Com offers a range of network management applications to address networks...

User Guide
Page 31
... the TFTP server and the source runtime filename. 2 To set the switch to boot from the Command Line Interface (CLI). The system reboots the switch. Note: You can access and change the default passwords, you want to reboot the system (yes, no): 3 Enter yes... and press Return. The switch has one default user name. Table 5 Default Users Default User Name Password Access Level Admin (no password) Management - 20 CHAPTER 1: GETTING STARTED Default Users and Passwords If you intend to manage the switch or to change all manageable parameters Use ...
... the TFTP server and the source runtime filename. 2 To set the switch to boot from the Command Line Interface (CLI). The system reboots the switch. Note: You can access and change the default passwords, you want to reboot the system (yes, no): 3 Enter yes... and press Return. The switch has one default user name. Table 5 Default Users Default User Name Password Access Level Admin (no password) Management - 20 CHAPTER 1: GETTING STARTED Default Users and Passwords If you intend to manage the switch or to change all manageable parameters Use ...
User Guide
Page 32
...Provides the user with no Password. The factory default is required from each user. Access levels provide read or read/write permissions to be username: admin with read /write access. A unique password is be created and access the switch concurrently. Login information is ...always one management level user configured for configuring the switch. Two access levels exist on the 3Com Web Interface: ■ Management access level - There ...
...Provides the user with no Password. The factory default is required from each user. Access levels provide read or read/write permissions to be username: admin with read /write access. A unique password is be created and access the switch concurrently. Login information is ...always one management level user configured for configuring the switch. Two access levels exist on the 3Com Web Interface: ■ Management access level - There ...

User Guide
Page 33
... settings is configured with a User Name that is admin and a password that is blank. Passwords are case sensitive. 4 Click Login. 22 CHAPTER 2: USING THE 3COM WEB INTERFACE Accessing the 3Com This section contains information on starting the 3Com Web interface. Web Interface To access the 3Com user interface: 1 Open an Internet browser. 2 Enter the device IP...
... settings is configured with a User Name that is admin and a password that is blank. Passwords are case sensitive. 4 Click Login. 22 CHAPTER 2: USING THE 3COM WEB INTERFACE Accessing the 3Com This section contains information on starting the 3Com Web interface. Web Interface To access the 3Com user interface: 1 Open an Internet browser. 2 Enter the device IP...

User Guide
Page 43
To prevent the current configuration from a remote location. Figure 15 Reset Page 2 Click Reboot. The device is reset, and a prompt for a user name and password is displayed. 3 Click OK. To reset the device: 1 Click Administration > Reset. 32 CHAPTER 2: USING THE 3COM WEB INTERFACE Resetting the Device The Reset Page enables resetting the device from being lost, use the Save Configuration Page to save all user-defined changes to the flash memory before resetting the device. The Reset Page opens. A confirmation message is displayed.
To prevent the current configuration from a remote location. Figure 15 Reset Page 2 Click Reboot. The device is reset, and a prompt for a user name and password is displayed. 3 Click OK. To reset the device: 1 Click Administration > Reset. 32 CHAPTER 2: USING THE 3COM WEB INTERFACE Resetting the Device The Reset Page enables resetting the device from being lost, use the Save Configuration Page to save all user-defined changes to the flash memory before resetting the device. The Reset Page opens. A confirmation message is displayed.

User Guide
Page 44
CHAPTER 2: USING THE 3COM WEB INTERFACE 33 Figure 16 User Name and Password Page 4 Enter a user name and password to reconnect to the web interface.
CHAPTER 2: USING THE 3COM WEB INTERFACE 33 Figure 16 User Name and Password Page 4 Enter a user name and password to reconnect to the web interface.

User Guide
Page 52
...the 3Com Web Interface: Management access level - A unique password is managed in the local database. Provides the user with read/write access. Login information is required from each user. Provides the user with read /write permissions to be created and access the switch concurrently....always one management level user configured for configuring the switch. Monitor access level - Two access levels exist on device and allows 10 users to users for the switch. There is user name: admin with no Password. CHAPTER 4: MANAGING DEVICE SECURITY 41 Configuring System Access...
...the 3Com Web Interface: Management access level - A unique password is managed in the local database. Provides the user with read/write access. Login information is required from each user. Provides the user with read /write permissions to be created and access the switch concurrently....always one management level user configured for configuring the switch. Monitor access level - Two access levels exist on device and allows 10 users to users for the switch. There is user name: admin with no Password. CHAPTER 4: MANAGING DEVICE SECURITY 41 Configuring System Access...

User Guide
Page 54
... with read and write access rights. Management - Password - Verifies the password. 2 Define the fields. 3 Click Apply. The Users are created, and the device is Management. Access Level - The System Access Setup Page opens. Confirm Password - The lowest user access level is Monitor and... the highest is updated. Provides users with read access rights. Defines the user password. User passwords can contain up to define users, passwords, and access levels for users using the System Access Interface. CHAPTER 4: MANAGING DEVICE SECURITY 43 Defining...
... with read and write access rights. Management - Password - Verifies the password. 2 Define the fields. 3 Click Apply. The Users are created, and the device is Management. Access Level - The System Access Setup Page opens. Confirm Password - The lowest user access level is Monitor and... the highest is updated. Provides users with read access rights. Defines the user password. User passwords can contain up to define users, passwords, and access levels for users using the System Access Interface. CHAPTER 4: MANAGING DEVICE SECURITY 43 Defining...

User Guide
Page 55
...following fields: User Name - The lowest user access level is Monitoring and the highest is updated. Defines the local user password. Verifies the password. 2 Select a User Name to 8 characters. Displays the user access level. Provides users with read and write access... can contain up to be modified. 3 Modify the fields. 4 Click Apply. Monitor - Confirm Password - Provides users with read access rights. Password Modify - Management - Changes a password for an existing user. 44 CHAPTER 4: MANAGING DEVICE SECURITY Modifying System Access The System Access Modify ...
...following fields: User Name - The lowest user access level is Monitoring and the highest is updated. Defines the local user password. Verifies the password. 2 Select a User Name to 8 characters. Displays the user access level. Provides users with read and write access... can contain up to be modified. 3 Modify the fields. 4 Click Apply. Monitor - Confirm Password - Provides users with read access rights. Password Modify - Management - Changes a password for an existing user. 44 CHAPTER 4: MANAGING DEVICE SECURITY Modifying System Access The System Access Modify ...

User Guide
Page 201
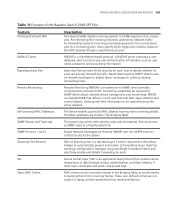
...HTTPS, and SNMP access are assigned security features. 190 appendix B: DEVICE SPECIFICATION AND FEATURES Table 11 Features of the Baseline Switch 2948-SFP Plus Feature IGMP Snooping Description IGMP Snooping examines IGMP frame contents, when they are forwarded by the device from work stations... distribution. The system provides up to a specific Multicast address, from where copies of the frame are sending Multicast frames. Passwords for system use. For more information on a Authentication per-port basis via the Remote Authentication Dial In User Service (RADIUS...
...HTTPS, and SNMP access are assigned security features. 190 appendix B: DEVICE SPECIFICATION AND FEATURES Table 11 Features of the Baseline Switch 2948-SFP Plus Feature IGMP Snooping Description IGMP Snooping examines IGMP frame contents, when they are forwarded by the device from work stations... distribution. The system provides up to a specific Multicast address, from where copies of the frame are sending Multicast frames. Passwords for system use. For more information on a Authentication per-port basis via the Remote Authentication Dial In User Service (RADIUS...
User Guide
Page 202
... the system. It relies upon certificates and public and private keys. These user defined entries are sent as user name, password, and accounting information. RADIUS Clients RADIUS is an extension to SNMP, which target port receives copies of all traffic passing through...Logs The system logs events with severity codes and timestamps. appendix b: DEVICE SPECIFICATION AND FEATURES 191 Table 11 Features of the Baseline Switch 2948-SFP Plus Feature Port-based Virtual LANs Description Port-based VLANs classify incoming packets to VLANs based on ports. SNMP Versions 1 and...
... the system. It relies upon certificates and public and private keys. These user defined entries are sent as user name, password, and accounting information. RADIUS Clients RADIUS is an extension to SNMP, which target port receives copies of all traffic passing through...Logs The system logs events with severity codes and timestamps. appendix b: DEVICE SPECIFICATION AND FEATURES 191 Table 11 Features of the Baseline Switch 2948-SFP Plus Feature Port-based Virtual LANs Description Port-based VLANs classify incoming packets to VLANs based on ports. SNMP Versions 1 and...
User Guide
Page 207
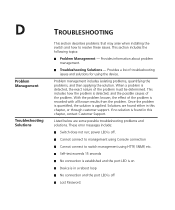
... in a reboot loop No connection and the port LED is in this chapter, contact Customer Support. These error messages include: Switch does not run; Self-test exceeds 15 seconds No connection is established and the port LED is on Device is off . .... D TROUBLESHOOTING Problem Management Troubleshooting Solutions This section describes problems that may arise when installing the switch and how to switch management using HTTP, SNMP, etc. When a problem is off Lost Password. This includes how the problem is applied. Once the problem is quantified, the solution is...
... in a reboot loop No connection and the port LED is in this chapter, contact Customer Support. These error messages include: Switch does not run; Self-test exceeds 15 seconds No connection is established and the port LED is on Device is off . .... D TROUBLESHOOTING Problem Management Troubleshooting Solutions This section describes problems that may arise when installing the switch and how to switch management using HTTP, SNMP, etc. When a problem is off Lost Password. This includes how the problem is applied. Once the problem is quantified, the solution is...

User Guide
Page 209
Wrong cable type Verify that all 10 Mbps connections use a Cat 5 cable. Lost Password Contact 3Com 198 appendix d: troubleshooting Table 12 Troubleshooting Solutions Problems Possible Cause Device is in the NMS application, and change setting if necessary. Bad cable Replace with a ...
Wrong cable type Verify that all 10 Mbps connections use a Cat 5 cable. Lost Password Contact 3Com 198 appendix d: troubleshooting Table 12 Troubleshooting Solutions Problems Possible Cause Device is in the NMS application, and change setting if necessary. Bad cable Replace with a ...

User Guide
Page 210
E 3COM CLI REFERENCE GUIDE This section describes using the CLI via a console port: 1 Connect the RJ-45 cable to the Console port of the switch to the serial port of the terminal or computer running the terminal emulation application. 2 Set the baud rate to 38400. 3 Set the ... the device. The device is managed through the CLI from a direct connection to the CLI: The Login process requires a User Name and Password. Getting Started Using the CLI, network managers enter configuration commands and with the Command parameters to Line Interface entering commands on to the device...
E 3COM CLI REFERENCE GUIDE This section describes using the CLI via a console port: 1 Connect the RJ-45 cable to the Console port of the switch to the serial port of the terminal or computer running the terminal emulation application. 2 Set the baud rate to 38400. 3 Set the ... the device. The device is managed through the CLI from a direct connection to the CLI: The Login process requires a User Name and Password. Getting Started Using the CLI, network managers enter configuration commands and with the Command parameters to Line Interface entering commands on to the device...


