

User Guide
Page 4
... 30 Setting Wireless Network Properties 31 Manually Select Radio Channels 33 Setting Up an Ad-Hoc Network 34 Changing Wireless Security Settings 35 Changing RADIUS Settings 37 Changing SNMP Settings 38 Using the Access Control List 39 Serial Port 40 Resetting the Bridge 42 Restoring the Bridge to Factory Defaults 43 Upgrading the System 44 Changing the Administration Login Name and Password 45 Backing up a Configuration 45 Restoring a Configuration 46 Logging Out 46 Clearing the Ethernet Client List 46 Viewing Connection Status 47 Viewing System Summary 47 4 TROUBLESHOOTING Diagnosing Problems...
... 30 Setting Wireless Network Properties 31 Manually Select Radio Channels 33 Setting Up an Ad-Hoc Network 34 Changing Wireless Security Settings 35 Changing RADIUS Settings 37 Changing SNMP Settings 38 Using the Access Control List 39 Serial Port 40 Resetting the Bridge 42 Restoring the Bridge to Factory Defaults 43 Upgrading the System 44 Changing the Administration Login Name and Password 45 Backing up a Configuration 45 Restoring a Configuration 46 Logging Out 46 Clearing the Ethernet Client List 46 Viewing Connection Status 47 Viewing System Summary 47 4 TROUBLESHOOTING Diagnosing Problems...
User Guide
Page 9
...to use the Configuration Management System and 3Com Wireless Infrastructure Device Manager. ■ Release Note-printed note that describes important product information. ■ README.TXT file-text file located on the 3Com Installation CD that describes last-minute product information. Downloaded from the Windows Start menu. Accessing Online Documentation The CD supplied with your Bridge contains the following online documentation: ■ 3Com 11a/b/g Wireless Workgroup Bridge User Guide ■ 3Com Wireless Infrastructure Device Manager Online Help ■ 3Com 11a/b/g Wireless...
...to use the Configuration Management System and 3Com Wireless Infrastructure Device Manager. ■ Release Note-printed note that describes important product information. ■ README.TXT file-text file located on the 3Com Installation CD that describes last-minute product information. Downloaded from the Windows Start menu. Accessing Online Documentation The CD supplied with your Bridge contains the following online documentation: ■ 3Com 11a/b/g Wireless Workgroup Bridge User Guide ■ 3Com Wireless Infrastructure Device Manager Online Help ■ 3Com 11a/b/g Wireless...

User Guide
Page 11
... broadcast over the radio, 3Com supports Wireless Equivalent Privacy (WEP) RC4 64-bit, 128-bit and 152-bit shared-key encryption. 3Com strengthens this basic security mechanism with additional security features, including: ■ MAC address access control lists ■ IEEE 802.1x per-port user authentication with RADIUS server authentication support ■ Temporal Key Integrity Protocol (TKIP) ■ Advanced Encryption Standard (AES) ■ WiFi Protected Access (WPA) ■ Extensible Authentication Protocol (EAP) support: EAP-TTLS and PEAP Downloaded from www.Manualslib.com manuals...
... broadcast over the radio, 3Com supports Wireless Equivalent Privacy (WEP) RC4 64-bit, 128-bit and 152-bit shared-key encryption. 3Com strengthens this basic security mechanism with additional security features, including: ■ MAC address access control lists ■ IEEE 802.1x per-port user authentication with RADIUS server authentication support ■ Temporal Key Integrity Protocol (TKIP) ■ Advanced Encryption Standard (AES) ■ WiFi Protected Access (WPA) ■ Extensible Authentication Protocol (EAP) support: EAP-TTLS and PEAP Downloaded from www.Manualslib.com manuals...
User Guide
Page 13
....com manuals search engine Infrastructure configurations extend your wireless LAN to devices that would otherwise have to be connected to 16 client devices-such as the 3Com 11a/b/g Wireless LAN Access Point. Downloaded from the wired LAN. Network Configuration and Planning The Bridge can operate in infrastructure mode and connected to an Ethernet hub, a single Bridge can support a stand-alone wireless network configuration or an integrated configuration with the wired network through a wireless LAN access point such as computers with one another at close range...
....com manuals search engine Infrastructure configurations extend your wireless LAN to devices that would otherwise have to be connected to 16 client devices-such as the 3Com 11a/b/g Wireless LAN Access Point. Downloaded from the wired LAN. Network Configuration and Planning The Bridge can operate in infrastructure mode and connected to an Ethernet hub, a single Bridge can support a stand-alone wireless network configuration or an integrated configuration with the wired network through a wireless LAN access point such as computers with one another at close range...
User Guide
Page 14
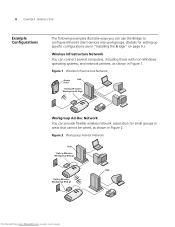
... provide flexible wireless network association for setting up specific configurations are in "Installing the Bridge" on page 9.) Wireless Infrastructure Network You can use the Bridge to configure Ethernet client devices into workgroups. (Details for small groups in areas that cannot be wired, as shown in Figure 2. Figure 2 Workgroup Ad-Hoc Network Hub 11a/b/ g Wireless Workgroup Brid ge .11a .11g .100 .10 11a/b/ g Wireless Workgroup Brid ge .11a .11g .100 .10 Hub Downloaded from www.Manualslib.com manuals search...
... provide flexible wireless network association for setting up specific configurations are in "Installing the Bridge" on page 9.) Wireless Infrastructure Network You can use the Bridge to configure Ethernet client devices into workgroups. (Details for small groups in areas that cannot be wired, as shown in Figure 2. Figure 2 Workgroup Ad-Hoc Network Hub 11a/b/ g Wireless Workgroup Brid ge .11a .11g .100 .10 11a/b/ g Wireless Workgroup Brid ge .11a .11g .100 .10 Hub Downloaded from www.Manualslib.com manuals search...

User Guide
Page 24
... Bridge's default settings on the network. Downloaded from the factory. Alternatively, you can enter the Bridge's IP address into a web browser on a computer on page 23 for instructions. The 3Com-approved external antenna for the Bridge to determine if there is a DHCP server on page 20 to determine whether or not you need to increase the range of the Bridge, you can connect the Bridge as it secure. See "Using the Configuration Management System" on the 3Com Installation...
... Bridge's default settings on the network. Downloaded from the factory. Alternatively, you can enter the Bridge's IP address into a web browser on a computer on page 23 for instructions. The 3Com-approved external antenna for the Bridge to determine if there is a DHCP server on page 20 to determine whether or not you need to increase the range of the Bridge, you can connect the Bridge as it secure. See "Using the Configuration Management System" on the 3Com Installation...

User Guide
Page 25
... supplied standard Category 5 UTP Ethernet cable. See Figure 12 on a different subnet than the computer. You can assign a new IP address to the Bridge using the default IP address assigned at the factory. See "Using the 3Com Wireless Infrastructure Device Manager" on page 24 for a connection diagram. 2 Enter the Bridge's default IP address (169.254.2.2) into the computer's web browser. ■ If the Configuration Management System starts, the Bridge is on page 16 for instructions. Downloaded from www.Manualslib.com manuals...
... supplied standard Category 5 UTP Ethernet cable. See Figure 12 on a different subnet than the computer. You can assign a new IP address to the Bridge using the default IP address assigned at the factory. See "Using the 3Com Wireless Infrastructure Device Manager" on page 24 for a connection diagram. 2 Enter the Bridge's default IP address (169.254.2.2) into the computer's web browser. ■ If the Configuration Management System starts, the Bridge is on page 16 for instructions. Downloaded from www.Manualslib.com manuals...
User Guide
Page 26
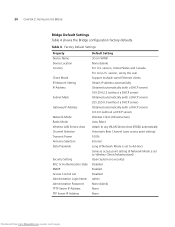
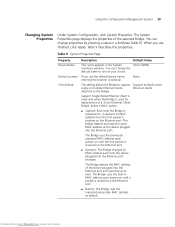
... Default Settings Property Device Name Device Location Country Client Mode IP Network Setting IP Address Subnet Mask Gateway IP Address Network Mode Radio Mode Wireless LAN Service Area Channel Selection Transmit Power Antenna Selection Data Preamble Security Setting 802.1x Authentication State SNMP Access Control List Administration Login Name Administration Password TFTP Server IP Address FTP Server IP Address Default Setting 3Com WWB None (blank) For U.S. 20 CHAPTER 2: INSTALLING THE BRIDGE Bridge Default Settings Table 4 shows the Bridge configuration factory defaults. version...
... Default Settings Property Device Name Device Location Country Client Mode IP Network Setting IP Address Subnet Mask Gateway IP Address Network Mode Radio Mode Wireless LAN Service Area Channel Selection Transmit Power Antenna Selection Data Preamble Security Setting 802.1x Authentication State SNMP Access Control List Administration Login Name Administration Password TFTP Server IP Address FTP Server IP Address Default Setting 3Com WWB None (blank) For U.S. 20 CHAPTER 2: INSTALLING THE BRIDGE Bridge Default Settings Table 4 shows the Bridge configuration factory defaults. version...
User Guide
Page 28
... instructions on using the Wireless Infrastructure Device Manager, see "Using the 3Com Wireless Infrastructure Device Manager" on using the 3CDaemon Server Tool, see the application's online help. Reboot the computer if prompted to do so. 6 Launch the tool from the Windows Start menu. For details on page 24. Downloaded from www.Manualslib.com manuals search engine 22 CHAPTER 2: INSTALLING THE BRIDGE To install one of the tools on your computer: 1 Turn on...
... instructions on using the Wireless Infrastructure Device Manager, see "Using the 3Com Wireless Infrastructure Device Manager" on using the 3CDaemon Server Tool, see the application's online help. Reboot the computer if prompted to do so. 6 Launch the tool from the Windows Start menu. For details on page 24. Downloaded from www.Manualslib.com manuals search engine 22 CHAPTER 2: INSTALLING THE BRIDGE To install one of the tools on your computer: 1 Turn on...

User Guide
Page 30
... the same name in the network (for installation instructions. The Wireless Infrastructure Device Manager must be prompted to the computer. Downloaded from www.Manualslib.com manuals search engine Choose the appropriate adapter and click OK. See "Using the 3Com Installation CD" on page 21 for example, 3Com WWB), make a note of the MAC address of the Windows operating systems listed in "Using the 3Com Installation CD" on page 21. ■ Is...
... the same name in the network (for installation instructions. The Wireless Infrastructure Device Manager must be prompted to the computer. Downloaded from www.Manualslib.com manuals search engine Choose the appropriate adapter and click OK. See "Using the 3Com Installation CD" on page 21 for example, 3Com WWB), make a note of the MAC address of the Windows operating systems listed in "Using the 3Com Installation CD" on page 21. ■ Is...

User Guide
Page 32
... password to allow the new IP address to assign an address on page 27 for details. Closes the device manager window and ends the session. If this is the first time the device is on a different subnet, you to choose which card to use. See "Using the Configuration Management System" on the same subnet as your computer has more than one network interface card installed, allows you are prompted to be set...
... password to allow the new IP address to assign an address on page 27 for details. Closes the device manager window and ends the session. If this is the first time the device is on a different subnet, you to choose which card to use. See "Using the Configuration Management System" on the same subnet as your computer has more than one network interface card installed, allows you are prompted to be set...
User Guide
Page 35
... This setting allows the Bridge to support Support multiple wired single or multiple Ethernet clients Ethernet clients attached to one of the selected Bridge. The Bridge detects the MAC address of a 3Com Ethernet Client Bridge. The Bridge uses the built-in : The Bridge uses the manufacturing radio MAC address as default. Select a MAC option: ■ Capture: Each time the Bridge is optional. When you use the default device name, entering the location is powered on, it captures its MAC address from www.Manualslib.com manuals search engine Downloaded...
... This setting allows the Bridge to support Support multiple wired single or multiple Ethernet clients Ethernet clients attached to one of the selected Bridge. The Bridge detects the MAC address of a 3Com Ethernet Client Bridge. The Bridge uses the built-in : The Bridge uses the manufacturing radio MAC address as default. Select a MAC option: ■ Capture: Each time the Bridge is optional. When you use the default device name, entering the location is powered on, it captures its MAC address from www.Manualslib.com manuals search engine Downloaded...

User Guide
Page 38
... change the Bridge WLAN service area. You may specify channel selection as follows: ■ Automatic Best Channel-When this mode, the Bridge uses the ESSID of the values (100%, 50%, 25%, 12%, min) from www.Manualslib.com manuals search engine In this option is establishing a new ad-hoc network, it from the Channel list. 32 CHAPTER 3: CONFIGURING THE BRIDGE Table 11 Wireless Network Page (continued) Wireless LAN Service Area Channel Selection Transmit Power Select...
... change the Bridge WLAN service area. You may specify channel selection as follows: ■ Automatic Best Channel-When this mode, the Bridge uses the ESSID of the values (100%, 50%, 25%, 12%, min) from www.Manualslib.com manuals search engine In this option is establishing a new ad-hoc network, it from the Channel list. 32 CHAPTER 3: CONFIGURING THE BRIDGE Table 11 Wireless Network Page (continued) Wireless LAN Service Area Channel Selection Transmit Power Select...
User Guide
Page 40
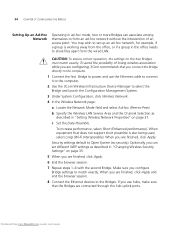
... session. 8 Connect the Ethernet devices to share files apart from the wired LAN. Security settings default to match exactly. b Specify the Wireless LAN Service Area and the Channel Selection as described in "Changing Wireless Security Settings" on the two Bridges must match exactly. Make sure you configure Bridge settings to Open System (no security). Downloaded from the office, or if a group in the office needs to the Bridges. 34 CHAPTER 3: CONFIGURING THE BRIDGE Setting Up an Ad-Hoc Network Operating...
... session. 8 Connect the Ethernet devices to share files apart from the wired LAN. Security settings default to match exactly. b Specify the Wireless LAN Service Area and the Channel Selection as described in "Changing Wireless Security Settings" on the two Bridges must match exactly. Make sure you configure Bridge settings to Open System (no security). Downloaded from the office, or if a group in the office needs to the Bridges. 34 CHAPTER 3: CONFIGURING THE BRIDGE Setting Up an Ad-Hoc Network Operating...

User Guide
Page 42
... key encryption. Click the button of encryption. 36 CHAPTER 3: CONFIGURING THE BRIDGE 104/128-bit Shared Key This option can be used with other 3Com 11a/b/g Wireless LAN devices and with equipment from certain manufacturers that also support 128-bit shared key encryption. To use TKIP: 1 On the Wireless Security page, select TKIP. 2 Select WPA-PSK for home network or WPA for the scenarios where RADIUS servers are employed: ■ WPA-PSK: Enter a pass-phrase key or hexidecimal key. Downloaded...
... key encryption. Click the button of encryption. 36 CHAPTER 3: CONFIGURING THE BRIDGE 104/128-bit Shared Key This option can be used with other 3Com 11a/b/g Wireless LAN devices and with equipment from certain manufacturers that also support 128-bit shared key encryption. To use TKIP: 1 On the Wireless Security page, select TKIP. 2 Select WPA-PSK for home network or WPA for the scenarios where RADIUS servers are employed: ■ WPA-PSK: Enter a pass-phrase key or hexidecimal key. Downloaded...

User Guide
Page 43
... can change the settings by selecting Generate a Random Key. ■ WPA: Select an authentication scheme (TTLS or PEAP) and a relevant authentication type, and enter a user name and a password. 3 Select Apply. This page allows for authentication purposes in User Service (RADIUS) server for configuration of the primary RADIUS Authentication Server. Primary RADIUS Server Enter the IP address of a Remote Access Dial-in 802.1x networks. Primary RADIUS Port Enter the port number of AES to set or modify AES relevant parameters. Make sure this address...
... can change the settings by selecting Generate a Random Key. ■ WPA: Select an authentication scheme (TTLS or PEAP) and a relevant authentication type, and enter a user name and a password. 3 Select Apply. This page allows for authentication purposes in User Service (RADIUS) server for configuration of the primary RADIUS Authentication Server. Primary RADIUS Server Enter the IP address of a Remote Access Dial-in 802.1x networks. Primary RADIUS Port Enter the port number of AES to set or modify AES relevant parameters. Make sure this address...

User Guide
Page 46
... port on the Bridge, and then configure the Bridge through the computer. ■ Select Enable to disable the Network Serial Port. Client Mode should be used to communicate with the remote computer. ■ Select Disable to establish a TCP/IP socket with which it will communicate. The Bridge network serial port may be used if you to a central server. Applications utilizing a network serial port between an RS-232 interface and a wireless device use a TCP/IP socket connection...
... port on the Bridge, and then configure the Bridge through the computer. ■ Select Enable to disable the Network Serial Port. Client Mode should be used to communicate with the remote computer. ■ Select Disable to establish a TCP/IP socket with which it will communicate. The Bridge network serial port may be used if you to a central server. Applications utilizing a network serial port between an RS-232 interface and a wireless device use a TCP/IP socket connection...

User Guide
Page 57
... address from the DHCP server. Downloaded from the hub or other device. 2 Unplug the Bridge power cord. The factory default setting for removing programs or use the standard operating system procedure for the Access Control List is disabled. Disconnecting the Bridge 51 Table 15 Troubleshooting (continued) You are restored, the Bridge can either use the following shortcut: 1 From the Windows Start menu, select Start > Programs > 3Com Wireless > Uninstall 3Com Wireless Infrastructure Device Manager. 2 When prompted to match the network. After the factory default...
... address from the DHCP server. Downloaded from the hub or other device. 2 Unplug the Bridge power cord. The factory default setting for removing programs or use the standard operating system procedure for the Access Control List is disabled. Disconnecting the Bridge 51 Table 15 Troubleshooting (continued) You are restored, the Bridge can either use the following shortcut: 1 From the Windows Start menu, select Start > Programs > 3Com Wireless > Uninstall 3Com Wireless Infrastructure Device Manager. 2 When prompted to match the network. After the factory default...

User Guide
Page 58
Some problems can be solved by installing a new version of the firmware. 52 CHAPTER 4: TROUBLESHOOTING Upgrading Bridge Firmware Firmware is the software that is installed on page 44 Downloaded from www.Manualslib.com manuals search engine For details on how to download a firmware update from the 3Com customer support Web site and install it on your Bridge, see "Upgrading the System" on the Bridge at the factory.
Some problems can be solved by installing a new version of the firmware. 52 CHAPTER 4: TROUBLESHOOTING Upgrading Bridge Firmware Firmware is the software that is installed on page 44 Downloaded from www.Manualslib.com manuals search engine For details on how to download a firmware update from the 3Com customer support Web site and install it on your Bridge, see "Upgrading the System" on the Bridge at the factory.
User Guide
Page 61
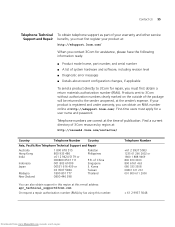
... of system hardware and software, including revision level ■ Diagnostic error messages ■ Details about recent configuration changes, if applicable To send a product directly to the sender unopened, at the sender's expense. First-time users must apply for repair, you must first register your product is registered and under warranty, you can also obtain support in this number: Telephone Number +61...
... of system hardware and software, including revision level ■ Diagnostic error messages ■ Details about recent configuration changes, if applicable To send a product directly to the sender unopened, at the sender's expense. First-time users must apply for repair, you must first register your product is registered and under warranty, you can also obtain support in this number: Telephone Number +61...


