
Operation Guide
Page 1
... this manual • The reproduction, transmission or use of the Video Electronics Standard Association. • Windows is subject to change without express written authority. CONTENTS Page PROJECTOR FEATURES 2 PREPARATIONS 2 PART NAMES 4 SETTING UP THE PROJECTOR .... 6 CONNECTING YOUR DEVICES ..... 8 USING THE REMOTE CONTROL 13 TURNING ON THE POWER .......... 14 TURNING OFF THE POWER ........ 16 ADJUSTING THE VOLUME 17 TEMPORARILY SOUND THE SOUND 17 ADJUSTING THE POSITION ........ 18 USING THE AUTOMATIC ADJUSTMENT FEATURE 19 CORRECTING KEYSTONE...
... this manual • The reproduction, transmission or use of the Video Electronics Standard Association. • Windows is subject to change without express written authority. CONTENTS Page PROJECTOR FEATURES 2 PREPARATIONS 2 PART NAMES 4 SETTING UP THE PROJECTOR .... 6 CONNECTING YOUR DEVICES ..... 8 USING THE REMOTE CONTROL 13 TURNING ON THE POWER .......... 14 TURNING OFF THE POWER ........ 16 ADJUSTING THE VOLUME 17 TEMPORARILY SOUND THE SOUND 17 ADJUSTING THE POSITION ........ 18 USING THE AUTOMATIC ADJUSTMENT FEATURE 19 CORRECTING KEYSTONE...

Operation Guide
Page 2
... Safety Guide Warranty Quick Start Guide USB mouse cable Video/Audio cable (with white lead) Component Video cable (with Lens Cap) Power cord (US Type) Power cord (UK Type) Power cord (Europe Type) 3M MP8765 MP7650/MP7750 Multimedia Projector Product Safety Guide MP8765 Projecteur multimedia - Guida di Sicurezza del Prodotto MP8765 Multimedia Projector - GUltra High Brightness Crisp, ultra-bright presentations is achieved by using a UHB (ultra high brightness) lamp and a highly efficient optical system GKeystone Distortion Correction Quick correction of distorted images...
... Safety Guide Warranty Quick Start Guide USB mouse cable Video/Audio cable (with white lead) Component Video cable (with Lens Cap) Power cord (US Type) Power cord (UK Type) Power cord (Europe Type) 3M MP8765 MP7650/MP7750 Multimedia Projector Product Safety Guide MP8765 Projecteur multimedia - Guida di Sicurezza del Prodotto MP8765 Multimedia Projector - GUltra High Brightness Crisp, ultra-bright presentations is achieved by using a UHB (ultra high brightness) lamp and a highly efficient optical system GKeystone Distortion Correction Quick correction of distorted images...

Operation Guide
Page 4
PART NAMES MENU button POWER indicator TEMP indicator LAMP indicator THE PROJECTOR Indicates the corresponding reference page RESET button KEYSTONE button INPUT button STANDBY/ON button Zoom ring Focus ring Lens cap Remote sensor AUDIO IN R and L ports VIDEO IN port Air filter Elevator button S-VIDEO IN port RGB IN 1 and 2 ports AC power inlet STANDBY/ON INPUT KEYSTONE RESET POWERTENPLANP CONTROL port RGB OUT port USB port COMPONENT VIDEO port 4 Elevator button Power switch
PART NAMES MENU button POWER indicator TEMP indicator LAMP indicator THE PROJECTOR Indicates the corresponding reference page RESET button KEYSTONE button INPUT button STANDBY/ON button Zoom ring Focus ring Lens cap Remote sensor AUDIO IN R and L ports VIDEO IN port Air filter Elevator button S-VIDEO IN port RGB IN 1 and 2 ports AC power inlet STANDBY/ON INPUT KEYSTONE RESET POWERTENPLANP CONTROL port RGB OUT port USB port COMPONENT VIDEO port 4 Elevator button Power switch

Operation Guide
Page 9
... control PS/2 mouse control ADB mouse control Serial mouse control RS-232C communication S-video input Video input Component video input Audio input Projector Port RGB IN 1 RGB IN 2 RGB OUT USB CONTROL S-VIDEO IN VIDEO IN COMPONENT VIDEO Y COMPONENT VIDEO CB/PB COMPONENT VIDEO CR/PR AUDIO IN L AUDIO IN R Connection Cables RGB cable with D-sub 15-pin shrink jack and inch thread screws USB cable PS/2 mouse cable ADB mouse cable Serial mouse cable RS-232C cable S-video cable with mini DIN 4-pin jack Audio/video cable Component video cable Audio/video cable or Audio cable...
... control PS/2 mouse control ADB mouse control Serial mouse control RS-232C communication S-video input Video input Component video input Audio input Projector Port RGB IN 1 RGB IN 2 RGB OUT USB CONTROL S-VIDEO IN VIDEO IN COMPONENT VIDEO Y COMPONENT VIDEO CB/PB COMPONENT VIDEO CR/PR AUDIO IN L AUDIO IN R Connection Cables RGB cable with D-sub 15-pin shrink jack and inch thread screws USB cable PS/2 mouse cable ADB mouse cable Serial mouse cable RS-232C cable S-video cable with mini DIN 4-pin jack Audio/video cable Component video cable Audio/video cable or Audio cable...

Operation Guide
Page 10
AUDIO IN K AUDIO IN R L / (MONO) VIDEO IN ## CR / RR CB / PB Y S-VIDEO IN COMPONENT VIIDEO USB # 1 RGB IN 2 " RGB OUT CONTROL " RGB IN USB cable If connecting to simultaneous LCD and CRT display). Use of some RGB input modes, the optional Mac adapter is done, please refer to the instruction manual of the corresponding laptop computer. CONNECTING YOUR DEVICES (continued) Connecting to a Computer ATTENTION Whenever attempting to connect a laptop computer to the projector, be possible...
AUDIO IN K AUDIO IN R L / (MONO) VIDEO IN ## CR / RR CB / PB Y S-VIDEO IN COMPONENT VIIDEO USB # 1 RGB IN 2 " RGB OUT CONTROL " RGB IN USB cable If connecting to simultaneous LCD and CRT display). Use of some RGB input modes, the optional Mac adapter is done, please refer to the instruction manual of the corresponding laptop computer. CONNECTING YOUR DEVICES (continued) Connecting to a Computer ATTENTION Whenever attempting to connect a laptop computer to the projector, be possible...
Operation Guide
Page 13
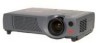
...; Replace the batteries whenever the remote control starts to malfunction. • When strong light, such as direct sunlight or light from an extremely close range (such as from an inverter fluorescent lamp), hits the projector's remote sensor, the remote control may result in malfunction. • Remove the batteries from the remote control and store them only as indicated in the remote control). 3 Close the battery cover Replace the battery cover in...
...; Replace the batteries whenever the remote control starts to malfunction. • When strong light, such as direct sunlight or light from an extremely close range (such as from an inverter fluorescent lamp), hits the projector's remote sensor, the remote control may result in malfunction. • Remove the batteries from the remote control and store them only as indicated in the remote control). 3 Close the battery cover Replace the battery cover in...
Operation Guide
Page 14
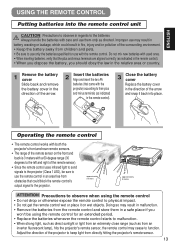
... POWER indicator stops blinking STANDBY/ON and lights to solid green once the projector's power is completely on the projector's power Set the power switch to solid orange. The projector will go to STANDBY mode and the POWER indicator will light to [ | ] (ON). VIDEO STANDBY/ON RGB SEARCH ASPECT AUTO BLANK MAGNIFY ON HOME PAGE UP VOLUME OFF END PAGE DOWN MUTE FREEZE KEYSTONE Control panel LANP TENP POWER STANDBY/ON INPUT KEYSTONE RESET 1 Make sure that the power cord is firmly and correctly connected...
... POWER indicator stops blinking STANDBY/ON and lights to solid green once the projector's power is completely on the projector's power Set the power switch to solid orange. The projector will go to STANDBY mode and the POWER indicator will light to [ | ] (ON). VIDEO STANDBY/ON RGB SEARCH ASPECT AUTO BLANK MAGNIFY ON HOME PAGE UP VOLUME OFF END PAGE DOWN MUTE FREEZE KEYSTONE Control panel LANP TENP POWER STANDBY/ON INPUT KEYSTONE RESET 1 Make sure that the power cord is firmly and correctly connected...
Operation Guide
Page 16
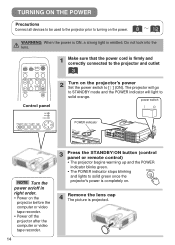
... . STANDBY/ON 2 Press the STANDBY/ON button again (control panel or remote control) Press the STANDBY/ON button again while the "Power off ?" The projector lamp goes off and starts cooling down , the POWER indicator will appear on the screen for turning power off and then attach the lens cap. STANDBY/ON Control panel LANP TENP POWER STANDBY/ON INPUT KEYSTONE RESET 3 Check that the POWER indicator has gone off . 16 4 Confirm that the POWER indicator stops blinking and lights to solid power switch orange. TURNING OFF THE POWER VIDEO STANDBY...
... . STANDBY/ON 2 Press the STANDBY/ON button again (control panel or remote control) Press the STANDBY/ON button again while the "Power off ?" The projector lamp goes off and starts cooling down , the POWER indicator will appear on the screen for turning power off and then attach the lens cap. STANDBY/ON Control panel LANP TENP POWER STANDBY/ON INPUT KEYSTONE RESET 3 Check that the POWER indicator has gone off . 16 4 Confirm that the POWER indicator stops blinking and lights to solid power switch orange. TURNING OFF THE POWER VIDEO STANDBY...

Operation Guide
Page 22
... FREEZE KEYSTONE 1 Press the BLANK button The input signal screen is unable to find an input signal at any of its ports, it was in prior to the input signal screen. Press the BLANK button again to remove the blank screen, and return to the search. If the projector is shut off, and a blank screen appears. You can set the blank screen using the menu (from the SCREEN menu, select BLANK). SIGNAL SEARCHING VIDEO STANDBY/ON...
... FREEZE KEYSTONE 1 Press the BLANK button The input signal screen is unable to find an input signal at any of its ports, it was in prior to the input signal screen. Press the BLANK button again to remove the blank screen, and return to the search. If the projector is shut off, and a blank screen appears. You can set the blank screen using the menu (from the SCREEN menu, select BLANK). SIGNAL SEARCHING VIDEO STANDBY/ON...

Operation Guide
Page 25
.../S-VIDEO): Green Red PICTURE 2 Menu With the PICTURE 2 menu, the five items shown in the Table below can be displayed correctly. Perform each operation in accordance with the instructions in the Table. PICTURE1 Menu Item Description MENU MAIN PICTURE-1 PICTURE-2 INPUT SCREEN OPTION COLOR BAL R COLOR BAL B SHARPNESS COLOR TINT 12 : SELECT Example : PICTURE1 Menu (COLOR BAL R) COLOR BAL R Adjust Red Color Balance: Dark Light COLOR BAL B Adjust Blue Color Balance: Dark Light SHARPNESS COLOR TINT Adjust Sharpness (for VIDEO/S-VIDEO): Clear Soft Adjust COLOR (for VIDEO/S-VIDEO...
.../S-VIDEO): Green Red PICTURE 2 Menu With the PICTURE 2 menu, the five items shown in the Table below can be displayed correctly. Perform each operation in accordance with the instructions in the Table. PICTURE1 Menu Item Description MENU MAIN PICTURE-1 PICTURE-2 INPUT SCREEN OPTION COLOR BAL R COLOR BAL B SHARPNESS COLOR TINT 12 : SELECT Example : PICTURE1 Menu (COLOR BAL R) COLOR BAL R Adjust Red Color Balance: Dark Light COLOR BAL B Adjust Blue Color Balance: Dark Light SHARPNESS COLOR TINT Adjust Sharpness (for VIDEO/S-VIDEO): Clear Soft Adjust COLOR (for VIDEO/S-VIDEO...

Operation Guide
Page 26
... performed. MENU MAIN PICTURE-1 PICTURE-2 INPUT SCREEN OPTION AUTO VIDEO HDTV SYNC ON G EXECUTE : SELECT Example : INPUT Menu (AUTO) INPUT Menu Item Description AUTO Auto Adjust (for the item VIDEO. This function is active only when the AUTO mode is inactive. MULTIFUNCTIONAL SETTINGS (continued) INPUT Menu With the INPUT menu, the four items shown in the Table. With inputting of RGB IN 1 and RGB IN 2 signals, the horizontal and vertical frequencies of the signals will be displayed on...
... performed. MENU MAIN PICTURE-1 PICTURE-2 INPUT SCREEN OPTION AUTO VIDEO HDTV SYNC ON G EXECUTE : SELECT Example : INPUT Menu (AUTO) INPUT Menu Item Description AUTO Auto Adjust (for the item VIDEO. This function is active only when the AUTO mode is inactive. MULTIFUNCTIONAL SETTINGS (continued) INPUT Menu With the INPUT menu, the four items shown in the Table. With inputting of RGB IN 1 and RGB IN 2 signals, the horizontal and vertical frequencies of the signals will be displayed on...

Operation Guide
Page 27
... TURN OFF The START UP Screen may be displayed for picture cutting, as well as you want ." After designating the screen you start capturing this is set as a non-patterned (plain) blue color screen. MyScreen: Using the MyScreen category (see this is set as a non-patterned (plain) blue color screen. When operations are being displayed. 2. in this Menu, one can register a desired screen (or screens). message has been displayed, pressing the ESC (or RESET) button...
... TURN OFF The START UP Screen may be displayed for picture cutting, as well as you want ." After designating the screen you start capturing this is set as a non-patterned (plain) blue color screen. MyScreen: Using the MyScreen category (see this is set as a non-patterned (plain) blue color screen. When operations are being displayed. 2. in this Menu, one can register a desired screen (or screens). message has been displayed, pressing the ESC (or RESET) button...

Operation Guide
Page 28
... "THE AIR FILTER". 28 And, always reset the filter time when cleaning or replacing the filter. The message functions will then appear. LAMP TIME Refer to FILTER TIME: This function displays the total time the air-filter has been used since new. After you replace the lamp with a new lamp, select RESET on the menu with the button. • Do not reset the lamp time unless you have replaced the lamp. FILTER TIME Refer to LAMP TIME: When set time. MENU MAIN PICTURE-1 PICTURE-2 INPUT SCREEN OPTION VOLUME AUTO OFF WHISPER LAMP TIME FILTER TIME 12 : SELECT...
... "THE AIR FILTER". 28 And, always reset the filter time when cleaning or replacing the filter. The message functions will then appear. LAMP TIME Refer to FILTER TIME: This function displays the total time the air-filter has been used since new. After you replace the lamp with a new lamp, select RESET on the menu with the button. • Do not reset the lamp time unless you have replaced the lamp. FILTER TIME Refer to LAMP TIME: When set time. MENU MAIN PICTURE-1 PICTURE-2 INPUT SCREEN OPTION VOLUME AUTO OFF WHISPER LAMP TIME FILTER TIME 12 : SELECT...

Operation Guide
Page 29
... devices (e.g. In this remote control. Turn off the projector and PC power, and connect the projector's CONTROL terminal to control notebook PCs, and other computers with mouse Remote Control Operation Use buttons Press ENTER button Press RESET button USB Mouse/Keyboard Control 1. track balls), using a USB cable. VIDEO STANDBY/ON RGB SEARCH ASPECT AUTO BLANK MAGNIFY ON HOME PAGE UP VOLUME OFF END PAGE DOWN MUTE FREEZE KEYSTONE POSITION MENU ESC ENTER RESET PS/2, ADB, Serial Mouse Control 1. Available Functions Move...
... devices (e.g. In this remote control. Turn off the projector and PC power, and connect the projector's CONTROL terminal to control notebook PCs, and other computers with mouse Remote Control Operation Use buttons Press ENTER button Press RESET button USB Mouse/Keyboard Control 1. track balls), using a USB cable. VIDEO STANDBY/ON RGB SEARCH ASPECT AUTO BLANK MAGNIFY ON HOME PAGE UP VOLUME OFF END PAGE DOWN MUTE FREEZE KEYSTONE POSITION MENU ESC ENTER RESET PS/2, ADB, Serial Mouse Control 1. Available Functions Move...

Operation Guide
Page 30
Before replacing the lamp, turn off the power, and unplug the power cord, then wait at least 45 minutes, in your eyes or mouth. • If the lamp should break (it will make a loud bang when it is used ) lamps; WARNING The LCD projector uses a glass lamp bulb. If this is a cause of used bulbs in the same manner as possible. Do not use old (used , it in order to...
Before replacing the lamp, turn off the power, and unplug the power cord, then wait at least 45 minutes, in your eyes or mouth. • If the lamp should break (it will make a loud bang when it is used ) lamps; WARNING The LCD projector uses a glass lamp bulb. If this is a cause of used bulbs in the same manner as possible. Do not use old (used , it in order to...

Operation Guide
Page 31
... replaced after the message of "CHANGE THE LAMP ...THE POWER WILL TURN OFF AFTER 0 hr." If the LAMP indicator turns red, or a message prompts you to cool for details.) 1 Turn off the projector, and unplug the power cord. NOTE • The LAMP indicator is still red, replace the lamp. 31 We recommend that you power up 8 Turn on the projector power, and using the menu, reset the lamp timer • To reset the lamp timer, from the OPTION menu, select LAMP TIME. is displayed, or the LAMP indicator...
... replaced after the message of "CHANGE THE LAMP ...THE POWER WILL TURN OFF AFTER 0 hr." If the LAMP indicator turns red, or a message prompts you to cool for details.) 1 Turn off the projector, and unplug the power cord. NOTE • The LAMP indicator is still red, replace the lamp. 31 We recommend that you power up 8 Turn on the projector power, and using the menu, reset the lamp timer • To reset the lamp timer, from the OPTION menu, select LAMP TIME. is displayed, or the LAMP indicator...

Operation Guide
Page 33
... air filter cover removed. • If the air filter becomes clogged by dust or the like, internal temperature rises and could cause malfunction. Please contact your local dealer, after confirming the serial number of your projector) 2 Remove the air filter cover and air filter 3 Insert the new filter, and replace the filter cover 4 Turn on the projector power, and using the menu, reset the filter timer • To reset the lamp timer, from overheating internally. 33 Prepare a new air filter (one specified for your separately sold replacement air filter...
... air filter cover removed. • If the air filter becomes clogged by dust or the like, internal temperature rises and could cause malfunction. Please contact your local dealer, after confirming the serial number of your projector) 2 Remove the air filter cover and air filter 3 Insert the new filter, and replace the filter cover 4 Turn on the projector power, and using the menu, reset the filter timer • To reset the lamp timer, from overheating internally. 33 Prepare a new air filter (one specified for your separately sold replacement air filter...
Operation Guide
Page 35
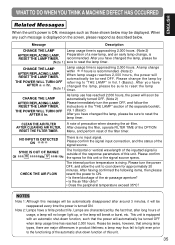
... to light even prior to reset the lamp timer. When any such message is approaching 2,000 hours. Message Description CHANGE THE LAMP Lamp usage time is turned ON. CHANGE THE LAMP Lamp usage time is displayed on the screen, please respond as those shown below . CHANGE THE LAMP AFTER REPLACING LAMP, RESET THE LAMP TIMER. After you have changed the lamp, please be sure to "THE LAMP" in the "THE LAMP" section of precaution when cleaning the air filter. Note 2: Lamps have changed the lamp...
... to light even prior to reset the lamp timer. When any such message is approaching 2,000 hours. Message Description CHANGE THE LAMP Lamp usage time is turned ON. CHANGE THE LAMP Lamp usage time is displayed on the screen, please respond as those shown below . CHANGE THE LAMP AFTER REPLACING LAMP, RESET THE LAMP TIMER. After you have changed the lamp, please be sure to "THE LAMP" in the "THE LAMP" section of precaution when cleaning the air filter. Note 2: Lamps have changed the lamp...
Operation Guide
Page 36
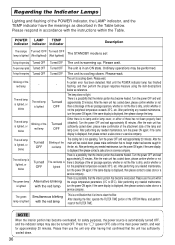
POWER LAMP TEMP indicator indicator indicator Description The orange lamp is lighted Turned OFF Turned OFF (Not lighted) (Not lighted) The STANDBY mode is set Flashing of the main power switch, and wait for safety purposes, the power source is time to 35°C). Flashing of the orange lamp Turned OFF Turned OFF The unit is cooling down . Please wait. - Wait until the POWER indicator lamp has finished flashing, and then perform the proper response measure using the item descriptions below . Turn the power OFF...
POWER LAMP TEMP indicator indicator indicator Description The orange lamp is lighted Turned OFF Turned OFF (Not lighted) (Not lighted) The STANDBY mode is set Flashing of the main power switch, and wait for safety purposes, the power source is time to 35°C). Flashing of the orange lamp Turned OFF Turned OFF The unit is cooling down . Please wait. - Wait until the POWER indicator lamp has finished flashing, and then perform the proper response measure using the item descriptions below . Turn the power OFF...

Operation Guide
Page 37
... picture adjustments by changing the BRIGHT and/or CONTRAST settings, etc. 24 Change (by a power outage (blackout), etc. The electrical wiring to a brighter level. 24 Remove the lens cap. 14 Colors have a fadedout appearance Color tone is not correctly connected. Either the FOCUS setting or the H PHASE is being inputted. Correctly connect the connection cord. 10, 11 Pictures are displayed, but no sounds are heard Sounds are heard, but no pictures are displayed...
... picture adjustments by changing the BRIGHT and/or CONTRAST settings, etc. 24 Change (by a power outage (blackout), etc. The electrical wiring to a brighter level. 24 Remove the lens cap. 14 Colors have a fadedout appearance Color tone is not correctly connected. Either the FOCUS setting or the H PHASE is being inputted. Correctly connect the connection cord. 10, 11 Pictures are displayed, but no sounds are heard Sounds are heard, but no pictures are displayed...


