
Operation Guide
Page 2
3M™ Digital Projector S55i/X55i Content Content About this manual 1 Content 2 Projector features 3 Preparations 3 About contents of this book, although only in English.) 2 © 3M 2005. position, H. size, Auto adjust execute INPUT Menu 32 Color space, Component, Video format, Frame lock, Information Connecting power supply 14 SETUP Menu 34 Remote control 15 Putting batteries 15 Keystone, Whisper, Mirror, Volume, Audio Using the remote control 16 SCREEN Menu 35 Power on/off 17 Turning on the power 17 Turning off the power 17 Language...
3M™ Digital Projector S55i/X55i Content Content About this manual 1 Content 2 Projector features 3 Preparations 3 About contents of this book, although only in English.) 2 © 3M 2005. position, H. size, Auto adjust execute INPUT Menu 32 Color space, Component, Video format, Frame lock, Information Connecting power supply 14 SETUP Menu 34 Remote control 15 Putting batteries 15 Keystone, Whisper, Mirror, Volume, Audio Using the remote control 16 SCREEN Menu 35 Power on/off 17 Turning on the power 17 Turning off the power 17 Language...

Operation Guide
Page 3
... ENTER RESET USB cable RCA Component cable RCA Video/Audio cable Lens cover, Rivet and Strap Soft case 3 © 3M 2005. All Rights Reserved. It is perfect for installation and gets a large image from short distance. High Brightness Newly developed 180W UHB (Ultra High Brightness) lamp gives you more important than brightness. Rich Connectivity This projector has a variety of package Your projector should come with its many signal sources...
... ENTER RESET USB cable RCA Component cable RCA Video/Audio cable Lens cover, Rivet and Strap Soft case 3 © 3M 2005. All Rights Reserved. It is perfect for installation and gets a large image from short distance. High Brightness Newly developed 180W UHB (Ultra High Brightness) lamp gives you more important than brightness. Rich Connectivity This projector has a variety of package Your projector should come with its many signal sources...

Operation Guide
Page 4
.... Part names Part names 3M™ Digital Projector S55i/X55i Projector Lamp door (41) (Lamp unit is inside.) Zoom ring (19) Focus ring (19) Vent (7) Lens (17) Lens cover (3) Control buttons (6) Front-Right side Remote sensor (16) Speaker Security bar (10) (Use for attaching a commercial anti-theft chain or wire.) Elevator button (9) Elevator foot (9) Filter cover (42) (Air fi...
.... Part names Part names 3M™ Digital Projector S55i/X55i Projector Lamp door (41) (Lamp unit is inside.) Zoom ring (19) Focus ring (19) Vent (7) Lens (17) Lens cover (3) Control buttons (6) Front-Right side Remote sensor (16) Speaker Security bar (10) (Use for attaching a commercial anti-theft chain or wire.) Elevator button (9) Elevator foot (9) Filter cover (42) (Air fi...
Operation Guide
Page 7
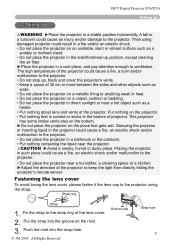
... enough to keep the light from directly hitting the projector's remote sensor. Fastening the lens cover To avoid losing the lens cover, please fasten it the lens cap to the projector using damaged projector could cause a fire, an electric shock and/or malfunction to the projector. • Do not place the projector near a humidifier, a smoking space or a kitchen. ►Adjust the direction...
... enough to keep the light from directly hitting the projector's remote sensor. Fastening the lens cover To avoid losing the lens cover, please fasten it the lens cap to the projector using damaged projector could cause a fire, an electric shock and/or malfunction to the projector. • Do not place the projector near a humidifier, a smoking space or a kitchen. ►Adjust the direction...

Operation Guide
Page 11
... the new resolution on the connectors and tighten. • Some computers may not work properly if any other abnormalities that have to the device and/or projector. ►Use the accessory cable or a designated-type cable for details. It might be recommended to use the standard drivers in your dealer for the connection. Plug-and-Play may have multiple display screen modes. Incorrect connection...
... the new resolution on the connectors and tighten. • Some computers may not work properly if any other abnormalities that have to the device and/or projector. ►Use the accessory cable or a designated-type cable for details. It might be recommended to use the standard drivers in your dealer for the connection. Plug-and-Play may have multiple display screen modes. Incorrect connection...

Operation Guide
Page 16
... the remote control starts malfunctioning. • When strong lights (such as direct sunlight) or light from an extremely close range (such as from directly hitting the projector's remote sensor. may cause to function. Adjust the direction of the remote sensor). • Also a remote signal reflected in the screen etc. All Rights Reserved. If it on wet objects. 3M™ Digital Projector S55i/X55i Remote control Using the remote control...
... the remote control starts malfunctioning. • When strong lights (such as direct sunlight) or light from an extremely close range (such as from directly hitting the projector's remote sensor. may cause to function. Adjust the direction of the remote sensor). • Also a remote signal reflected in the screen etc. All Rights Reserved. If it on wet objects. 3M™ Digital Projector S55i/X55i Remote control Using the remote control...

Operation Guide
Page 17
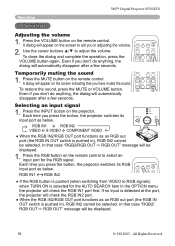
... and correctly connected to the OFF position. The power indicator will light up and the POWER POWER indicator will begin blinking in orange. NOTE • Turn the power on/off . Remove the lens cover, and set the power switch to the projector and the outlet. 2. Press the STANDBY/ON button on the projector or the remote control. Do not look into the lens of the lamp. (2) During use or immediately after use, do not turn off ? The projector lamp will...
... and correctly connected to the OFF position. The power indicator will light up and the POWER POWER indicator will begin blinking in orange. NOTE • Turn the power on/off . Remove the lens cover, and set the power switch to the projector and the outlet. 2. Press the STANDBY/ON button on the projector or the remote control. Do not look into the lens of the lamp. (2) During use or immediately after use, do not turn off ? The projector lamp will...
Operation Guide
Page 18
... KEYSTONE the projector will appear on the remote control to RGB signals) END PAGEDOWN MUTE when TURN ON is pushed in adjusting the volume. 2. A dialog will automatically disappear after a few seconds. Each time you in ), RGB IN2 cannot be displayed. ESC RESET 18 © 3M 2005. To close the dialog and complete the operation, press the VOLUME button again. ASPECT AUTO BLANK POSITION MAGNIFY HOME MENU...
... KEYSTONE the projector will appear on the remote control to RGB signals) END PAGEDOWN MUTE when TURN ON is pushed in adjusting the volume. 2. A dialog will automatically disappear after a few seconds. Each time you in ), RGB IN2 cannot be displayed. ESC RESET 18 © 3M 2005. To close the dialog and complete the operation, press the VOLUME button again. ASPECT AUTO BLANK POSITION MAGNIFY HOME MENU...

Operation Guide
Page 19
... projector switches its input ports in turn. For an RGB signal NORMAL 4:3 16:9 VIDEO STANDBY/ON RGB SEARCH For a video signal/no signal is found , the projector will stop searching and OdN isplay the image. Use the focus ring to adjust the screen size. Press the ASPECT button on the remote control. POSITION MENU ● Performing the automatic adjustment initializes the aspect ratio setting. Each time you press the button, the projector switches the mode...
... projector switches its input ports in turn. For an RGB signal NORMAL 4:3 16:9 VIDEO STANDBY/ON RGB SEARCH For a video signal/no signal is found , the projector will stop searching and OdN isplay the image. Use the focus ring to adjust the screen size. Press the ASPECT button on the remote control. POSITION MENU ● Performing the automatic adjustment initializes the aspect ratio setting. Each time you press the button, the projector switches the mode...

Operation Guide
Page 20
... AUTO button on the screen. POSITION MENU ENTER When you don't do anything, the dialog will be automatically selected. Make sure that it may still be automatically selected. Even if you want to attemptingFROEFEFZtEo use this operation, press the POSITION button again. For a component video signal, the signal type is set to its maximum size prior to reset the operation, press the RESET button on the remote control...
... AUTO button on the screen. POSITION MENU ENTER When you don't do anything, the dialog will be automatically selected. Make sure that it may still be automatically selected. Even if you want to attemptingFROEFEFZtEo use this operation, press the POSITION button again. For a component video signal, the signal type is set to its maximum size prior to reset the operation, press the RESET button on the remote control...
Operation Guide
Page 23
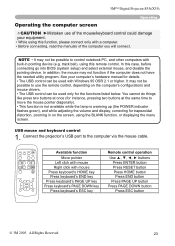
... POWER indicator flashes green), and while adjusting the volume and display, correcting for trapezoidal distortion, zooming in pointing device (e.g. In addition, the mouse may not be possible to use of the computer you will connect. You cannot do things like press two buttons at once (for the functions listed below. USB mouse and keyboard control 1. 3M™ Digital Projector S55i/X55i Operating Operating the computer screen CAUTION...
... POWER indicator flashes green), and while adjusting the volume and display, correcting for trapezoidal distortion, zooming in pointing device (e.g. In addition, the mouse may not be possible to use of the computer you will connect. You cannot do things like press two buttons at once (for the functions listed below. USB mouse and keyboard control 1. 3M™ Digital Projector S55i/X55i Operating Operating the computer screen CAUTION...
Operation Guide
Page 24
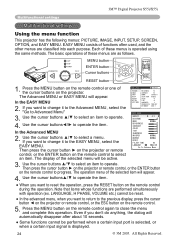
...Then press the cursor button ► on the projector or remote control, or the ENTER button on the remote control during the operation. MENU [RGB] :SELECT PICTURE IMAGE INPUT SETUP SCREEN OPTION EASY MENU BRIGHTNESS +0 CONTRAST +0 GAMMA DEFAULT 1 COLOR TEMP MIDDLE COLOR +0 TINT 0 SHARPNESS 3 PROGRESSIVE TURN OFF MY MEMORY SAVE 1 EASY MENU ASPECT 4:3 KEYSTONE +0 MODE BRIGHTNESS CONTRAST COLOR TINT SHARPNESS NORMAL +0 +0 +0 +0 3 WHISPER NORMAL MIRROR NORMAL RESET FILTER TIME 0h LANGUAGE ENGLISH...
...Then press the cursor button ► on the projector or remote control, or the ENTER button on the remote control during the operation. MENU [RGB] :SELECT PICTURE IMAGE INPUT SETUP SCREEN OPTION EASY MENU BRIGHTNESS +0 CONTRAST +0 GAMMA DEFAULT 1 COLOR TEMP MIDDLE COLOR +0 TINT 0 SHARPNESS 3 PROGRESSIVE TURN OFF MY MEMORY SAVE 1 EASY MENU ASPECT 4:3 KEYSTONE +0 MODE BRIGHTNESS CONTRAST COLOR TINT SHARPNESS NORMAL +0 +0 +0 +0 3 WHISPER NORMAL MIRROR NORMAL RESET FILTER TIME 0h LANGUAGE ENGLISH...

Operation Guide
Page 32
... S-VIDEO port. 3M™ Digital Projector S55i/X55i Multifunctional settings INPUT Menu With the INPUT menu, the items shown in the table below MENU [RGB] :SELECT can be selected only for video format. Using the buttons ▲/▼ turns the frame lock function on the input signal. PICTURE IMAGE COLOR SPACE AUTO COMPONENT COMPONENT Select an item using the cursor buttons ▲/▼ on the projector or remote control, and press the cursor button ► INPUT SETUP SCREEN OPTION VIDEO FORMAT AUTO FRAME LOCK TURN ON...
... S-VIDEO port. 3M™ Digital Projector S55i/X55i Multifunctional settings INPUT Menu With the INPUT menu, the items shown in the table below MENU [RGB] :SELECT can be selected only for video format. Using the buttons ▲/▼ turns the frame lock function on the input signal. PICTURE IMAGE COLOR SPACE AUTO COMPONENT COMPONENT Select an item using the cursor buttons ▲/▼ on the projector or remote control, and press the cursor button ► INPUT SETUP SCREEN OPTION VIDEO FORMAT AUTO FRAME LOCK TURN ON...
Operation Guide
Page 34
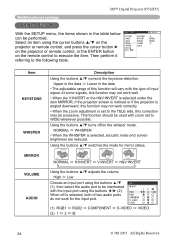
... and screen brightness are reduced. Using the buttons ▲/▼ switches the mode for the input port. RGB1 1 2 When off /on the remote control to WIDE whenever possible. Using the buttons ▲/▼ turns off is selected, both of input signal. NORMAL H:INVERT V:INVERT H&V:INVERT Using the buttons ▲/▼ adjusts the volume. Then perform it referring to the following table. 3M™ Digital Projector S55i/X55i Multifunctional settings SETUP Menu With the SETUP menu, the...
... and screen brightness are reduced. Using the buttons ▲/▼ switches the mode for the input port. RGB1 1 2 When off /on the remote control to WIDE whenever possible. Using the buttons ▲/▼ turns off is selected, both of input signal. NORMAL H:INVERT V:INVERT H&V:INVERT Using the buttons ▲/▼ adjusts the volume. Then perform it referring to the following table. 3M™ Digital Projector S55i/X55i Multifunctional settings SETUP Menu With the SETUP menu, the...

Operation Guide
Page 38
... started from the current port. PICTURE Select an item using the cursor buttons ▲/▼ on the projector or IMAGE INPUT AUTO SEARCH TURN OFF AUTO OFF 0min LAMP TIME 0h remote control, and press the cursor button ► on the projector SETUP SCREEN FILTER TIME 0h SERVICE or remote control, or the ENTER button on /off automatically. Using the buttons ▲/▼ adjusts the time to count down to 99, and when the passed time with INPUT, RGB, and VIDEO buttons. To reset...
... started from the current port. PICTURE Select an item using the cursor buttons ▲/▼ on the projector or IMAGE INPUT AUTO SEARCH TURN OFF AUTO OFF 0min LAMP TIME 0h remote control, and press the cursor button ► on the projector SETUP SCREEN FILTER TIME 0h SERVICE or remote control, or the ENTER button on /off automatically. Using the buttons ▲/▼ adjusts the time to count down to 99, and when the passed time with INPUT, RGB, and VIDEO buttons. To reset...

Operation Guide
Page 39
...; AUTO ADJUST GHOST KEY LOCK FILTER MESSAG FACTORY RESET FAN SPEED Using the buttons ▲/▼ switches the rotation speed of ghost using the buttons ▲/▼ to the projector, environment around the projector, etc., the automatic adjustment may not work correctly. GHOST 1. Adjust the selected element using the buttons ◄/►. 2. Note that the projector is noisier when the HIGH is automatically performed depending on conditions, such as input image, signal cable...
...; AUTO ADJUST GHOST KEY LOCK FILTER MESSAG FACTORY RESET FAN SPEED Using the buttons ▲/▼ switches the rotation speed of ghost using the buttons ▲/▼ to the projector, environment around the projector, etc., the automatic adjustment may not work correctly. GHOST 1. Adjust the selected element using the buttons ◄/►. 2. Note that the projector is noisier when the HIGH is automatically performed depending on conditions, such as input image, signal cable...

Operation Guide
Page 45
... "Air Filter" section of this manual. All Rights Reserved. 45 RESET FILTER TIMER. 3M™ Digital Projector S55i/X55i Troubleshooting Troubleshooting Related messages When the unit's power is turned on. When any such message is displayed after the remedy, please set FAN SPEED of the SERVICE item in the OPTION menu to reset the filter timer (38). If the same message is displayed on the screen, please follow the instructions described below may be TO REMOVE WARNING MESSAGE...
... "Air Filter" section of this manual. All Rights Reserved. 45 RESET FILTER TIMER. 3M™ Digital Projector S55i/X55i Troubleshooting Troubleshooting Related messages When the unit's power is turned on. When any such message is displayed after the remedy, please set FAN SPEED of the SERVICE item in the OPTION menu to reset the filter timer (38). If the same message is displayed on the screen, please follow the instructions described below may be TO REMOVE WARNING MESSAGE...
Operation Guide
Page 46
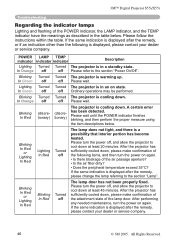
... than the following items, and then turn the power on again. • Is there blockage of the air passage aperture? • Is the air filter dirty? • Does the peripheral temperature exceed 35°C? 3M™ Digital Projector S55i/X55i Troubleshooting Regarding the indicator lamps Lighting and flashing of the POWER indicator, the LAMP indicator, and the TEMP indicator have the meanings as described in the table...
... than the following items, and then turn the power on again. • Is there blockage of the air passage aperture? • Is the air filter dirty? • Does the peripheral temperature exceed 35°C? 3M™ Digital Projector S55i/X55i Troubleshooting Regarding the indicator lamps Lighting and flashing of the POWER indicator, the LAMP indicator, and the TEMP indicator have the meanings as described in the table...

Operation Guide
Page 47
3M™ Digital Projector S55i/X55i Troubleshooting Regarding the indicator lamps (continued) POWER LAMP TEMP indicator indicator indicator Description Blinking In Red or Lighting In Red Turned off Lighting In Red There is a possibility that no foreign matter has become overheated, for safety purposes, the power source is displayed after the remedy, please contact your dealer or service company. Blinking In Red or Lighting In Red Turned off Blinking In Red The cooling fan is not operating. After cleaning or changing the air filter, please be turned off...
3M™ Digital Projector S55i/X55i Troubleshooting Regarding the indicator lamps (continued) POWER LAMP TEMP indicator indicator indicator Description Blinking In Red or Lighting In Red Turned off Lighting In Red There is a possibility that no foreign matter has become overheated, for safety purposes, the power source is displayed after the remedy, please contact your dealer or service company. Blinking In Red or Lighting In Red Turned off Blinking In Red The cooling fan is not operating. After cleaning or changing the air filter, please be turned off...
Operation Guide
Page 48
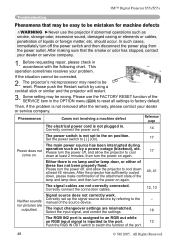
... at least 2 minutes, then turn off , and allow the projector to cool 17 come on position. The input changeover settings are outputted. This operation sometimes resolves your dealer or service company. Set the power switch to the manual of liquids or foreign matter, etc. Correctly connect the connection cables. 12, 13 Signal source does not correctly work. nor pictures are mismatched. 3M™ Digital Projector S55i/X55i Troubleshooting Phenomena that the smoke...
... at least 2 minutes, then turn off , and allow the projector to cool 17 come on position. The input changeover settings are outputted. This operation sometimes resolves your dealer or service company. Set the power switch to the manual of liquids or foreign matter, etc. Correctly connect the connection cables. 12, 13 Signal source does not correctly work. nor pictures are mismatched. 3M™ Digital Projector S55i/X55i Troubleshooting Phenomena that the smoke...


