Installation Guide
Page 3
... existing Escalade ATA RAID Controller . . . . . 13 Installing a Parallel ATA RAID Controller 14 Connect the interface cables to the Escalade ATA RAID Controller 14 Install the Escalade ATA RAID Controller in the computer . 15 Connect the drives to the interface cables 16 Installing a Serial ATA RAID Controller 18 Connect the interface cables to the Escalade Serial ATA RAID Controller 18 Connect the drives to the interface cables 20 Check your installation and close the case 22 Check motherboard boot sequence 22 3ware Disk Array Configuration Utility 23 Hot spare and hot swap 23 BIOS...
... existing Escalade ATA RAID Controller . . . . . 13 Installing a Parallel ATA RAID Controller 14 Connect the interface cables to the Escalade ATA RAID Controller 14 Install the Escalade ATA RAID Controller in the computer . 15 Connect the drives to the interface cables 16 Installing a Serial ATA RAID Controller 18 Connect the interface cables to the Escalade Serial ATA RAID Controller 18 Connect the drives to the interface cables 20 Check your installation and close the case 22 Check motherboard boot sequence 22 3ware Disk Array Configuration Utility 23 Hot spare and hot swap 23 BIOS...

Installation Guide
Page 4
... a Hot Spare 34 Changing an existing configuration 35 Modifying a disk array 35 Deleting a disk array 35 How to maintain or verify a disk array 36 Rebuilding a mirrored disk array 37 Rebuilding a RAID 5 disk array 39 Additional Procedures 47 Troubleshooting: Problems and Solutions 49 Hardware installation 49 Appendix A Compliance and Conformity Statements 51 Federal Communications Commission Radio Frequency Interference Statement 51 Microsoft Windows Hardware Quality Lab (WHQL 52 European Community Conformity Statement 52 Appendix B Warranty, Technical Support and Service...
... a Hot Spare 34 Changing an existing configuration 35 Modifying a disk array 35 Deleting a disk array 35 How to maintain or verify a disk array 36 Rebuilding a mirrored disk array 37 Rebuilding a RAID 5 disk array 39 Additional Procedures 47 Troubleshooting: Problems and Solutions 49 Hardware installation 49 Appendix A Compliance and Conformity Statements 51 Federal Communications Commission Radio Frequency Interference Statement 51 Microsoft Windows Hardware Quality Lab (WHQL 52 European Community Conformity Statement 52 Appendix B Warranty, Technical Support and Service...
Installation Guide
Page 5
...Disk Array Display 37 Figure 13. Degraded RAID 1 Array Drive When Not in Use . . 40 Figure 16. BIOS Initialization Screen for a Mirrored Array 29 Figure 8. Select Available Drive to Serial ATA Converter) 18 Figure 3. Parallel ATA Drive with CBL-P-SATA (Parallel to Replace Faulted Drive, RAID 1 Example 42 Figure 17. Degraded RAID 10 Array Drive When Not in Use . 39 Figure 15. List of Figures Figure 1. 8-Port Escalade 7500-8 ATA RAID Controller Layout 14 Figure 2. 12-Port Escalade 8500-12 Serial ATA RAID Controller with Serial ATA Converter Installed 22 Figure 4. 3ware BIOS...
...Disk Array Display 37 Figure 13. Degraded RAID 1 Array Drive When Not in Use . . 40 Figure 16. BIOS Initialization Screen for a Mirrored Array 29 Figure 8. Select Available Drive to Serial ATA Converter) 18 Figure 3. Parallel ATA Drive with CBL-P-SATA (Parallel to Replace Faulted Drive, RAID 1 Example 42 Figure 17. Degraded RAID 10 Array Drive When Not in Use . 39 Figure 15. List of Figures Figure 1. 8-Port Escalade 7500-8 ATA RAID Controller Layout 14 Figure 2. 12-Port Escalade 8500-12 Serial ATA RAID Controller with Serial ATA Converter Installed 22 Figure 4. 3ware BIOS...
Installation Guide
Page 7
... not support RAID 5) • Drive Support. mand Line Interface • BIOS. Redhat, SuSE. (Drivers available in this manual also supports the following legacy products: 7410, 7810, 7450 (now 7500-4), 7850 (now 7500-8), and 7210. • True Hardware RAID. This user guide gives simple, step-by-step instructions for installing and configuring your RAID data storage and management system. PC99, PnP, BBS Compliant • Windows Support. Twinstor, Command Queuing, Elevator Seeking, R5Fusion (R5Fusion is PCI 32 bit / 33...
... not support RAID 5) • Drive Support. mand Line Interface • BIOS. Redhat, SuSE. (Drivers available in this manual also supports the following legacy products: 7410, 7810, 7450 (now 7500-4), 7850 (now 7500-8), and 7210. • True Hardware RAID. This user guide gives simple, step-by-step instructions for installing and configuring your RAID data storage and management system. PC99, PnP, BBS Compliant • Windows Support. Twinstor, Command Queuing, Elevator Seeking, R5Fusion (R5Fusion is PCI 32 bit / 33...
Installation Guide
Page 8
...Windows Support. W98SE, WME, WinNT4 with SP6, Win2k with parallel drives is missing any of using the Escalade SerialATA Controller with SP2, and WinXP • Linux Support. ATA Command Readback, SMART Monitoring, Dynamic Sector Repair, Rebuild Pacing, Rebuild Scheduling, Background Media Scan, Hot Swap, Hot Spare, Hardware Health Monitoring, Scheduled Verify Escalade 8000 Serial ATA Family (includes 8500-4, 85008, 8500-12) • True Hardware RAID. PCI 64 bit / 33 Mhz • Management. 3DM Disk Management Utility or 3ware Command Line Interface • BIOS. Serial ATA 150 (SATA...
...Windows Support. W98SE, WME, WinNT4 with SP6, Win2k with parallel drives is missing any of using the Escalade SerialATA Controller with SP2, and WinXP • Linux Support. ATA Command Readback, SMART Monitoring, Dynamic Sector Repair, Rebuild Pacing, Rebuild Scheduling, Background Media Scan, Hot Swap, Hot Spare, Hardware Health Monitoring, Scheduled Verify Escalade 8000 Serial ATA Family (includes 8500-4, 85008, 8500-12) • True Hardware RAID. PCI 64 bit / 33 Mhz • Management. 3DM Disk Management Utility or 3ware Command Line Interface • BIOS. Serial ATA 150 (SATA...
Installation Guide
Page 9
... Escalade ATA RAID Controller into an available PCI expansion slot. Creating or deleting disk arrays destroys existing files on an ESD-protective mat. • Don't remove the ATA RAID Controller from its protective bag until you Begin exceed 36" (91.4 cm) for parallel ATA controllers and 1M (39") for the best performance. 3ware Escalade ATA RAID Controller Installation Guide CBL-P-SATA (Parallel to Serial Drive Converter Kit) • Escalade CBL-P-SATA (one per port) • Jumper(s) for converter (if not already installed) • 3ware Installation Guide...
... Escalade ATA RAID Controller into an available PCI expansion slot. Creating or deleting disk arrays destroys existing files on an ESD-protective mat. • Don't remove the ATA RAID Controller from its protective bag until you Begin exceed 36" (91.4 cm) for parallel ATA controllers and 1M (39") for the best performance. 3ware Escalade ATA RAID Controller Installation Guide CBL-P-SATA (Parallel to Serial Drive Converter Kit) • Escalade CBL-P-SATA (one per port) • Jumper(s) for converter (if not already installed) • 3ware Installation Guide...

Installation Guide
Page 11
... replacement is not recommended. If your boot disk is connected to the ATA RAID Controller and you intend to retain it as your boot device, note or mark which physical disk is connected to slot 0 on the new ATA RAID Controller. Failing to the manufacturer's instructions. 3 Disconnect the disks from theATA RAID Controller and discard. Preserving the slot order of how the other drives are part of the old ATA RAID Controller. www.3ware.com 13 To remove an existing Escalade ATA RAID Controller...
... replacement is not recommended. If your boot disk is connected to the ATA RAID Controller and you intend to retain it as your boot device, note or mark which physical disk is connected to slot 0 on the new ATA RAID Controller. Failing to the manufacturer's instructions. 3 Disconnect the disks from theATA RAID Controller and discard. Preserving the slot order of how the other drives are part of the old ATA RAID Controller. www.3ware.com 13 To remove an existing Escalade ATA RAID Controller...

Installation Guide
Page 12
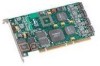
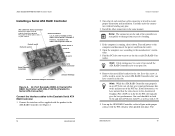
3ware Escalade ATA RAID Controller Installation Guide Installing a Parallel ATA RAID Controller Note: If you want to use for the slot. Ports: 65 4 7 3 21 0 0 Serial Number (on plate) Figure 1. 8-Port Escalade 7500-8 ATA RAID Controller Layout Connect the interface cables to the Escalade ATA RAID Controller 1 Connect the interface cables supplied with the product to either pins 1 and 2 or pins 3 and 4. See Figure 1. 14 www.3ware.com Hardware Installation Note: UltraATA-66, UltraATA-100 and UltraATA133 drives require 40-pin, 80-conductor ribbon cables. Align the ATA RAID Controller so...
3ware Escalade ATA RAID Controller Installation Guide Installing a Parallel ATA RAID Controller Note: If you want to use for the slot. Ports: 65 4 7 3 21 0 0 Serial Number (on plate) Figure 1. 8-Port Escalade 7500-8 ATA RAID Controller Layout Connect the interface cables to the Escalade ATA RAID Controller 1 Connect the interface cables supplied with the product to either pins 1 and 2 or pins 3 and 4. See Figure 1. 14 www.3ware.com Hardware Installation Note: UltraATA-66, UltraATA-100 and UltraATA133 drives require 40-pin, 80-conductor ribbon cables. Align the ATA RAID Controller so...
Installation Guide
Page 13
... 4-port or 8-port Escalade ATA RAID Controller is important. 2 Before connecting your drives, check your installation and close the case". To operate properly, the Escalade ATA RAID Controller requires that the drives are not already installed in the case and secure the bracket with the screw that all slots give the best performance. www.3ware.com 17 3ware Escalade ATA RAID Controller Installation Guide Hint: While the ATA RAID Controller runs properly in step 4. Refer to information provided with 3.3V. 5 Line the ATA RAID Controller...
... 4-port or 8-port Escalade ATA RAID Controller is important. 2 Before connecting your drives, check your installation and close the case". To operate properly, the Escalade ATA RAID Controller requires that the drives are not already installed in the case and secure the bracket with the screw that all slots give the best performance. www.3ware.com 17 3ware Escalade ATA RAID Controller Installation Guide Hint: While the ATA RAID Controller runs properly in step 4. Refer to information provided with 3.3V. 5 Line the ATA RAID Controller...
Installation Guide
Page 14
... side of the controller are ground Plug cable to the ATA RAID Controller. Note: The connectors on the end of ports 8 and 10 Ports: 6 and 7 4 and 5 2 and 3 0 and 1 Serial Number (on the under side of ports 0 through 6 9 and 11, located on plate) Power Converter Adapter Connector Serial ATA Cable Connector Jumper Settings Figure 2. 12-Port Escalade 8500-12 Serial ATA RAID Controller with CBL-P-SATA (Parallel to Serial ATA Converter) Connect the interface cables to the Escalade Serial ATA RAID Controller 1 Connect the interface cables supplied with the PCI slot pins when pushed into...
... side of the controller are ground Plug cable to the ATA RAID Controller. Note: The connectors on the end of ports 8 and 10 Ports: 6 and 7 4 and 5 2 and 3 0 and 1 Serial Number (on the under side of ports 0 through 6 9 and 11, located on plate) Power Converter Adapter Connector Serial ATA Cable Connector Jumper Settings Figure 2. 12-Port Escalade 8500-12 Serial ATA RAID Controller with CBL-P-SATA (Parallel to Serial ATA Converter) Connect the interface cables to the Escalade Serial ATA RAID Controller 1 Connect the interface cables supplied with the PCI slot pins when pushed into...
Installation Guide
Page 17
... 3DM configure page. Note: The BIOS will automatically be installed if no drives are creating your array, you may designate a drive as a spare. This is done by combining disks, deleting disks or breaking disk arrays back into their member disks. Leaving a drive undesignated results in the BIOS screen, it becoming a JBOD drive. These two methods are "setting aside" drive(s) as distinct www.3ware.com 23 JBOD drives become available to the Escalade ATA RAID Controller. Hot spare and hot swap Hot Spare...
... 3DM configure page. Note: The BIOS will automatically be installed if no drives are creating your array, you may designate a drive as a spare. This is done by combining disks, deleting disks or breaking disk arrays back into their member disks. Leaving a drive undesignated results in the BIOS screen, it becoming a JBOD drive. These two methods are "setting aside" drive(s) as distinct www.3ware.com 23 JBOD drives become available to the Escalade ATA RAID Controller. Hot spare and hot swap Hot Spare...

Installation Guide
Page 18
... another device. To exit the 3ware Disk Array Configuration Utility without saving your changes, a list of affected drives will be displayed and you will not be required to be asked to designate an available drive as a Hot Spare from this page, you must use an approved and recognized hot swap drive-carrier, connecting interface cables and power cables can/will resume. 3ware Escalade ATA RAID Controller Installation Guide volumes, and, consequently, they cannot be done with a Spare Replace the drive at...
... another device. To exit the 3ware Disk Array Configuration Utility without saving your changes, a list of affected drives will be displayed and you will not be required to be asked to designate an available drive as a Hot Spare from this page, you must use an approved and recognized hot swap drive-carrier, connecting interface cables and power cables can/will resume. 3ware Escalade ATA RAID Controller Installation Guide volumes, and, consequently, they cannot be done with a Spare Replace the drive at...

Installation Guide
Page 19
.... 3ware Escalade ATA RAID Controller Installation Guide Determining your configuration Caution: Configuring a disk array writes format-type data onto its member disks and overwrites all the files on the number of supported RAID levels can be implemented on a single controller based on those disks. Pressing Escape will exit the configuration utility as well as a hot spare and gray when hot spare cannot be specified. The 3ware Disk Array Configuration main display shows the current disk drive configuration. • Available Drives reports independent drives (JBOD) not associ- Toggle Hot...
.... 3ware Escalade ATA RAID Controller Installation Guide Determining your configuration Caution: Configuring a disk array writes format-type data onto its member disks and overwrites all the files on the number of supported RAID levels can be implemented on a single controller based on those disks. Pressing Escape will exit the configuration utility as well as a hot spare and gray when hot spare cannot be specified. The 3ware Disk Array Configuration main display shows the current disk drive configuration. • Available Drives reports independent drives (JBOD) not associ- Toggle Hot...
Installation Guide
Page 20
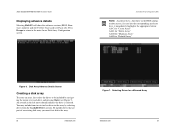
...drive is selected. You may include from two to the main 3ware Disk Array Configuration screen. 3ware Disk Array Configuration Utility Note: Accelerate keys. An asterisk in the BIOS configuration screen, if a user hits the corresponding accelerate keys, it immediately highlights the appropriate button: Alt-C for "Create Array" Alt-D for "Delete Array" Alt-M for "Maintain Array" Alt-R for a Mirrored Array www.3ware.com 29 3ware Escalade ATA RAID Controller Installation Guide Displaying advance details Selecting Shift-F5 will show the software versions (BIOS, Firmware, monitor) and slot...
...drive is selected. You may include from two to the main 3ware Disk Array Configuration screen. 3ware Disk Array Configuration Utility Note: Accelerate keys. An asterisk in the BIOS configuration screen, if a user hits the corresponding accelerate keys, it immediately highlights the appropriate button: Alt-C for "Create Array" Alt-D for "Delete Array" Alt-M for "Maintain Array" Alt-R for a Mirrored Array www.3ware.com 29 3ware Escalade ATA RAID Controller Installation Guide Displaying advance details Selecting Shift-F5 will show the software versions (BIOS, Firmware, monitor) and slot...

Installation Guide
Page 21
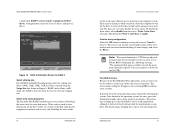
... RAID Configuration: Array's Write Cache State: RAID 5 enable Stripe Size: 64 KB OK Cancel Alt-F1 Help Previous/Next Enter Change Value Esc Cancel Figure 9. Create a disk array from these drives: Port 0 - Create Disk Array Note: Creating an array will be lost if one . • Stripe (RAID 0): maximizes performance and capacity through a process called striping. High performance arrays write portions of a single file across all the drives for examples). Create Disk Array Display, RAID 5 Example Select RAID configuration The Escalade ATA RAID Controller gives...
... RAID Configuration: Array's Write Cache State: RAID 5 enable Stripe Size: 64 KB OK Cancel Alt-F1 Help Previous/Next Enter Change Value Esc Cancel Figure 9. Create a disk array from these drives: Port 0 - Create Disk Array Note: Creating an array will be lost if one . • Stripe (RAID 0): maximizes performance and capacity through a process called striping. High performance arrays write portions of a single file across all the drives for examples). Create Disk Array Display, RAID 5 Example Select RAID configuration The Escalade ATA RAID Controller gives...
Installation Guide
Page 22
... a RAID 0 or RAID 10 configuration select the striping size. The default for any physical or logical unit. Note: The current limitation is 2 TB for Write Cache State is enable. The disadvantage of disabling the write cache for the drive to create an array over 2 TB the BIOS will be fault tolerant until you always want the computer to its next task. BIOS Initialization Screen for www.3ware.com 33 Select write cache properties The Escalade ATA RAID Controller...
... a RAID 0 or RAID 10 configuration select the striping size. The default for any physical or logical unit. Note: The current limitation is 2 TB for Write Cache State is enable. The disadvantage of disabling the write cache for the drive to create an array over 2 TB the BIOS will be fault tolerant until you always want the computer to its next task. BIOS Initialization Screen for www.3ware.com 33 Select write cache properties The Escalade ATA RAID Controller...

Installation Guide
Page 23
... new drives. You cannot remove any data saved from one of the screen will dynamically replace the failed drive in the Determining your Available Drives. If a hot spare is selected. Select a hot spare by navigating to it takes to write zeros to the array. Changing an existing configuration 1 Back up disks first. 3 Boot, partition and format any disk arrays that contain data that the array was never initialized, the initialization will then perform the verification of the array (check data...
... new drives. You cannot remove any data saved from one of the screen will dynamically replace the failed drive in the Determining your Available Drives. If a hot spare is selected. Select a hot spare by navigating to it takes to write zeros to the array. Changing an existing configuration 1 Back up disks first. 3 Boot, partition and format any disk arrays that contain data that the array was never initialized, the initialization will then perform the verification of the array (check data...
Installation Guide
Page 24
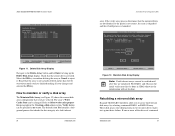
... 30.0GB 30.0GB Create Array Delete Array Maintain Array Rebuild Array Alt-F1 Help Previous/Next $ Toggle Hot Spare EnterSelect/Deselect F6 Restore Initial Values Esc Cancel F8 Done Figure 11. Array Unit 2 - 2 drive Mirror Port 2 - Rebuilding a mirrored disk array Escalade ATA RAID Controllers allow you have its write cache state changed . 3ware Escalade ATA RAID Controller Installation Guide 3ware Disk Array Configuration Available Drives: Disk Arrays: *Array Unit 0 - 4 drive 64K RAID 0 Port 0 - Check that the mirrored drives are initialized. If one or more drives to bring up...
... 30.0GB 30.0GB Create Array Delete Array Maintain Array Rebuild Array Alt-F1 Help Previous/Next $ Toggle Hot Spare EnterSelect/Deselect F6 Restore Initial Values Esc Cancel F8 Done Figure 11. Array Unit 2 - 2 drive Mirror Port 2 - Rebuilding a mirrored disk array Escalade ATA RAID Controllers allow you have its write cache state changed . 3ware Escalade ATA RAID Controller Installation Guide 3ware Disk Array Configuration Available Drives: Disk Arrays: *Array Unit 0 - 4 drive 64K RAID 0 Port 0 - Check that the mirrored drives are initialized. If one or more drives to bring up...

Installation Guide
Page 28
... degraded. 2 Add a different disk drive to rebuild the array. 3 Press Alt + F3 at Boot time to enter 3ware BIOS. 4 Select the degraded array and the newly added drive. 5 Select Rebuild. The rebuild starts with a new drive Currently, a rebuild cannot be cancelled using the 3DM software, but a rebuild can be aborted by following drives will be displayed (see Figure 18). 3ware Disk Array Configuration Creating or destroying arrays will notify the user when the rebuild process is complete. 44 www.3ware.com 3ware Disk Array Configuration Utility...
... degraded. 2 Add a different disk drive to rebuild the array. 3 Press Alt + F3 at Boot time to enter 3ware BIOS. 4 Select the degraded array and the newly added drive. 5 Select Rebuild. The rebuild starts with a new drive Currently, a rebuild cannot be cancelled using the 3DM software, but a rebuild can be aborted by following drives will be displayed (see Figure 18). 3ware Disk Array Configuration Creating or destroying arrays will notify the user when the rebuild process is complete. 44 www.3ware.com 3ware Disk Array Configuration Utility...

Installation Guide
Page 30
...the ATA RAID Controller and operating system using boot diskettes • Installing the ATA RAID Controller on the 3ware CD-ROM packaged with a new version of the 3DM disk management application. Finish setting up your 3ware ATA RAID Controller and RAID array by performing one of the procedures listed above followed by installation of the controller The Escalade User Guide is included on systems that boot from a dif- The Escalade User Guide describes these procedures in "Hardware Installation" and "3ware Disk Array Configuration Utility", the operating system, disk drivers, and...
...the ATA RAID Controller and operating system using boot diskettes • Installing the ATA RAID Controller on the 3ware CD-ROM packaged with a new version of the 3DM disk management application. Finish setting up your 3ware ATA RAID Controller and RAID array by performing one of the procedures listed above followed by installation of the controller The Escalade User Guide is included on systems that boot from a dif- The Escalade User Guide describes these procedures in "Hardware Installation" and "3ware Disk Array Configuration Utility", the operating system, disk drivers, and...


