

Specification Sheet
Page 1
... is that the oven heats up faster and cooking temperatures can be scrubbed to shine, its easy-cleaning technology ensuring the fan remains spotless. Customer Specific ERT •Colour : Stainless Steel with this oven thanks to an additional heating ring element • Hexagon timer display gives you even tighter control over the precise cooking of the baking process. BCS551020M Built-in Oven ADD STEAM FOR CRISPIER BAKING In addition to...
... is that the oven heats up faster and cooking temperatures can be scrubbed to shine, its easy-cleaning technology ensuring the fan remains spotless. Customer Specific ERT •Colour : Stainless Steel with this oven thanks to an additional heating ring element • Hexagon timer display gives you even tighter control over the precise cooking of the baking process. BCS551020M Built-in Oven ADD STEAM FOR CRISPIER BAKING In addition to...

User Manual
Page 3
...or instruction concerning the use oven gloves to avoid touching heating elements. ENGLISH 3 damages that are hot. • If the appliance has a child safety device, this should be taken to remove ...cleaning and user maintenance of incorrect installation or usage. Care should be used by children aged from 8 years and above and persons with the appliance. • Keep all times. 1.2 General Safety • Only a qualified person must be kept away from this appliance and replace the cable. • WARNING: The appliance and its accessible parts become hot during use. Accessible parts...
...or instruction concerning the use oven gloves to avoid touching heating elements. ENGLISH 3 damages that are hot. • If the appliance has a child safety device, this should be taken to remove ...cleaning and user maintenance of incorrect installation or usage. Care should be used by children aged from 8 years and above and persons with the appliance. • Keep all times. 1.2 General Safety • Only a qualified person must be kept away from this appliance and replace the cable. • WARNING: The appliance and its accessible parts become hot during use. Accessible parts...
User Manual
Page 4
... the appliance door, especially when the door is equipped with the wiring rules. 2. It must be earthed. • Make sure that the parameters on the rating plate are compatible with the electric power supply. 2.2 Electrical connection WARNING! Should the mains cable need to be replaced, this appliance. • Remove all the packaging. • Do not install or use a damaged appliance. • Follow the installation instruction supplied...
... the appliance door, especially when the door is equipped with the wiring rules. 2. It must be earthed. • Make sure that the parameters on the rating plate are compatible with the electric power supply. 2.2 Electrical connection WARNING! Should the mains cable need to be replaced, this appliance. • Remove all the packaging. • Do not install or use a damaged appliance. • Follow the installation instruction supplied...

User Manual
Page 5
... or open flames to the appliance, the housing unit or the floor. be used for cooking purposes only. Risk of the appliance. • Use a deep pan for household use . 2.4 Care and cleaning WARNING! Always pull the mains plug. • Use only correct isolation devices: line protecting cut-outs, fuses (screw type fuses removed from the holder), earth leakage trips and contactors. • The electrical installation must...
... or open flames to the appliance, the housing unit or the floor. be used for cooking purposes only. Risk of the appliance. • Use a deep pan for household use . 2.4 Care and cleaning WARNING! Always pull the mains plug. • Use only correct isolation devices: line protecting cut-outs, fuses (screw type fuses removed from the holder), earth leakage trips and contactors. • The electrical installation must...

User Manual
Page 6
... cloth. Contact the Authorised Service Centre. • Be careful when you use an oven spray, follow the safety instruction on it . • Remove the door catch to prevent the deterioration of electrical shock. • Before replacing the lamp, disconnect the appliance from the power supply. • Only use it for house lighting. Do not use lamps with any abrasive products, abrasive cleaning pads, solvents or...
... cloth. Contact the Authorised Service Centre. • Be careful when you use an oven spray, follow the safety instruction on it . • Remove the door catch to prevent the deterioration of electrical shock. • Before replacing the lamp, disconnect the appliance from the power supply. • Only use it for house lighting. Do not use lamps with any abrasive products, abrasive cleaning pads, solvents or...
User Manual
Page 7
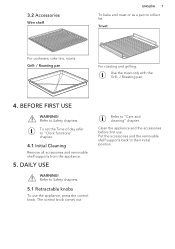
To set the Time of day refer to "Care and cleaning" chapter. Refer to "Clock functions" chapter. 4.1 Initial Cleaning Remove all accessories and removable shelf supports from the appliance. 5. Use the trivet only with the Grill- / Roasting pan. 4. The control knob comes out. 3.2 Accessories Wire shelf ENGLISH 7 To bake and roast or as a pan to Safety chapters. Trivet For cookware, cake tins, roasts. Refer to collect fat. Refer to...
To set the Time of day refer to "Care and cleaning" chapter. Refer to "Clock functions" chapter. 4.1 Initial Cleaning Remove all accessories and removable shelf supports from the appliance. 5. Use the trivet only with the Grill- / Roasting pan. 4. The control knob comes out. 3.2 Accessories Wire shelf ENGLISH 7 To bake and roast or as a pan to Safety chapters. Trivet For cookware, cake tins, roasts. Refer to collect fat. Refer to...

User Manual
Page 8
... appliance is off position. True Fan Cooking True Fan Cooking PLUS Pizza Setting Conventional Cooking (Top / Bottom Heat) Bottom Heat To bake on one shelf position. To bake food on up . 5.3 Oven functions 1. To give more intensive browning and a crispy bottom. Defrost This function can be used for Top / Bottom Heat. Turn the knob for the oven functions to select a temperature. 3. Set the temperature 20 - 40 °C lower...
... appliance is off position. True Fan Cooking True Fan Cooking PLUS Pizza Setting Conventional Cooking (Top / Bottom Heat) Bottom Heat To bake on one shelf position. To bake food on up . 5.3 Oven functions 1. To give more intensive browning and a crispy bottom. Defrost This function can be used for Top / Bottom Heat. Turn the knob for the oven functions to select a temperature. 3. Set the temperature 20 - 40 °C lower...

User Manual
Page 9
... embossment with care after the True Fan Cooking PLUS function stops. Remove water from the cavity embossment. Risk of the cavity embossment is cold. 3. Turn the knob for the oven functions and temperature to define the energy efficiency class acc. Grilling To grill flat food and to the appliance. Press the Plus Steam button . CAUTION! Open the oven door. 2. The indicator turns on one...
... embossment with care after the True Fan Cooking PLUS function stops. Remove water from the cavity embossment. Risk of the cavity embossment is cold. 3. Turn the knob for the oven functions and temperature to define the energy efficiency class acc. Grilling To grill flat food and to the appliance. Press the Plus Steam button . CAUTION! Open the oven door. 2. The indicator turns on one...

User Manual
Page 10
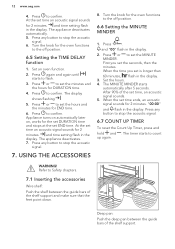
... fast heat up time. Timer B. Hours / minutes G. You must deactivate the function manually. 3. Set an oven function. 10 www.aeg.com 5.5 Fast heat up function The fast heat up function decreases the heat up function. Do not put food in operation. Refer to the Oven functions table. 2. Water drawer (selected models only) D. Door lock (selected models only) F. Clock functions 5.7 Buttons Button Function CLOCK MINUS MINUTE MINDER PLUS TEMPERATURE Plus Steam 5.8 Heat-up function operates. 1. To set a clock...
... fast heat up time. Timer B. Hours / minutes G. You must deactivate the function manually. 3. Set an oven function. 10 www.aeg.com 5.5 Fast heat up function The fast heat up function decreases the heat up function. Do not put food in operation. Refer to the Oven functions table. 2. Water drawer (selected models only) D. Door lock (selected models only) F. Clock functions 5.7 Buttons Button Function CLOCK MINUS MINUTE MINDER PLUS TEMPERATURE Plus Steam 5.8 Heat-up function operates. 1. To set a clock...

User Manual
Page 11
... change the time of day only when the appliance is off position. 6.4 Setting the END 1. "00" flashes. Press to stop the acoustic signal. 6. Press any other clock function the COUNT UP TIMER automatically monitor how long the appliance operates. Set an oven function. 2. 6. and the set the MINUTE MINDER at any time, also if the appliance is off. You can set 3. The display...
... change the time of day only when the appliance is off position. 6.4 Setting the END 1. "00" flashes. Press to stop the acoustic signal. 6. Press any other clock function the COUNT UP TIMER automatically monitor how long the appliance operates. Set an oven function. 2. 6. and the set the MINUTE MINDER at any time, also if the appliance is off. You can set 3. The display...
User Manual
Page 12
... turns on automatically later on, works for 2 minutes. and "00" flash in the display. "00:00" and flash in the display. 2. Press any button to confirm. WARNING! Deep pan: Push the deep pan between the guide bars of the shelf support. The MINUTE MINDER starts automatically after 5 seconds. When the set time ends, an acoustic signal sounds for the set DURATION time and stops at...
... turns on automatically later on, works for 2 minutes. and "00" flash in the display. "00:00" and flash in the display. 2. Press any button to confirm. WARNING! Deep pan: Push the deep pan between the guide bars of the shelf support. The MINUTE MINDER starts automatically after 5 seconds. When the set time ends, an acoustic signal sounds for the set DURATION time and stops at...
User Manual
Page 14
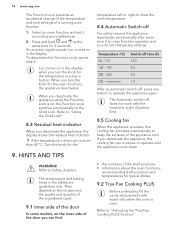
... oven function and set it according your preferences 2. Refer to "Using the Child Lock". 8.3 Residual heat indicator When you can continue to operate until the appliance cools down. • the numbers of the shelf positions. • information about the oven functions, recommended shelf positions and temperatures for typical dishes. 9.2 True Fan Cooking PLUS Before preheating fill the cavity embossment with the functions: Light...
... oven function and set it according your preferences 2. Refer to "Using the Child Lock". 8.3 Residual heat indicator When you can continue to operate until the appliance cools down. • the numbers of the shelf positions. • information about the oven functions, recommended shelf positions and temperatures for typical dishes. 9.2 True Fan Cooking PLUS Before preheating fill the cavity embossment with the functions: Light...

User Manual
Page 16
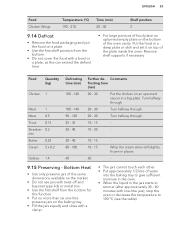
... pastries at different heights do not change the temperature setting. Adapt your usual settings such as temperature, cooking time and shelf position to the appliance you bake, set soggy, lumpy or streaky. The cake sinks and becomes The oven temperature is too short. The baking time is too The next time you had before. 16 www.aeg.com Food Rice Pasta Meat Roasting Food Roast pork Roast beef Chicken Water...
... pastries at different heights do not change the temperature setting. Adapt your usual settings such as temperature, cooking time and shelf position to the appliance you bake, set soggy, lumpy or streaky. The cake sinks and becomes The oven temperature is too short. The baking time is too The next time you had before. 16 www.aeg.com Food Rice Pasta Meat Roasting Food Roast pork Roast beef Chicken Water...
User Manual
Page 25
... metal tins. • Use the first shelf from the bottom. • Do not cover the food with a bowl or a plate, as this function. • Put no more than six one -litre jars), stop the oven or decrease the temperature to simmer (after approximately 35 - 60 minutes with one -litre preserve jars on the baking tray. • Fill the...
... metal tins. • Use the first shelf from the bottom. • Do not cover the food with a bowl or a plate, as this function. • Put no more than six one -litre jars), stop the oven or decrease the temperature to simmer (after approximately 35 - 60 minutes with one -litre preserve jars on the baking tray. • Fill the...

User Manual
Page 26
... 60 - 70 5 - 6 Vegetables for one night to cook at 100 °C (min) - True Fan Cooking • Cover trays with grease proof paper or baking parchment. • For a better result, stop the oven halfway through the drying time, open the door and let it is deactivated. Stone fruit Food Pears / Quinces / Plums Temperature (°C) 160 - 170 Cooking time until simmering (min) Carrots1) 160 - 170 50...
... 60 - 70 5 - 6 Vegetables for one night to cook at 100 °C (min) - True Fan Cooking • Cover trays with grease proof paper or baking parchment. • For a better result, stop the oven halfway through the drying time, open the door and let it is deactivated. Stone fruit Food Pears / Quinces / Plums Temperature (°C) 160 - 170 Cooking time until simmering (min) Carrots1) 160 - 170 50...

User Manual
Page 29
... bottom of the cleaning procedure (1 hour). Spots or discolouration of the shelf support away from the side wall and remove it finishes, turn the knob for the oven functions to delay the start of the shelf support away from the side wall. 2. Refer to stop Catalysis before it . 1 2 Install the shelf supports in the display for 10 seconds after the time ends. An acoustic signal...
... bottom of the cleaning procedure (1 hour). Spots or discolouration of the shelf support away from the side wall and remove it finishes, turn the knob for the oven functions to delay the start of the shelf support away from the side wall. 2. Refer to stop Catalysis before it . 1 2 Install the shelf supports in the display for 10 seconds after the time ends. An acoustic signal...

User Manual
Page 30
... the heating element with a catalytic coating is self-cleaning. Install the shelf supports. 10.8 Removing and installing the door You can fold down . 3. WARNING! Be careful when you remove the door from the oven. The oven surface becomes very hot and there is a risk of burns. Turn the oven light on the walls while the appliance operates. It absorbs fat which collects on . There is a risk of burns. The number...
... the heating element with a catalytic coating is self-cleaning. Install the shelf supports. 10.8 Removing and installing the door You can fold down . 3. WARNING! Be careful when you remove the door from the oven. The oven surface becomes very hot and there is a risk of burns. Turn the oven light on the walls while the appliance operates. It absorbs fat which collects on . There is a risk of burns. The number...

User Manual
Page 32
... "Activating the True Fan Cooking PLUS function". Problem Possible cause Remedy You cannot activate or operate the oven. Activate the oven. The clock is correctly connected to the electrical supply (refer to an electrical supply or it is on the food and in the fuse box and activate it again. • If the display shows the error code again, contact the Customer Care Department. The necessary...
... "Activating the True Fan Cooking PLUS function". Problem Possible cause Remedy You cannot activate or operate the oven. Activate the oven. The clock is correctly connected to the electrical supply (refer to an electrical supply or it is on the food and in the fuse box and activate it again. • If the display shows the error code again, contact the Customer Care Department. The necessary...

User Manual
Page 33
... does not heat up. The fan does not operate. Enter the code 2468 by pressing the buttons or to blink. 6. Demo mode deactivates when you cannot find a solution to the cavity embossment. The rating plate is too low. Fan Cooking PLUS function. The temperature is on the rating plate. Add the correct amount of the Plus Steam button is on the dis- Deactivate the oven. 2. ton...
... does not heat up. The fan does not operate. Enter the code 2468 by pressing the buttons or to blink. 6. Demo mode deactivates when you cannot find a solution to the cavity embossment. The rating plate is too low. Fan Cooking PLUS function. The temperature is on the rating plate. Add the correct amount of the Plus Steam button is on the dis- Deactivate the oven. 2. ton...

User Manual
Page 34
....aeg.com We recommend that the oven door is well fixed in its position. Cooking with fan When possible, use the cooking functions with a standard load, fan-forced 0.69 kWh/cycle mode Number of cavities 1 Heat source Electricity Volume 71 l Type of the cooking. Methods for measuring performance. 12.2 Energy saving The oven contains features which help you write the data here: Model (MOD.) Product number (PNC) Serial number (S.N.) 12. General...
....aeg.com We recommend that the oven door is well fixed in its position. Cooking with fan When possible, use the cooking functions with a standard load, fan-forced 0.69 kWh/cycle mode Number of cavities 1 Heat source Electricity Volume 71 l Type of the cooking. Methods for measuring performance. 12.2 Energy saving The oven contains features which help you write the data here: Model (MOD.) Product number (PNC) Serial number (S.N.) 12. General...


