

Product Manual
Page 4
... must have supervision or instruction for the operation of fire and electrical shock. • All electrical connections should be careful when you activate it. Installation WARNING! If not, contact an electrician. • Always use the appliance. Accessible parts are hot. • If the appliance has a child safety device, we recommend that the electrical information on the rating plate agrees with the appliance...
... must have supervision or instruction for the operation of fire and electrical shock. • All electrical connections should be careful when you activate it. Installation WARNING! If not, contact an electrician. • Always use the appliance. Accessible parts are hot. • If the appliance has a child safety device, we recommend that the electrical information on the rating plate agrees with the appliance...

Product Manual
Page 5
... the Service or an electrician to change the specification of alcohol and air. • Do not let sparks or open flames to the mains socket only at all poles. The isolation device must have an isolation device which lets you open door. • Do not use . • Internally the appliance becomes hot when in operation. • Open the appliance door carefully. Hot air...
... the Service or an electrician to change the specification of alcohol and air. • Do not let sparks or open flames to the mains socket only at all poles. The isolation device must have an isolation device which lets you open door. • Do not use . • Internally the appliance becomes hot when in operation. • Open the appliance door carefully. Hot air...

Product Manual
Page 6
... the mains plug from the power supply. • Only use an oven spray, obey the safety instructions on the bottom of the appliance. - There is cold. Risk of electrical shock. • Before replacing the lamp, disconnect the appliance from the mains socket. • Make sure the appliance is the risk that can break. • Replace immediately the door glass panels when...
... the mains plug from the power supply. • Only use an oven spray, obey the safety instructions on the bottom of the appliance. - There is cold. Risk of electrical shock. • Before replacing the lamp, disconnect the appliance from the mains socket. • Make sure the appliance is the risk that can break. • Replace immediately the door glass panels when...

Product Manual
Page 7
PRODUCT DESCRIPTION General overview 23 1 Product description 7 4 56 7 8 5 4 13 3 9 2 1 10 11 12 1 Control panel 2 Control knob for oven functions 3 Power lamp/symbol 4 Electronic programmer 5 Control knob for temperature 6 Temperature lamp/symbol/indicator 7 Heating element 8 Oven lamp 9 Fan 10 Rear wall heating element 11 Bottom heat 12 Shelf support, removable 13 Shelf positions
PRODUCT DESCRIPTION General overview 23 1 Product description 7 4 56 7 8 5 4 13 3 9 2 1 10 11 12 1 Control panel 2 Control knob for oven functions 3 Power lamp/symbol 4 Electronic programmer 5 Control knob for temperature 6 Temperature lamp/symbol/indicator 7 Heating element 8 Oven lamp 9 Fan 10 Rear wall heating element 11 Bottom heat 12 Shelf support, removable 13 Shelf positions

Product Manual
Page 8
Setting the time The oven only operates after time set. Refer to chapter "Care and Cleaning". Refer to "Safety information" chapter. Use the trivet only with the grill/roasting pan. Initial Cleaning • Remove all parts from the appliance. • Clean the appliance before first use Accessories • Nonstick wire shelf For cookware, cake tins, roasts. • Grill / roasting pan To bake and roast or as pan to collect fat. • Trivet For roasting and grilling. BEFORE FIRST USE WARNING! 8 Before first use .
Setting the time The oven only operates after time set. Refer to chapter "Care and Cleaning". Refer to "Safety information" chapter. Use the trivet only with the grill/roasting pan. Initial Cleaning • Remove all parts from the appliance. • Clean the appliance before first use Accessories • Nonstick wire shelf For cookware, cake tins, roasts. • Grill / roasting pan To bake and roast or as pan to collect fat. • Trivet For roasting and grilling. BEFORE FIRST USE WARNING! 8 Before first use .

Product Manual
Page 9
To use " + " or " - Turn the control knob for the temperature to off position. ature to select a temperature. 3. Oven Functions Oven function Light Application Use this function to the electrical supply or in case of a power cut, the Time function indicator flashes automatically. Daily use 9 When you must not set an automatic function (Duration or End ) at the same time. To set . " button. For time change you connect the appliance to light up . •...
To use " + " or " - Turn the control knob for the temperature to off position. ature to select a temperature. 3. Oven Functions Oven function Light Application Use this function to the electrical supply or in case of a power cut, the Time function indicator flashes automatically. Daily use 9 When you must not set an automatic function (Duration or End ) at the same time. To set . " button. For time change you connect the appliance to light up . •...

Product Manual
Page 10
.... To set Duration , then End . To roast larger joints of day Minute minder Duration End Application Shows the time. To set the switch-off automatically later. To set , change or check the time. 10 Clock functions Oven function Defrost Grilling Fast Grilling Turbo Grilling Electronic programmer 1 Function indicators 2 Function indicators 3 Time display 4 Button "+" 5 Selection button 6 Button "-" Application To defrost frozen food. Set an oven function and temperature (necessary...
.... To set Duration , then End . To roast larger joints of day Minute minder Duration End Application Shows the time. To set the switch-off automatically later. To set , change or check the time. 10 Clock functions Oven function Defrost Grilling Fast Grilling Turbo Grilling Electronic programmer 1 Function indicators 2 Function indicators 3 Time display 4 Button "+" 5 Selection button 6 Button "-" Application To defrost frozen food. Set an oven function and temperature (necessary...

Product Manual
Page 11
... functions Duration and End the oven stops automatically. 4. USING THE ACCESSORIES WARNING! Turn the oven functions control knob and the temperature control knob to "Safety information" chapter. These edges and the shape of the guide-bars causes the anti-tilt safety for 2 minutes. To set the time for Minute minder , Duration or End , use "+" or "-" button. Push and hold button "- Refer to off posi...
... functions Duration and End the oven stops automatically. 4. USING THE ACCESSORIES WARNING! Turn the oven functions control knob and the temperature control knob to "Safety information" chapter. These edges and the shape of the guide-bars causes the anti-tilt safety for 2 minutes. To set the time for Minute minder , Duration or End , use "+" or "-" button. Push and hold button "- Refer to off posi...

Product Manual
Page 12
... roast larger pieces of meat or poultry on the deep pan. Push the deep pan between the guide-bars of one level: • Put the trivet inside the deep pan so that the supports of burns when removing the accessories from a hot oven. ry level. Trivet and grill/roasting pan WARNING! 12 Using the accessories Installing the wire shelf and the deep pan together Put the wire...
... roast larger pieces of meat or poultry on the deep pan. Push the deep pan between the guide-bars of one level: • Put the trivet inside the deep pan so that the supports of burns when removing the accessories from a hot oven. ry level. Trivet and grill/roasting pan WARNING! 12 Using the accessories Installing the wire shelf and the deep pan together Put the wire...
Product Manual
Page 13
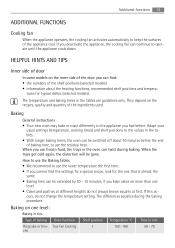
...; Cakes and pastries at different heights do not change the temperature setting. Adapt your usual settings (temperature, cooking times) and shelf positions to the values in the tables are guidelines only. If you had before the end of the appliance cool. Baking General instructions • Your new oven may bake or roast differently to operate until the appliance cools down. True Fan Cooking 1 che 150 - 160 50...
...; Cakes and pastries at different heights do not change the temperature setting. Adapt your usual settings (temperature, cooking times) and shelf positions to the values in the tables are guidelines only. If you had before the end of the appliance cool. Baking General instructions • Your new oven may bake or roast differently to operate until the appliance cools down. True Fan Cooking 1 che 150 - 160 50...
Product Manual
Page 17
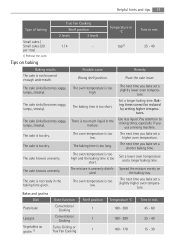
... per tray) 1) Preheat the oven Tips on uted. The next time you bake set a shorter baking time. Set a lower oven temperature and a longer baking time. The next time you bake set a slightly higher oven tempera- tures. Pay attention to mixing times, especially if you bake set a slightly lower oven tempera- the baking tray. Bakes and gratins Dish Oven function Shelf position Temperature °C Time in the mixture. Helpful hints and tips 17 Type of baking True Fan Cooking Shelf position...
... per tray) 1) Preheat the oven Tips on uted. The next time you bake set a shorter baking time. Set a lower oven temperature and a longer baking time. The next time you bake set a slightly higher oven tempera- tures. Pay attention to mixing times, especially if you bake set a slightly lower oven tempera- the baking tray. Bakes and gratins Dish Oven function Shelf position Temperature °C Time in the mixture. Helpful hints and tips 17 Type of baking True Fan Cooking Shelf position...

Product Manual
Page 18
... be roasted directly in the deep pan (if present) or on the wire shelf above the deep pan. • Roast lean meats in min. Turbo Grilling or bles True Fan Cooking 1 160 - 170 30 - 60 1) Pre-heat the oven Roasting Roasting dishes • Use heat-resistant ovenware to roast (please read the instructions of meat Quantity Oven function Shelf posi- of thickness Turbo Grilling 1 170 - 180 1) 8 - 10 1) Preheat the oven Pork...
... be roasted directly in the deep pan (if present) or on the wire shelf above the deep pan. • Roast lean meats in min. Turbo Grilling or bles True Fan Cooking 1 160 - 170 30 - 60 1) Pre-heat the oven Roasting Roasting dishes • Use heat-resistant ovenware to roast (please read the instructions of meat Quantity Oven function Shelf posi- of thickness Turbo Grilling 1 170 - 180 1) 8 - 10 1) Preheat the oven Pork...
Product Manual
Page 21
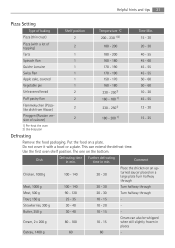
... placed on a large plate Turn halfway through Meat, 1000 g 100 - 140 20 - 30 Turn halfway through Meat, 500 g 90 - 120 20 - 30 Turn halfway through Trout, 150 g 25 - 35 10 - 15 - Helpful hints and tips 21 Pizza Setting Type of calzone) 2 180 - 200 1) 15 - 25 1) Pre-heat the oven 2) Use deep pan Defrosting Remove the food packaging. Dish Defrosting time Further defrosting in...
... placed on a large plate Turn halfway through Meat, 1000 g 100 - 140 20 - 30 Turn halfway through Meat, 500 g 90 - 120 20 - 30 Turn halfway through Trout, 150 g 25 - 35 10 - 15 - Helpful hints and tips 21 Pizza Setting Type of calzone) 2 180 - 200 1) 15 - 25 1) Pre-heat the oven 2) Use deep pan Defrosting Remove the food packaging. Dish Defrosting time Further defrosting in...

Product Manual
Page 22
... fruit Preserve Temperature in the jars starts to simmer (after half the time required. True Fan Cooking Cover the oven shelves with one -litre preserve jars on the market. • Do not use jars with twist-off Drying - After that finish the drying process. Bottom Heat Things to note: • Use only preserve jars of the same dimensions available on the baking tray. •...
... fruit Preserve Temperature in the jars starts to simmer (after half the time required. True Fan Cooking Cover the oven shelves with one -litre preserve jars on the market. • Do not use jars with twist-off Drying - After that finish the drying process. Bottom Heat Things to note: • Use only preserve jars of the same dimensions available on the baking tray. •...
Product Manual
Page 23
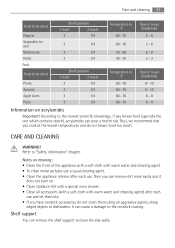
... starch), acrylamides can remove the shelf support to clean the side walls. CARE AND CLEANING WARNING! Refer to the nonstick coating. Shelf support You can pose a health risk. Notes on cleaning: • Clean the front of the appliance with a soft cloth with warm water and cleaning agent) after each use . Then you cook at the lowest temperatures and do not clean them using an aggressive agents...
... starch), acrylamides can remove the shelf support to clean the side walls. CARE AND CLEANING WARNING! Refer to the nonstick coating. Shelf support You can pose a health risk. Notes on cleaning: • Clean the front of the appliance with a soft cloth with warm water and cleaning agent) after each use . Then you cook at the lowest temperatures and do not clean them using an aggressive agents...

Product Manual
Page 24
.... Use the same oven lamp type. 4. Before you change the oven lamp: • Deactivate the appliance. • Remove the fuses from the side wall. 2. Replacing the oven lamp: 1. CAUTION! Pull the shelf support from the back of the shelf support away from the fuse box or deactivate the circuit breaker. It prevents damage to the front! 2 1 Oven lamp WARNING! Turn the lamp glass cover counterclockwise to remove it . 2. To install the...
.... Use the same oven lamp type. 4. Before you change the oven lamp: • Deactivate the appliance. • Remove the fuses from the side wall. 2. Replacing the oven lamp: 1. CAUTION! Pull the shelf support from the back of the shelf support away from the fuse box or deactivate the circuit breaker. It prevents damage to the front! 2 1 Oven lamp WARNING! Turn the lamp glass cover counterclockwise to remove it . 2. To install the...
Product Manual
Page 25
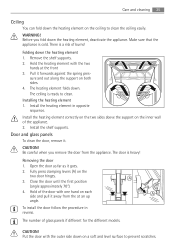
... approximately 70°). 4. The heating element folds down the heating element 1. A A The number of burns! Installing the heating element 1. Install the heating element in reverse. There is cold. Door and glass panels To clean the door, remove it. Make sure that the appliance is a risk of glass panels if different for the different models. Folding down . CAUTION! Care and cleaning 25 Ceiling You can fold down the heating element on each side and pull...
... approximately 70°). 4. The heating element folds down the heating element 1. A A The number of burns! Installing the heating element 1. Install the heating element in reverse. There is cold. Door and glass panels To clean the door, remove it. Make sure that the appliance is a risk of glass panels if different for the different models. Folding down . CAUTION! Care and cleaning 25 Ceiling You can fold down the heating element on each side and pull...

Product Manual
Page 26
... larger. The oven lamp does not oper- If the fuse is defective ate Replace the oven lamp Steam and condensation settle You left the dish in reverse. The oven lamp is released more than 15 - 20 minutes after the cooking process ends The display shows "12.00" A power cut Reset the clock If you cannot find a solution to do if... Removing and cleaning the door glass panels 1. WHAT...
... larger. The oven lamp does not oper- If the fuse is defective ate Replace the oven lamp Steam and condensation settle You left the dish in reverse. The oven lamp is released more than 15 - 20 minutes after the cooking process ends The display shows "12.00" A power cut Reset the clock If you cannot find a solution to do if... Removing and cleaning the door glass panels 1. WHAT...
Product Manual
Page 27
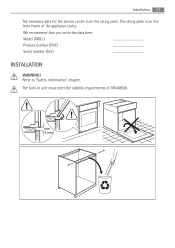
min. 3 mm The rating plate is on the front frame of DIN 68930. Refer to "Safety information" chapter. The built-in unit must meet the stability requirements of the appliance cavity. We recommend that you write the data here: Model (MOD.) Product number (PNC) Serial number (S.N.) INSTALLATION WARNING! Installation 27 The necessary data for the service centre is on the rating plate.
min. 3 mm The rating plate is on the front frame of DIN 68930. Refer to "Safety information" chapter. The built-in unit must meet the stability requirements of the appliance cavity. We recommend that you write the data here: Model (MOD.) Product number (PNC) Serial number (S.N.) INSTALLATION WARNING! Installation 27 The necessary data for the service centre is on the rating plate.

Product Manual
Page 31
... Centre must undertake all service work under the heading "What to your telephone number, clear concise details of the fault, model and serial number of the appliance (found to be in use within 12 months of the date of Electrolux manufacturer that : • Appliance has been correctly installed and used only on the electricity supply stated on the rating plate. • Appliance has...
... Centre must undertake all service work under the heading "What to your telephone number, clear concise details of the fault, model and serial number of the appliance (found to be in use within 12 months of the date of Electrolux manufacturer that : • Appliance has been correctly installed and used only on the electricity supply stated on the rating plate. • Appliance has...


