Specification Sheet
Page 1
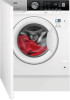
... cycles to wear. Customised cycles with other kitchen appliances, AEG's built-in washing machine makes less noise while providing absolute care. This provides spotless results in dry fabrics. ProSteam® uses vapour at the end of cycles to reduce wrinkles while refreshing garments between cycles. Minimising the need for ironing and dry-cleaning for a comfortable home The quiet washing machine ensures low noise levels when running a cycle. Sensors then adjust washing times...
... cycles to wear. Customised cycles with other kitchen appliances, AEG's built-in washing machine makes less noise while providing absolute care. This provides spotless results in dry fabrics. ProSteam® uses vapour at the end of cycles to reduce wrinkles while refreshing garments between cycles. Minimising the need for ironing and dry-cleaning for a comfortable home The quiet washing machine ensures low noise levels when running a cycle. Sensors then adjust washing times...
Specification Sheet
Page 2
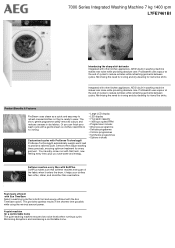
..., Steam, Spin/Drain, Rinse, Sport, Duvet, 20min 3Kg, OutDoor, Denim, Wool\Silk All Open 7000 Series Cotton 60°C (kWh) Time of wash / cotton 60°C Water cotton 60 Load Capacity kg (Wash) Drum volume Max spin speed (rpm) Residual Humidity Motor System Washing noise, dB(A) Spinning noise, dB(A) Dimensions (mm) (HxWxD) Depth max, mm Wheels/feet Cord Length Inlet hose length (mm) Outlet hose length (mm) Connected Load Voltage Required Fuse Frequency Porthole Type 7000 Series Integrated Washing Machine 7 kg...
..., Steam, Spin/Drain, Rinse, Sport, Duvet, 20min 3Kg, OutDoor, Denim, Wool\Silk All Open 7000 Series Cotton 60°C (kWh) Time of wash / cotton 60°C Water cotton 60 Load Capacity kg (Wash) Drum volume Max spin speed (rpm) Residual Humidity Motor System Washing noise, dB(A) Spinning noise, dB(A) Dimensions (mm) (HxWxD) Depth max, mm Wheels/feet Cord Length Inlet hose length (mm) Outlet hose length (mm) Connected Load Voltage Required Fuse Frequency Porthole Type 7000 Series Integrated Washing Machine 7 kg...
User Manual
Page 2
..., Serial Number. DIAL AND BUTTONS 18 7. When contacting our Authorised Service Centre, ensure that help make life simpler features you for your appliance: www.aeg.com/shop CUSTOMER CARE AND SERVICE Always use original spare parts. HINTS AND TIPS...31 12. SAFETY INFORMATION 3 2. CARE AND CLEANING 32 13. The information can be found on ordinary appliances. 2 www.aeg.com CONTENTS 1. CONTROL PANEL...17 6. TROUBLESHOOTING 37 14. TECHNICAL...
..., Serial Number. DIAL AND BUTTONS 18 7. When contacting our Authorised Service Centre, ensure that help make life simpler features you for your appliance: www.aeg.com/shop CUSTOMER CARE AND SERVICE Always use original spare parts. HINTS AND TIPS...31 12. SAFETY INFORMATION 3 2. CARE AND CLEANING 32 13. The information can be found on ordinary appliances. 2 www.aeg.com CONTENTS 1. CONTROL PANEL...17 6. TROUBLESHOOTING 37 14. TECHNICAL...

User Manual
Page 3
...instructions in a safe and accessible location for any injuries or damages that are the result of this appliance. • This appliance is open. • If the appliance has a child safety device, it appropriately. • Keep detergents away from children. • Keep children and pets away from children and dispose of it should be used... the door is intended to be activated. • Children shall not carry out cleaning and user maintenance of the appliance without supervision. 1.2 General Safety • Do not change the specification of incorrect installation or usage. staff...
...instructions in a safe and accessible location for any injuries or damages that are the result of this appliance. • This appliance is open. • If the appliance has a child safety device, it appropriately. • Keep detergents away from children. • Keep children and pets away from children and dispose of it should be used... the door is intended to be activated. • Children shall not carry out cleaning and user maintenance of the appliance without supervision. 1.2 General Safety • Do not change the specification of incorrect installation or usage. staff...
User Manual
Page 4
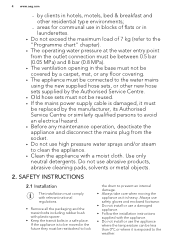
... using the new supplied hose sets, or other new hose sets supplied by the Authorised Service Centre. • Old hose sets must not be reused. • If the mains power supply cable is damaged, it must comply with relevant national regulations. • Remove all the packaging and the transit bolts including rubber bush with the appliance. • Do not install or use abrasive products, abrasive cleaning...
... using the new supplied hose sets, or other new hose sets supplied by the Authorised Service Centre. • Old hose sets must not be reused. • If the mains power supply cable is damaged, it must comply with relevant national regulations. • Remove all the packaging and the transit bolts including rubber bush with the appliance. • Do not install or use abrasive products, abrasive cleaning...

User Manual
Page 5
... the water hoses. • Before connection to new pipes, pipes not used . 2.2 Electrical connection WARNING! Contact the Authorised Service Centre for a long time, where repair work has been carried out or new devices fitted (water meters, etc.), let the water flow until it to excessive humidity. • Do not install the appliance where the appliance door cannot be flat, stable, heat resistant and clean...
... the water hoses. • Before connection to new pipes, pipes not used . 2.2 Electrical connection WARNING! Contact the Authorised Service Centre for a long time, where repair work has been carried out or new devices fitted (water meters, etc.), let the water flow until it to excessive humidity. • Do not install the appliance where the appliance door cannot be flat, stable, heat resistant and clean...
User Manual
Page 16
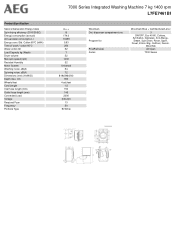
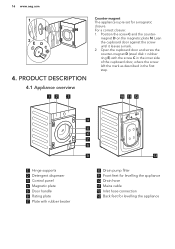
... in the first step. 10 11 12 1 Hinge supports 2 Detergent dispenser 3 Control panel 4 Magnetic plate 5 Door handle 6 Rating plate 7 Plate with rubber beater 4 5 6 7 8 9 13 8 Drain pump filter 9 Front feet for levelling the appliance 10 Drain hose 11 Mains cable 12 Inlet hose connection 13 Back feet for a magnetic closure. PRODUCT DESCRIPTION 4.1 Appliance overview 12 3 Counter-magnet The appliance is pre set for levelling the appliance Position the screw C and the counter...
... in the first step. 10 11 12 1 Hinge supports 2 Detergent dispenser 3 Control panel 4 Magnetic plate 5 Door handle 6 Rating plate 7 Plate with rubber beater 4 5 6 7 8 9 13 8 Drain pump filter 9 Front feet for levelling the appliance 10 Drain hose 11 Mains cable 12 Inlet hose connection 13 Back feet for a magnetic closure. PRODUCT DESCRIPTION 4.1 Appliance overview 12 3 Counter-magnet The appliance is pre set for levelling the appliance Position the screw C and the counter...

User Manual
Page 18
... start indicator. Extra Rinse indicator. g. ). • Cycle end ( ). • Warning code (e.g. ). • Error indicator ( ). Child safety lock indicator. Check the compatibility between options/functions and washing programmes in this button for a few seconds to activate the appliance again. The position is still possible to perform the drum cleaning. it lights at the beginning of the washing phase, when it is a "Reset" function, which stops and resets...
... start indicator. Extra Rinse indicator. g. ). • Cycle end ( ). • Warning code (e.g. ). • Error indicator ( ). Child safety lock indicator. Check the compatibility between options/functions and washing programmes in this button for a few seconds to activate the appliance again. The position is still possible to perform the drum cleaning. it lights at the beginning of the washing phase, when it is a "Reset" function, which stops and resets...

User Manual
Page 19
... to deactivate all spin phases. The door stays locked and the drum turns regularly to unlock the door. If you touch the Start/Pause button, the appliance performs only the draining phase. Use this option to prevent the fabrics from creasing. When you set on . The appliance performs only the draining phase of the last rinse is not performed. The water of the selected washing programme. The...
... to deactivate all spin phases. The door stays locked and the drum turns regularly to unlock the door. If you touch the Start/Pause button, the appliance performs only the draining phase. Use this option to prevent the fabrics from creasing. When you set on . The appliance performs only the draining phase of the last rinse is not performed. The water of the selected washing programme. The...

User Manual
Page 20
... door is activated, the appliance will default to indicate that the buttons are disabled. To activate/deactivate this option to a more convenient time. The steam phase reduces fabric creasing and facilitates the fabric ironing. A small laundry load helps to set a washing programme, the display shows the default duration and dashes. If you use fabric softener. Touch the button repeatedly to reach better results. 6.11 Child Lock...
... door is activated, the appliance will default to indicate that the buttons are disabled. To activate/deactivate this option to a more convenient time. The steam phase reduces fabric creasing and facilitates the fabric ironing. A small laundry load helps to set a washing programme, the display shows the default duration and dashes. If you use fabric softener. Touch the button repeatedly to reach better results. 6.11 Child Lock...

User Manual
Page 24
... a water repellency restoring cycle, specifically tailored for Denim clothing with a hydrophobic coating. For better care a reduced load size is 2 kg. 24 www.aeg.com Programme Default temperature Temperature range Outdoor 30 °C 40 °C - Cold Reference spin speed Maximum load Programme description (Type of the drawer . • Reduce the laundry load to gently wash modern outdoor sportswear and is also suitable for fabric into the softener compartment of load and soil level...
... a water repellency restoring cycle, specifically tailored for Denim clothing with a hydrophobic coating. For better care a reduced load size is 2 kg. 24 www.aeg.com Programme Default temperature Temperature range Outdoor 30 °C 40 °C - Cold Reference spin speed Maximum load Programme description (Type of the drawer . • Reduce the laundry load to gently wash modern outdoor sportswear and is also suitable for fabric into the softener compartment of load and soil level...

User Manual
Page 26
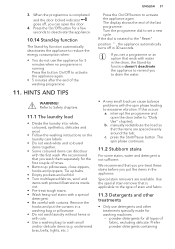
.... and the Spin buttons simultaneously for drying and other laundry instructions. If you set the No Spin option, the appliance performs draining only. 7.2 Woolmark Apparel Care - M1380 The Woolmark symbol is completed, touch the Temp. The display shows On or Off. Follow the garment care label for about 5 minutes). 26 www.aeg.com Spin Prewash1) 2) Soft Plus Plus Steam2) Delay Start Time Save Programme...
.... and the Spin buttons simultaneously for drying and other laundry instructions. If you set the No Spin option, the appliance performs draining only. 7.2 Woolmark Apparel Care - M1380 The Woolmark symbol is completed, touch the Temp. The display shows On or Off. Follow the garment care label for about 5 minutes). 26 www.aeg.com Spin Prewash1) 2) Soft Plus Plus Steam2) Delay Start Time Save Programme...

User Manual
Page 27
... mains plug to the laundry. Close the door firmly. Make sure that the electrical power is available and the water tap is open. 2. Pour 2 litres of water leakage and damage to the mains socket. 2. This removes all possible dirt from the drum and the tub. Open the water tap. 3. Compartment for cotton at a time. Compartment for fabric softener and other liquid treatments(fabric conditioner, starch). Compartment for washing phase...
... mains plug to the laundry. Close the door firmly. Make sure that the electrical power is available and the water tap is open. 2. Pour 2 litres of water leakage and damage to the mains socket. 2. This removes all possible dirt from the drum and the tub. Open the water tap. 3. Compartment for cotton at a time. Compartment for fabric softener and other liquid treatments(fabric conditioner, starch). Compartment for washing phase...

User Manual
Page 28
... level ( ). Turn the programme dial to remove the dispenser. 3. To change the temperature and/or the spin speed, touch the related buttons. 3. The related indicators illuminate on the packaging of liquid additives. - After a washing cycle, if necessary, remove any detergent residue from the detergent dispenser. 10.4 Check the position of the Start/Pause button flashes. Pull out the detergent dispenser until it stops. The display shows an indicative programme duration and the maximum load...
... level ( ). Turn the programme dial to remove the dispenser. 3. To change the temperature and/or the spin speed, touch the related buttons. 3. The related indicators illuminate on the packaging of liquid additives. - After a washing cycle, if necessary, remove any detergent residue from the detergent dispenser. 10.4 Check the position of the Start/Pause button flashes. Pull out the detergent dispenser until it stops. The display shows an indicative programme duration and the maximum load...

User Manual
Page 30
... end of cycle If you should not open the door: 1. 30 www.aeg.com 2. The display shows the indicator . 1. The door unlocks and the indicator goes off . 2. Press button On/Off to set a new washing programme. 10.11 Opening the door Adding garments If the temperature and level of the previous programme. Press the Start/Pause button: the appliance drains the water and spins. Keep the door and the detergent dispenser slightly...
... end of cycle If you should not open the door: 1. 30 www.aeg.com 2. The display shows the indicator . 1. The door unlocks and the indicator goes off . 2. Press button On/Off to set a new washing programme. 10.11 Opening the door Adding garments If the temperature and level of the previous programme. Press the Start/Pause button: the appliance drains the water and spins. Keep the door and the detergent dispenser slightly...
User Manual
Page 31
... some stains, water and detergent is running. If the dial is completed and the door locked indicator goes off in a washing bag or pillowcase. • Do not wash laundry without hems or with the spin phase leading to drain the water. WARNING! Prefer powder detergents containing manually redistribute the load so that you pre-treat these stains before you to excessive vibration. If you set a new cycle. We...
... some stains, water and detergent is running. If the dial is completed and the door locked indicator goes off in a washing bag or pillowcase. • Do not wash laundry without hems or with the spin phase leading to drain the water. WARNING! Prefer powder detergents containing manually redistribute the load so that you pre-treat these stains before you to excessive vibration. If you set a new cycle. We...

User Manual
Page 32
... whites and laundry sanitization - liquid detergents, preferably for low temperature wash programmes (60 °C max) for washing machines. Follow the instructions that you use a stain remover, set a programme with an empty drum and a descaling product occasionally. Do not use a water softener. CARE AND CLEANING • Always start a washing programme with the maximum load of laundry allowed. • If you find out the water hardness in your local water authority. CAUTION! 32 www.aeg.com bleach for...
... whites and laundry sanitization - liquid detergents, preferably for low temperature wash programmes (60 °C max) for washing machines. Follow the instructions that you use a stain remover, set a programme with an empty drum and a descaling product occasionally. Do not use a water softener. CARE AND CLEANING • Always start a washing programme with the maximum load of laundry allowed. • If you find out the water hardness in your local water authority. CAUTION! 32 www.aeg.com bleach for...
User Manual
Page 38
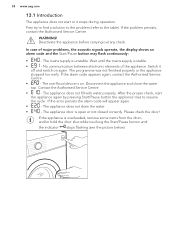
... stops flashing (see the picture below). The appliance does not fill with water properly. If the problem persists, contact the Authorised Service Centre. In case of the appliance. The appliance does not drain the water. • - Contact the Authorised Service Centre. • - No communication between electronic elements of major problems, the acoustic signals operate, the display shows an alarm code and the Start...
... stops flashing (see the picture below). The appliance does not fill with water properly. If the problem persists, contact the Authorised Service Centre. In case of the appliance. The appliance does not drain the water. • - Contact the Authorised Service Centre. • - No communication between electronic elements of major problems, the acoustic signals operate, the display shows an alarm code and the Start...
User Manual
Page 39
... water inlet hose and the drain hose have no damages. • Make sure you set an option which ends with water in the tub. The water and drains immedi- The spin phase does not operate or the washing cycle lasts longer than usual. • Set the spin programme. • Make sure that the drain filter is not clogged. Refer to "Care and cleaning". • Make sure that the connection of the drain hose...
... water inlet hose and the drain hose have no damages. • Make sure you set an option which ends with water in the tub. The water and drains immedi- The spin phase does not operate or the washing cycle lasts longer than usual. • Set the spin programme. • Make sure that the drain filter is not clogged. Refer to "Care and cleaning". • Make sure that the connection of the drain hose...
User Manual
Page 40
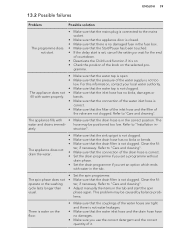
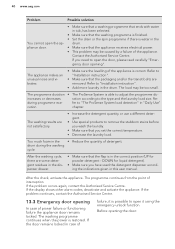
... powder detergent - 40 www.aeg.com Problem Possible solution • Make sure that a washing programme that ends with water in tub, has been selected. • Make sure that the washing programme is finished. • Set the drain or the spin programme if there is water in the drum. The appliance makes an unusual noise and vibrates. • Make sure the levelling of interruption. during the washing cycle. The washing...
... powder detergent - 40 www.aeg.com Problem Possible solution • Make sure that a washing programme that ends with water in tub, has been selected. • Make sure that the washing programme is finished. • Set the drain or the spin programme if there is water in the drum. The appliance makes an unusual noise and vibrates. • Make sure the levelling of interruption. during the washing cycle. The washing...


