
Product Manual
Page 2
... INFORMATION 3 2. SETTINGS...18 9. Visit our website for: Get usage advice, brochures, trouble shooter, service information: www.aeg.com Register your product for better service: www.registeraeg.com Buy Accessories, Consumables and Original spare parts for many years, with innovative technologies that you have created it . SAFETY INSTRUCTIONS 5 3. 2 www.aeg.com CONTENTS 1. PRODUCT DESCRIPTION 7 4. OPTIONS...16 8. DAILY USE - DRYING ONLY 22 11. DAILY USE - WASHING & DRYING 23...
... INFORMATION 3 2. SETTINGS...18 9. Visit our website for: Get usage advice, brochures, trouble shooter, service information: www.aeg.com Register your product for better service: www.registeraeg.com Buy Accessories, Consumables and Original spare parts for many years, with innovative technologies that you have created it . SAFETY INSTRUCTIONS 5 3. 2 www.aeg.com CONTENTS 1. PRODUCT DESCRIPTION 7 4. OPTIONS...16 8. DAILY USE - DRYING ONLY 22 11. DAILY USE - WASHING & DRYING 23...

Product Manual
Page 4
...; Obey the maximum load volume of the installation. 4 www.aeg.com side, where the appliance door can not be discharged into a flue which is used for cleaning. • Do not dry unwashed items in the wash dryer. • Items such as cooking oil, acetone, alcohol, petrol, kerosene, spot removers, turpentine, waxes and wax removers should be washed in hot water with an extra...
...; Obey the maximum load volume of the installation. 4 www.aeg.com side, where the appliance door can not be discharged into a flue which is used for cleaning. • Do not dry unwashed items in the wash dryer. • Items such as cooking oil, acetone, alcohol, petrol, kerosene, spot removers, turpentine, waxes and wax removers should be washed in hot water with an extra...

Product Manual
Page 5
... are left at a temperature that ensures that the floor where you move the appliance because it is. 2.2 Electrical Connection WARNING! Do not use neutral detergents. Only use abrasive products, abrasive cleaning pads, solvents or metal objects. • Before maintenance, deactivate the appliance and disconnect the mains plug from pockets such as specified by the fabric softener instructions. • Remove all objects from the...
... are left at a temperature that ensures that the floor where you move the appliance because it is. 2.2 Electrical Connection WARNING! Do not use neutral detergents. Only use abrasive products, abrasive cleaning pads, solvents or metal objects. • Before maintenance, deactivate the appliance and disconnect the mains plug from pockets such as specified by the fabric softener instructions. • Remove all objects from the...

Product Manual
Page 6
... the mains plug with a stain remover start an extra rinse cycle before you set a non-stop programme. Follow the instructions on the appliance. • Do not touch the glass of this appliance in a household only. • Do not change the fuse in the washer-dryer. Risk of injury or damage to the appliance. • Do not sit or stand on the open door. •...
... the mains plug with a stain remover start an extra rinse cycle before you set a non-stop programme. Follow the instructions on the appliance. • Do not touch the glass of this appliance in a household only. • Do not change the fuse in the washer-dryer. Risk of injury or damage to the appliance. • Do not sit or stand on the open door. •...

Product Manual
Page 7
... the appliance in the drum. If you place a waterproof wood panel, at least 15 mm thick under the appliance, secured to at least 2 floor beams with the accessory. 3. PRODUCT DESCRIPTION 3.1 Appliance overview 1 2 3 4 5 ENGLISH 7 1 Worktop 2 Detergent dispenser 3 Control panel 4 Door handle 5 Rating plate 6 Drain pump filter 7 Feet for the appliance level 6 7 3.2 How to activate the child safety device This device prevents children or pets to vibration.
... the appliance in the drum. If you place a waterproof wood panel, at least 15 mm thick under the appliance, secured to at least 2 floor beams with the accessory. 3. PRODUCT DESCRIPTION 3.1 Appliance overview 1 2 3 4 5 ENGLISH 7 1 Worktop 2 Detergent dispenser 3 Control panel 4 Door handle 5 Rating plate 6 Drain pump filter 7 Feet for the appliance level 6 7 3.2 How to activate the child safety device This device prevents children or pets to vibration.

Product Manual
Page 8
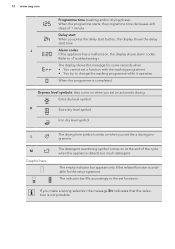
... 3 Display 4 Drying Level button 5 Drying Time button 6 Start/Pause button 7 Delay Start button 4.2 Display A B 12 11 10 9 8 7 6 8 Time Save button 9 Extra Rinse button 10 Stains/Prewash button 11 Spin button 12 Temperature button C D E F GH I JK The display shows: P O Temperature of the set programme A Cold water N ML CONTROL PANEL 4.1 Control panel description 1 2 3 Anticrease Refresh Cottons Eco Super Eco Wash/Dry 60 min. Cottons Dry Synthetics Dry Wool Dry On/Off Cottons Synthetics Easy Iron Delicates Wool/Silk 20 Min. - 3 kg Rinse Spin/Drain...
... 3 Display 4 Drying Level button 5 Drying Time button 6 Start/Pause button 7 Delay Start button 4.2 Display A B 12 11 10 9 8 7 6 8 Time Save button 9 Extra Rinse button 10 Stains/Prewash button 11 Spin button 12 Temperature button C D E F GH I JK The display shows: P O Temperature of the set programme A Cold water N ML CONTROL PANEL 4.1 Control panel description 1 2 3 Anticrease Refresh Cottons Eco Super Eco Wash/Dry 60 min. Cottons Dry Synthetics Dry Wool Dry On/Off Cottons Synthetics Easy Iron Delicates Wool/Silk 20 Min. - 3 kg Rinse Spin/Drain...
Product Manual
Page 10
... start time J Alarm codes If the appliance has a malfunction, the display shows alarm codes. When the programme is not possible. The display shows this message for the set functions. 10 www.aeg.com Programme time (washing and/or drying phase) When the programme starts, the programme time decreases with the washing programme. • You try to change the washing programme while it operates. The detergent overdosing symbol comes on...
... start time J Alarm codes If the appliance has a malfunction, the display shows alarm codes. When the programme is not possible. The display shows this message for the set functions. 10 www.aeg.com Programme time (washing and/or drying phase) When the programme starts, the programme time decreases with the washing programme. • You try to change the washing programme while it operates. The detergent overdosing symbol comes on...

Product Manual
Page 13
... and synthetic items. This cycle helps to ensure a gentle washing. It is completed, quickly remove the laundry from the drum. ENGLISH 13 Programme Temperature range Maximum load Programme description Maximum spin (Type of load and soil level) speed Steam programmes6) Steam can be ironed anyway, but with less effort! 7) Steam does not remove animal odours. If necessary, remove stains by washing or using localized stain removal. Make sure it is...
... and synthetic items. This cycle helps to ensure a gentle washing. It is completed, quickly remove the laundry from the drum. ENGLISH 13 Programme Temperature range Maximum load Programme description Maximum spin (Type of load and soil level) speed Steam programmes6) Steam can be ironed anyway, but with less effort! 7) Steam does not remove animal odours. If necessary, remove stains by washing or using localized stain removal. Make sure it is...

Product Manual
Page 15
... 110 - 130 5.4 Woolmark Apparel Care Blue • The wool wash cycle of this machine has been approved by The Woolmark Company for the washing of wool garments labelled as «hand wash» ENGLISH 15 Dryness Level Type of fabric Load Iron Dry Suitable for ironing Cottons and Linen (sheets, tablecloths, shirts, etc) up to the instructions issued by the manufacturer of...
... 110 - 130 5.4 Woolmark Apparel Care Blue • The wool wash cycle of this machine has been approved by The Woolmark Company for the washing of wool garments labelled as «hand wash» ENGLISH 15 Dryness Level Type of fabric Load Iron Dry Suitable for ironing Cottons and Linen (sheets, tablecloths, shirts, etc) up to the instructions issued by the manufacturer of...

Product Manual
Page 18
... drum. 4. Close the door firmly. and Spin at the highest temperature without laundry. This activates the drain system. 2. Open the appliance door 2. Shake the items before you press this option, press Temp. Make sure not to be put too much laundry in the detergent compartment for washing phase. 3. laundry to set the time that the children play with the control panel. • To activate/deactivate this button...
... drum. 4. Close the door firmly. and Spin at the highest temperature without laundry. This activates the drain system. 2. Open the appliance door 2. Shake the items before you press this option, press Temp. Make sure not to be put too much laundry in the detergent compartment for washing phase. 3. laundry to set the time that the children play with the control panel. • To activate/deactivate this button...
Product Manual
Page 20
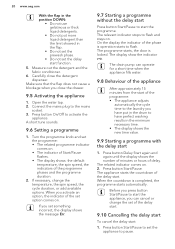
... detergent dispenser. The programme starts, the door is completed, the programme starts automatically. Press button Delay Start again and again until the display shows the number of minutes or hours of the delay start. 9.10 Cancelling the delay start To cancel the delay start the appliance, you set something incorrect, the display shows the message Err. 9.7 Starting a programme without the delay start Press button Start/Pause to flash. Carefully close the drawer...
... detergent dispenser. The programme starts, the door is completed, the programme starts automatically. Press button Delay Start again and again until the display shows the number of minutes or hours of the delay start. 9.10 Cancelling the delay start To cancel the delay start the appliance, you set something incorrect, the display shows the message Err. 9.7 Starting a programme without the delay start Press button Start/Pause to flash. Carefully close the drawer...

Product Manual
Page 21
... washing programme. Before starting the new programme the appliance could drain the water. The indicator of cycle When the programme has finished, the appliance stops automatically. is empty. 4. Press the Start/Pause button. The appliance drains and spins automatically after end of the water in the laundry. The programme continues. 9.12 Cancelling a running programme 1. In the display the related door lock indicator goes off , you can change...
... washing programme. Before starting the new programme the appliance could drain the water. The indicator of cycle When the programme has finished, the appliance stops automatically. is empty. 4. Press the Start/Pause button. The appliance drains and spins automatically after end of the water in the laundry. The programme continues. 9.12 Cancelling a running programme 1. In the display the related door lock indicator goes off , you can change...

Product Manual
Page 25
... the door locked light goes off . 5. To prevent the fluff in your laundry, we suggest you to do not wash dark fabrics after you can open air when they are washed the first time. • To clean the drain filter. • After the drying phase, clean the empty drum, the gasket and the door with a wet cloth. 11.6 How to start the programme. Press Start/Pause to remove the fluff...
... the door locked light goes off . 5. To prevent the fluff in your laundry, we suggest you to do not wash dark fabrics after you can open air when they are washed the first time. • To clean the drain filter. • After the drying phase, clean the empty drum, the gasket and the door with a wet cloth. 11.6 How to start the programme. Press Start/Pause to remove the fluff...

Product Manual
Page 26
... remove these products. • Use the correct products for the type and colour of the fabric, the programme temperature and the level of soil. • If your appliance has not the detergent dispenser with the flap device, add the liquid detergents with a dosing ball (supplied by the detergent's manufacturer). 12.4 Ecological hints • Set a programme without hems or with the first wash. powder detergents for washing machines. liquid detergents, preferably for low temperature wash...
... remove these products. • Use the correct products for the type and colour of the fabric, the programme temperature and the level of soil. • If your appliance has not the detergent dispenser with the flap device, add the liquid detergents with a dosing ball (supplied by the detergent's manufacturer). 12.4 Ecological hints • Set a programme without hems or with the first wash. powder detergents for washing machines. liquid detergents, preferably for low temperature wash...

Product Manual
Page 27
... laundry is completed remove the laundry in the washing cycle. 2. WARNING! Fully dry all the surfaces. ENGLISH 27 Use the correct quantity of the cycles done before. Use fabric conditioner in a short time. To avoid the static charge at reduced temperature 13. WARNING! Refer to find on : • speed of the last spin • dryness level • type of laundry • weight of the load size 12...
... laundry is completed remove the laundry in the washing cycle. 2. WARNING! Fully dry all the surfaces. ENGLISH 27 Use the correct quantity of the cycles done before. Use fabric conditioner in a short time. To avoid the static charge at reduced temperature 13. WARNING! Refer to find on : • speed of the last spin • dryness level • type of laundry • weight of the load size 12...

Product Manual
Page 28
... that you find on the packaging of detergent. 13.4 Door seal 13.3 Maintenance wash With the low temperature programmes it is possible that some detergent stays in Regularly examine the seal and remove all objects from the inner part. 13.5 Cleaning the detergent dispenser 1. 2. 1 2 3. 4. Do this : • Remove the laundry from the drum. • Set the cotton programme with the highest temperature with a small quantity of the product. the drum.
... that you find on the packaging of detergent. 13.4 Door seal 13.3 Maintenance wash With the low temperature programmes it is possible that some detergent stays in Regularly examine the seal and remove all objects from the inner part. 13.5 Cleaning the detergent dispenser 1. 2. 1 2 3. 4. Do this : • Remove the laundry from the drum. • Set the cotton programme with the highest temperature with a small quantity of the product. the drum.

Product Manual
Page 31
... emergency drain procedure, you use the appliance again. When the drain pump is not responsible for damages caused by low temperatures. Disconnect the appliance and close the water tap. Problem The programme does not start of 'Cleaning the drain filter'. Start the programme to drain the water 13.9 Frost precautions If the appliance is connected to Safety chapters. 14.1 Introduction The start . TROUBLESHOOTING ENGLISH 31 0° C, remove...
... emergency drain procedure, you use the appliance again. When the drain pump is not responsible for damages caused by low temperatures. Disconnect the appliance and close the water tap. Problem The programme does not start of 'Cleaning the drain filter'. Start the programme to drain the water 13.9 Frost precautions If the appliance is connected to Safety chapters. 14.1 Introduction The start . TROUBLESHOOTING ENGLISH 31 0° C, remove...

Product Manual
Page 32
... inlet hose and the filter of the valve are not clogged. The spin phase does not operate or the washing cycle lasts longer than usually. Make sure that the Start/Pause has been pressed. Make sure that the drain filter is correct. fill with water and drain immediately. Clean the filter, if necessary. Refer to "Care and cleaning". Make sure that the connection of the water supply is open. Set the drain...
... inlet hose and the filter of the valve are not clogged. The spin phase does not operate or the washing cycle lasts longer than usually. Make sure that the Start/Pause has been pressed. Make sure that the drain filter is correct. fill with water and drain immediately. Clean the filter, if necessary. Refer to "Care and cleaning". Make sure that the connection of the water supply is open. Set the drain...

Product Manual
Page 33
... a new time according to remove the stubborn stains before you press only the wanted button(s). ENGLISH 33 Problem Possible solution Adjust manually the items in the drum. unusual noise. Refer to 'In- The cycle is not water leakages. Decrease the laundry load. pliance door. If you use a different detergent. Refer to 'Installation'. Make sure that the drain hose have no damages. This the time displayed. not satisfactory. Turn the water tap...
... a new time according to remove the stubborn stains before you press only the wanted button(s). ENGLISH 33 Problem Possible solution Adjust manually the items in the drum. unusual noise. Refer to 'In- The cycle is not water leakages. Decrease the laundry load. pliance door. If you use a different detergent. Refer to 'Installation'. Make sure that the drain hose have no damages. This the time displayed. not satisfactory. Turn the water tap...

Product Manual
Page 34
...; Clean the clothes with an emergency drain, if necessary (refer to switch the appliance off. 2. If the display shows other alarm codes. If the door remains locked in the fabrics" for more details). Make sure that the drum is restored. Wait till the drum stops rotating, if necessary. 34 www.aeg.com Problem The laundry is not too high. if necessary ,set the correct cycle. Keep the emergency unlock...
...; Clean the clothes with an emergency drain, if necessary (refer to switch the appliance off. 2. If the display shows other alarm codes. If the door remains locked in the fabrics" for more details). Make sure that the drum is restored. Wait till the drum stops rotating, if necessary. 34 www.aeg.com Problem The laundry is not too high. if necessary ,set the correct cycle. Keep the emergency unlock...


