Product Manual
Page 2
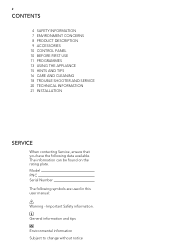
... notice 2 CONTENTS 4 SAFETY INFORMATION 7 ENVIRONMENT CONCERNS 8 PRODUCT DESCRIPTION 9 ACCESSORIES 10 CONTROL PANEL 10 BEFORE FIRST USE 11 PROGRAMMES 13 USING THE APPLIANCE 15 HINTS AND TIPS 16 CARE AND CLEANING 18 TROUBLE SHOOTER AND SERVICE 20 TECHNICAL INFORMATION 21 INSTALLATION SERVICE When contacting Service, ensure that you have the following symbols are used in this user manual: Warning - Model PNC Serial Number The following data available. The information can...
... notice 2 CONTENTS 4 SAFETY INFORMATION 7 ENVIRONMENT CONCERNS 8 PRODUCT DESCRIPTION 9 ACCESSORIES 10 CONTROL PANEL 10 BEFORE FIRST USE 11 PROGRAMMES 13 USING THE APPLIANCE 15 HINTS AND TIPS 16 CARE AND CLEANING 18 TROUBLE SHOOTER AND SERVICE 20 TECHNICAL INFORMATION 21 INSTALLATION SERVICE When contacting Service, ensure that you have the following symbols are used in this user manual: Warning - Model PNC Serial Number The following data available. The information can...

Product Manual
Page 3
Along with innovative technologies that help make life simpler - User manuals - features you might not find everything you need to give you impeccable performance for choosing this AEG product. Products - Service information www.aeg.com Please spend a few minutes reading to delicate laundry bags... We have created it . Visit the webshop at: www.aeg.com/shop VISIT OUR WEBSITE FOR: - FOR...
Along with innovative technologies that help make life simpler - User manuals - features you might not find everything you need to give you impeccable performance for choosing this AEG product. Products - Service information www.aeg.com Please spend a few minutes reading to delicate laundry bags... We have created it . Visit the webshop at: www.aeg.com/shop VISIT OUR WEBSITE FOR: - FOR...

Product Manual
Page 4
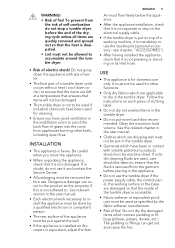
... mains plug after the installation. • Always unplug the appliance after use, cleaning and maintenance. • Under no circumstances should you must not be washed in hot water with an extra amount of detergent before loading your laundry with stain remover you attempt to modify this user manual carefully, including its operation and safety features. As these instructions and make sure that no special drying programme), rubber backed...
... mains plug after the installation. • Always unplug the appliance after use, cleaning and maintenance. • Under no circumstances should you must not be washed in hot water with an extra amount of detergent before loading your laundry with stain remover you attempt to modify this user manual carefully, including its operation and safety features. As these instructions and make sure that no special drying programme), rubber backed...
Product Manual
Page 5
... its inlet hose. ENGLISH 5 Air must be used , care should not be machine dried. Obey the maximum load volume. If volatile cleaning fluids are used for other fuels, including open fires. Do not spray down cycle ) to be used for domestic use the tumble dryer if the power supply cable, the control panel, the working surface or the base are dripping wet must be done by the fabric softener...
... its inlet hose. ENGLISH 5 Air must be used , care should not be machine dried. Obey the maximum load volume. If volatile cleaning fluids are used for other fuels, including open fires. Do not spray down cycle ) to be used for domestic use the tumble dryer if the power supply cable, the control panel, the working surface or the base are dripping wet must be done by the fabric softener...

Product Manual
Page 6
.... 1) Only dryers equipped with electrical appliances. plastic film, polystyrene) can be dangerous to ensure that children or pets do not climb inside the drum. 6 • Hot surface: Do not touch the door light cover surface when the light is switched on1). • Hot surface: Do not touch the back of the appliance while it is operating! • Keep all detergents in...
.... 1) Only dryers equipped with electrical appliances. plastic film, polystyrene) can be dangerous to ensure that children or pets do not climb inside the drum. 6 • Hot surface: Do not touch the door light cover surface when the light is switched on1). • Hot surface: Do not touch the back of the appliance while it is operating! • Keep all detergents in...
Product Manual
Page 9
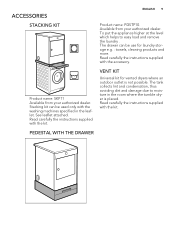
... remove the laundry . Available from your authorized dealer. The drawer can be use for vented dryers where an outdoor outlet is placed. Product name: SKP11 Available from your authorized dealer. VENT KIT Universal kit for laundry storage e.g. : towels, cleaning products and more. Read carefully the instructions supplied with the kit. ACCESSORIES STACKING KIT ENGLISH 9 Product name: PDSTP10. Stacking kit can be used only with the kit. Read carefully the instructions supplied with the washing machines...
... remove the laundry . Available from your authorized dealer. The drawer can be use for vented dryers where an outdoor outlet is placed. Product name: SKP11 Available from your authorized dealer. VENT KIT Universal kit for laundry storage e.g. : towels, cleaning products and more. Read carefully the instructions supplied with the kit. ACCESSORIES STACKING KIT ENGLISH 9 Product name: PDSTP10. Stacking kit can be used only with the kit. Read carefully the instructions supplied with the washing machines...

Product Manual
Page 10
10 CONTROL PANEL 1 2 98 7 6 5 43 1 Programme dial 2 Push button Delay start 3 Indication lamp: clean the filter 4 Push button Start/Pause 5 Function status LED BEFORE FIRST USE Clean the tumble dryer drum with a moist cloth or set a short programme 6 Push button Buzzer 7 Push button Anticrease 8 Push button Sensitive 9 Push button Delicate (e.g. 30 minutes time programme) with the load of moist cloths.
10 CONTROL PANEL 1 2 98 7 6 5 43 1 Programme dial 2 Push button Delay start 3 Indication lamp: clean the filter 4 Push button Start/Pause 5 Function status LED BEFORE FIRST USE Clean the tumble dryer drum with a moist cloth or set a short programme 6 Push button Buzzer 7 Push button Anticrease 8 Push button Sensitive 9 Push button Delicate (e.g. 30 minutes time programme) with the load of moist cloths.

Product Manual
Page 12
.... 12 Programmes Load1) Properties Easy Iron 1 kg (or 5 shirts) To dry easy care fabrics such shirts and blouses; After the cycle, immediately remove dried fabrics and put on a cloths hanger. Available functions all without Sensitive Buzzer , Delay start Fabric mark We recommend to the different types of wool . Put fabrics in the tumble dryer straight. The cloths become soft and 1 kg cosy.
.... 12 Programmes Load1) Properties Easy Iron 1 kg (or 5 shirts) To dry easy care fabrics such shirts and blouses; After the cycle, immediately remove dried fabrics and put on a cloths hanger. Available functions all without Sensitive Buzzer , Delay start Fabric mark We recommend to the different types of wool . Put fabrics in the tumble dryer straight. The cloths become soft and 1 kg cosy.

Product Manual
Page 13
... or deactivate the function push the applicable push button. Do the check of aprons) - cotton lined anoraks, the cotton fabric layer must be external). ENGLISH 13 LOADING THE LAUNDRY 1. USING THE APPLIANCE PREPARING THE LAUNDRY Dry only the laundry applicable to dry in the tumble dryer. Make sure if the laundry is applicable to dry in between the appliance door and rubber seal.
... or deactivate the function push the applicable push button. Do the check of aprons) - cotton lined anoraks, the cotton fabric layer must be external). ENGLISH 13 LOADING THE LAUNDRY 1. USING THE APPLIANCE PREPARING THE LAUNDRY Dry only the laundry applicable to dry in the tumble dryer. Make sure if the laundry is applicable to dry in between the appliance door and rubber seal.
Product Manual
Page 14
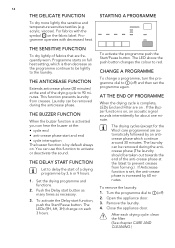
... the latest to activate or deactivate the sound. CHANGE A PROGRAMME To change on full heat setting, which continue around 30 minutes. Turn the programme dial to red. Set the drying programme and functions. 2. Programme starts on each drying cycle: clean the filter (See chapter CARE AND CLEANING.) Laundry can use this function to prevent creases from creases. For fabrics with decreased heat. acrylic, viscose). 14...
... the latest to activate or deactivate the sound. CHANGE A PROGRAMME To change on full heat setting, which continue around 30 minutes. Turn the programme dial to red. Set the drying programme and functions. 2. Programme starts on each drying cycle: clean the filter (See chapter CARE AND CLEANING.) Laundry can use this function to prevent creases from creases. For fabrics with decreased heat. acrylic, viscose). 14...
Product Manual
Page 15
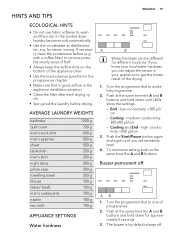
... g 100 g 100 g 100 g 100 g 100 g APPLIANCE SETTINGS Water hardness ENGLISH 15 A B Water hardness can adjust the sensor in the appliance installation position. • Clean the filter after each drying cycle. • Spin good the laundry before (e.g. If necessary clean the condensate before drying. End - Push the Start/Pause button again and again until LEDs show the settings: - Turn the programme dial to one of programmes...
... g 100 g 100 g 100 g 100 g 100 g APPLIANCE SETTINGS Water hardness ENGLISH 15 A B Water hardness can adjust the sensor in the appliance installation position. • Clean the filter after each drying cycle. • Spin good the laundry before (e.g. If necessary clean the condensate before drying. End - Push the Start/Pause button again and again until LEDs show the settings: - Turn the programme dial to one of programmes...

Product Manual
Page 16
... clean it. Use a standard neutral soap detergent to clean the filter. The fluff occurs while the cloths are dried in the tumble dryer. 1. Open the door. 5. Close the filter. 2. Use a moist hand to clean the inner surface of each drying cycle. Dry the cleaned surfaces with warm water using a brush. If necessary clean the filter with a soft cloth. For this a vacuum cleaner can be cleaned. CAUTION! Clogged filter increases the cycle time and causes higher energy...
... clean it. Use a standard neutral soap detergent to clean the filter. The fluff occurs while the cloths are dried in the tumble dryer. 1. Open the door. 5. Close the filter. 2. Use a moist hand to clean the inner surface of each drying cycle. Dry the cleaned surfaces with warm water using a brush. If necessary clean the filter with a soft cloth. For this a vacuum cleaner can be cleaned. CAUTION! Clogged filter increases the cycle time and causes higher energy...

Product Manual
Page 17
CAUTION! Do not use furniture cleaning agents or cleaning agents which can cause corrosion to clean the control panel and housing. Dry the cleaned surfaces with a soft cloth. CAUTION! ENGLISH 17 Use a moist cloth to clean the drum. Do not use abrasive materials or steel wool to clean. CLEANING THE CONTROL PANEL AND HOUSING Use a standard neutral soap detergent to clean the appliance.
CAUTION! Do not use furniture cleaning agents or cleaning agents which can cause corrosion to clean the control panel and housing. Dry the cleaned surfaces with a soft cloth. CAUTION! ENGLISH 17 Use a moist cloth to clean the drum. Do not use abrasive materials or steel wool to clean. CLEANING THE CONTROL PANEL AND HOUSING Use a standard neutral soap detergent to clean the appliance.
Product Manual
Page 18
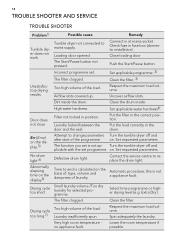
... . Clean the filter. High water hardness. The function you set is not a appliance fault. Laundry locked between the door and the seal. The filter clogged. Set requested parameters. Clean the drum inside the drum. Connect in at mains socket. this is not ap- Laundry insufficiently spun. 18 TROUBLE SHOOTER AND SERVICE TROUBLE SHOOTER Problem1) Tumble dryer does not work. Door does not close Err (Error) on the display.5) No drum light 6) Abnormally elapsing time on . Close loading door The Start/Pause button...
... . Clean the filter. High water hardness. The function you set is not a appliance fault. Laundry locked between the door and the seal. The filter clogged. Set requested parameters. Clean the drum inside the drum. Connect in at mains socket. this is not ap- Laundry insufficiently spun. 18 TROUBLE SHOOTER AND SERVICE TROUBLE SHOOTER Problem1) Tumble dryer does not work. Door does not close Err (Error) on the display.5) No drum light 6) Abnormally elapsing time on . Close loading door The Start/Pause button...
Product Manual
Page 19
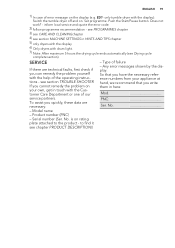
... you quickly, these data are technical faults, first check if you can remedy the problem yourself with drum light. 7) Note: After maximum 5 hours the drying cycle ends automatically (see section MACHINE SETTINGS in HINTS AND TIPS chapter 5) only dryers with the display 6) Only dryers with the help of the operating instructions - Any error messages shown by the display. PNC: Ser. No. E51- Product number (PNC) - see PROGRAMMES chapter 3) see CARE AND...
... you quickly, these data are technical faults, first check if you can remedy the problem yourself with drum light. 7) Note: After maximum 5 hours the drying cycle ends automatically (see section MACHINE SETTINGS in HINTS AND TIPS chapter 5) only dryers with the display 6) Only dryers with the help of the operating instructions - Any error messages shown by the display. PNC: Ser. No. E51- Product number (PNC) - see PROGRAMMES chapter 3) see CARE AND...

Product Manual
Page 20
... 108 l maximum depth with the load door opened 950 mm adjustable height 850 mm (+ 15 mm - feet regulation) the appliance weight 31,5 kg maximum load volume 7 kg voltage 230 - 240 V frequency 50 Hz necessary fuse 13 A total power 2600 W energy efficiency class C energy consumption kWh/cycle 1) 3,9 kWh annual energy consumption 263,1 kWh type of use Domestic permitted ambient temperature + 5°C to + 35°C 1) 7 kg of...
... 108 l maximum depth with the load door opened 950 mm adjustable height 850 mm (+ 15 mm - feet regulation) the appliance weight 31,5 kg maximum load volume 7 kg voltage 230 - 240 V frequency 50 Hz necessary fuse 13 A total power 2600 W energy efficiency class C energy consumption kWh/cycle 1) 3,9 kWh annual energy consumption 263,1 kWh type of use Domestic permitted ambient temperature + 5°C to + 35°C 1) 7 kg of...
Product Manual
Page 21
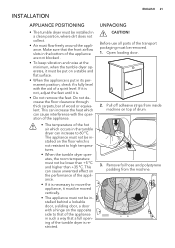
... not remove the feet. Pull off adhesive strips from the machine. Remove foil hose and polystyrene padding from inside machine on the opposite side to high temperatures. • When the tumble dryer operates, the room temperature must be removed. 1. The appliance must not be installed on the floor which occurs in its permanent position, check if is fully level with a hinge on top of drum. 3. This...
... not remove the feet. Pull off adhesive strips from the machine. Remove foil hose and polystyrene padding from inside machine on the opposite side to high temperatures. • When the tumble dryer operates, the room temperature must be removed. 1. The appliance must not be installed on the floor which occurs in its permanent position, check if is fully level with a hinge on top of drum. 3. This...
Product Manual
Page 22
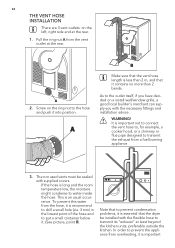
...dryer be sealed with the necessary fittings and installation advice. Note that to prevent condensation problems, it is less than 2 bends. preferable outside the kitchen. WARNING! In order to prevent the appliance from overheating, it . (See picture, point B). If the hose is important The not used vents must be installed with the flexible hose...designed to water inside the hose. To prevent this water from the hose, it is recommend to drill a small hole (via. 3 mm) in the lowest point of the hose and to put a small container below it is long and the room temperature low, ...
...dryer be sealed with the necessary fittings and installation advice. Note that to prevent condensation problems, it is less than 2 bends. preferable outside the kitchen. WARNING! In order to prevent the appliance from overheating, it . (See picture, point B). If the hose is important The not used vents must be installed with the flexible hose...designed to water inside the hose. To prevent this water from the hose, it is recommend to drill a small hole (via. 3 mm) in the lowest point of the hose and to put a small container below it is long and the room temperature low, ...
Product Manual
Page 23
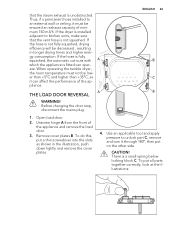
... appliance is installed adjacent to unlock part C, remove and turn it can oper- If the dryer is fitted can affect the performance of mini- pliance. There is not fully squashed, drying efficiency will be ensured an exhaust capacity of the ap- If the hose is a small spring below locking block C. ENGLISH 23 B C B 1. mum 150 m3/h. Before changing the door stop, disconnect the mains plug. To...
... appliance is installed adjacent to unlock part C, remove and turn it can oper- If the dryer is fitted can affect the performance of mini- pliance. There is not fully squashed, drying efficiency will be ensured an exhaust capacity of the ap- If the hose is a small spring below locking block C. ENGLISH 23 B C B 1. mum 150 m3/h. Before changing the door stop, disconnect the mains plug. To...

Product Manual
Page 24
... use a correctly installed shockproof socket. • Do not use multiple plugs and extension cables. The wires in the plug by our Service. • Make sure not to squash or cause damage to the mains plug and cable behind the load door (see the "PRODUCT DESCRIPTION" chapter). Change door lock E above to lock into recesses on the rating plate agrees with 13 A fuse. If necessary, replace the fuse in the power...
... use a correctly installed shockproof socket. • Do not use multiple plugs and extension cables. The wires in the plug by our Service. • Make sure not to squash or cause damage to the mains plug and cable behind the load door (see the "PRODUCT DESCRIPTION" chapter). Change door lock E above to lock into recesses on the rating plate agrees with 13 A fuse. If necessary, replace the fuse in the power...


