
Operating Instructions
Page 2
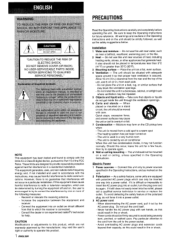
... unit has condensation inside the unit through the ventilation openings. 6 Carts and stands - Do not use this unit near a bathtub, washbowl, swimming pool, or the like. 2 Heat - Do not install the unit in the Operating Instructions and on the CD pickup lens when: - Never handle the AC power plug with the limits for a few hours, then try again...
... unit has condensation inside the unit through the ventilation openings. 6 Carts and stands - Do not use this unit near a bathtub, washbowl, swimming pool, or the like. 2 Heat - Do not install the unit in the Operating Instructions and on the CD pickup lens when: - Never handle the AC power plug with the limits for a few hours, then try again...

Operating Instructions
Page 3
... 3 REMOTE CONTROL m.......5 BEFORE OPERATION 6I SOUND AUDIO ADJUSTMENTS GRAPHIC EQUALIZER m m DSP SURROUND SYSTEM 7 RADIO RECEPTION MANUAL TUNING s 8 PRESETTING STATIONS 8I CD PLAYING BASIC OPERATIONS 9 PROGRAMMED PLAY ICI TAPE PLAYBACK BASIC OPERATIONS m m mm.ll CONTINUOUS PLAY 12! BASIC RECORDING 1:) DUBBING A TAPE MANUALLY 14 DUBBING THE WHOLE TAPE 14 Al EDIT RECORDING 15 [m PROGRAMMED EDIT RECORDING 16 DOLBY PRO LOGIC ADJUSTING SPEAKER LEVEL BALANCE 17 PLAY WITH DOLBY PRO LOGIC 18 KARAOKE MICROPHONE MIXING r 19 KARAOKE PROGRAM 20 CLOCK AND TIMER SETTING...
... 3 REMOTE CONTROL m.......5 BEFORE OPERATION 6I SOUND AUDIO ADJUSTMENTS GRAPHIC EQUALIZER m m DSP SURROUND SYSTEM 7 RADIO RECEPTION MANUAL TUNING s 8 PRESETTING STATIONS 8I CD PLAYING BASIC OPERATIONS 9 PROGRAMMED PLAY ICI TAPE PLAYBACK BASIC OPERATIONS m m mm.ll CONTINUOUS PLAY 12! BASIC RECORDING 1:) DUBBING A TAPE MANUALLY 14 DUBBING THE WHOLE TAPE 14 Al EDIT RECORDING 15 [m PROGRAMMED EDIT RECORDING 16 DOLBY PRO LOGIC ADJUSTING SPEAKER LEVEL BALANCE 17 PLAY WITH DOLBY PRO LOGIC 18 KARAOKE MICROPHONE MIXING r 19 KARAOKE PROGRAM 20 CLOCK AND TIMER SETTING...

Operating Instructions
Page 4
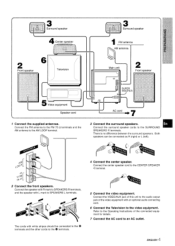
... the rear of your home, Complete setting and connection of the two front speakers. CONNECTIONS Before connecting the AC cord The rated voltage of ycur set to position the speakers properly. I Serial Nc. (Lot No.) 1 CX-NMT50 SX-NA54 / SX-C400 I '1 I SX-R210 I I TS-~35 (NSX-MT55only) 1 6) SX-R21O Surround speakers SX-C400 Center speaker Remote control AM antenna Operating Instructions, etc. 11111, ,%: FM antenna @ Front speakers @ Center speaker Position in case of this stereo system...
... the rear of your home, Complete setting and connection of the two front speakers. CONNECTIONS Before connecting the AC cord The rated voltage of ycur set to position the speakers properly. I Serial Nc. (Lot No.) 1 CX-NMT50 SX-NA54 / SX-C400 I '1 I SX-R210 I I TS-~35 (NSX-MT55only) 1 6) SX-R21O Surround speakers SX-C400 Center speaker Remote control AM antenna Operating Instructions, etc. 11111, ,%: FM antenna @ Front speakers @ Center speaker Position in case of this stereo system...
Operating Instructions
Page 5
... surround speakers, Both speakers can be connected to the 0 terminals and the other cords to an AC outlet. Connect the center speaker cord to the SURROUND m SPEAKERS 4 terminals. Refer to the Operating Instructions of the video equipment with L mark to the AM LOOP terminal, 3 Connect thesurround speakers. Connect the VIDEO/AUX jack of this unit to the audio output jack of the connected equipment for details. 7 Connect the AC cord to the O terminals. 5 Connect...
... surround speakers, Both speakers can be connected to the 0 terminals and the other cords to an AC outlet. Connect the center speaker cord to the SURROUND m SPEAKERS 4 terminals. Refer to the Operating Instructions of the video equipment with L mark to the AM LOOP terminal, 3 Connect thesurround speakers. Connect the VIDEO/AUX jack of this unit to the audio output jack of the connected equipment for details. 7 Connect the AC cord to the O terminals. 5 Connect...
Operating Instructions
Page 6
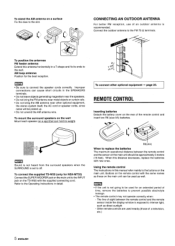
... decreases, replace the batteries with new ones. q Do not bring the AM antenna near other optional equipment+ page 23. To connect other optional equipment, the stereo system itself, the AC cord or speaker cords, since noise will be approximately 5 meters (16 feet). speakers when the To connect the supplied TS-W35 (only for the best reception. Other remote controls are used as direct sunlight - m Sound is not...
... decreases, replace the batteries with new ones. q Do not bring the AM antenna near other optional equipment+ page 23. To connect other optional equipment, the stereo system itself, the AC cord or speaker cords, since noise will be approximately 5 meters (16 feet). speakers when the To connect the supplied TS-W35 (only for the best reception. Other remote controls are used as direct sunlight - m Sound is not...
Operating Instructions
Page 7
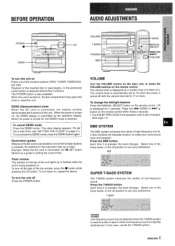
... DEMO button. Illumination guides Whenewr the AC cord is turned off the light of the function buttons (TAPE, TUNER, VIDEO/AUX, CD, ME)). Examp!e: When the AC cord is received (Direct Play Function). q The DOLBY PRO LOGIC front speakers level is also changed. (See page 17) BBE SYSTEM The BBE system enhances the clarity of the inserted disc or tape begins, or the previously tuned station is connected, the II SET button flashes as a number...
... DEMO button. Illumination guides Whenewr the AC cord is turned off the light of the function buttons (TAPE, TUNER, VIDEO/AUX, CD, ME)). Examp!e: When the AC cord is received (Direct Play Function). q The DOLBY PRO LOGIC front speakers level is also changed. (See page 17) BBE SYSTEM The BBE system enhances the clarity of the inserted disc or tape begins, or the previously tuned station is connected, the II SET button flashes as a number...

Operating Instructions
Page 8
... SURROUND modes and can recreate the effect of the recording. "GEQ OFF is canceled when: - Sound adjustment during recording The output volume and tone (except BBE) of the speakers or headphones may be heard from the surround speakers. q The Dolby Pro Logic surround speakers level is also changed . - GRAPHIC EQUALIZER .. .. .. ROCK: Powerful sound emphasizing treble and bass POP: More presence in . ROCIK/ POP / CLASSIC The DSP (Digital Signal Processor) surround...
... SURROUND modes and can recreate the effect of the recording. "GEQ OFF is canceled when: - Sound adjustment during recording The output volume and tone (except BBE) of the speakers or headphones may be heard from the surround speakers. q The Dolby Pro Logic surround speakers level is also changed . - GRAPHIC EQUALIZER .. .. .. ROCK: Powerful sound emphasizing treble and bass POP: More presence in . ROCIK/ POP / CLASSIC The DSP (Digital Signal Processor) surround...
Operating Instructions
Page 10
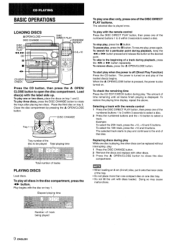
... the 25th track, press the +1 O, +10 and 5 buttons. Replacing discs during play While one disc tray. Doing so may cause malfunctions. Place the third disc on . Selecting a track with other discs can be played Total playing time Total number of the disc to close the disc compartment. To play of the tray. BASIC OPERATIONS Press the CD button, then press the A OPEN/ CLOSE button to select a track. The power is off (Direct Play Function) Press the CD button. m q When loading...
... the 25th track, press the +1 O, +10 and 5 buttons. Replacing discs during play While one disc tray. Doing so may cause malfunctions. Place the third disc on . Selecting a track with other discs can be played Total playing time Total number of the disc to close the disc compartment. To play of the tray. BASIC OPERATIONS Press the CD button, then press the A OPEN/ CLOSE button to select a track. The power is off (Direct Play Function) Press the CD button. m q When loading...

Operating Instructions
Page 11
... button twice in red on the display. To play all discs, press the +> button to the previously played track with the numbered buttons. -to skip to start play A single disc or all the steps again. G lights up on the display. RANI]OM/REPEAT play . REPEAT play . RANIDOM /REPEAT PLAY Use the remote control. Program number Total playing time c,f the selected tracks Selected track number Total number of the inserted discs. 3 Press the numbered buttons and the +1 Clbutton to the program Repeat steps 2 and 3 in stop mode...
... button twice in red on the display. To play all discs, press the +> button to the previously played track with the numbered buttons. -to skip to start play A single disc or all the steps again. G lights up on the display. RANI]OM/REPEAT play . REPEAT play . RANIDOM /REPEAT PLAY Use the remote control. Program number Total playing time c,f the selected tracks Selected track number Total number of the inserted discs. 3 Press the numbered buttons and the +1 Clbutton to the program Repeat steps 2 and 3 in stop mode...
Operating Instructions
Page 14
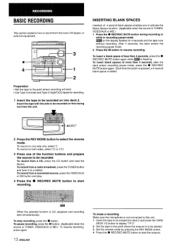
... recorded. To record from the tuner, CD player, or external equipment. To stop recording, press the s button. REC/REC MUTE button during recording or while in to be recorded on first facing out from the unit. 2 Press the REV MODE button to record from a radio broadcast, press the TUNER button and tune in recording pause mode. ~ on the display flashes for recording. 1 Insert the tape to activate the Music Sensor function. (Applicable when the source is CD, playback...
... recorded. To record from the tuner, CD player, or external equipment. To stop recording, press the s button. REC/REC MUTE button during recording or while in to be recorded on first facing out from the unit. 2 Press the REV MODE button to record from a radio broadcast, press the TUNER button and tune in recording pause mode. ~ on the display flashes for recording. 1 Insert the tape to activate the Music Sensor function. (Applicable when the source is CD, playback...
Operating Instructions
Page 17
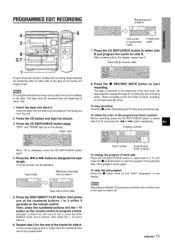
... track of disc 2, press the DISC DIFIECT PLAY and 2 buttons, then press the + 10 and O buttons. 6 Repeat step 5 for the rest of the tracks for side B. Track number Programmed track numbers To change the program of each side of the tape as the tracks are programmed. After confirming B on the remote control to program a track. To check the order of the programmed track numbers When "Al" is played through for side A Tape side A (front side) 5 Press the DISC DIRECT PLAY button...
... track of disc 2, press the DISC DIFIECT PLAY and 2 buttons, then press the + 10 and O buttons. 6 Repeat step 5 for the rest of the tracks for side B. Track number Programmed track numbers To change the program of each side of the tape as the tracks are programmed. After confirming B on the remote control to program a track. To check the order of the programmed track numbers When "Al" is played through for side A Tape side A (front side) 5 Press the DISC DIRECT PLAY button...
Operating Instructions
Page 18
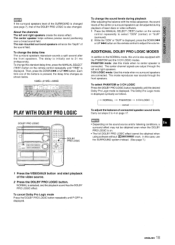
... in Dolby Surround, astonishingly realistic sound surrounds the listener to each channel. While "CEN" or "SUR" is equipped with a built-in the front and center sound field, while ambient sounds like cars and crowds are properly connected. (See page 4) q Make sure the laser disc, video tape, etc., support no Immv s.mcmm. Use the remote control. 1 Press the DOLBY PRO LOGIC button to match the characteristics of speaker sound levels...
... in Dolby Surround, astonishingly realistic sound surrounds the listener to each channel. While "CEN" or "SUR" is equipped with a built-in the front and center sound field, while ambient sounds like cars and crowds are properly connected. (See page 4) q Make sure the laser disc, video tape, etc., support no Immv s.mcmm. Use the remote control. 1 Press the DOLBY PRO LOGIC button to match the characteristics of speaker sound levels...
Operating Instructions
Page 19
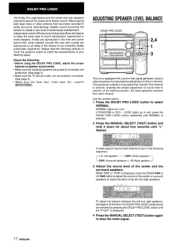
... delay time The surround speakers reproduce sounds a split second after the front speakers, The delay is initially set to 21 ms (milliseconds), To change the sound levels during playback After adjusting the balance with the noise sequencer, the SOUnCf levels of the center or surround speakers can be adjusted during playback of laser discs or video software. 1 Press the MANUAL SELECT (TEST) button on the remote control repeatedly until "TIME is displayed, press...
... delay time The surround speakers reproduce sounds a split second after the front speakers, The delay is initially set to 21 ms (milliseconds), To change the sound levels during playback After adjusting the balance with the noise sequencer, the SOUnCf levels of the center or surround speakers can be adjusted during playback of laser discs or video software. 1 Press the MANUAL SELECT (TEST) button on the remote control repeatedly until "TIME is displayed, press...
Operating Instructions
Page 20
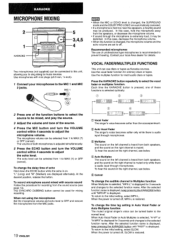
... displayed for multi audio discs or tapes. Use microphones with source sound Follow the procedure for ordinary discs or tapes. To record microphone sound mixed with mini plugs (03.5 mm, 1/8inch). 1 Connect your local Aiwa dealer for mixing recording. The SYNCHRO DUBBING button cannot be used for details. When not using the microphones Set the microphone volume and echo level to OFF and remove "the microphones from both speakers, and the sound...
... displayed for multi audio discs or tapes. Use microphones with source sound Follow the procedure for ordinary discs or tapes. To record microphone sound mixed with mini plugs (03.5 mm, 1/8inch). 1 Connect your local Aiwa dealer for mixing recording. The SYNCHRO DUBBING button cannot be used for details. When not using the microphones Set the microphone volume and echo level to OFF and remove "the microphones from both speakers, and the sound...
Operating Instructions
Page 22
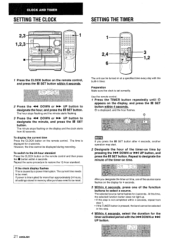
... settings stored in memory after 4 seconds, another operation may start. 2 Designate the hour of the source name flashes on the display and the clock starts from step 1. q If this step is pressed, the band cannot be reset. q If the TUNER button is not completed within 4 seconds, repeat from 00 seconds. Use the remote control 1 Press the TIMER button repeatedly until @ appears on at a specified time...
... settings stored in memory after 4 seconds, another operation may start. 2 Designate the hour of the source name flashes on the display and the clock starts from step 1. q If this step is pressed, the band cannot be reset. q If the TUNER button is not completed within 4 seconds, repeat from 00 seconds. Use the remote control 1 Press the TIMER button repeatedly until @ appears on at a specified time...
Operating Instructions
Page 23
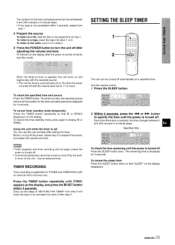
... display disappears. 2 ENGLISH ~! Before 'turning off automatically at a specified time, Use the remote control, 1 Press the SLEEP button. 2 Within 4 seconds, press the - Each time the button is applicable for TUNER and VI DEO/AUX (with the volume level set between 5 and 240 minutes in to a station. 6 Press the POWER button to a tape, insert the tape into deck 2 after step 5. SETTING THE SLEEP TIMER ~ * If this unit. To listen to the radio, tune...
... display disappears. 2 ENGLISH ~! Before 'turning off automatically at a specified time, Use the remote control, 1 Press the SLEEP button. 2 Within 4 seconds, press the - Each time the button is applicable for TUNER and VI DEO/AUX (with the volume level set between 5 and 240 minutes in to a station. 6 Press the POWER button to a tape, insert the tape into deck 2 after step 5. SETTING THE SLEEP TIMER ~ * If this unit. To listen to the radio, tune...
Operating Instructions
Page 24
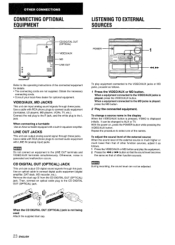
... Aiwa turntable equipped with RCA phono plugs to AUX or TV. To adjust the sound level of the external source When the sound level of the external source is played: press the MD button. 2 Play the connected equipment. Use a cable with LINE IN (analog input) jacks. CD DIGITAL OUT (OPTICAL) JACK This unit can be adjusted. When a equipment connected to the VIDEO/AUX jacks is not being used Attach the supplied dust cap. 23 ENGLISH With the power...
... Aiwa turntable equipped with RCA phono plugs to AUX or TV. To adjust the sound level of the external source When the sound level of the external source is played: press the MD button. 2 Play the connected equipment. Use a cable with LINE IN (analog input) jacks. CD DIGITAL OUT (OPTICAL) JACK This unit can be adjusted. When a equipment connected to the VIDEO/AUX jacks is not being used Attach the supplied dust cap. 23 ENGLISH With the power...
Operating Instructions
Page 25
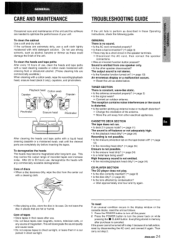
... cleaning cassette or a moistened swab, wait until the cleaned parts are completely dry before inserting the tapes. This may be turned off the power. 2 Press the POWER button to direct sunlight, or leave them in a car parked in step 1 because of a malfunction, reset by condensation? + Wait approximately one speaker only. q Was an incorrect function button pressed? The output sound is distorted. If the surfaces are extremely dirty, use...
... cleaning cassette or a moistened swab, wait until the cleaned parts are completely dry before inserting the tapes. This may be turned off the power. 2 Press the POWER button to direct sunlight, or leave them in a car parked in step 1 because of a malfunction, reset by condensation? + Wait approximately one speaker only. q Was an incorrect function button pressed? The output sound is distorted. If the surfaces are extremely dirty, use...
Operating Instructions
Page 26
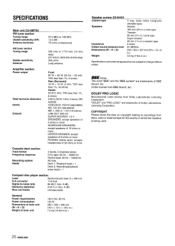
..., 6 ohms, DIN AUDIO) VIDEO/AUX: 150 mV (adjustable) MD: 150 mV (adjustable) MIC 1, MIC 2:1 mV (10 kohms) LINE OUT 200 mV SUPER WOOFER: 1.9 V SPEAKERS: accept speakers of 6 ohms or more SURROUND SPEAKERS: accept speakers of 16 ohms or more CENTER SPEAKER: accept speakers of 8 ohms or more PHONES (stereo jack): accepts headphones of 32 ohms or more Cassette deck section Track format Frequency response Recording system Heads 4 tracks, 2 channels stereo CrOz tape: 50 Hz...
..., 6 ohms, DIN AUDIO) VIDEO/AUX: 150 mV (adjustable) MD: 150 mV (adjustable) MIC 1, MIC 2:1 mV (10 kohms) LINE OUT 200 mV SUPER WOOFER: 1.9 V SPEAKERS: accept speakers of 6 ohms or more SURROUND SPEAKERS: accept speakers of 16 ohms or more CENTER SPEAKER: accept speakers of 8 ohms or more PHONES (stereo jack): accepts headphones of 32 ohms or more Cassette deck section Track format Frequency response Recording system Heads 4 tracks, 2 channels stereo CrOz tape: 50 Hz...
Operating Instructions
Page 80
... s CLEAR 8, 9, 11 CLOCK 21 DEMO 6 +> DIRECTION/PRESET 8, 9, 11 DISC CHANGE 9 DISC DIRECT PLAY 9 DOLBY PRO LOGIC 17 U, W DOWN 8, 9, 11 ECHO 19 EDIT/CHECK (CD EDIT/CHECK 9, 15, 16 GEQ 7 KARAOKE 19 MANUAL SELECT (TEST 7, 19 MD 23 MIC 1, MIC 2 19 MIC 19 MoNo 8 A OPEN/CLOSE 9 PHoNEs 7 POWER 6 PRGM 10 RANDOM/REPEAT 10 q REC/REC MUTE 13 REV MODE (DECK2) 11 II SET 8,9, 11 SLEEP 22 SURROUND (DISCO, LIVE...
... s CLEAR 8, 9, 11 CLOCK 21 DEMO 6 +> DIRECTION/PRESET 8, 9, 11 DISC CHANGE 9 DISC DIRECT PLAY 9 DOLBY PRO LOGIC 17 U, W DOWN 8, 9, 11 ECHO 19 EDIT/CHECK (CD EDIT/CHECK 9, 15, 16 GEQ 7 KARAOKE 19 MANUAL SELECT (TEST 7, 19 MD 23 MIC 1, MIC 2 19 MIC 19 MoNo 8 A OPEN/CLOSE 9 PHoNEs 7 POWER 6 PRGM 10 RANDOM/REPEAT 10 q REC/REC MUTE 13 REV MODE (DECK2) 11 II SET 8,9, 11 SLEEP 22 SURROUND (DISCO, LIVE...


