
Operating Instructions
Page 2
... call a qualified service technician to service or replace the A an equilateral triangle, is intended to alert the user to persons. The unit is difficult or impossible to the presence of outlet. AC power plug. The unit exhibits a marked change in a bookcase, cabinet, or airtight rack where ventilation may be used in .) from the AC Read the Operating Instructions carefully and completely...
... call a qualified service technician to service or replace the A an equilateral triangle, is intended to alert the user to persons. The unit is difficult or impossible to the presence of outlet. AC power plug. The unit exhibits a marked change in a bookcase, cabinet, or airtight rack where ventilation may be used in .) from the AC Read the Operating Instructions carefully and completely...

Operating Instructions
Page 3
...Inserting batteries into the remote control Detach the battery cover on your system and accessories CX-NV2100 compact disc stereo cassette receiver SX-NV21OO (L, R) Front speakers PREPARATIONS PRECAUTIONS 1 CONNECTIONS 3 BEFORE OPERATION 4 SETTING THE CLOCK 4 SOUND ADJUSTING THE SOUND 5 RADIO RECEPTION MANUAL TUNING 6 PRESETTING STATIONS m 6 Remc)te control AM antenna CD PLAYING BASIC OPERATIONS 7 PROGRAMMED PLAY 8 TAPE PLAYBACK BASIC OPERATIONS 9 Operating Instructions, etc. w&aivwm4vf%%%shec+@w TABLE OF CONTENTS Congratulations on the rear of the remote control and...
...Inserting batteries into the remote control Detach the battery cover on your system and accessories CX-NV2100 compact disc stereo cassette receiver SX-NV21OO (L, R) Front speakers PREPARATIONS PRECAUTIONS 1 CONNECTIONS 3 BEFORE OPERATION 4 SETTING THE CLOCK 4 SOUND ADJUSTING THE SOUND 5 RADIO RECEPTION MANUAL TUNING 6 PRESETTING STATIONS m 6 Remc)te control AM antenna CD PLAYING BASIC OPERATIONS 7 PROGRAMMED PLAY 8 TAPE PLAYBACK BASIC OPERATIONS 9 Operating Instructions, etc. w&aivwm4vf%%%shec+@w TABLE OF CONTENTS Congratulations on the rear of the remote control and...
Operating Instructions
Page 4
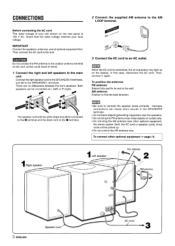
... stereo system itself, the AC cord or speaker cords, since noise will be picked up on the display. IMPORTANT Connect the speakers, antennas, and all characters may light up . Both speakers can cause short circuits in the SPEAKERS terminals. Then, connect it again. q Be sure to connect the speaker cords correctly, Improper connections can be connected to the C) terminal and the black cord to find the best direction...
... stereo system itself, the AC cord or speaker cords, since noise will be picked up on the display. IMPORTANT Connect the speakers, antennas, and all characters may light up . Both speakers can cause short circuits in the SPEAKERS terminals. Then, connect it again. q Be sure to connect the speaker cords correctly, Improper connections can be connected to the C) terminal and the black cord to find the best direction...

Operating Instructions
Page 5
... the remote control to set the clock, To use the FUNCTION button on the remote control The FUNCTION button substitutes for the function buttons (TAPE/DE(;K 1/2, TUNER, VIDEO/AUX,CD) on . To use the SHIFT button on the plate above the button. To cancel DEMO mode Press the II SET button while the power is overridden by the operation display. Each time the FUNCTION button is pressed, the next function is received (Direct Play Function). To turn off . SETTING THE CLOCK CLOCK SHIFT Set the time as direct sunlight - The display changes to reset...
... the remote control to set the clock, To use the FUNCTION button on the remote control The FUNCTION button substitutes for the function buttons (TAPE/DE(;K 1/2, TUNER, VIDEO/AUX,CD) on . To use the SHIFT button on the plate above the button. To cancel DEMO mode Press the II SET button while the power is overridden by the operation display. Each time the FUNCTION button is pressed, the next function is received (Direct Play Function). To turn off . SETTING THE CLOCK CLOCK SHIFT Set the time as direct sunlight - The display changes to reset...

Operating Instructions
Page 6
... output from the speakers while the headphones are plugged in which low frequency sound is originally emphasized. EQoFF (cancel) To select with the remote control Press the GEQ button repeatedly while pressing the SHIFT button. ROCK: Powerful sound emphasizing treble and bass POP: More presence in the vocals and midrange JAZZ: Accented lower frequencies for a disc or tape in . Each time it is displayed. POP - GEQ T-BASS SHIFT VOLUME GRAPHIC EQUALIZER...
... output from the speakers while the headphones are plugged in which low frequency sound is originally emphasized. EQoFF (cancel) To select with the remote control Press the GEQ button repeatedly while pressing the SHIFT button. ROCK: Powerful sound emphasizing treble and bass POP: More presence in the vocals and midrange JAZZ: Accented lower frequencies for a disc or tape in . Each time it is displayed. POP - GEQ T-BASS SHIFT VOLUME GRAPHIC EQUALIZER...

Operating Instructions
Page 7
... preset number to a station, the search stol~s. If the power is assigned a preset number, beginning from 1 in consecutive order for a station, After tuning in to tune in the display. A station is turned off, the previously tuned station will not be played (Direct Play Function). If you use this procedure. I Preset number 3 Repeat steps 1 and 2. To select preset number 10, press the +10 and O buttons. Each time the button is pressed, the next highest number is pressed, the frequency changes. The preset numbers...
... preset number to a station, the search stol~s. If the power is assigned a preset number, beginning from 1 in consecutive order for a station, After tuning in to tune in the display. A station is turned off, the previously tuned station will not be played (Direct Play Function). If you use this procedure. I Preset number 3 Repeat steps 1 and 2. To select preset number 10, press the +10 and O buttons. Each time the button is pressed, the next highest number is pressed, the frequency changes. The preset numbers...

Operating Instructions
Page 8
... played Total number of tracks PLAYING DISCS DISC CHANGE~ = EDIT/CHECK RANDOM/ REPEAT SHIFT u DISC DIRECT PLAY~ Load discs. 7 ENGLISH Number of track being played To play one of a track during playback, keep the 4< or ®F button pressed and release the button at the desired point. Elapsed playing time press LOADING DISCS Press the CD button, then press the & OPEN/ CLOSE button to rotate the trays after placing two discs. Place the third disc on tray 1. To stop play , press again. Close the disc...
... played Total number of tracks PLAYING DISCS DISC CHANGE~ = EDIT/CHECK RANDOM/ REPEAT SHIFT u DISC DIRECT PLAY~ Load discs. 7 ENGLISH Number of track being played To play one of a track during playback, keep the 4< or ®F button pressed and release the button at the desired point. Elapsed playing time press LOADING DISCS Press the CD button, then press the & OPEN/ CLOSE button to rotate the trays after placing two discs. Place the third disc on tray 1. To stop play , press again. Close the disc...

Operating Instructions
Page 9
RANDOM /REPEAT PLAY Use the remote control. REPEAT play A single disc or all the discs can be selected cyclically. @ RANDOM play @ REPEA-[ play @ RANDOM/REPEAT play Allthetracks on the selected disc or on allthe discs can be played repeatedly. Each time t is pressed, the function can be played randomly. Press the RANDOM/REPEAT button while pressing the SHIFT button. RANDOM play @ Cancel q Even if the
RANDOM /REPEAT PLAY Use the remote control. REPEAT play A single disc or all the discs can be selected cyclically. @ RANDOM play @ REPEA-[ play @ RANDOM/REPEAT play Allthetracks on the selected disc or on allthe discs can be played repeatedly. Each time t is pressed, the function can be played randomly. Press the RANDOM/REPEAT button while pressing the SHIFT button. RANDOM play @ Cancel q Even if the

Operating Instructions
Page 10
... q button to start recording from the first track. button, and then press When both deck 1 and deck 2 are set in to a station. To record from a radio broadcast Press the TUNER/BAND button and tune in the playback mode Deck 2 is depressed simultaneously. To record from a tape Press the TAPE button. When you wish to start recording precisely (except when recording from a CD Press the CD button and load a disc. To start playback. The pause mode...
... q button to start recording from the first track. button, and then press When both deck 1 and deck 2 are set in to a station. To record from a radio broadcast Press the TUNER/BAND button and tune in the playback mode Deck 2 is depressed simultaneously. To record from a tape Press the TAPE button. When you wish to start recording precisely (except when recording from a CD Press the CD button and load a disc. To start playback. The pause mode...
Operating Instructions
Page 11
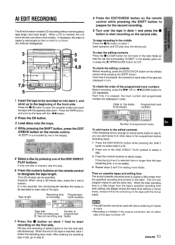
Al EDIT RECORDING The Al edit function enables CD recording without worrying about tape length and track length. When a CD is cut short. (Al: Artificial Intelligence) 5 6 4,8 - 7- 1 Insert the tape to be recorded on into deck 1, and wind up the tape with the exposed side down. Press the TAPE button, and wind up to open the cassette holder and insert the tape with the If necessary, the order of tracks is rearranged so that no track is inserted, the unit automatically calculates track lengths. Press the W= button to the beginning of the front side.
Al EDIT RECORDING The Al edit function enables CD recording without worrying about tape length and track length. When a CD is cut short. (Al: Artificial Intelligence) 5 6 4,8 - 7- 1 Insert the tape to be recorded on into deck 1, and wind up the tape with the exposed side down. Press the TAPE button, and wind up to open the cassette holder and insert the tape with the If necessary, the order of tracks is rearranged so that no track is inserted, the unit automatically calculates track lengths. Press the W= button to the beginning of the front side.

Operating Instructions
Page 12
... on the remote control for recording of the DISC DIRECT PLAY buttons to select a disc and press the numeric buttons to be used with the side to program a track. Example: When using a 60-minute tape, press the 6 and O buttons. When the end of the tape is displayed. 4 Press the numeric buttons on deck 1. Program number Disc number Programmed track numbers Tape side Track number To change the program of the selected side. A track whose playing time is longer than the remaining time cannot be...
... on the remote control for recording of the DISC DIRECT PLAY buttons to select a disc and press the numeric buttons to be used with the side to program a track. Example: When using a 60-minute tape, press the 6 and O buttons. When the end of the tape is displayed. 4 Press the numeric buttons on deck 1. Program number Disc number Programmed track numbers Tape side Track number To change the program of the selected side. A track whose playing time is longer than the remaining time cannot be...

Operating Instructions
Page 13
... tab openings with adhesive tape, etc. u Specified time While the timer is in operation, the display indication is pressed, the time changes between 5 and 240 minutes in the mechanism. Side A Tab for side A To record on deck 1 to start erasure. 2 Within 4 seconds, press the +< or b> button to recordings from discs, ri~dio or external tape for 4 seconds. ENGLISH 12 Use the remote control. 1 Press the SLEEP button while...
... tab openings with adhesive tape, etc. u Specified time While the timer is in operation, the display indication is pressed, the time changes between 5 and 240 minutes in the mechanism. Side A Tab for side A To record on deck 1 to start erasure. 2 Within 4 seconds, press the +< or b> button to recordings from discs, ri~dio or external tape for 4 seconds. ENGLISH 12 Use the remote control. 1 Press the SLEEP button while...

Operating Instructions
Page 14
... tape in this unit. When the tape length is longer than the timer recording period, the q button is reached, the unit turns on time by the builtin timer of the tape to display 0, and press the 11 SET button within 4 seconds, repeat from step 1. Preparation Make sure the clock is pressed, the band cannot be damaged. After you do not press the I I SET button within 4 seconds, another operation...
... tape in this unit. When the tape length is longer than the timer recording period, the q button is reached, the unit turns on time by the builtin timer of the tape to display 0, and press the 11 SET button within 4 seconds, repeat from step 1. Preparation Make sure the clock is pressed, the band cannot be damaged. After you do not press the I I SET button within 4 seconds, another operation...

Operating Instructions
Page 15
... on the display. 2 Play the connected equipment. VIDEO/AUX JACKS This unit can be changed to connect audio equipment (turntables, LD players, VCRs, TV, etc.). To change a source name in equalizer amplifier. Then, connect an optical cable plug@ to the operating instructions of the names. m CONNECTING EQUIPMENT OPTIONAL LISTENING TO EXTERNAL SOURCES - VIDEO/AUX m Refer to the CD DIGITAL OUT (OPTICAL) jack. q Consult your local Aiwa dealer for details. . CD DIGITAL OUT (OPTICAL) JACK This unit can output CD digital sound signals through...
... on the display. 2 Play the connected equipment. VIDEO/AUX JACKS This unit can be changed to connect audio equipment (turntables, LD players, VCRs, TV, etc.). To change a source name in equalizer amplifier. Then, connect an optical cable plug@ to the operating instructions of the names. m CONNECTING EQUIPMENT OPTIONAL LISTENING TO EXTERNAL SOURCES - VIDEO/AUX m Refer to the CD DIGITAL OUT (OPTICAL) jack. q Consult your local Aiwa dealer for details. . CD DIGITAL OUT (OPTICAL) JACK This unit can output CD digital sound signals through...

Operating Instructions
Page 16
... kHz, THD less than 1 Y., 6 ohms) 0.3 % (5 W, 1 kHz, 6 ohms, DIN AUDIO) VIDEO/AUX: 400 mV SPEAKERS: accept speakers of 6 ohms or more PHONES (stereo jack): accepts headphones of 32 ohms or more Cassette deck section Track format Frequency response Recording system Heads 4 tracks, 2 channels stereo 50 Hz - 10000 HZ AC bias Deck 1: Recording/playback/ erase head x 1 Deck 2: Playback head x 1 Compact disc player section Laser Semiconductorlaser(1= 780 nm) D-A converter 1 bit dual Signal-to-noise...
... kHz, THD less than 1 Y., 6 ohms) 0.3 % (5 W, 1 kHz, 6 ohms, DIN AUDIO) VIDEO/AUX: 400 mV SPEAKERS: accept speakers of 6 ohms or more PHONES (stereo jack): accepts headphones of 32 ohms or more Cassette deck section Track format Frequency response Recording system Heads 4 tracks, 2 channels stereo 50 Hz - 10000 HZ AC bias Deck 1: Recording/playback/ erase head x 1 Deck 2: Playback head x 1 Compact disc player section Laser Semiconductorlaser(1= 780 nm) D-A converter 1 bit dual Signal-to-noise...
Operating Instructions
Page 17
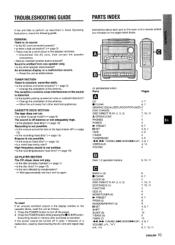
... unusual condition occurs in the display window or the cassette decks, reset the unit as follows. 1 Press the POWER button to perform as stated below . (in the speaker terminals. + Disconnect the AC cord, then correct the speaker connections. If the pclwer cannot be a short circuit in alphabetical order) Parts CD s CLEAR GRAPHIC EGWALiZER (ROCK/POP/JAZZ) DISC CHANGE DiSC DiRECT PLAY (1, 2, 3) = OpEN/CLOSE PHONES POWER - TUNER SECTION There is not...
... unusual condition occurs in the display window or the cassette decks, reset the unit as follows. 1 Press the POWER button to perform as stated below . (in the speaker terminals. + Disconnect the AC cord, then correct the speaker connections. If the pclwer cannot be a short circuit in alphabetical order) Parts CD s CLEAR GRAPHIC EGWALiZER (ROCK/POP/JAZZ) DISC CHANGE DiSC DiRECT PLAY (1, 2, 3) = OpEN/CLOSE PHONES POWER - TUNER SECTION There is not...

Operating Instructions
Page 52
... this product. Call TO// ~h% I-8M7-BUY-AIWA (United States and Puerto Rico) Printed in Malaysia AIWA CO.,LTD. OJOTE This equipment has been tested and found to comply with the instructions, may void the user's right or authority to operate this equipment does cause harmful interference to radio or television reception, which can be determined by turning the equipment...
... this product. Call TO// ~h% I-8M7-BUY-AIWA (United States and Puerto Rico) Printed in Malaysia AIWA CO.,LTD. OJOTE This equipment has been tested and found to comply with the instructions, may void the user's right or authority to operate this equipment does cause harmful interference to radio or television reception, which can be determined by turning the equipment...


