
Spec Sheet - LE23H062
Page 1
.../DC Adapter 45Watts (TYP) Volume up/down, CH up/down, Menu, Input, Power, TV Mode Tuner Mode, Auto Channel Scan, Additive Scan, Skip Channel, Analog MTS, Digital MTS, TV & Video Mode Picture Mode(Standard, Movie, Game, Vivid Custom), Backlight, Brightness, Contrast, Sharpness, Color, Tint, Noise Reduction, Color Temperature, Color Enhancement, Adptive Luma, DCR Audio Audio Mode(Flat, Rock, Pop, Classic, Jazz), Balance, TV Speakers, Advanced Audio, Equalizer Setting PC Mode Auto Adjust, H. 1.5" LE23H062 Description Panel Analog TV Tuner Digital Tuner Video Inputs Size Resolution...
.../DC Adapter 45Watts (TYP) Volume up/down, CH up/down, Menu, Input, Power, TV Mode Tuner Mode, Auto Channel Scan, Additive Scan, Skip Channel, Analog MTS, Digital MTS, TV & Video Mode Picture Mode(Standard, Movie, Game, Vivid Custom), Backlight, Brightness, Contrast, Sharpness, Color, Tint, Noise Reduction, Color Temperature, Color Enhancement, Adptive Luma, DCR Audio Audio Mode(Flat, Rock, Pop, Classic, Jazz), Balance, TV Speakers, Advanced Audio, Equalizer Setting PC Mode Auto Adjust, H. 1.5" LE23H062 Description Panel Analog TV Tuner Digital Tuner Video Inputs Size Resolution...

User Manual - LE23H062
Page 7
... Table of Contents 1. 1.1 INSTALLATION INSTRUCTIONS 1 1.3 Control Panel 3 1.4 Key pad 4 1.5 Remote Control 5 1.6 Input and Output Jacks 7 2.2 Connecting External Devices 9 2.2.1 Connecting External Earphones 9 2.2.2 Connecting to AV Devices 10 2.2.3 Connecting a VCR/ STB/ DVD Player Using Component Video 11 2.2.4 Connecting a VCR/ STB/ DVD Player Using Composite Video 11 2.2.5 Connecting a PC using VGA 12 2.2.6 Connecting a PC using DVI 12 2.2.7 Connecting HDMI 13 2.2.8 Connecting USB 13 2.3 Using the TV 14 2.3.1 Turning the TV On and Off 14 2.3.2 Switching Source Signals...
... Table of Contents 1. 1.1 INSTALLATION INSTRUCTIONS 1 1.3 Control Panel 3 1.4 Key pad 4 1.5 Remote Control 5 1.6 Input and Output Jacks 7 2.2 Connecting External Devices 9 2.2.1 Connecting External Earphones 9 2.2.2 Connecting to AV Devices 10 2.2.3 Connecting a VCR/ STB/ DVD Player Using Component Video 11 2.2.4 Connecting a VCR/ STB/ DVD Player Using Composite Video 11 2.2.5 Connecting a PC using VGA 12 2.2.6 Connecting a PC using DVI 12 2.2.7 Connecting HDMI 13 2.2.8 Connecting USB 13 2.3 Using the TV 14 2.3.1 Turning the TV On and Off 14 2.3.2 Switching Source Signals...
User Manual - LE23H062
Page 8
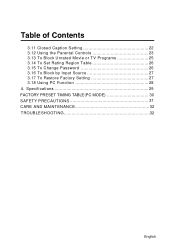
Specifications 29 FACTORY PRESET TIMING TABLE(PC MODE 30 SAFETY PRECAUTIONS 31 CARE AND MAINTENANCE 32 TROUBLESHOOTING 32 English English Table of Contents 3.11 Closed Caption Setting 22 3.12 Using the Parental Controls 23 3.13 To Block Unrated Movie or TV Programs 25 3.14 To Set Rating Region Table 26 3.15 To Change Password 26 3.16 To Block by Input Source 27 3.17 To Restore Factory Setting 27 3.18 Using PC Function 28 4.
Specifications 29 FACTORY PRESET TIMING TABLE(PC MODE 30 SAFETY PRECAUTIONS 31 CARE AND MAINTENANCE 32 TROUBLESHOOTING 32 English English Table of Contents 3.11 Closed Caption Setting 22 3.12 Using the Parental Controls 23 3.13 To Block Unrated Movie or TV Programs 25 3.14 To Set Rating Region Table 26 3.15 To Change Password 26 3.16 To Block by Input Source 27 3.17 To Restore Factory Setting 27 3.18 Using PC Function 28 4.

User Manual - LE23H062
Page 9
... it . 3.Detach the stand from the TV. 1 English 1. 1.1 INSTALLATION INSTRUCTIONS RELEASE LOCK INSTALLATION: 1.Turn the TV over and set it upside down. 2.Align the TV to the slots on the stand. 3.Please note that the longer edge of the stand to stand to ensure that the TV has been firmly installed to loosen it with the base of the screw. 5.Check the underside...
... it . 3.Detach the stand from the TV. 1 English 1. 1.1 INSTALLATION INSTRUCTIONS RELEASE LOCK INSTALLATION: 1.Turn the TV over and set it upside down. 2.Align the TV to the slots on the stand. 3.Please note that the longer edge of the stand to stand to ensure that the TV has been firmly installed to loosen it with the base of the screw. 5.Check the underside...
User Manual - LE23H062
Page 10
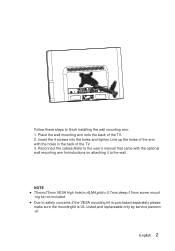
Due to finish installing the wall mounting arm: 1. English 2 Follow these steps to safety concerns,if the VESA mounting kit is purchased separately please make sure the mountingkit is UL-Listed,and replaceable only by service personn -el. Reconnect the cables.Refer to the user's manual that came with the holes in the back of the TV. 3. Insert the 4 screws into the holes...
Due to finish installing the wall mounting arm: 1. English 2 Follow these steps to safety concerns,if the VESA mounting kit is purchased separately please make sure the mountingkit is UL-Listed,and replaceable only by service personn -el. Reconnect the cables.Refer to the user's manual that came with the holes in the back of the TV. 3. Insert the 4 screws into the holes...
User Manual - LE23H062
Page 13
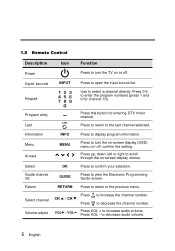
... Programming Guide screen. to the previous menu. confirm the setting. Press 0-9 to enter the program numbers (press 1 and 0 for entering DTV minor channel. Press to return to decrease audio volume. 5 English Press VOL + to the last channel selected. LAST Press to return to increase audio volume. Press up, down, left or right to display program information. English 1.5 Remote Control Description Icon Power Input source INPUT Keypad Function Press to turn the on-screen display...
... Programming Guide screen. to the previous menu. confirm the setting. Press 0-9 to enter the program numbers (press 1 and 0 for entering DTV minor channel. Press to return to decrease audio volume. 5 English Press VOL + to the last channel selected. LAST Press to return to increase audio volume. Press up, down, left or right to display program information. English 1.5 Remote Control Description Icon Power Input source INPUT Keypad Function Press to turn the on-screen display...

User Manual - LE23H062
Page 15
Connect to a PC's VGA port. Connect to an external device, such as a DVD player, a Set-Top Box, or a PC's DVI/ HDMI port. 1.6 Input and Output Jacks Description Power connector HDMI 1 input HDMI 2 input VGA (PC) input Audio input (PC) Component inputs (audio) Connector Function DC IN Connect to a PC's audio port. AUDIO L AUDIO R Connect to the included Adaptor. HDMI1 HDMI2 Connect to an external device, such as a DVD player, set-top box, or a PC's DVI/ HDMI port. Connect to an external device, such as a VCR, Set-Top-Box, or a DVD player. 7 English
Connect to a PC's VGA port. Connect to an external device, such as a DVD player, a Set-Top Box, or a PC's DVI/ HDMI port. 1.6 Input and Output Jacks Description Power connector HDMI 1 input HDMI 2 input VGA (PC) input Audio input (PC) Component inputs (audio) Connector Function DC IN Connect to a PC's audio port. AUDIO L AUDIO R Connect to the included Adaptor. HDMI1 HDMI2 Connect to an external device, such as a DVD player, set-top box, or a PC's DVI/ HDMI port. Connect to an external device, such as a VCR, Set-Top-Box, or a DVD player. 7 English

User Manual - LE23H062
Page 16
Connect to an external device, such as a VCR, Set-Top-Box, or a DVD player. Cable/ Antenna S-Video input Composite inputs USB TV S-VIDEO VIDEO L AUDIO R Connect to earphones or external speakers with built-in amplifiers. Connect to an antenna or cable TV. Connect to an external device, such as a VCR, Set-Top-Box, or a DVD player. English 8 Insert the USB flash drive into the USB port. VIDEO Y Component inputs (video) PB PR Earphone output Connect to an external device, such as a VCR, Set-Top-Box, or a DVD player.
Connect to an external device, such as a VCR, Set-Top-Box, or a DVD player. Cable/ Antenna S-Video input Composite inputs USB TV S-VIDEO VIDEO L AUDIO R Connect to earphones or external speakers with built-in amplifiers. Connect to an antenna or cable TV. Connect to an external device, such as a VCR, Set-Top-Box, or a DVD player. English 8 Insert the USB flash drive into the USB port. VIDEO Y Component inputs (video) PB PR Earphone output Connect to an external device, such as a VCR, Set-Top-Box, or a DVD player.

User Manual - LE23H062
Page 17
English 2.2 Connecting External Devices Connect external devices such as VCRs, Set-Top-Box, DVD players, video game consoles, earphones, or a PC to the TV using the appropriate ports on the rear of the TV. 2.2.1 Connecting External Earphones Headphones Speakers (Built-in Amplifiers) Note: • External speakers or headphones are not included with the TV. • The internal TV speakers will not output sound when headphones are plugged in. • Use external speakers with built-in amplifiers only. • Only one external device for sound can be connected at a time. 9 English
English 2.2 Connecting External Devices Connect external devices such as VCRs, Set-Top-Box, DVD players, video game consoles, earphones, or a PC to the TV using the appropriate ports on the rear of the TV. 2.2.1 Connecting External Earphones Headphones Speakers (Built-in Amplifiers) Note: • External speakers or headphones are not included with the TV. • The internal TV speakers will not output sound when headphones are plugged in. • Use external speakers with built-in amplifiers only. • Only one external device for sound can be connected at a time. 9 English

User Manual - LE23H062
Page 18
English 2.2.2 Connecting to AV Devices A B HDMI 1 HDMI 2 or R AUDIO L Pr Pb Y C or AUDIO R L VIDEO S-Video Audio Cable (Optional) HDMI Cable (Optional) Video Cable (Optional) Audio/ Video Cable (Optional) HDMI Game Console R L Pr Pb Y R L VIDEO S-VIDEO VCR or STB DVD English 10
English 2.2.2 Connecting to AV Devices A B HDMI 1 HDMI 2 or R AUDIO L Pr Pb Y C or AUDIO R L VIDEO S-Video Audio Cable (Optional) HDMI Cable (Optional) Video Cable (Optional) Audio/ Video Cable (Optional) HDMI Game Console R L Pr Pb Y R L VIDEO S-VIDEO VCR or STB DVD English 10

User Manual - LE23H062
Page 19
VCR STB DVD AV AUDIO RL Audio Cable (Optional) VIDEO Video Cable (Optional) 11 English R AUDIO LY Pb Pr VCR STB DVD Audio Cable (Optional) Video Cable (Optional) 2.2.4 Connecting a VCR/ STB/ DVD Player Using Composite Video Connect the TV to a VCR/ STB/ DVD player using the composite video input. English 2.2.3 Connecting a VCR/ STB/ DVD Player Using Component Video Connect the TV to a VCR/ STB/ DVD player using the component video inputs.
VCR STB DVD AV AUDIO RL Audio Cable (Optional) VIDEO Video Cable (Optional) 11 English R AUDIO LY Pb Pr VCR STB DVD Audio Cable (Optional) Video Cable (Optional) 2.2.4 Connecting a VCR/ STB/ DVD Player Using Composite Video Connect the TV to a VCR/ STB/ DVD player using the composite video input. English 2.2.3 Connecting a VCR/ STB/ DVD Player Using Component Video Connect the TV to a VCR/ STB/ DVD player using the component video inputs.

User Manual - LE23H062
Page 22
... on the control panel or CH on the remote control to decrease the channel number. • Enter the specific channel number by pressing the number buttons on . 2 Press again. English 14 The power LED changes from amber to blue, indicating that the TV is off. 2.3.2 Switching Source Signals Press INPUT on the control panel or remote control to select the incoming source signal to set the signal source. (Air or Cable, default is on the remote control. English 2.3 Using the TV 2.3.1 Turning the...
... on the control panel or CH on the remote control to decrease the channel number. • Enter the specific channel number by pressing the number buttons on . 2 Press again. English 14 The power LED changes from amber to blue, indicating that the TV is off. 2.3.2 Switching Source Signals Press INPUT on the control panel or remote control to select the incoming source signal to set the signal source. (Air or Cable, default is on the remote control. English 2.3 Using the TV 2.3.1 Turning the...

User Manual - LE23H062
Page 26
... cancel the selection, press OK again on the screen: Picture, Audio, Time, Setup, Lock, and Channel. 2 Press / to select your desired top menu. 3 Press to enter the menu you 'd like to enter Favorite setting. English 18 English 3.3 Viewing the Menus 1 Press MENU to exit from the OSD menu. 3.4 Favorite Channel Setting Picture Picture Mode Contrast Brightness Sharpness Tint Color Backlight X-Contrast Color Mode Move OK Enter Standard 50 50 50 45...
... cancel the selection, press OK again on the screen: Picture, Audio, Time, Setup, Lock, and Channel. 2 Press / to select your desired top menu. 3 Press to enter the menu you 'd like to enter Favorite setting. English 18 English 3.3 Viewing the Menus 1 Press MENU to exit from the OSD menu. 3.4 Favorite Channel Setting Picture Picture Mode Contrast Brightness Sharpness Tint Color Backlight X-Contrast Color Mode Move OK Enter Standard 50 50 50 45...

User Manual - LE23H062
Page 27
... to enter Channel Label setting. 5 Use / to choose letters or signs, / to move forward or backward. 6 After you input the channel name, press RETURN or OK to complete the setting. 7 Press RETURN to return back to previous menu in Channel. 19 English Channel Air/Cable Auto Scan Favorite Show/Hide Channel No. Channel Air/Cable Auto Scan Favorite Show/Hide Channel No. English 3.5 Showing/Hiding Channel When the channel is...
... to enter Channel Label setting. 5 Use / to choose letters or signs, / to move forward or backward. 6 After you input the channel name, press RETURN or OK to complete the setting. 7 Press RETURN to return back to previous menu in Channel. 19 English Channel Air/Cable Auto Scan Favorite Show/Hide Channel No. Channel Air/Cable Auto Scan Favorite Show/Hide Channel No. English 3.5 Showing/Hiding Channel When the channel is...

User Manual - LE23H062
Page 28
... X-Contrast Color Mode Move OK Enter Standard 50 50 50 45 70 100 Off Standard Return Return Menu Exit 4 Press RETURN to return back to previous menu in Picture. 3.8 Setting up Picture Options 1 Press MENU to display the OSD main menu. 2 Press / to select Picture menu, and then press to enter. 3 Press / to select the control of Menu Language, Transparent, OSD Time Out, Closed Caption, Restore Default, Input Label, Media...
... X-Contrast Color Mode Move OK Enter Standard 50 50 50 45 70 100 Off Standard Return Return Menu Exit 4 Press RETURN to return back to previous menu in Picture. 3.8 Setting up Picture Options 1 Press MENU to display the OSD main menu. 2 Press / to select Picture menu, and then press to enter. 3 Press / to select the control of Menu Language, Transparent, OSD Time Out, Closed Caption, Restore Default, Input Label, Media...
User Manual - LE23H062
Page 30
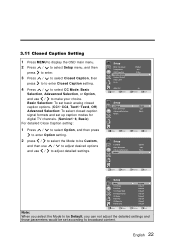
... Setup menu, and then press to enter. 3 Press / to select Closed Caption, then press to to enter Closed Caption setting. 4 Press / to select CC Mode, Basic Selection, Adavanced Selection, or Option, and use / to adjust detailed settings. English 22 Basic Selection: To set basic analog closed caption options. (CC1~CC4, Text1~Text4, Off) Advanced Selection: To select closed caption signal formats and set up caption modes for digital TV channels. (Service1~6, Basic) For detailed Close Caption setting...
... Setup menu, and then press to enter. 3 Press / to select Closed Caption, then press to to enter Closed Caption setting. 4 Press / to select CC Mode, Basic Selection, Adavanced Selection, or Option, and use / to adjust detailed settings. English 22 Basic Selection: To set basic analog closed caption options. (CC1~CC4, Text1~Text4, Off) Advanced Selection: To select closed caption signal formats and set up caption modes for digital TV channels. (Service1~6, Basic) For detailed Close Caption setting...
User Manual - LE23H062
Page 35
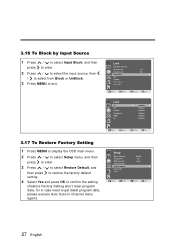
... to display the OSD main menu. 2 Press / to select Setup menu, and then press to enter. 3 Press / to select Restore Default, and then press to restore the factory default setting. 4 Select Yes and press OK to confirm the setting (Restore Factory Setting won't reset program data, for in case need to exit. Move OK Enter Return Return Menu Exit Setup Menu Language Transparent OSD Time Out Closed Caption Restore Default Input Label Media...
... to display the OSD main menu. 2 Press / to select Setup menu, and then press to enter. 3 Press / to select Restore Default, and then press to restore the factory default setting. 4 Select Yes and press OK to confirm the setting (Restore Factory Setting won't reset program data, for in case need to exit. Move OK Enter Return Return Menu Exit Setup Menu Language Transparent OSD Time Out Closed Caption Restore Default Input Label Media...
User Manual - LE23H062
Page 37
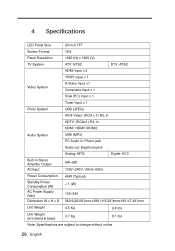
4 Specifications LED Panel Size 23 inch TFT Screen Format 16:9 Panel Resolution 1920 (H) x 1080 (V) TV System ATV: NTSC DTV: ATSC HDMI Input x 2 YPbPr Input x 1 Video System S-Video Input x1 Composite Input x 1 VGA (PC) Input x 1 Tuner Input x 1 Photo System USB (JPEG) AV/S-Video: (RCA x 1) R/L in HDTV: (RCAx1) R/L in HDMI: HDMI1/HDMI2 Audio System USB (MP3) PC Audio in: Phone jack Audio out: Earphone jack Analog: MTS Digital: AC3 Built-in Stereo Amplifier Output ACInput 5W+5W 100V~240V / 50Hz~60Hz Power Consumption Standby Power Consumption...
4 Specifications LED Panel Size 23 inch TFT Screen Format 16:9 Panel Resolution 1920 (H) x 1080 (V) TV System ATV: NTSC DTV: ATSC HDMI Input x 2 YPbPr Input x 1 Video System S-Video Input x1 Composite Input x 1 VGA (PC) Input x 1 Tuner Input x 1 Photo System USB (JPEG) AV/S-Video: (RCA x 1) R/L in HDTV: (RCAx1) R/L in HDMI: HDMI1/HDMI2 Audio System USB (MP3) PC Audio in: Phone jack Audio out: Earphone jack Analog: MTS Digital: AC3 Built-in Stereo Amplifier Output ACInput 5W+5W 100V~240V / 50Hz~60Hz Power Consumption Standby Power Consumption...
User Manual - LE23H062
Page 39
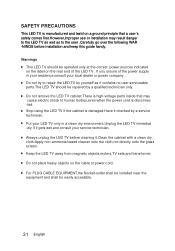
...,even when the power cord is damaged.Have it checked by a qualified technician only. Put your LED TV only in your residence,consult your service technician. For PLUG CABLE EQUIPMENT,the Socket-outlet shall be installed near the equipment and shall be operated only at the correct power sources indicated on the label on the rear end of the power supply in a clean...
...,even when the power cord is damaged.Have it checked by a qualified technician only. Put your LED TV only in your residence,consult your service technician. For PLUG CABLE EQUIPMENT,the Socket-outlet shall be installed near the equipment and shall be operated only at the correct power sources indicated on the label on the rear end of the power supply in a clean...

User Manual - LE23H062
Page 40
... LED TV in a clean and moisture-free area. Make sure all cables are subject to reduce glare. Never try to repair your LED TV yourself.Always call your LED TV away form the sunlight to change without notice.All rights reserved. TROUBLESHOOTING No Power Make sure A/C power cord is securely connected to the TV. Your have selected the correct video input. Adjust brightness. English 32 Plug...
... LED TV in a clean and moisture-free area. Make sure all cables are subject to reduce glare. Never try to repair your LED TV yourself.Always call your LED TV away form the sunlight to change without notice.All rights reserved. TROUBLESHOOTING No Power Make sure A/C power cord is securely connected to the TV. Your have selected the correct video input. Adjust brightness. English 32 Plug...

