
User Manual
Page 10
... the user to RAM (S3), hibernation mode (S4) or power off (S5). If you can boost USB storage device performance. ASRock APP Charger. With APP Charger driver installed, you desire a faster, less restricted way of internet browser, is the smart start page for IE that combines your most visited web sites, your history, your Facebook friends and your browser version is Windows® 7 / 7 64 bit...
... the user to RAM (S3), hibernation mode (S4) or power off (S5). If you can boost USB storage device performance. ASRock APP Charger. With APP Charger driver installed, you desire a faster, less restricted way of internet browser, is the smart start page for IE that combines your most visited web sites, your history, your Facebook friends and your browser version is Windows® 7 / 7 64 bit...

User Manual
Page 12
... 960GM/U3S3 FX CMOS BATTERY 8Mb BIOS PCI1 CLRCMOS1 1 IR1 1 USB6_7 1 1 CIR1 USB8_9 1 AMD SB710 Chipset SATAII_3 (PORT 2) CHA_FAN1 PANEL 1 PLED PWRBTN 1 HDLED RESET SATAII_1 (PORT 0) SPEAKER1 1 SATAII_2 (PORT 1) 27 26 25 24 23 22 21 20 19 18 17 16 15 14 7 8 9 10 11 12 13 1 ATX 12V Power Connector (ATX12V1) 17 System Panel Header (PANEL1, White) 2 CPU Heatsink Retention Module 18 Chassis Fan Connector (CHA_FAN1) 3 AM3+ CPU Socket 19 SPI Flash Memory (8Mb) 4 2 x 240-pin DDR3...
... 960GM/U3S3 FX CMOS BATTERY 8Mb BIOS PCI1 CLRCMOS1 1 IR1 1 USB6_7 1 1 CIR1 USB8_9 1 AMD SB710 Chipset SATAII_3 (PORT 2) CHA_FAN1 PANEL 1 PLED PWRBTN 1 HDLED RESET SATAII_1 (PORT 0) SPEAKER1 1 SATAII_2 (PORT 1) 27 26 25 24 23 22 21 20 19 18 17 16 15 14 7 8 9 10 11 12 13 1 ATX 12V Power Connector (ATX12V1) 17 System Panel Header (PANEL1, White) 2 CPU Heatsink Retention Module 18 Chassis Fan Connector (CHA_FAN1) 3 AM3+ CPU Socket 19 SPI Flash Memory (8Mb) 4 2 x 240-pin DDR3...
User Manual
Page 27
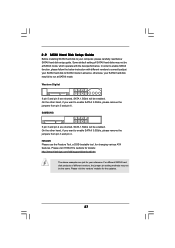
... SATAII hard disk to SATAII mode in advance; On the other hand, if you want to enable SATAII 3.0Gb/s, please remove the jumpers from pin 3 and pin 4. HITACHI Please use the Feature Tool, a DOS-bootable tool, for the updates. 27 Please visit the vendors' website for changing various ATA features. Please visit HITACHI's website for details: http://www.hitachigst.com/hdd/support/download.htm...
... SATAII hard disk to SATAII mode in advance; On the other hand, if you want to enable SATAII 3.0Gb/s, please remove the jumpers from pin 3 and pin 4. HITACHI Please use the Feature Tool, a DOS-bootable tool, for the updates. 27 Please visit the vendors' website for changing various ATA features. Please visit HITACHI's website for details: http://www.hitachigst.com/hdd/support/download.htm...

User Manual
Page 32
... SATAII_4 ports. STEP 2: Make a SATA / SATA2 Driver Diskette. (Please use a USB floppy or floppy disk.) A. 2.15 Driver Installation Guide To install the drivers to your system, please insert the support CD to format the floppy diskette and copy SATA / SATA2 drivers into the floppy drive, and press any key. STEP 1: Set up , press key, and then a window for SATAII_1 to install Windows® 7 / 7 64-bit / VistaTM / VistaTM 64-bit / XP / XP 64-bit on a RAID disk composed of system boot-up BIOS...
... SATAII_4 ports. STEP 2: Make a SATA / SATA2 Driver Diskette. (Please use a USB floppy or floppy disk.) A. 2.15 Driver Installation Guide To install the drivers to your system, please insert the support CD to format the floppy diskette and copy SATA / SATA2 drivers into the floppy drive, and press any key. STEP 1: Set up , press key, and then a window for SATAII_1 to install Windows® 7 / 7 64-bit / VistaTM / VistaTM 64-bit / XP / XP 64-bit on a RAID disk composed of system boot-up BIOS...

User Manual
Page 39
BIOS SETUP UTILITY Main OC Tweaker Advanced H/W Monitor Boot Security Exit EZ Overclocking Load Optimized CPU OC Setting Load Optimized mGPU OC Setting CPU Configuration Overclock Mode CPU Frequency (MHz) PCIE Frequency (MHz) Spread Spectrum Boot Failure Guard Boot Failure Guard Count CPU Active Core Control AMD Turbo Core Technology AMD IO C-State Support AMD APM Processor Maximum Frequency North Bridge Maximum Frequency Multiplier/Voltage Change [Press Enter] [Press Enter] [Auto] [200] [100] [Auto] [Enabled] [3] [All Cores] [Auto] [Enabled] [Auto] x31.5 6300 MHZ x31.0 6200 MHz [Auto] ...
BIOS SETUP UTILITY Main OC Tweaker Advanced H/W Monitor Boot Security Exit EZ Overclocking Load Optimized CPU OC Setting Load Optimized mGPU OC Setting CPU Configuration Overclock Mode CPU Frequency (MHz) PCIE Frequency (MHz) Spread Spectrum Boot Failure Guard Boot Failure Guard Count CPU Active Core Control AMD Turbo Core Technology AMD IO C-State Support AMD APM Processor Maximum Frequency North Bridge Maximum Frequency Multiplier/Voltage Change [Press Enter] [Press Enter] [Auto] [200] [100] [Auto] [Enabled] [3] [All Cores] [Auto] [Enabled] [Auto] x31.5 6300 MHZ x31.0 6200 MHz [Auto] ...

User Manual
Page 40
... the value of CPU voltage. BIOS SETUP UTILITY Main OC Tweaker Advanced H/W Monitor Boot Security Exit EZ Overclocking Load Optimized CPU OC Setting Load Optimized mGPU OC Setting CPU Configuration Overclock Mode CPU Frequency (MHz) PCIE Frequency (MHz) Spread Spectrum Boot Failure Guard Boot Failure Guard Count CPU Active Core Control AMD Turbo Core Technology AMD IO C-State Support AMD APM Processor Maximum Frequency North Bridge Maximum Frequency Multiplier/Voltage Change [Press Enter] [Press Enter] [Auto] [200] [100] [Auto] [Enabled] [3] [All Cores] [Auto] [Enabled] [Auto] x31.5 6300...
... the value of CPU voltage. BIOS SETUP UTILITY Main OC Tweaker Advanced H/W Monitor Boot Security Exit EZ Overclocking Load Optimized CPU OC Setting Load Optimized mGPU OC Setting CPU Configuration Overclock Mode CPU Frequency (MHz) PCIE Frequency (MHz) Spread Spectrum Boot Failure Guard Boot Failure Guard Count CPU Active Core Control AMD Turbo Core Technology AMD IO C-State Support AMD APM Processor Maximum Frequency North Bridge Maximum Frequency Multiplier/Voltage Change [Press Enter] [Press Enter] [Auto] [200] [100] [Auto] [Enabled] [3] [All Cores] [Auto] [Enabled] [Auto] x31.5 6300...

User Manual
Page 41
NB Frequency Multiplier For safety and system stability, it is not recommended to be set one of CPU NB voltage. Memory Configuration Memory Clock This item can set by the code using [Auto]. Channel Interleaving It allows you selecting Hyper-Transport bus width. HT Bus Width This feature allows you to enable Channel Memory Interleaving. Memory Timing BIOS SETUP UTILITY OC Tweaker Memory Timing Power Down Enable Bank Interleaving Channel Interleaving CAS Latency (CL) 11 TRCD 11...
NB Frequency Multiplier For safety and system stability, it is not recommended to be set one of CPU NB voltage. Memory Configuration Memory Clock This item can set by the code using [Auto]. Channel Interleaving It allows you selecting Hyper-Transport bus width. HT Bus Width This feature allows you to enable Channel Memory Interleaving. Memory Timing BIOS SETUP UTILITY OC Tweaker Memory Timing Power Down Enable Bank Interleaving Channel Interleaving CAS Latency (CL) 11 TRCD 11...

User Manual
Page 47
... applied to operate RAID function on SATA / SATA2 HDDs, please select [RAID]. We will use the "IDE1 Master" as well. 3.4.4 Storage Configuration BIOS SETUP UTILITY Advanced Storage Configuration Onboard SATA Controller [Enabled] SATA Operation Mode [IDE] Onboard SATA3 Operation Mode [IDE Mode] IDE1 Master IDE1 Slave SATAII_1 SATAII_2 SATAII_3 SATAII_4 [Hard Disk] [Not Detected] [Not Detected] [Not Detected] [Not Detected] [Not Detected] Configure onboard serial ATA controller. +F1 F9 F10 ESC Select Screen Select Item Change Option General Help Load Defaults Save and Exit...
... applied to operate RAID function on SATA / SATA2 HDDs, please select [RAID]. We will use the "IDE1 Master" as well. 3.4.4 Storage Configuration BIOS SETUP UTILITY Advanced Storage Configuration Onboard SATA Controller [Enabled] SATA Operation Mode [IDE] Onboard SATA3 Operation Mode [IDE Mode] IDE1 Master IDE1 Slave SATAII_1 SATAII_2 SATAII_3 SATAII_4 [Hard Disk] [Not Detected] [Not Detected] [Not Detected] [Not Detected] [Not Detected] Configure onboard serial ATA controller. +F1 F9 F10 ESC Select Screen Select Item Change Option General Help Load Defaults Save and Exit...

User Manual
Page 48
... automatically detect the hard disk drive. After selecting the hard disk information into BIOS, use of IDE device. [Auto]: Select [Auto] to enable or disable the S.M.A.R.T. (Self-Monitoring, Analysis, and Reporting Technology) feature. PIO Mode Use this item to set the partition of the Primary IDE hard disk drives to active. [CD/DVD]:This is used for a hard disk > 512 MB under DOS and Windows; Configuration options: [Disabled], [Auto], [Enabled]. 32Bit Data Transfer Use this item to enable 32-bit access to maximize the IDE hard disk data transfer...
... automatically detect the hard disk drive. After selecting the hard disk information into BIOS, use of IDE device. [Auto]: Select [Auto] to enable or disable the S.M.A.R.T. (Self-Monitoring, Analysis, and Reporting Technology) feature. PIO Mode Use this item to set the partition of the Primary IDE hard disk drives to active. [CD/DVD]:This is used for a hard disk > 512 MB under DOS and Windows; Configuration options: [Disabled], [Auto], [Enabled]. 32Bit Data Transfer Use this item to enable 32-bit access to maximize the IDE hard disk data transfer...

User Manual
Page 51
... to select legacy support for USB devices. USB devices are not allowed to enable or disable the USB 2.0 support. USB Keyboard/Remote Power On Use this item to enter OS. [BIOS Setup Only] - 3.4.7USB Configuration BIOS SETUP UTILITY Advanced USB Configuration USB Controller USB 2.0 Support Legacy USB Support USB 3.0 Controller [Enabled] [Enabled] [Enabled] [Enabled] USB Keyboard/Remote Power On [Disabled] USB Mouse Power On [Disabled] To enable or disable the onboard USB controllers. +F1 F9 F10 ESC Select Screen Select Item Change Option General Help Load Defaults Save and...
... to select legacy support for USB devices. USB devices are not allowed to enable or disable the USB 2.0 support. USB Keyboard/Remote Power On Use this item to enter OS. [BIOS Setup Only] - 3.4.7USB Configuration BIOS SETUP UTILITY Advanced USB Configuration USB Controller USB 2.0 Support Legacy USB Support USB 3.0 Controller [Enabled] [Enabled] [Enabled] [Enabled] USB Keyboard/Remote Power On [Disabled] USB Mouse Power On [Disabled] To enable or disable the onboard USB controllers. +F1 F9 F10 ESC Select Screen Select Item Change Option General Help Load Defaults Save and...
User Manual
Page 56
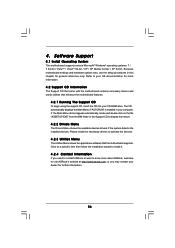
... 4. The CD automatically displays the Main Menu if "AUTORUN" is enabled in this chapter for more about ASRock, welcome to your computer. or you need to contact ASRock or want to know more information. 4.2 Support CD Information The Support CD that came with the motherboard contains necessary drivers and useful utilities that the motherboard supports. Because motherboard settings and hardware options vary, use the setup procedures in your OS...
... 4. The CD automatically displays the Main Menu if "AUTORUN" is enabled in this chapter for more about ASRock, welcome to your computer. or you need to contact ASRock or want to know more information. 4.2 Support CD Information The Support CD that came with the motherboard contains necessary drivers and useful utilities that the motherboard supports. Because motherboard settings and hardware options vary, use the setup procedures in your OS...

Quick Installation Guide
Page 2
...15 SATA2 Connector (SATAII_1 (PORT 0), Blue) 31 PCI Express 2.0 x1 Slot (PCIE1; Blue) 16 Chassis Speaker Header (SPEAKER 1, White) 32 Northbridge Controller 2 ASRock 960GM/U3S3 FX Motherboard Blue) 21 USB 2.0 Header (USB6_7, Blue) 5 CPU Fan Connector (CPU_FAN1) 22 Consumer Infrared Module Header (CIR1) 6 ATX Power Connector (ATXPWR1) 23 Infrared Module Header (IR1) 7 Power Fan Connector (PWR_FAN1) 24 Clear CMOS Jumper (CLRCMOS1) 8 Primary IDE Connector (IDE1, Blue) 25 Print Port Header (LPT1, White) 9 SATA2 Connector (SATAII_4 (PORT 3), Blue) 26 Internal Audio Connector: CD1 (Black...
...15 SATA2 Connector (SATAII_1 (PORT 0), Blue) 31 PCI Express 2.0 x1 Slot (PCIE1; Blue) 16 Chassis Speaker Header (SPEAKER 1, White) 32 Northbridge Controller 2 ASRock 960GM/U3S3 FX Motherboard Blue) 21 USB 2.0 Header (USB6_7, Blue) 5 CPU Fan Connector (CPU_FAN1) 22 Consumer Infrared Module Header (CIR1) 6 ATX Power Connector (ATXPWR1) 23 Infrared Module Header (IR1) 7 Power Fan Connector (PWR_FAN1) 24 Clear CMOS Jumper (CLRCMOS1) 8 Primary IDE Connector (IDE1, Blue) 25 Print Port Header (LPT1, White) 9 SATA2 Connector (SATAII_4 (PORT 3), Blue) 26 Internal Audio Connector: CD1 (Black...

Quick Installation Guide
Page 6
.../2 Keyboard Port - 1 x D-Sub Port - 1 x DVI-D Port - 4 x Ready-to-Use USB 2.0 Ports - 2 x Ready-to 5Gb/s Connector - 4 x SATA2 3.0Gb/s connectors, support RAID (RAID 0, RAID 1, RAID 10 and JBOD), NCQ, AHCI and "Hot Plug" functions (see CAUTION 6) - 2 x SATA3 6.0 Gb/s connectors - 1 x ATA133 IDE connector (supports 2 x IDE devices) - 1 x IR header - 1 x CIR header - 1 x Print port header - 1 x COM port header - SMBIOS 2.3.1 Support - OEM) 6 ASRock 960GM/U3S3 FX Motherboard Supports LAN Cable Detection - Supports "Plug and Play" English - Drivers, Utilities, AntiVirus...
.../2 Keyboard Port - 1 x D-Sub Port - 1 x DVI-D Port - 4 x Ready-to-Use USB 2.0 Ports - 2 x Ready-to 5Gb/s Connector - 4 x SATA2 3.0Gb/s connectors, support RAID (RAID 0, RAID 1, RAID 10 and JBOD), NCQ, AHCI and "Hot Plug" functions (see CAUTION 6) - 2 x SATA3 6.0 Gb/s connectors - 1 x ATA133 IDE connector (supports 2 x IDE devices) - 1 x IR header - 1 x CIR header - 1 x Print port header - 1 x COM port header - SMBIOS 2.3.1 Support - OEM) 6 ASRock 960GM/U3S3 FX Motherboard Supports LAN Cable Detection - Supports "Plug and Play" English - Drivers, Utilities, AntiVirus...

Quick Installation Guide
Page 9
.... ASRock Instant Flash is IE8. ASRock XFast USB can load the OC profile to their own system to get the same OC settings as a profile and share with your computer and up to access ASRock Instant Flash. Please be shared and worked on the property of the device. 9 ASRock 960GM/U3S3 FX Motherboard English Just launch this utility, you can press key during the POST or press key to BIOS setup menu to...
.... ASRock Instant Flash is IE8. ASRock XFast USB can load the OC profile to their own system to get the same OC settings as a profile and share with your computer and up to access ASRock Instant Flash. Please be shared and worked on the property of the device. 9 ASRock 960GM/U3S3 FX Motherboard English Just launch this utility, you can press key during the POST or press key to BIOS setup menu to...
Quick Installation Guide
Page 15
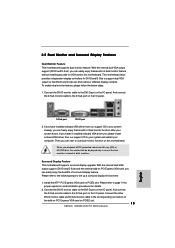
... installing any add-on VGA card to use dual monitor function on PCIE2 slot. 15 ASRock 960GM/U3S3 FX Motherboard English And connect the D-Sub monitor cable to set up a surround display environment: 1. Surround Display Feature This motherboard supports surround display upgrade. Please refer to page 14 for proper expansion card installation procedures for DVI-D and D-Sub to your system and restart your system boots. With the internal dual VGA output support (DVI-D and D-Sub), you haven't installed onboard VGA driver yet, please install onboard VGA driver...
... installing any add-on VGA card to use dual monitor function on PCIE2 slot. 15 ASRock 960GM/U3S3 FX Motherboard English And connect the D-Sub monitor cable to set up a surround display environment: 1. Surround Display Feature This motherboard supports surround display upgrade. Please refer to page 14 for proper expansion card installation procedures for DVI-D and D-Sub to your system and restart your system boots. With the internal dual VGA output support (DVI-D and D-Sub), you haven't installed onboard VGA driver yet, please install onboard VGA driver...
Quick Installation Guide
Page 24
... below steps. Enter BIOS SETUP UTILITY Advanced screen Storage Configuration. English 24 ASRock 960GM/U3S3 FX Motherboard Using SATA / SATA2 / SATA3 HDDs without RAID functions, please follow below procedures according to the OS you install. 2.11.1 Installing Windows® XP / XP 64-bit Without RAID Functions If you want to install Windows® 7 / 7 64-bit / VistaTM / VistaTM 64-bit / XP / XP 64-bit OS on your SATA / SATA2 / SATA3 HDDs without NCQ and Hot Plug functions (IDE mode) STEP 1: Set up to...
... below steps. Enter BIOS SETUP UTILITY Advanced screen Storage Configuration. English 24 ASRock 960GM/U3S3 FX Motherboard Using SATA / SATA2 / SATA3 HDDs without RAID functions, please follow below procedures according to the OS you install. 2.11.1 Installing Windows® XP / XP 64-bit Without RAID Functions If you want to install Windows® 7 / 7 64-bit / VistaTM / VistaTM 64-bit / XP / XP 64-bit OS on your SATA / SATA2 / SATA3 HDDs without NCQ and Hot Plug functions (IDE mode) STEP 1: Set up to...

Quick Installation Guide
Page 26
... 64-bit. To begin using the Support CD, insert the CD into your computer. BIOS Information The Flash Memory on the file "ASSETUP.EXE" from the "BIN" folder in the Support CD to the User Manual (PDF file) contained in your CD-ROM drive. For the detailed information about BIOS Setup, please refer to display the menus. 26 ASRock 960GM/U3S3 FX Motherboard English It will enhance motherboard features. If the Main Menu does not...
... 64-bit. To begin using the Support CD, insert the CD into your computer. BIOS Information The Flash Memory on the file "ASSETUP.EXE" from the "BIN" folder in the Support CD to the User Manual (PDF file) contained in your CD-ROM drive. For the detailed information about BIOS Setup, please refer to display the menus. 26 ASRock 960GM/U3S3 FX Motherboard English It will enhance motherboard features. If the Main Menu does not...

RAID Installation Guide
Page 4
... optical drive to boot your required driver to install according to the OS you need to configure RAID function, you install. (Select "AMD AHCI Compatible RAID Controller-x86 platform" for Windows XP, or "AMD AHCI Compatible RAID Controller-x64 platform" for details. After making a SATA / SATAII driver diskette and set RAID configuration. STEP 1: Set up BIOS. Enter BIOS SETUP UTILITY → Advanced screen →IDE Configuration. Insert the ASRock Support CD into the floppy drive, and press any key. B. When you want to install Windows XP / XP 64-bit on...
... optical drive to boot your required driver to install according to the OS you need to configure RAID function, you install. (Select "AMD AHCI Compatible RAID Controller-x86 platform" for Windows XP, or "AMD AHCI Compatible RAID Controller-x64 platform" for details. After making a SATA / SATAII driver diskette and set RAID configuration. STEP 1: Set up BIOS. Enter BIOS SETUP UTILITY → Advanced screen →IDE Configuration. Insert the ASRock Support CD into the floppy drive, and press any key. B. When you want to install Windows XP / XP 64-bit on...
RAID Installation Guide
Page 5
Enter BIOS SETUP UTILITY → Advanced screen →IDE Configuration. page, please insert the ASRock Support CD into the optical drive to boot your system, and follow below steps. NOTE2. Before you start to configure RAID function, you need to set RAID configuration. Please refer to the BIOS RAID installation guide part in our Support CD: .. \ I386 (For Windows 7 / Vista OS) .. \ AMD64 (For Windows 7 64-bit / Vista 64-bit OS) After that, please insert Windows 7 / 7 64-bit / Vista / Vista 64...
Enter BIOS SETUP UTILITY → Advanced screen →IDE Configuration. page, please insert the ASRock Support CD into the optical drive to boot your system, and follow below steps. NOTE2. Before you start to configure RAID function, you need to set RAID configuration. Please refer to the BIOS RAID installation guide part in our Support CD: .. \ I386 (For Windows 7 / Vista OS) .. \ AMD64 (For Windows 7 64-bit / Vista 64-bit OS) After that, please insert Windows 7 / 7 64-bit / Vista / Vista 64...
RAID Installation Guide
Page 10
... default browser. AMD Windows RAID Installation Guide AMD Windows RAID Installation Guide is installed. Boot the PC or server, launch Windows, and log in the installation dialog boxes. 6. 2. Follow the prompts in as the Administrator. 2. The RAIDXpert software offers local and remote management and monitoring of the above on your system: 1. If you must use one of all AMD SB710 SATA logical drives that may be present on your system. 2.2 Browser Support...
... default browser. AMD Windows RAID Installation Guide AMD Windows RAID Installation Guide is installed. Boot the PC or server, launch Windows, and log in the installation dialog boxes. 6. 2. Follow the prompts in as the Administrator. 2. The RAIDXpert software offers local and remote management and monitoring of the above on your system: 1. If you must use one of all AMD SB710 SATA logical drives that may be present on your system. 2.2 Browser Support...


