

RAID Installation Guide
Page 3
... on the remaining data and the parity information. RAID 5 makes efficient use the Option ROM to configure RAID. 1.1 Introduction to a second drive. It will improve data access and storage since the disk array management software will direct all applications to read and write data in the other drive if one logical unit. AMD BIOS RAID Installation Guide AMD BIOS RAID Installation Guide is an instruction for "Redundant Array of the data in parallel...
... on the remaining data and the parity information. RAID 5 makes efficient use the Option ROM to configure RAID. 1.1 Introduction to a second drive. It will improve data access and storage since the disk array management software will direct all applications to read and write data in the other drive if one logical unit. AMD BIOS RAID Installation Guide AMD BIOS RAID Installation Guide is an instruction for "Redundant Array of the data in parallel...

RAID Installation Guide
Page 19
... to install RAIDXpert on the PC with AMD SATA RAID controllers. If the computer is an instruction for you must use one of the above on your networked PC in the RAID configuration (server, controller, logical drives, physical drives, and enclosure). The RAIDXpert software offers local and remote management and monitoring of all major events/alarms, memory cache management, drive event logging, logical drive maintenance, rebuild, and access to...
... to install RAIDXpert on the PC with AMD SATA RAID controllers. If the computer is an instruction for you must use one of the above on your networked PC in the RAID configuration (server, controller, logical drives, physical drives, and enclosure). The RAIDXpert software offers local and remote management and monitoring of all major events/alarms, memory cache management, drive event logging, logical drive maintenance, rebuild, and access to...

User Manual
Page 8
... - CPU/Chassis/Power Fan Tachometer - DRAM, APU PCIE VDDP, CPU and CPU NB/GFX Voltage Multi-adjustment Support CD - - 1 x HDMI_SPDIF header - 1 x Power LED header - 2 x CPU Fan connectors (1 x 4-pin, 1 x 3-pin) - 3 x Chassis Fan connectors (1 x 4-pin, 2 x 3-pin) - 1 x Power Fan connector (3-pin) - 24 pin ATX power connector - 8 pin 12V power connector - Front panel audio connector - 3 x USB 2.0 headers (support 6 USB 2.0 ports) - 1 x USB 3.0 header (supports 2 USB 3.0 ports) - 1 x Dr. Debug (7-Segment Debug LED) - 1 x Power Switch with LED - 1 x Reset Switch with LED BIOS...
... - CPU/Chassis/Power Fan Tachometer - DRAM, APU PCIE VDDP, CPU and CPU NB/GFX Voltage Multi-adjustment Support CD - - 1 x HDMI_SPDIF header - 1 x Power LED header - 2 x CPU Fan connectors (1 x 4-pin, 1 x 3-pin) - 3 x Chassis Fan connectors (1 x 4-pin, 2 x 3-pin) - 1 x Power Fan connector (3-pin) - 24 pin ATX power connector - 8 pin 12V power connector - Front panel audio connector - 3 x USB 2.0 headers (support 6 USB 2.0 ports) - 1 x USB 3.0 header (supports 2 USB 3.0 ports) - 1 x Dr. Debug (7-Segment Debug LED) - 1 x Power Switch with LED - 1 x Reset Switch with LED BIOS...
User Manual
Page 15
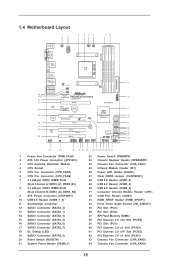
... Power Switch (PWRBTN) 23 Chassis Speaker Header (SPEAKER1) 24 Chassis Fan Connector (CHA_FAN1) 25 Infrared Module Header (IR1) 26 Power LED Header (PLED1) 27 Clear CMOS Jumper (CLRCMOS1) 28 USB 2.0 Header (USB7_8) 29 USB 2.0 Header (USB5_6) 30 USB 2.0 Header (USB3_4) 31 Consumer Infrared Module Header (CIR1) 32 COM Port Header (COM1) 33 HDMI_SPDIF Header (HDMI_SPDIF1) 34 Front Panel Audio Header (HD_AUDIO1) 35 PCI Slot (PCI3) 36 PCI Slot (PCI2) 37 SPI Flash Memory (64Mb) 38 PCI Express 2.0 x16 Slot (PCIE4) 39 PCI Slot (PCI1) 40 PCI Express 2.0 x1 Slot (PCIE3) 41 PCI Express 2.0 x16 Slot...
... Power Switch (PWRBTN) 23 Chassis Speaker Header (SPEAKER1) 24 Chassis Fan Connector (CHA_FAN1) 25 Infrared Module Header (IR1) 26 Power LED Header (PLED1) 27 Clear CMOS Jumper (CLRCMOS1) 28 USB 2.0 Header (USB7_8) 29 USB 2.0 Header (USB5_6) 30 USB 2.0 Header (USB3_4) 31 Consumer Infrared Module Header (CIR1) 32 COM Port Header (COM1) 33 HDMI_SPDIF Header (HDMI_SPDIF1) 34 Front Panel Audio Header (HD_AUDIO1) 35 PCI Slot (PCI3) 36 PCI Slot (PCI2) 37 SPI Flash Memory (64Mb) 38 PCI Express 2.0 x16 Slot (PCIE4) 39 PCI Slot (PCI1) 40 PCI Express 2.0 x1 Slot (PCIE3) 41 PCI Express 2.0 x16 Slot...

User Manual
Page 25
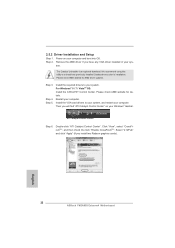
... VGA driver installed in your Windows® taskbar. Restart your computer. ATI Catalyst Control Center Step 6. Step 2. The Catalyst Uninstaller is an optional download. For Windows® 8 / 7 / VistaTM OS: Install the CATALYST Control Center. Please check AMD website for AMD driver updates. Click "View", select "CrossFireXTM", and then check the item "Enable CrossFireXTM". Please check AMD website for details. We recommend using this utility to your computer and boot...
... VGA driver installed in your Windows® taskbar. Restart your computer. ATI Catalyst Control Center Step 6. Step 2. The Catalyst Uninstaller is an optional download. For Windows® 8 / 7 / VistaTM OS: Install the CATALYST Control Center. Please check AMD website for AMD driver updates. Click "View", select "CrossFireXTM", and then check the item "Enable CrossFireXTM". Please check AMD website for details. We recommend using this utility to your computer and boot...

User Manual
Page 27
.... 2.6 AMD Dual Graphics Operation Guide This motherboard supports AMD Dual Graphics feature. An AMD Dual Graphics system includes an AMD Radeon HD 7000 graphics processor and a motherboard based on [Auto]. Step 2. For any VGA driver installed in a Windows® 8 / 7 environment. Please remove the AMD driver if you have any future update, please refer to your system for further information. Connect the monitor cable to enter AMD VISION Engine Control Center. 27 Click "AMD VISION Engine Control Center" to the onboard VGA port. Please refer to PCIE2 slot. Install...
.... 2.6 AMD Dual Graphics Operation Guide This motherboard supports AMD Dual Graphics feature. An AMD Dual Graphics system includes an AMD Radeon HD 7000 graphics processor and a motherboard based on [Auto]. Step 2. For any VGA driver installed in a Windows® 8 / 7 environment. Please remove the AMD driver if you have any future update, please refer to your system for further information. Connect the monitor cable to enter AMD VISION Engine Control Center. 27 Click "AMD VISION Engine Control Center" to the onboard VGA port. Please refer to PCIE2 slot. Install...

User Manual
Page 29
... monitors instead of multi monitor feature without installing any add-on the I /O panel, or connect HDMI monitor cable to the DVI port only. 29 With the internal VGA output support (DVI-D, D-Sub and HDMI), you playback HDCP-protected video from our support CD to your computer. 1. When you can drive same or different display contents. To support Dual-link DVI monitor, please do not use D-Sub and HDMI ports. This motherboard also provides independent display controllers...
... monitors instead of multi monitor feature without installing any add-on the I /O panel, or connect HDMI monitor cable to the DVI port only. 29 With the internal VGA output support (DVI-D, D-Sub and HDMI), you playback HDCP-protected video from our support CD to your computer. 1. When you can drive same or different display contents. To support Dual-link DVI monitor, please do not use D-Sub and HDMI ports. This motherboard also provides independent display controllers...

User Manual
Page 41
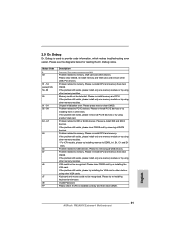
...-install PCI-E devices or try using other memory modules. * For X79 models, please try using another VGA card. Please re-install CPU and memory then clear CMOS. If the problem still exists, please try removing all USB devices. Invalid Password. Please re-install CPU and memory then clear CMOS. Memory could not be recognized. Please press reset or clear CMOS. If the problem still exists, please remove all SATA devices. Problem related to DDR3_A1, B1, C1 and D1 slots. Please try installing the VGA card in other devices. Keyboard...
...-install PCI-E devices or try using other memory modules. * For X79 models, please try using another VGA card. Please re-install CPU and memory then clear CMOS. If the problem still exists, please try removing all USB devices. Invalid Password. Please re-install CPU and memory then clear CMOS. Memory could not be recognized. Please press reset or clear CMOS. If the problem still exists, please remove all SATA devices. Problem related to DDR3_A1, B1, C1 and D1 slots. Please try installing the VGA card in other devices. Keyboard...

User Manual
Page 43
Please read below instructions step by the chipset because of its limitation, the SATA3 Hot Plug support information of Hot Plug feature carefully. SATA data cable (Red) B. Please make sure the SATA3 driver is indicated in RAID / AHCI mode. SATA power cable with SATA 15-pin power connector interface A. Make sure your SATA3 HDD can support Hot Plug function from our motherboard package. 5. The latest SATA3 driver is available on our website: www.asrock.com...
Please read below instructions step by the chipset because of its limitation, the SATA3 Hot Plug support information of Hot Plug feature carefully. SATA data cable (Red) B. Please make sure the SATA3 driver is indicated in RAID / AHCI mode. SATA power cable with SATA 15-pin power connector interface A. Make sure your SATA3 HDD can support Hot Plug function from our motherboard package. 5. The latest SATA3 driver is available on our website: www.asrock.com...

User Manual
Page 54
... select the type of Primary VGA in case of this to enable or disable Dual Graphics feature. Share Memory This allows you to set the share memory feature. The default value is [Auto]. If you to DVI port. Configuration options: [Onboard], [PCI] and [PCI Express]. Onboard HDMI HD Audio This allows you select [Auto], Dual Graphics function will switch the PCI Bus scanning order while searching for video card. The default value is [as Dual Link DVI], you can use HDMI monitor with audio function. Dual Graphics This...
... select the type of Primary VGA in case of this to enable or disable Dual Graphics feature. Share Memory This allows you to set the share memory feature. The default value is [Auto]. If you to DVI port. Configuration options: [Onboard], [PCI] and [PCI Express]. Onboard HDMI HD Audio This allows you select [Auto], Dual Graphics function will switch the PCI Bus scanning order while searching for video card. The default value is [as Dual Link DVI], you can use HDMI monitor with audio function. Dual Graphics This...

User Manual
Page 56
... is [AHCI Mode]. Configuration options: [AHCI Mode], [RAID Mode] and [IDE Mode]. 1. RAID ROM Onboard Connector Port1 SATA3_1 Port2 SATA3_2 Port3 SATA3_3 Port4 SATA3_4 Port5 SATA3_5 Port6 eSATA3 Port7 SATA3_6 Port8 SATA3_7 Easy RAID Installer Easy RAID Installer can start installing the OS in RAID ROM. The default value of this item to enable or disable the "SATA Controller" feature. If you to copy the RAID driver from a support CD to install SATA ODD driver on SATA3_5, SATA3_7, SATA3_8 and eSATA3 ports. 2. AMD AHCI BIOS ROM Use this...
... is [AHCI Mode]. Configuration options: [AHCI Mode], [RAID Mode] and [IDE Mode]. 1. RAID ROM Onboard Connector Port1 SATA3_1 Port2 SATA3_2 Port3 SATA3_3 Port4 SATA3_4 Port5 SATA3_5 Port6 eSATA3 Port7 SATA3_6 Port8 SATA3_7 Easy RAID Installer Easy RAID Installer can start installing the OS in RAID ROM. The default value of this item to enable or disable the "SATA Controller" feature. If you to copy the RAID driver from a support CD to install SATA ODD driver on SATA3_5, SATA3_7, SATA3_8 and eSATA3 ports. 2. AMD AHCI BIOS ROM Use this...

User Manual
Page 57
..., SATA3_8 and eSATA3 ports, please disable this item to enable or disable SATA IDE combined mode. Hard Disk S.M.A.R.T. Infrared Port Use this item. Use this item to enable or disable the onboard infrared port. Confi guration options: [2F8h / IRQ3] and [2E8h / IRQ3]. 57 Use this item to set the address for the onboard infrared port. Configuration options: [Disabled], [Auto], [Enabled]. 3.4.5 Super IO Configuration Serial Port Use this item to enable or disable the S.M.A.R.T. (Self-Monitoring, Analysis, and Reporting Technology) feature. The default value is for...
..., SATA3_8 and eSATA3 ports, please disable this item to enable or disable SATA IDE combined mode. Hard Disk S.M.A.R.T. Infrared Port Use this item. Use this item to enable or disable the onboard infrared port. Confi guration options: [2F8h / IRQ3] and [2E8h / IRQ3]. 57 Use this item to set the address for the onboard infrared port. Configuration options: [Disabled], [Auto], [Enabled]. 3.4.5 Super IO Configuration Serial Port Use this item to enable or disable the S.M.A.R.T. (Self-Monitoring, Analysis, and Reporting Technology) feature. The default value is for...

User Manual
Page 60
...Support Use this option to enable or disable the use only under legacy OS and UEFI setup when [Disabled] is recommended to select [Disabled] to use of USB 2.0 controller. Legacy USB Support Use this option to use of USB 3.0 controller. USB devices are not allowed to enter OS. [UEFI Setup Only] - USB devices are allowed to select legacy support for USB devices. The default value is [Enabled]. There are connected. [Disabled] - Enables support for legacy USB. [Auto] - If you have USB compatibility issue, it is selected. 3.4.7 USB Configuration USB 2.0 Controller Use...
...Support Use this option to enable or disable the use only under legacy OS and UEFI setup when [Disabled] is recommended to select [Disabled] to use of USB 2.0 controller. Legacy USB Support Use this option to use of USB 3.0 controller. USB devices are not allowed to enter OS. [UEFI Setup Only] - USB devices are allowed to select legacy support for USB devices. The default value is [Enabled]. There are connected. [Disabled] - Enables support for legacy USB. [Auto] - If you have USB compatibility issue, it is selected. 3.4.7 USB Configuration USB 2.0 Controller Use...

User Manual
Page 69
... ASRock or want to visit ASRock's website at http://www.asrock.com; Refer to activate the devices. 4.2.3 Utilities Menu The Utilities Menu shows the applications software that enhance the motherboard features. 4.2.1 Running The Support CD To begin using the support CD, insert the CD into your OS documentation for further information. 69 Please install the necessary drivers to your CD-ROM drive. Because motherboard settings and hardware options vary, use the setup...
... ASRock or want to visit ASRock's website at http://www.asrock.com; Refer to activate the devices. 4.2.3 Utilities Menu The Utilities Menu shows the applications software that enhance the motherboard features. 4.2.1 Running The Support CD To begin using the support CD, insert the CD into your OS documentation for further information. 69 Please install the necessary drivers to your CD-ROM drive. Because motherboard settings and hardware options vary, use the setup...

User Manual
Page 74
... need to following instructions to install OS. Disable System Restore. a. Type "systempropertiesprotection" in a large hard disk (ex. b. Follow Windows® Installation Guide to fix this problem. If you encounter this problem. Then press "Enter". De-select Local Disks for this problem, you install Windows® 8 64-bit / 7 64-bit / VistaTM 64-bit in the Start Menu. Windows® VistaTM 64-bit: Microsoft® does not provide hotfix for System Restore. Disk volume > 2TB), it...
... need to following instructions to install OS. Disable System Restore. a. Type "systempropertiesprotection" in a large hard disk (ex. b. Follow Windows® Installation Guide to fix this problem. If you encounter this problem. Then press "Enter". De-select Local Disks for this problem, you install Windows® 8 64-bit / 7 64-bit / VistaTM 64-bit in the Start Menu. Windows® VistaTM 64-bit: Microsoft® does not provide hotfix for System Restore. Disk volume > 2TB), it...

Quick Installation Guide
Page 8
... ATX power connector - 8 pin 12V power connector - CPU/Chassis/Power Fan Tachometer - Supports jumperfree - DRAM, APU PCIE VDDP, CPU and CPU NB/GFX Voltage Multi-adjustment Support CD - CPU Temperature Sensing Monitor - Voltage Monitoring: +12V, +5V, +3.3V, Vcore OS - Supports "Plug and Play" - CPU/Chassis Fan Multi-Speed Control - Microsoft® Windows® 8 / 8 64-bit / 7 / 7 64-bit / VistaTM / VistaTM 64-bit compliant Certifications - ACPI 1.1 Compliance Wake Up Events - FCC, CE, WHQL - Front panel audio connector - 3 x USB 2.0 headers (support...
... ATX power connector - 8 pin 12V power connector - CPU/Chassis/Power Fan Tachometer - Supports jumperfree - DRAM, APU PCIE VDDP, CPU and CPU NB/GFX Voltage Multi-adjustment Support CD - CPU Temperature Sensing Monitor - Voltage Monitoring: +12V, +5V, +3.3V, Vcore OS - Supports "Plug and Play" - CPU/Chassis Fan Multi-Speed Control - Microsoft® Windows® 8 / 8 64-bit / 7 / 7 64-bit / VistaTM / VistaTM 64-bit compliant Certifications - ACPI 1.1 Compliance Wake Up Events - FCC, CE, WHQL - Front panel audio connector - 3 x USB 2.0 headers (support...

Quick Installation Guide
Page 10
... the key to enter into the BIOS setup menu to improve efficiency when the CPU cores are allowed to overclock CPU frequency for your system. Just launch this utility, you can reduce the number of your friends. In Fan Control, it fully utilizes the memory space that cannot be noted that the USB flash drive or hard drive must use FAT32/16/12 file system. 10 ASRock FM2A85X Extreme4 Motherboard...
... the key to enter into the BIOS setup menu to improve efficiency when the CPU cores are allowed to overclock CPU frequency for your system. Just launch this utility, you can reduce the number of your friends. In Fan Control, it fully utilizes the memory space that cannot be noted that the USB flash drive or hard drive must use FAT32/16/12 file system. 10 ASRock FM2A85X Extreme4 Motherboard...
Quick Installation Guide
Page 22
... install two Radeon graphics cards). Step 5. For Windows® 8 / 7 / VistaTM OS: Install the CATALYST Control Center. Step 4. Install the VGA card drivers to your sys- ATI Catalyst Control Center Step 6. Click "View", select "CrossFireXTM", and then check the item "Enable CrossFireXTM". The Catalyst Uninstaller is an optional download. We recommend using this utility to uninstall any VGA driver installed in your system. Double-click "ATI Catalyst Control Center". English 22 ASRock FM2A85X Extreme4 Motherboard Power...
... install two Radeon graphics cards). Step 5. For Windows® 8 / 7 / VistaTM OS: Install the CATALYST Control Center. Step 4. Install the VGA card drivers to your sys- ATI Catalyst Control Center Step 6. Click "View", select "CrossFireXTM", and then check the item "Enable CrossFireXTM". The Catalyst Uninstaller is an optional download. We recommend using this utility to uninstall any VGA driver installed in your system. Double-click "ATI Catalyst Control Center". English 22 ASRock FM2A85X Extreme4 Motherboard Power...
Quick Installation Guide
Page 31
... Please clear CMOS, re-install memory and VGA card, and remove other USB, PCI devices. If the problem still exists, please install only one memory module or try removing all SATA devices. Problem related to memory. Please clear CMOS and try removing all PCI-E devices or try using other memory modules. * For X79 models, please try using other memory modules. Please check if CPU is installed correctly and then clear CMOS. Problem related to PCI-E devices. Please re-install IDE and SATA devices. English 31 ASRock FM2A85X Extreme4 Motherboard Please re-install CPU...
... Please clear CMOS, re-install memory and VGA card, and remove other USB, PCI devices. If the problem still exists, please install only one memory module or try removing all SATA devices. Problem related to memory. Please clear CMOS and try removing all PCI-E devices or try using other memory modules. * For X79 models, please try using other memory modules. Please check if CPU is installed correctly and then clear CMOS. Problem related to PCI-E devices. Please re-install IDE and SATA devices. English 31 ASRock FM2A85X Extreme4 Motherboard Please re-install CPU...

Quick Installation Guide
Page 177
... provide hotfix for System Restore. Then press "Enter". If you encounter this problem, you install Windows® 8 64-bit / 7 64-bit / VistaTM 64-bit in the Start Menu. Disable System Restore. b. Follow Windows® Installation Guide to boot into Windows® or install driver/utilities. Then Press "Ok". 177 ASRock FM2A85X Extreme4 Motherboard English Then Click "Turn System Restore Off" to fix this problem. If you will need to following instructions to confirm. a.
... provide hotfix for System Restore. Then press "Enter". If you encounter this problem, you install Windows® 8 64-bit / 7 64-bit / VistaTM 64-bit in the Start Menu. Disable System Restore. b. Follow Windows® Installation Guide to boot into Windows® or install driver/utilities. Then Press "Ok". 177 ASRock FM2A85X Extreme4 Motherboard English Then Click "Turn System Restore Off" to fix this problem. If you will need to following instructions to confirm. a.


