
User Guide
Page 2
... consequential damages in connection with the furnishing, performance, or use of ATI hardware, software or other products and documentation described herein, for any interruption of service, loss or interruption of business, loss of the ATI hardware, software, or other company and/or product names are subject to improve reliability, function or design. ii Copyright © 2005, ATI Technologies Inc. Features, performance and specifications are trademarks...
... consequential damages in connection with the furnishing, performance, or use of ATI hardware, software or other products and documentation described herein, for any interruption of service, loss or interruption of business, loss of the ATI hardware, software, or other company and/or product names are subject to improve reliability, function or design. ii Copyright © 2005, ATI Technologies Inc. Features, performance and specifications are trademarks...

User Guide
Page 5
... Part Numbers 2 Uninstall Previous Graphics Card Drivers 3 Installing Hardware 5 Quick Installation 5 Detailed Installation 5 Connecting Your Monitors 7 Turning on the System 9 Installing Software 11 HYDRAVISION™ Multi-monitor Management 11 Installing Drivers and Software in Windows® 12 Software Installation Prerequisites 12 Monitor Configuration 13 Reinstalling Drivers 14 Display Properties 15 Accessing the CATALYST™ Software Suite 15 ATI Displays Tab 16 Dynamic Display Reassignment 18 ATI Color Tab 18 Hotkeys 21 ATI Options Tab 23 ATI...
... Part Numbers 2 Uninstall Previous Graphics Card Drivers 3 Installing Hardware 5 Quick Installation 5 Detailed Installation 5 Connecting Your Monitors 7 Turning on the System 9 Installing Software 11 HYDRAVISION™ Multi-monitor Management 11 Installing Drivers and Software in Windows® 12 Software Installation Prerequisites 12 Monitor Configuration 13 Reinstalling Drivers 14 Display Properties 15 Accessing the CATALYST™ Software Suite 15 ATI Displays Tab 16 Dynamic Display Reassignment 18 ATI Color Tab 18 Hotkeys 21 ATI Options Tab 23 ATI...

User Guide
Page 7
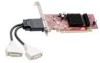
... to support both DVI and VGA). • Low-profile & half-length card for maximum flexibility. For mission-critical, "always on" systems, FireMV™ graphics cards deliver uninterrupted performance. 1 CHAPTER 1: Getting Started Your ATI FireMV™ 2200 multi-view 2D workstation graphics card is designed exclusively for a wide range of your FireMV™ 2200 card include: • Dual display. • Industry standard DMS59 connector for easy access to after-market cables. • DMS59 to dual DVI-I cable...
... to support both DVI and VGA). • Low-profile & half-length card for maximum flexibility. For mission-critical, "always on" systems, FireMV™ graphics cards deliver uninterrupted performance. 1 CHAPTER 1: Getting Started Your ATI FireMV™ 2200 multi-view 2D workstation graphics card is designed exclusively for a wide range of your FireMV™ 2200 card include: • Dual display. • Industry standard DMS59 connector for easy access to after-market cables. • DMS59 to dual DVI-I cable...
User Guide
Page 8
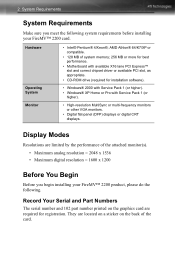
... of the card. Display Modes Resolutions are required for installation software). • Windows® 2000 with Service Pack 1 (or higher). • Windows® XP Home or Pro with Service Pack 1 (or higher). • High-resolution MultiSync or multi-frequency monitors or other VGA monitors. • Digital flat-panel (DFP) displays or digital CRT displays. Record Your Serial and Part Numbers The serial number and 102 part number printed on the back of the attached monitor(s). • Maximum analog resolution = 2048...
... of the card. Display Modes Resolutions are required for installation software). • Windows® 2000 with Service Pack 1 (or higher). • Windows® XP Home or Pro with Service Pack 1 (or higher). • High-resolution MultiSync or multi-frequency monitors or other VGA monitors. • Digital flat-panel (DFP) displays or digital CRT displays. Record Your Serial and Part Numbers The serial number and 102 part number printed on the back of the attached monitor(s). • Maximum analog resolution = 2048...

User Guide
Page 9
... new ATI product. To uninstall previous drivers With your current graphics card still in your computer: 1 Close all applications that are currently running. 2 Navigate to the Control Panel and select Add/Remove Programs. 3 Select your system after the drivers have been removed. Uninstall Previous Graphics Card Drivers To ensure the successful installation of your new FireMV™ 2200 card, you remove your current display drivers. Before You Begin 3 X Serial number (S/N) Y 102 part number...
... new ATI product. To uninstall previous drivers With your current graphics card still in your computer: 1 Close all applications that are currently running. 2 Navigate to the Control Panel and select Add/Remove Programs. 3 Select your system after the drivers have been removed. Uninstall Previous Graphics Card Drivers To ensure the successful installation of your new FireMV™ 2200 card, you remove your current display drivers. Before You Begin 3 X Serial number (S/N) Y 102 part number...

User Guide
Page 11
...-board graphics solution and do not intend to use it as part of a multiple monitor display, disable it. 2 Shut down and disconnect your computer system. 3 Remove any previously installed card. 4 Install your new FireMV™ 2200 card. 5 Reassemble and connect your computer system. 6 Install the FireMV™ 2200 drivers and configuration software from the ATI Installation CD-ROM by doing one of the following instructions will guide you through the automatic ATISETUP utility; Detailed Installation The following : • Run...
...-board graphics solution and do not intend to use it as part of a multiple monitor display, disable it. 2 Shut down and disconnect your computer system. 3 Remove any previously installed card. 4 Install your new FireMV™ 2200 card. 5 Reassemble and connect your computer system. 6 Install the FireMV™ 2200 drivers and configuration software from the ATI Installation CD-ROM by doing one of the following instructions will guide you through the automatic ATISETUP utility; Detailed Installation The following : • Run...
User Guide
Page 12
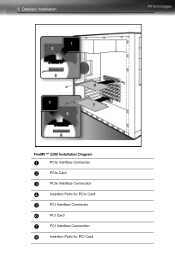
6 Detailed Installation FireMV™ 2200 Installation Diagram X PCIe Interface Connector Y PCIe Card Z PCIe Interface Connection [ Insertion Point for PCIe Card \ PCI Interface Connector ] PCI Card ^ PCI Interface Connection _ Insertion Point for PCI Card
6 Detailed Installation FireMV™ 2200 Installation Diagram X PCIe Interface Connector Y PCIe Card Z PCIe Interface Connection [ Insertion Point for PCIe Card \ PCI Interface Connector ] PCI Card ^ PCI Interface Connection _ Insertion Point for PCI Card

User Guide
Page 13
... computer has an on-board graphics capability, you have disconnected and plug in removing the cover. Connecting Your Monitors Your FireMV™ 2200 card is designed for use with the slot and press it on the motherboard. plate cover. 6 Align your ATI graphics card with a DMS-59 cable connector, which provides support for help in the computer's power cord. 9 Turn on the monitor and then your computer...
... computer has an on-board graphics capability, you have disconnected and plug in removing the cover. Connecting Your Monitors Your FireMV™ 2200 card is designed for use with the slot and press it on the motherboard. plate cover. 6 Align your ATI graphics card with a DMS-59 cable connector, which provides support for help in the computer's power cord. 9 Turn on the monitor and then your computer...

User Guide
Page 14
A single display will not function properly if it to the secondary connection. If you are using a single display, make sure you connect it is connected to the primary connection. 8 Detailed Installation X Male DMS-59 connector Y Female DMS-59 connection on the backplate of your FireMV™ 2200 graphics card Z Dual Female DVI-I connections Note: The DMS-59 cable has two connections: a primary and a secondary.
A single display will not function properly if it to the secondary connection. If you are using a single display, make sure you connect it is connected to the primary connection. 8 Detailed Installation X Male DMS-59 connector Y Female DMS-59 connection on the backplate of your FireMV™ 2200 graphics card Z Dual Female DVI-I connections Note: The DMS-59 cable has two connections: a primary and a secondary.

User Guide
Page 15
... analog display. If you have installed the FireMV™ 2200 drivers and software, you have properly installed your card. Once you can connect displays to adjust the video settings and configure multiple monitors. The following table lists the different ways you turn on your monitor before you can use the Display Properties control panel to your graphics card, operating system messages will be running in a basic video mode. Failure to -VGA adapter. Display Connector(s) Configuration Used Comments Single CRT display Single DFP display DFP display + DFP Display CRT display...
... analog display. If you have installed the FireMV™ 2200 drivers and software, you have properly installed your card. Once you can connect displays to adjust the video settings and configure multiple monitors. The following table lists the different ways you turn on your monitor before you can use the Display Properties control panel to your graphics card, operating system messages will be running in a basic video mode. Failure to -VGA adapter. Display Connector(s) Configuration Used Comments Single CRT display Single DFP display DFP display + DFP Display CRT display...

User Guide
Page 17
...™ Multi-monitor Management The HYDRAVISION™ multi-monitor and desktop management software will guide you do not want to install HYDRAVISION™ , select the Custom driver installation and clear the HYDRAVISION™ check box. If you through the installation of the ATISETUP utility. CHAPTER 3: HYDRAVISION™ Multi-monitor Management 11 Installing Software This chapter will install automatically with the Express driver installation of the drivers and software associated with your FireMV™ 2200 card.
...™ Multi-monitor Management The HYDRAVISION™ multi-monitor and desktop management software will guide you do not want to install HYDRAVISION™ , select the Custom driver installation and clear the HYDRAVISION™ check box. If you through the installation of the ATISETUP utility. CHAPTER 3: HYDRAVISION™ Multi-monitor Management 11 Installing Software This chapter will install automatically with the Express driver installation of the drivers and software associated with your FireMV™ 2200 card.

User Guide
Page 18
... monitor cable is not enabled or the ATISETUP utility does not start automatically: a) Click the Start button in the task bar. ATI Easy Install will start automatically if you insert the ATI Installation CD-ROM into your CD-ROM drive after the operating system has started. 12 Installing Drivers and Software in Windows® Installing Drivers and Software in Windows® You will need to install the FireMV™ 2200 drivers and software...
... monitor cable is not enabled or the ATISETUP utility does not start automatically: a) Click the Start button in the task bar. ATI Easy Install will start automatically if you insert the ATI Installation CD-ROM into your CD-ROM drive after the operating system has started. 12 Installing Drivers and Software in Windows® Installing Drivers and Software in Windows® You will need to install the FireMV™ 2200 drivers and software...
User Guide
Page 19
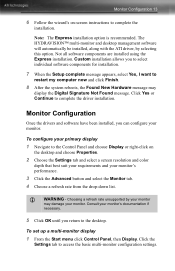
... Control Panel and choose Display or right-click on -screen instructions to complete the installation. Monitor Configuration 13 6 Follow the wizard's on the desktop and choose Properties. 2 Choose the Settings tab and select a screen resolution and color depth that best suit your requirements and your monitor's performance. 3 Click the Advanced button and select the Monitor tab. 4 Choose a refresh rate from the drop-down list. Not all software components are installed using the Express installation...
... Control Panel and choose Display or right-click on -screen instructions to complete the installation. Monitor Configuration 13 6 Follow the wizard's on the desktop and choose Properties. 2 Choose the Settings tab and select a screen resolution and color depth that best suit your requirements and your monitor's performance. 3 Click the Advanced button and select the Monitor tab. 4 Choose a refresh rate from the drop-down list. Not all software components are installed using the Express installation...

User Guide
Page 20
... Display Properties > Settings tab. 2 Select the Monitor icon identified by the number 2. 3 Click Extend my Windows desktop onto this monitor. 4 Set the Screen Resolution and Color Quality as Secondary. The ATISETUP utility will start automatically, perform the following actions: 1 Click the Start button in the task bar. 2 Select Run. 3 Browse to ATISETUP.EXE on the ATI Installation CD-ROM. To manually reinstall drivers To manually reinstall drivers, when prompted for a driver installation...
... Display Properties > Settings tab. 2 Select the Monitor icon identified by the number 2. 3 Click Extend my Windows desktop onto this monitor. 4 Set the Screen Resolution and Color Quality as Secondary. The ATISETUP utility will start automatically, perform the following actions: 1 Click the Start button in the task bar. 2 Select Run. 3 Browse to ATISETUP.EXE on the ATI Installation CD-ROM. To manually reinstall drivers To manually reinstall drivers, when prompted for a driver installation...

User Guide
Page 24
... desktop and full screen 3D environments. Extended Desktop mode is enabled through the Windows® Display Property dialog, under Settings. ATI Color Tab The ATI Color tab allows you to view or extend your Windows® documentation. 18 ATI Color Tab Dynamic Display Reassignment You can change the assignment of the Primary display, at least one display device available and have the proper adapters or connectors, you can plug it in to your FireMV™ 2200 graphics card...
... desktop and full screen 3D environments. Extended Desktop mode is enabled through the Windows® Display Property dialog, under Settings. ATI Color Tab The ATI Color tab allows you to view or extend your Windows® documentation. 18 ATI Color Tab Dynamic Display Reassignment You can change the assignment of the Primary display, at least one display device available and have the proper adapters or connectors, you can plug it in to your FireMV™ 2200 graphics card...

User Guide
Page 43
..., disable any built-in Safe Mode. Check the system configuration utility of your computer in graphics capabilities on your enhanced driver. No Display • Check that the card is securely fastened to become the secondary display.) • Make sure that you selected the appropriate monitor when you experience problems. ATI's documentation contains helpful installation/configuration tips and other valuable feature information. For more advanced troubleshooting information...
..., disable any built-in Safe Mode. Check the system configuration utility of your computer in graphics capabilities on your enhanced driver. No Display • Check that the card is securely fastened to become the secondary display.) • Make sure that you selected the appropriate monitor when you experience problems. ATI's documentation contains helpful installation/configuration tips and other valuable feature information. For more advanced troubleshooting information...

User Guide
Page 44
... Screen Position settings in Display Properties > Advanced > Displays > Adjustments tune the position of your monitor to position the picture on the graphics card. • Check the driver installation and make sure that Video Card Isn't Properly Configured Warning! 38 Customer Care General Problems Problem Screen Defects Appear Possible Solution • Check if your monitor supports the resolution, horizontal (kHz) and vertical (Hz) refresh rates as required by the graphics card. • Check your current resolution, refresh rate, and color...
... Screen Position settings in Display Properties > Advanced > Displays > Adjustments tune the position of your monitor to position the picture on the graphics card. • Check the driver installation and make sure that Video Card Isn't Properly Configured Warning! 38 Customer Care General Problems Problem Screen Defects Appear Possible Solution • Check if your monitor supports the resolution, horizontal (kHz) and vertical (Hz) refresh rates as required by the graphics card. • Check your current resolution, refresh rate, and color...

User Guide
Page 46
... will review the expense associated with refunds, returns, or exchange-specific inquiries. Warranty Information Hardware Warranty Service Statement ATI Technologies Inc. Should the product, in good working condition, according to its discretion, repair or replace the product upon receipt. • ATI reserves the right to replace the product with product specifications and instructions, natural or personal disaster, or unauthorized alterations, repairs, or modifications. Late model products are assumed to be required...
... will review the expense associated with refunds, returns, or exchange-specific inquiries. Warranty Information Hardware Warranty Service Statement ATI Technologies Inc. Should the product, in good working condition, according to its discretion, repair or replace the product upon receipt. • ATI reserves the right to replace the product with product specifications and instructions, natural or personal disaster, or unauthorized alterations, repairs, or modifications. Late model products are assumed to be required...

User Guide
Page 48
... Methods of Measurement of Information Technology Equipment (ITE), including EN 61000-4-2, EN 61000-4-3, EN 61000-4-4, EN 61000-4-5, EN 61000-4-6 This equipment has been tested and found to radio communications. For further compliance information: ATI Research Inc. 4 Mount Royal... required to provide reasonable protection against harmful interference in a particular installation. The use of shielded cables for connection of the monitor to the graphics card is connected. • Consult the dealer or an experienced radio/TV technician for a Class B digital device, pursuant to Part ...
... Methods of Measurement of Information Technology Equipment (ITE), including EN 61000-4-2, EN 61000-4-3, EN 61000-4-4, EN 61000-4-5, EN 61000-4-6 This equipment has been tested and found to radio communications. For further compliance information: ATI Research Inc. 4 Mount Royal... required to provide reasonable protection against harmful interference in a particular installation. The use of shielded cables for connection of the monitor to the graphics card is connected. • Consult the dealer or an experienced radio/TV technician for a Class B digital device, pursuant to Part ...

User Guide
Page 52
46 configuration multiple monitors 13 primary monitor 13 contrast 20, 21 color settings 18 video overlay 26 custom settings 3D 30 D desktop color settings 19 display corruption DVI 24 high resolution 24 displays Hotkey 16 primary 16 scheme 16, 17 secondary 16 Displays Tab 16 driver information 23 drivers installing 12 uninstalling 3 DVI operational mode 24 F full-screen 3D 18 G gamma 20, 21 color settings 18 video overlay 26 gamma correction 20 graphics card resetting through VPU Recover...
46 configuration multiple monitors 13 primary monitor 13 contrast 20, 21 color settings 18 video overlay 26 custom settings 3D 30 D desktop color settings 19 display corruption DVI 24 high resolution 24 displays Hotkey 16 primary 16 scheme 16, 17 secondary 16 Displays Tab 16 driver information 23 drivers installing 12 uninstalling 3 DVI operational mode 24 F full-screen 3D 18 G gamma 20, 21 color settings 18 video overlay 26 gamma correction 20 graphics card resetting through VPU Recover...


